Updated: 24 October 2026 by Sylwia (MyCrochetory)
Learning how to read crochet charts takes about one evening, and plenty of crocheters put it off for years. I get why. A chart looks like someone spilled tiny ovals, crosses and T shapes across the page, and none of it looks like yarn.
So you close the chart and scroll down to the written rows, because at least the words look familiar. Then one of those rows runs three lines long, full of skips, chain spaces and stitch counts, and you lose your place halfway through. On a chart, that same row is one small picture, and you can see where every stitch lands before your hook touches the yarn.
I’m a mathematician, and I’ve always been drawn to shapes, so to me a page of symbols looks more like a puzzle than a wall. Most of my designs start as sketches in a big sketchbook, and these days I draw the charts for my own patterns too. Drawing them is what showed me how much simpler a chart is than the words it replaces.
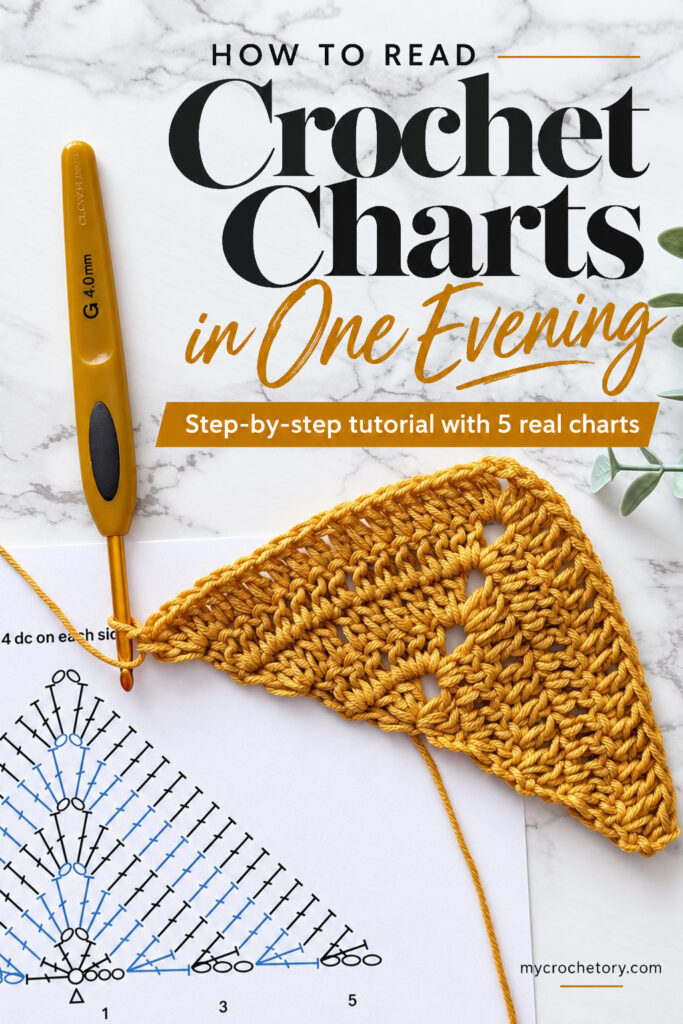
Charts also travel well. The symbols are almost the same in every country, so a chart from a Japanese stitch book or a Russian Pinterest pin works without a translator, and that opens up patterns that never got an English version.
In this guide, I’ll show you how to read crochet charts one small piece at a time. First come the symbols, then charts in rows and in the round, and then five real charts we crochet together, step by step. The last one is the lace from my Sunny Lace Cowl, and by the time you get there, you’ll read it without the written pattern.
In this guide:
- What is a crochet chart?
- Crochet charts vs crochet graphs
- Crochet chart symbols you need to know
- Into the stitch or into the space?
- How to read crochet charts in rows
- How to read crochet charts in the round
- Left-handed? Just flip it
- Let’s practice: 5 real crochet charts
- Tips and common mistakes
- Crochet chart FAQ
What is a crochet chart?
A crochet chart is a drawing of your pattern where every stitch gets its own little symbol, placed exactly where that stitch will sit in your work. Some designers call it a crochet diagram, and it means the same thing. Put together, the symbols make a tiny map of your finished piece.
That map is the reason I always look at the chart first. Words can trick you, because “double crochet” in a US pattern is a taller stitch than “double crochet” in a UK one, and mixing the two up can turn a scarf into a blanket. A chart can’t trick you like that, since the symbol stays the same in both.
Seeing the whole map at once also helps you catch mistakes early. One look shows how each row sits on the row below, so the moment your work stops matching the drawing, you’ll know. With a long written row, you’d have to count your way back stitch by stitch.
Crochet charts vs crochet graphs
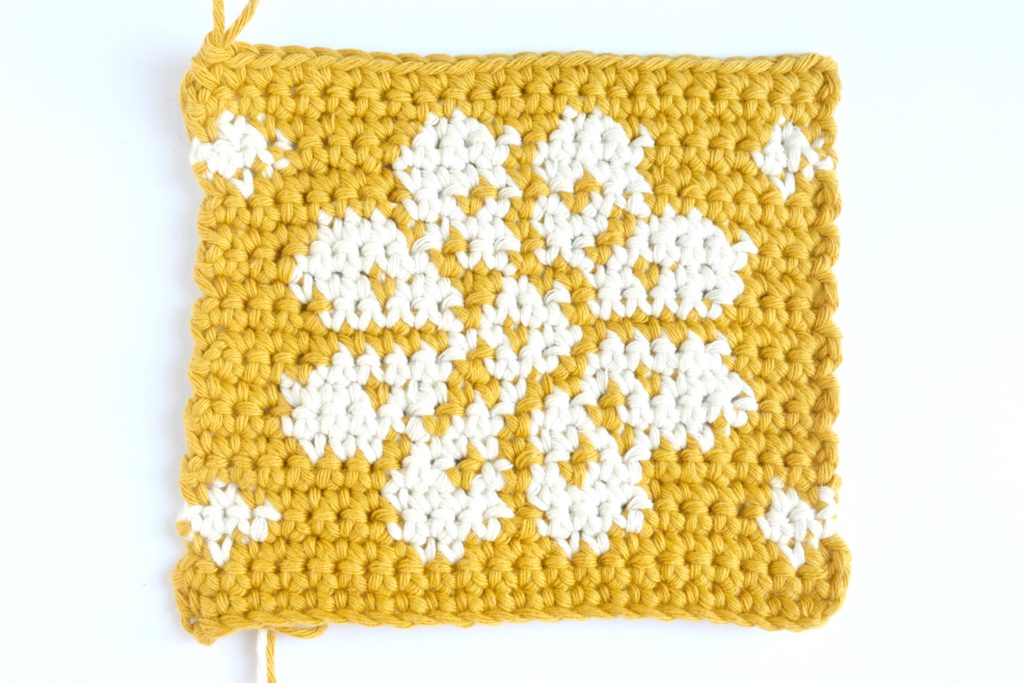
Before we go any further, let’s make sure the pattern on your screen is a chart at all. Some patterns call themselves charts but show a grid of tiny colored squares instead of symbols, a bit like pixel art. Those grids are crochet graphs.
You’ll find graphs in C2C, tapestry, filet, mosaic crochet and intarsia crochet. In most of them, every square is one stitch or a small block of stitches, and its color tells you which yarn to pick up. Filet crochet is even simpler, since a filled square is a solid block and an empty one is an open space.
The graph in the photo below comes from my intarsia tutorial, and yes, the flower sits on ochre, the color I’ve loved for as long as I can remember. You read a graph row by row too, but you count squares and follow colors instead of reading stitch symbols. So if your pattern looks like pixel art, this guide won’t help much, because here we stick to symbol charts.

Crochet chart symbols you need to know
Good news first. You don’t have to learn every symbol before your first chart, because the first six in the table below are enough for most beginner patterns. They’re the chain, the slip stitch and the four basic stitches, and puffs, popcorns and the rest can wait until a pattern actually uses them.
Crochet chart symbols are drawn to match the height of each stitch, which makes them easy to guess. A taller stitch gets a taller symbol, and the little lines across the stem tell you how tall, one line for a dc and two for a tr. So a T with two lines is a treble, even in a pattern written in a language you can’t read.
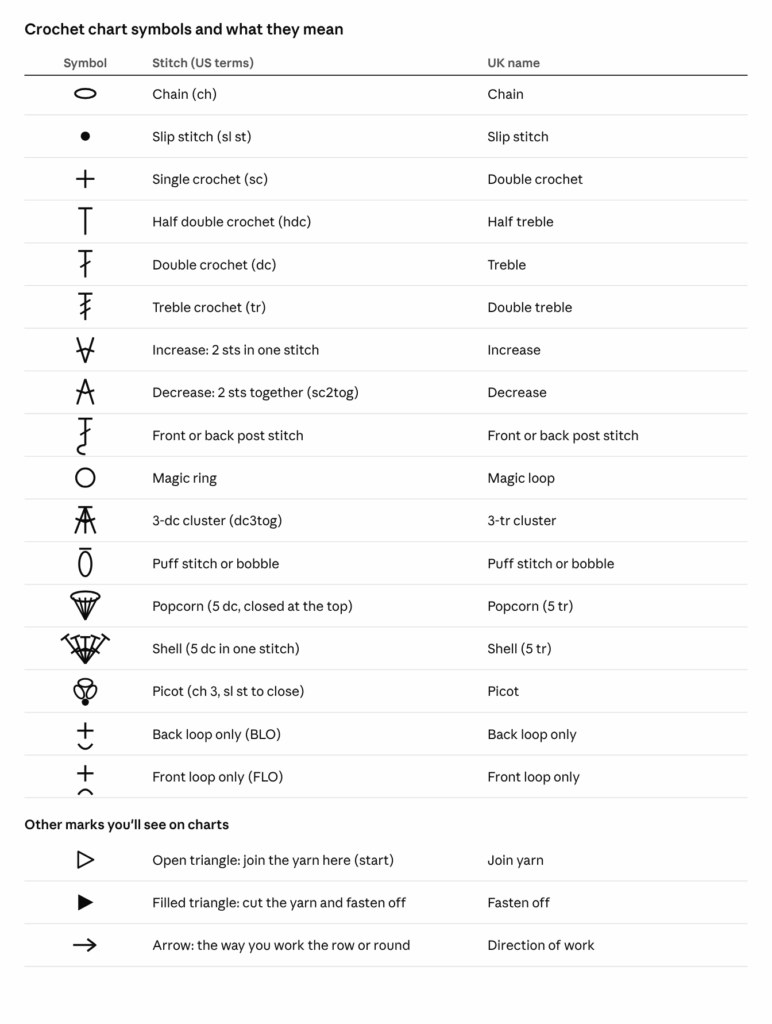
One heads-up before you print that table. Designers don’t all draw symbols the same way, so puffs, bobbles and loop marks can look a bit different from one pattern to the next. That’s why I check the key (or legend) next to a chart before I start, and why every chart in this post has its own key underneath.
If one of these stitches is still new to you, my beginner tutorials show each one step by step, the chain, slip stitch, single crochet, half double crochet, double crochet and treble crochet.
Pin this table to your crochet board, and the next time a pattern uses a symbol you don’t recognize, you’ll have the answer in two taps.
Into the stitch or into the space?
Sooner or later, every lace chart makes you wonder where exactly your hook goes, into the stitch or into the space below it. Luckily, the answer sits right at the bottom of each symbol. Wherever the foot of a symbol lands, that’s where your hook goes.
- The foot touches another symbol? Work into that stitch.
- The symbol sits above a chain or an arch of chains? Work into the space under the chains, not into the chain itself (unless the pattern tells you to).
- Several symbols meet at the bottom? They all go into the same stitch. That’s an increase, or a shell if there are lots of them.
- Several symbols meet at the top? You work them together and close them as one. That’s a decrease or a cluster.
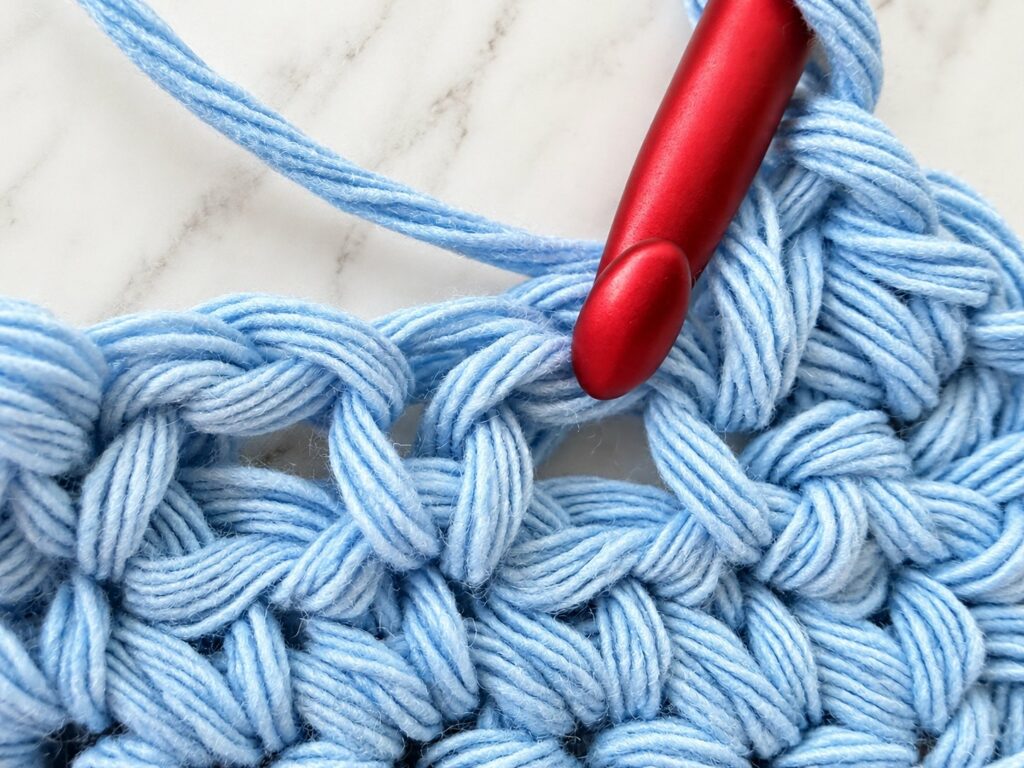
You can practice this rule in Example 3. From row 2 on, moss stitch puts every sc into a chain space, and dashed lines on the chart show where each one lands.
How to read crochet charts in rows, step by step
Row charts are the best place to start, because they’re the easiest to follow. You’ll find them in flat projects like scarves, blankets, dishcloths and wraps, which you work back and forth. So the chart goes back and forth too, and you read it like a zigzag.
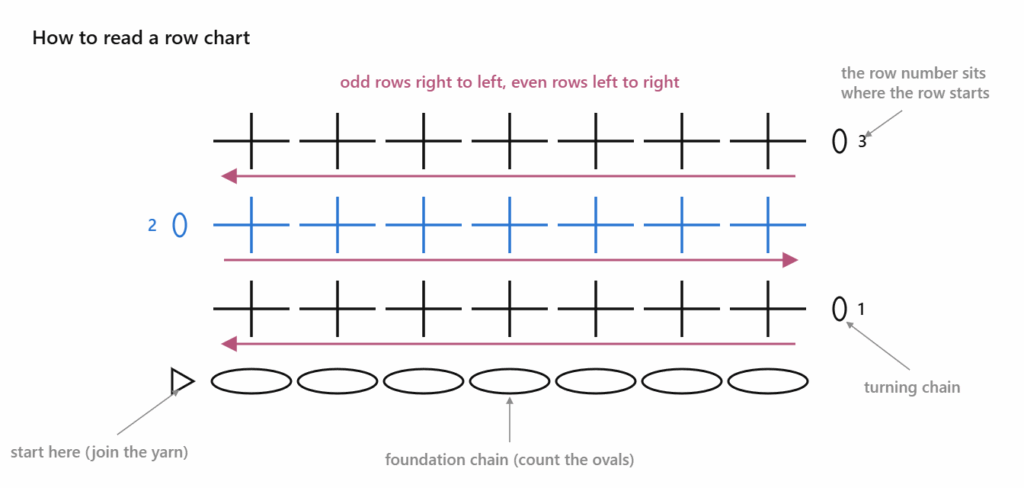
Step 1: Find the bottom of the chart
Every row chart starts at the bottom, so that’s where your eyes go first. The long line of little ovals down there is your foundation chain. Count them, make that many chains, and you’re ready for row 1.
Step 2: Work row 1 from right to left
If you crochet right-handed, you read row 1 from right to left, which is the same way your hook travels across the work. To find where it begins, look for the number 1 at the side of the chart. That number always sits at the end where the row starts.
Right next to it, you’ll see a few ovals stacked up like a little tower. That’s your turning chain, and it lifts your yarn up to the height of the new row.
Step 3: Turn and read row 2 from left to right
When row 1 is done, you turn your work, but you don’t turn the chart! You simply read row 2 the other way, from left to right. The number 2 sits on the left side, right where you start.
Odd rows go right to left, even rows go left to right, and the row numbers always show you where to begin.
Step 4: Spot the repeats
Most charts don’t draw the whole project. A full blanket chart would be huge, so designers draw the pattern repeat once or twice instead. Look for a bracket, a shaded box or a thick outline, and work that part again and again until you reach the end of the row.
Step 5: Count your stitches
At the end of every row, count your stitches and check them against the chart. Miss one stitch, and every row after it is off by one too. Counting catches it while you only have to undo a few stitches.
How to read crochet charts in the round, step by step
Round charts look the scariest, with symbols spinning out from the middle like the seeds of a sunflower. My very first crochet project was a granny square blanket for my daughter, so rounds were where I started too. You’ll find round charts in anything that grows from the middle, like doilies, mandalas, coasters and hats, and they’re easier than they look, because you always see the whole piece at once.
Step 1: Start in the center
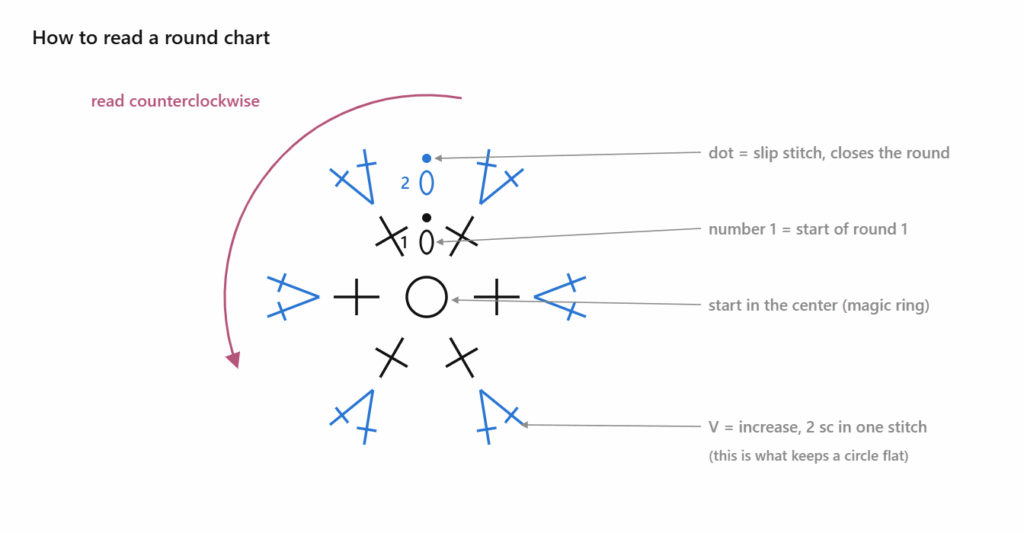
Round charts start right in the middle, so put your finger on the center. There you’ll see either a magic ring (a small circle) or a short chain joined into a ring with a slip stitch. Make whichever one the chart shows (my magic ring tutorial has three ways to make it).
Step 2: Find the start of round 1
Next, find the number 1, which sits next to the first stitch of the round, usually by the starting chain. Many charts also give each round its own color. The color lets you follow one round all the way around without jumping into the next one.
Step 3: Read counterclockwise
If you crochet right-handed, you read rounds counterclockwise, the same way your hook moves around a circle. Follow the symbols one by one until you’re back where you started. Lefties, you go the other way, and I’ll explain that in a minute.
Step 4: Close the round
At the end of most rounds you’ll spot a filled dot, and that’s the slip stitch that closes the round. Some patterns are worked in a spiral and never join, though. In that case there’s no dot, and you just keep going round and round.
Step 5: Watch for increases
Now watch for little fans, because those are your increases, two or three stitches coming out of the same spot. Increases keep your circle growing flat. Skip one, and the edge starts to curl up.
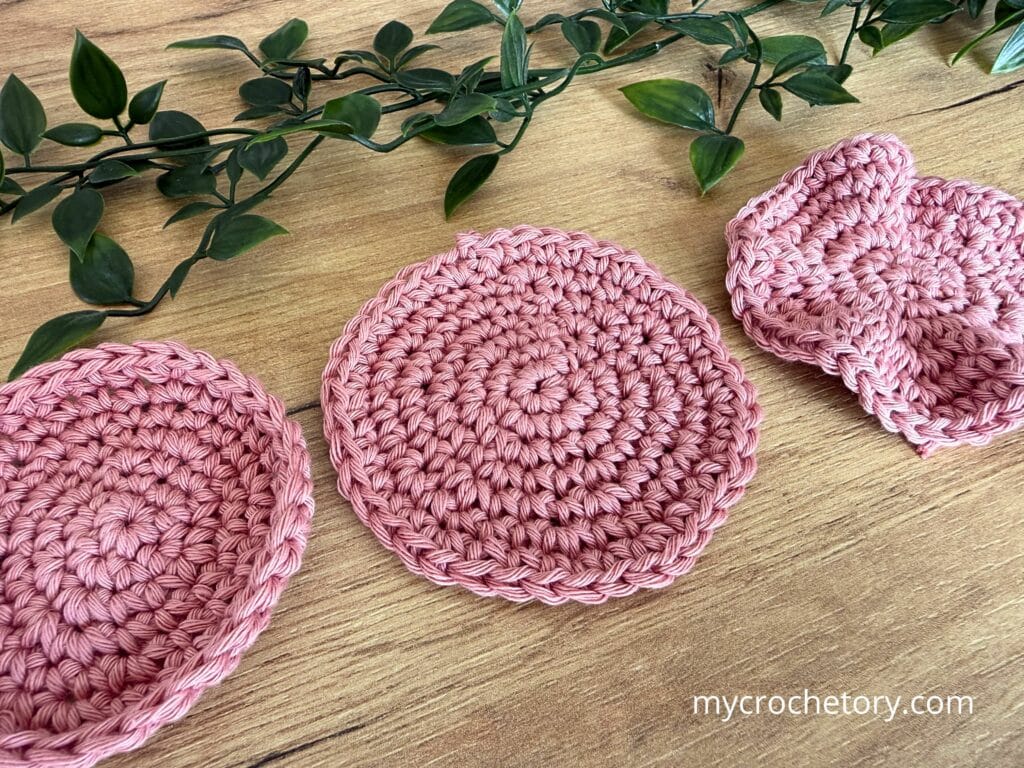
So if your circle starts to curl into a bowl or ripple like a potato chip, check your increases against the chart first. If that doesn’t solve it, my post Why is my crochet circle curling? 5 easy fixes goes through every cause.
Step 6: Spot charts that show only a slice
Big doilies and mandalas often show only a slice of the circle, like a quarter or a sixth, because the rest is the same slice again. Look for brackets, a shaded wedge or a note like “repeat 5 more times”. Then crochet the slice, and keep repeating it until you’re back at the start.
Put a stitch marker at the start of each repeat. If your stitch count is off, you only have to check one slice instead of the whole round.
Left-handed? Just flip it
Crochet left-handed? Then you’ve probably spent years flipping right-handed instructions in your head, and charts make that a lot easier. You just read every chart in a mirror, so row 1 runs from left to right, row 2 from right to left, and so on up the chart.
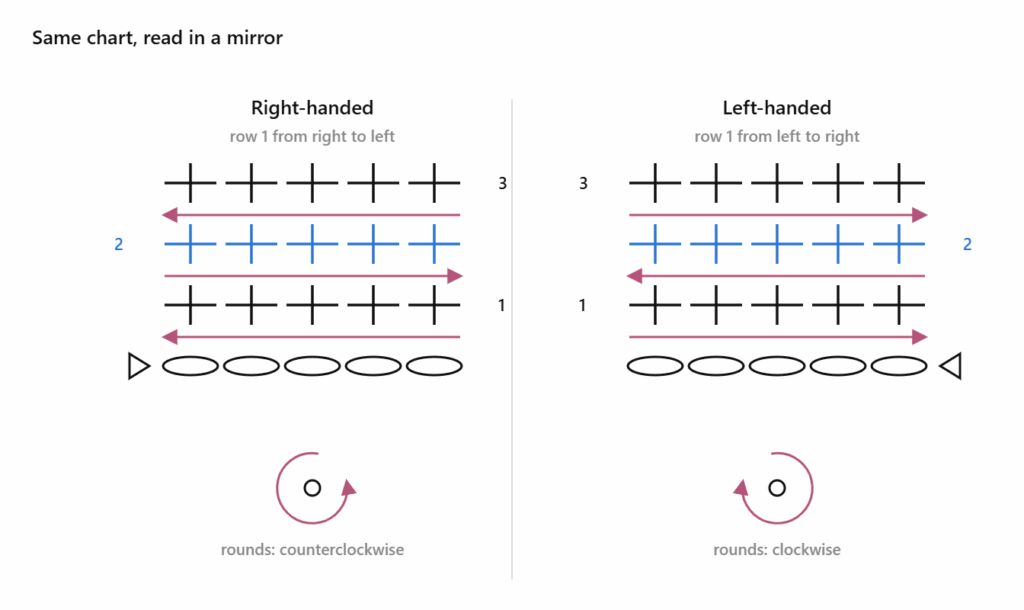
Round charts get the same flip. You still begin in the center, but you travel clockwise and close each round at the slip stitch dot.
Your piece will come out as a mirror image of the chart, and on a granny square, a blanket or my Sunny Lace Cowl, nobody will see the difference. It only matters when a design has letters or a picture that must face one way. For those, flip the chart in any photo app and follow the flipped version.
Let’s practice: 5 real crochet charts
Reading about charts only gets you halfway, so now it’s time to crochet real ones. I picked five crochet charts for beginners, crocheted a swatch of each one and photographed every step, so you can compare your work with mine as you go. Each chart adds one new thing to read, so take them in order.
Every example starts with the full chart and then splits it into steps. In each step, the highlighted part is what you’re crocheting right now, and the faded rows are the ones you’ve already made. Read the step first, guess what it means, and only then check my explanation underneath (with a hook and a scrap of yarn in your hands, if you can).
Example 1: plain single crochet rows
If you’ve never read a chart before, start right here. This single crochet chart is as simple as it gets, three rows of nine stitches with a turning chain at the start of every row. Once it makes sense, every other row chart is the same idea with more symbols.
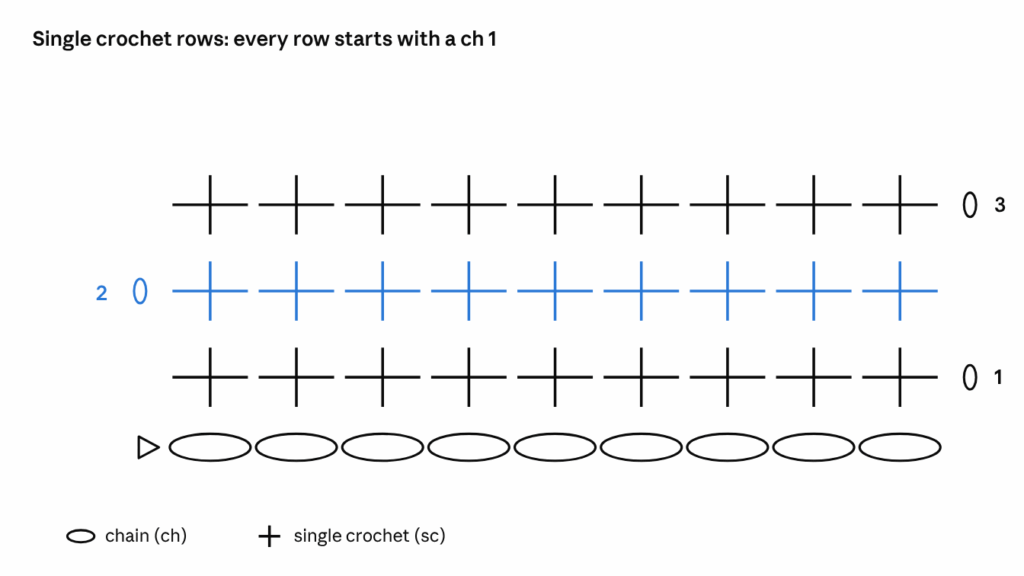
Here’s the same chart again, one row at a time.
Step 1: Make the foundation chain
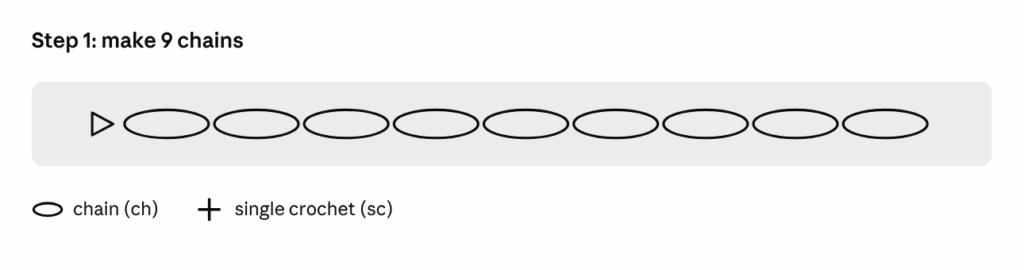
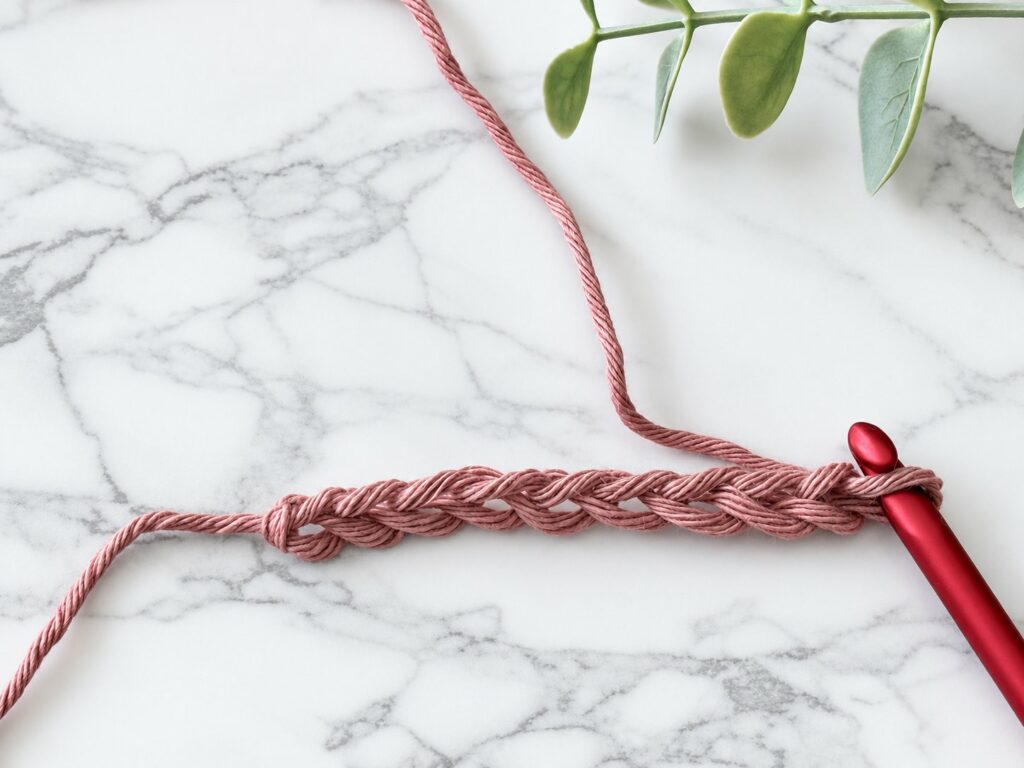
Make a slip knot and chain 9, and you’ve just made the nine ovals along the bottom of the chart. See the little open triangle on the left? That’s your starting point, and on most charts it means “join the yarn here”.
Step 2: Row 1, from right to left
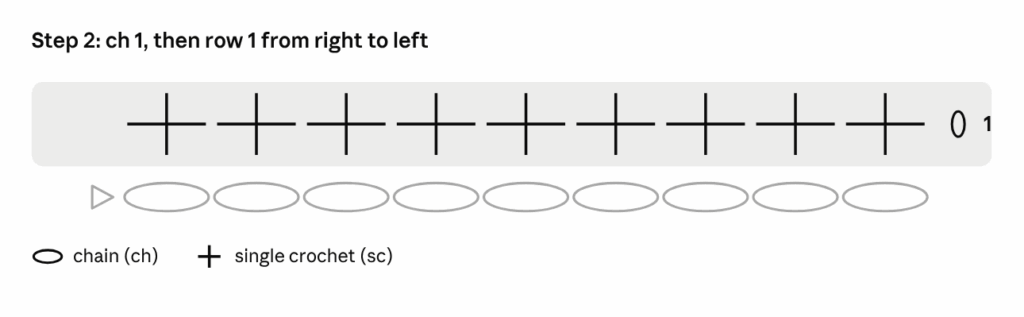
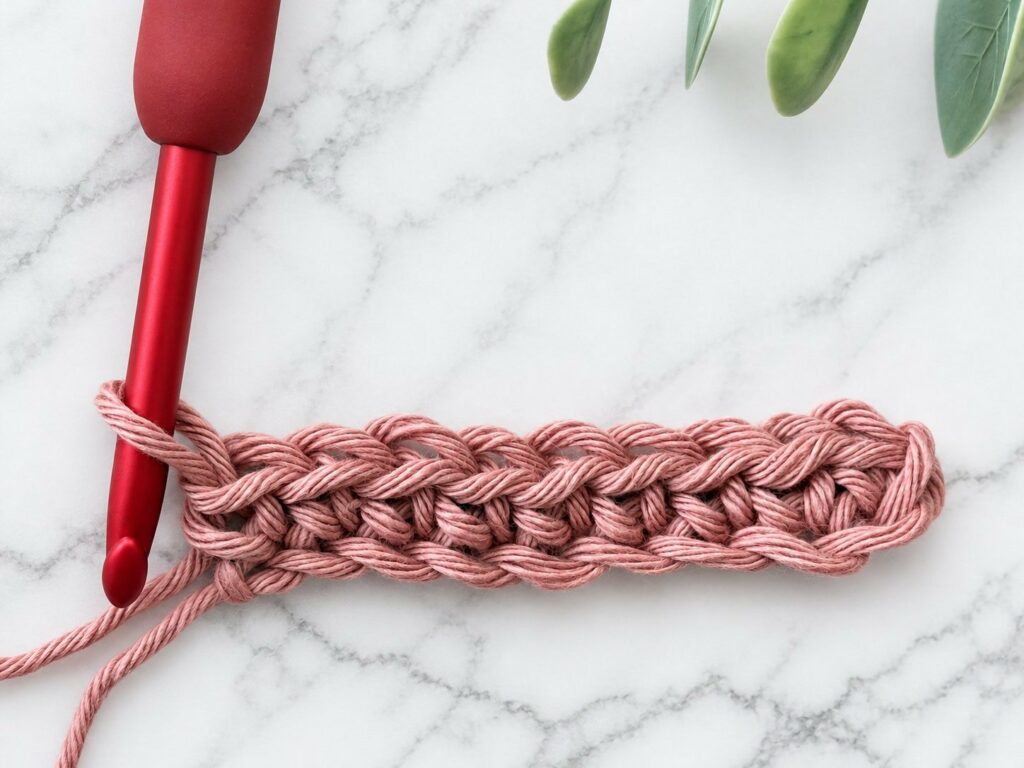
Now chain 1 and find it on the chart. It’s the standing oval on the right, next to the number 1, and here it doesn’t count as a stitch. Read the row from right to left, make 1 sc in each chain, and count them at the end, because you want exactly 9.
Step 3: Row 2, from left to right
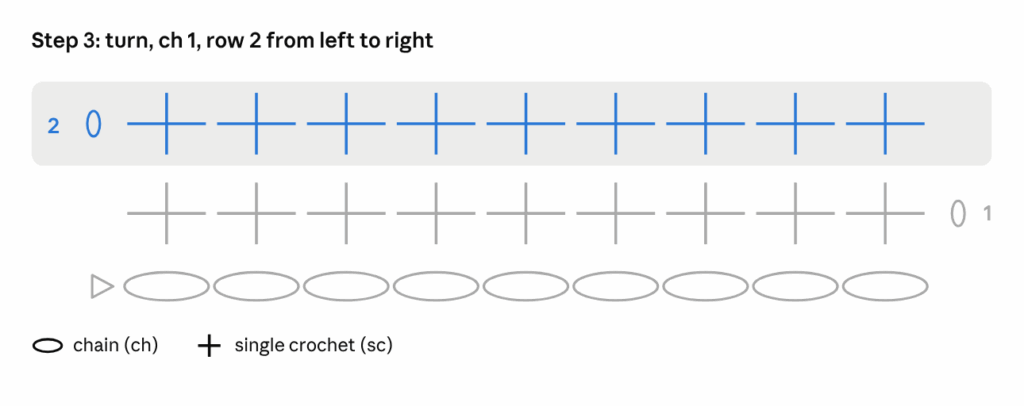
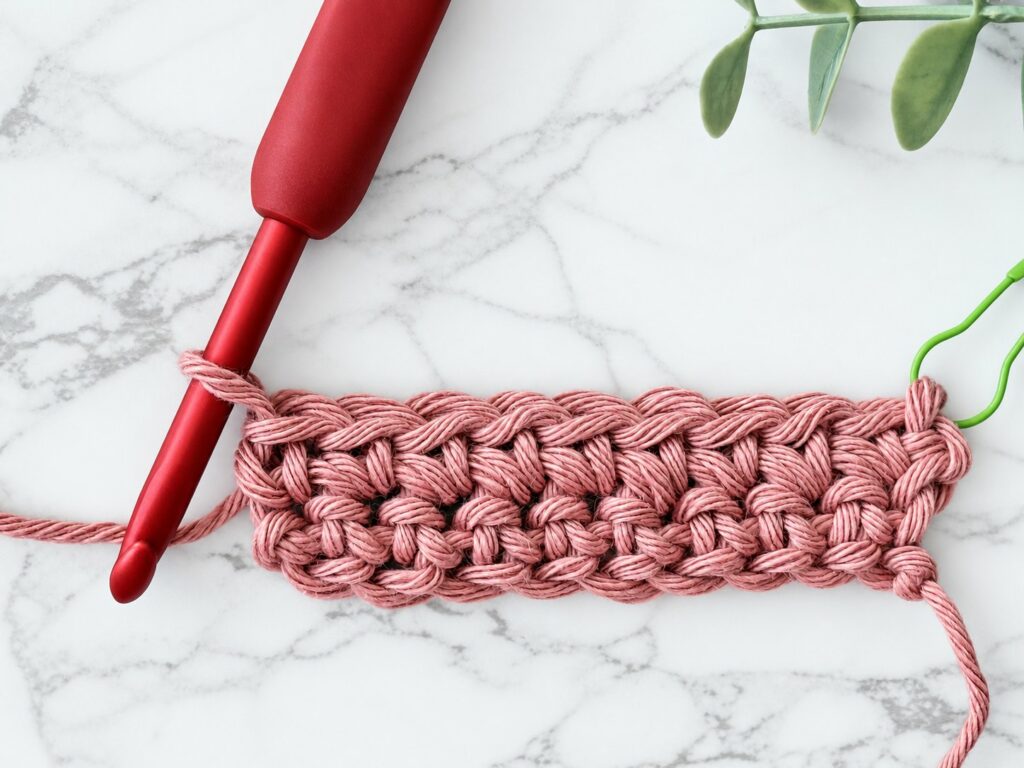
Turn your work, chain 1 again, and look where the standing oval sits now. It’s on the left, next to the number 2, which is the chart’s way of telling you that row 2 goes from left to right. Make 1 sc in each sc from row 1 (nine again), and skip the ch 1 when you get to the end of the next row, since it doesn’t count.
Step 4: Row 3 and beyond
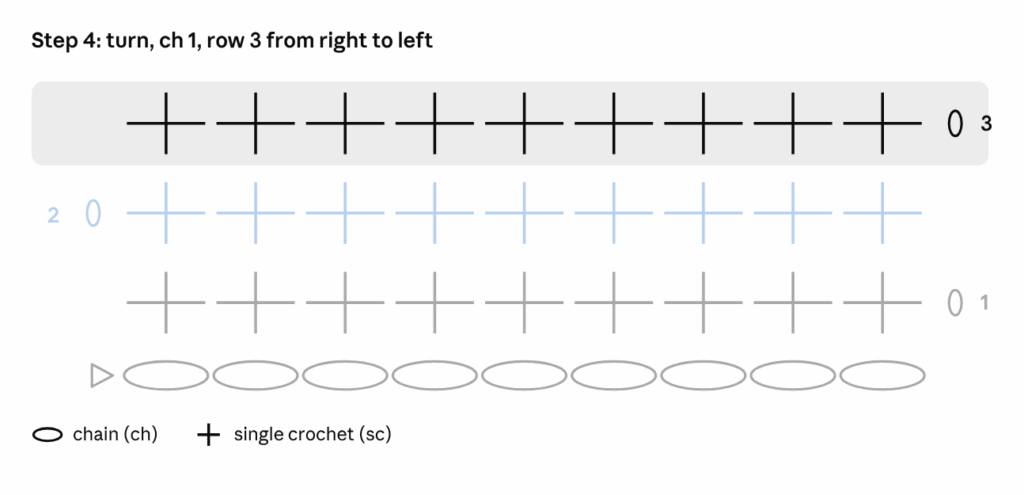
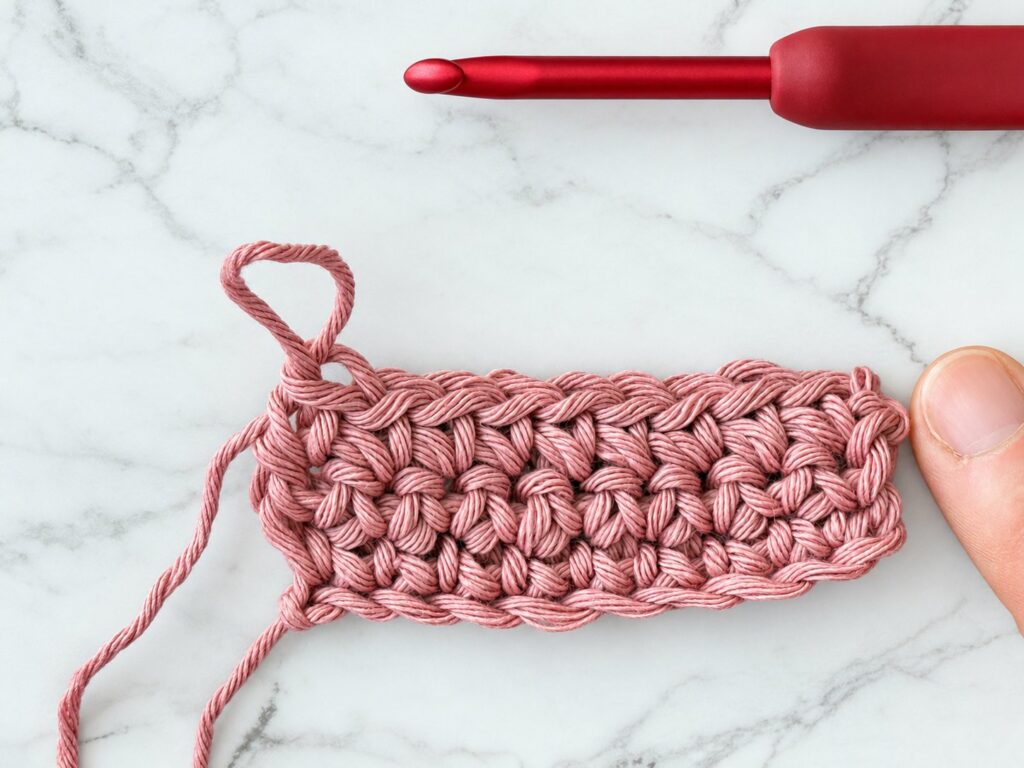
Turn, chain 1 (the oval is back on the right, next to the 3) and make 9 sc, exactly like row 1. And that’s the whole chart cracked, because from here every row is turn, ch 1, 9 sc. The only thing that moves is the little standing oval, so follow it and you’ll always know where a row starts.
Example 2: a crochet circle
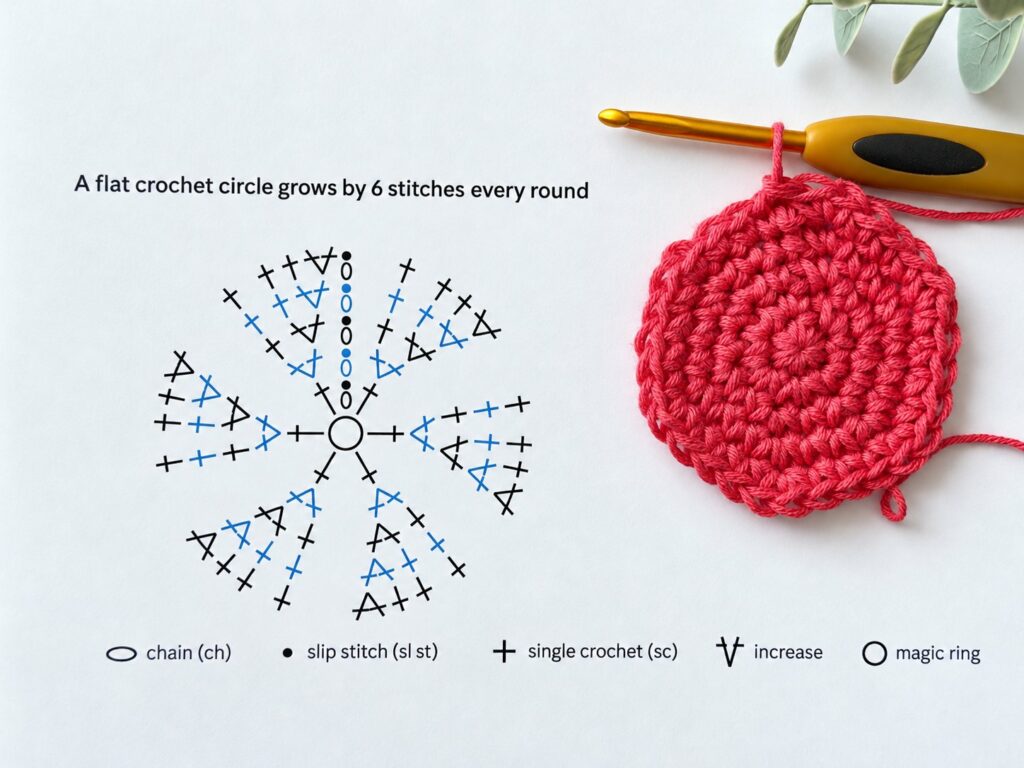
Next comes the crochet circle, and this one is worth knowing by heart. Coasters, hats, baskets and amigurumi all start with one, so you’ll use this chart again and again. It’s also the clearest way to see how increases look on paper, and five rounds are all you need.
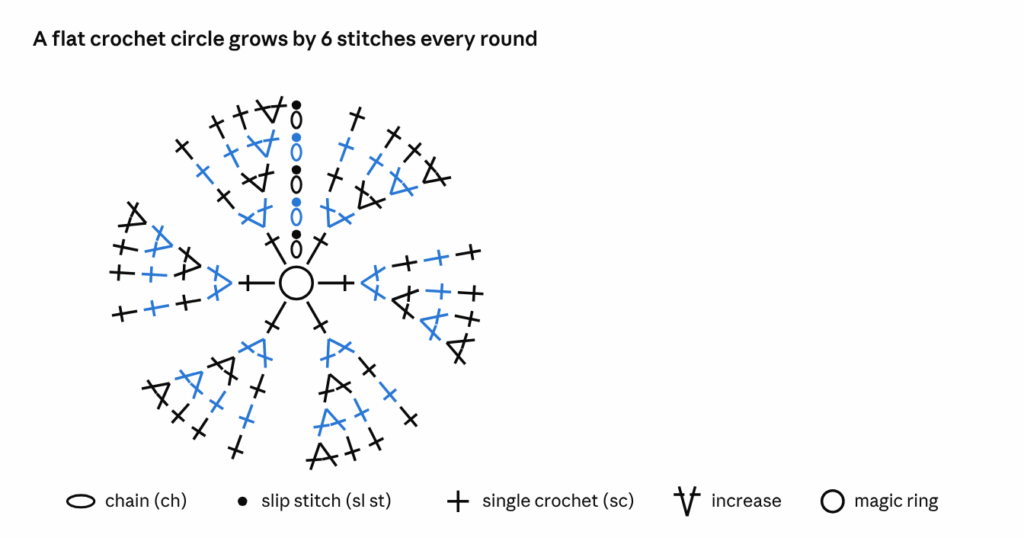
Let’s build it round by round. The rounds switch between black and blue on the chart, so you always know where one ends and the next one starts.
Step 1: Magic ring and round 1
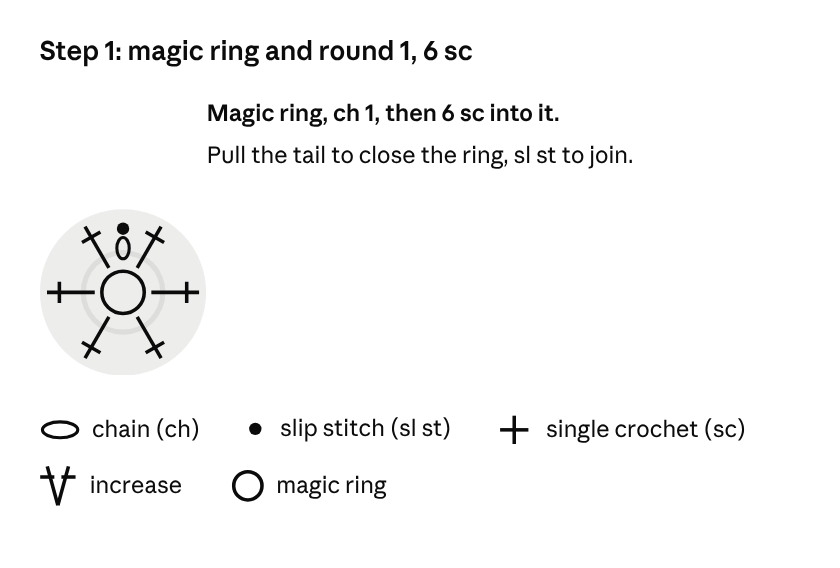
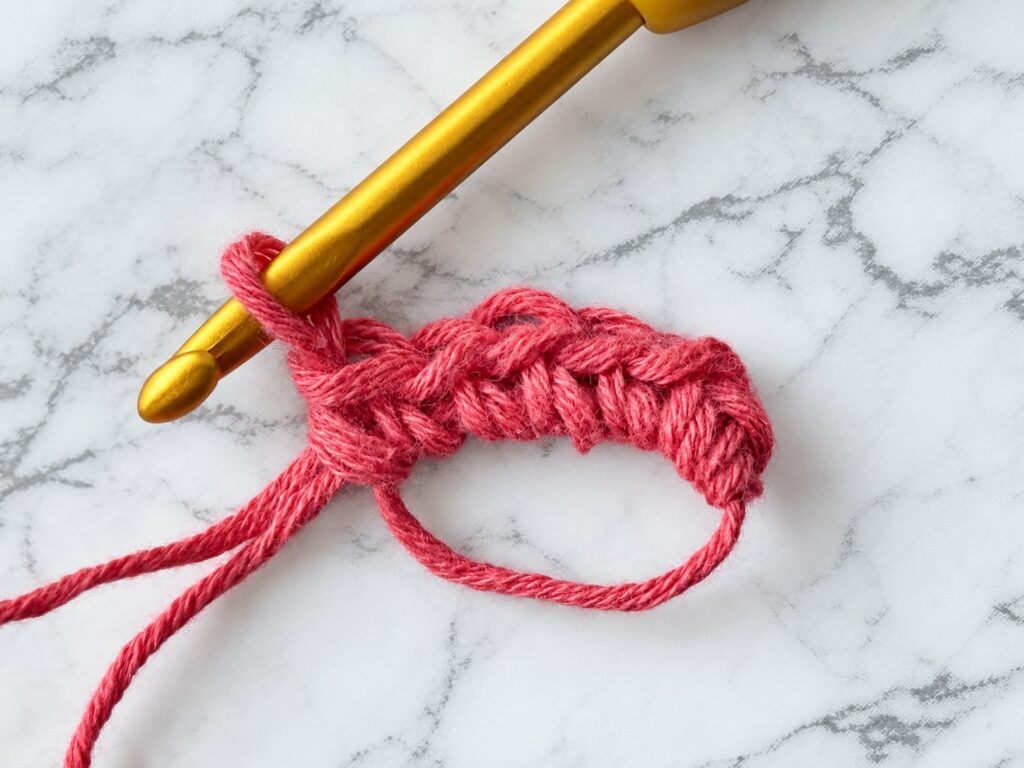
Make a magic ring and chain 1, which is the small oval at the top of the chart. Work 6 sc into the ring (count the six crosses around it), then pull the tail until the hole closes. Slip stitch into the first sc to join, and there’s your first little dot, right next to the ch 1.
Step 2: Round 2
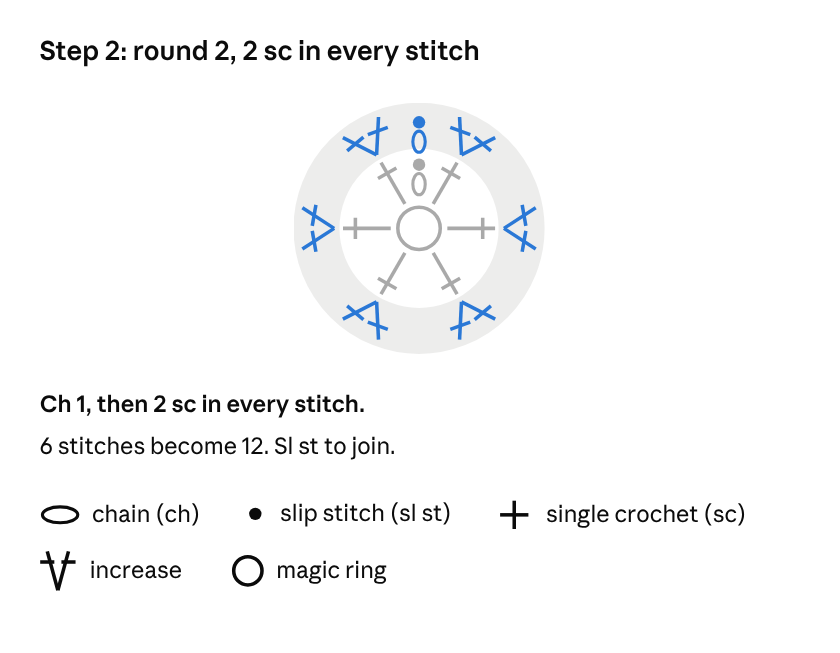
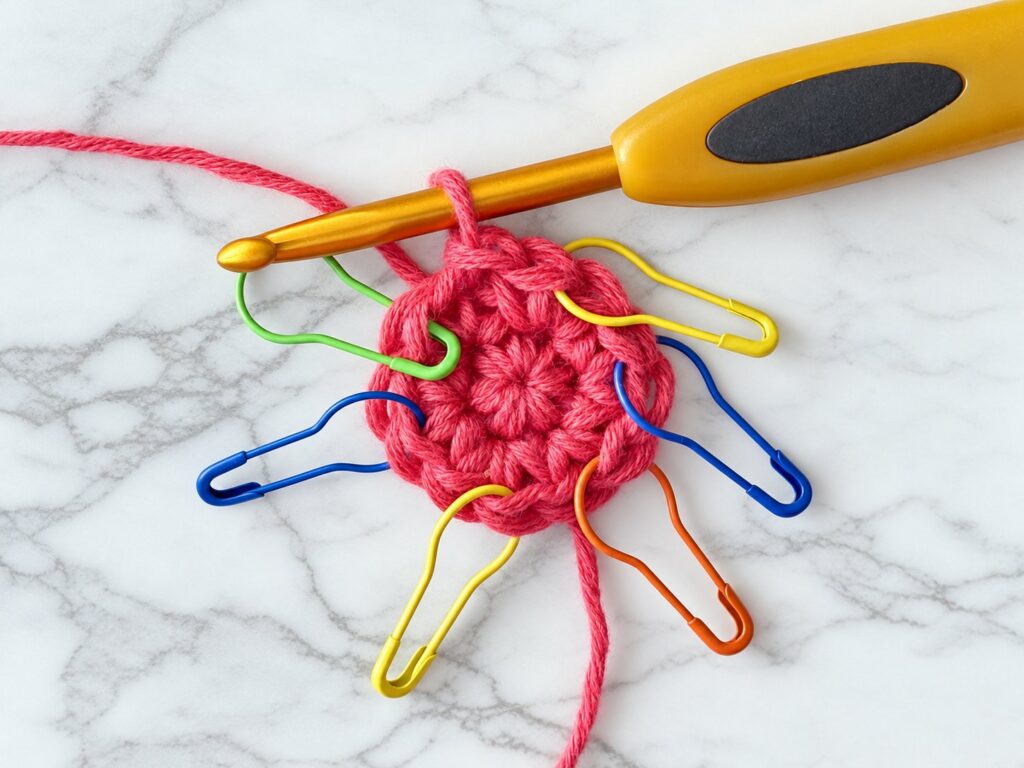
Chain 1, make 2 sc in every stitch, and watch what happens on the chart, because each pair turns into a V. The two legs of the V meet at the bottom, since both stitches go into the same stitch below. Six stitches become 12, and a slip stitch closes the round.
Step 3: Round 3
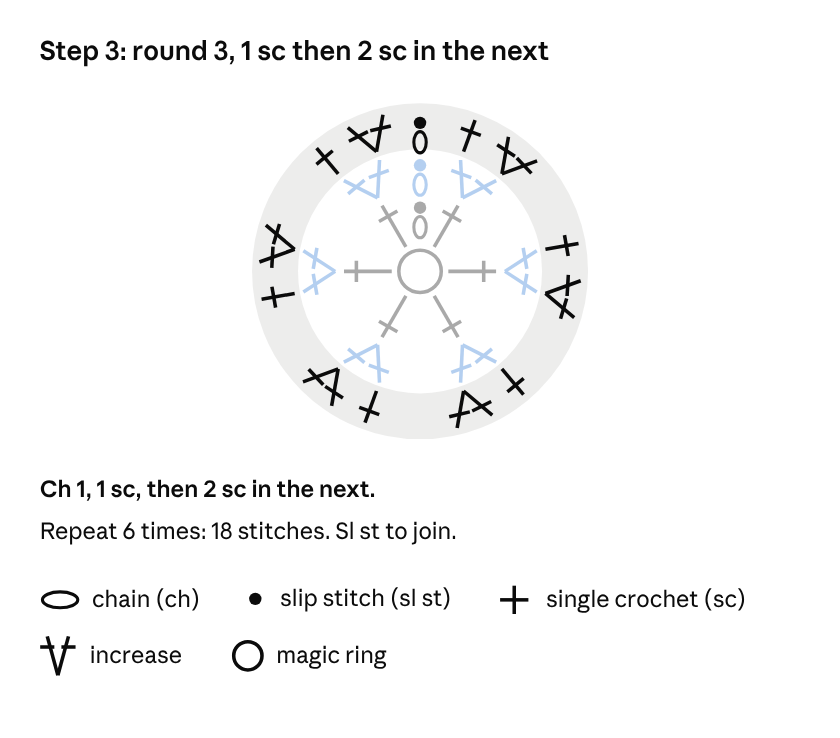
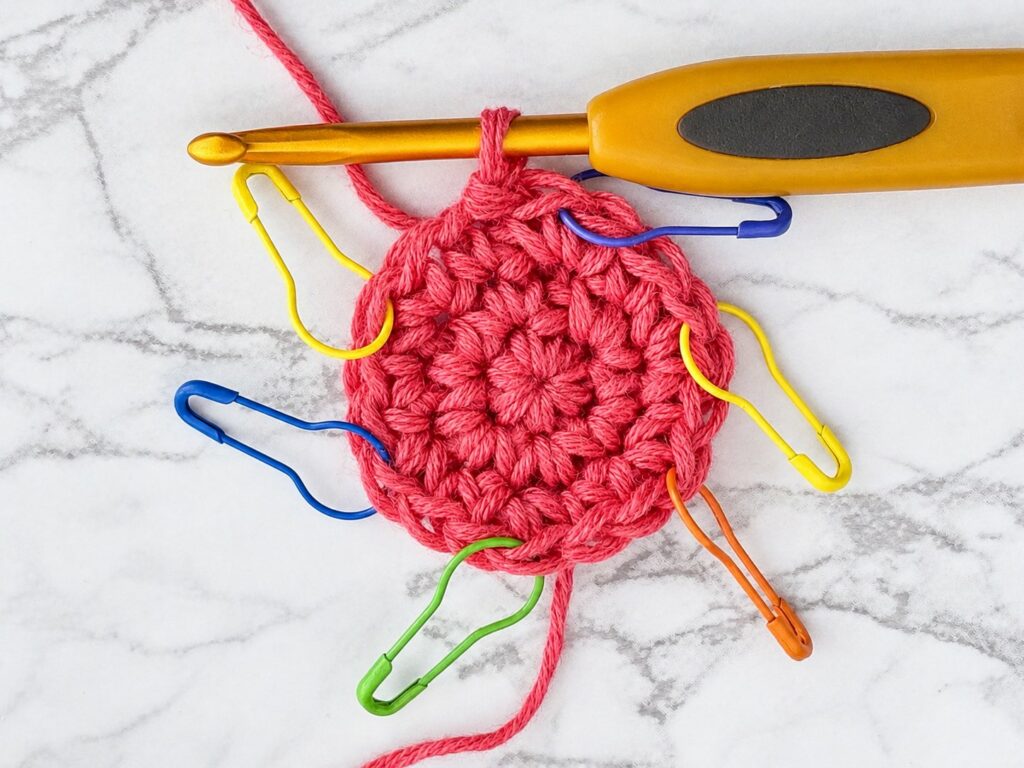
Now the chart starts to show a pattern. Chain 1, make 1 sc in the first stitch and 2 sc in the next, and repeat that 6 times, so you read cross, V, cross, V all the way around. Count 18 stitches at the end, then slip stitch to join.
Step 4: Round 4
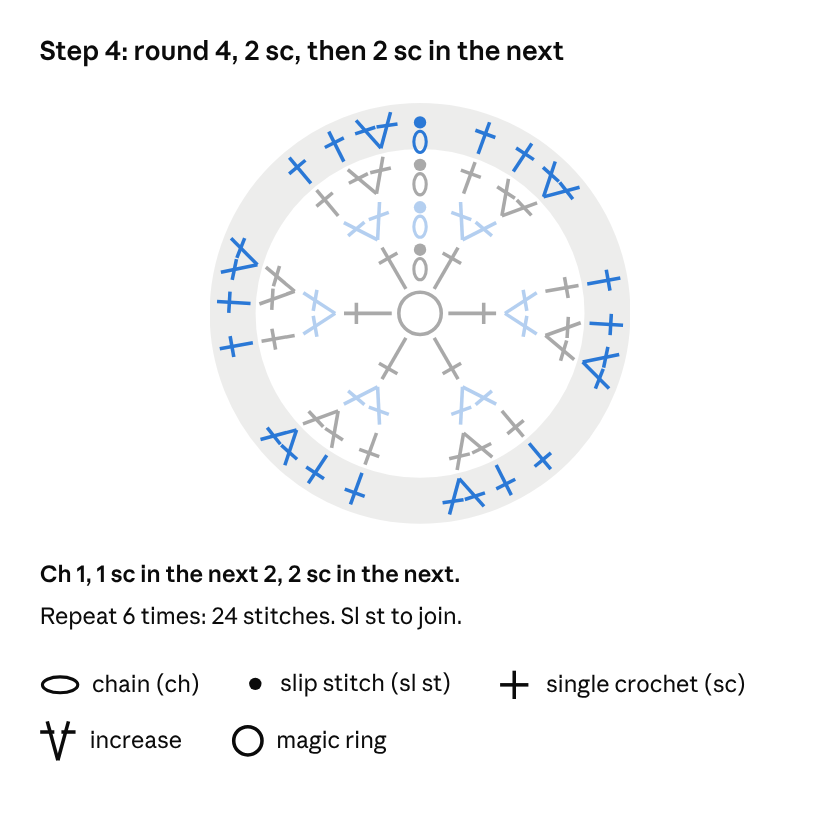
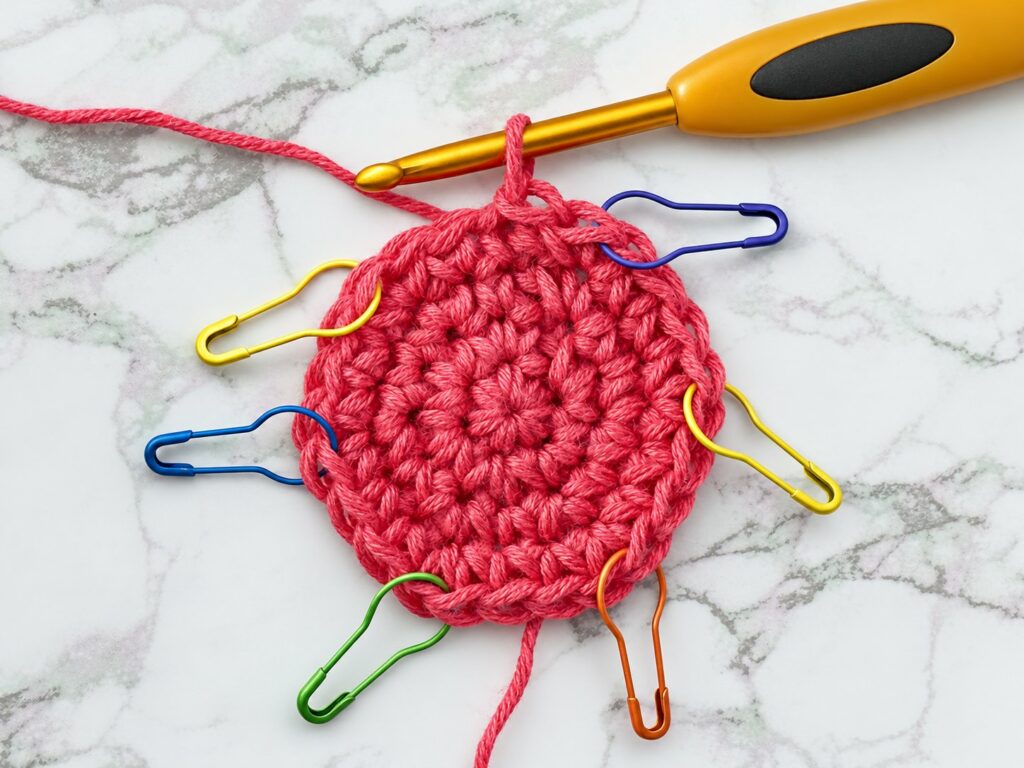
Chain 1 and make 1 sc in each of the next 2 stitches, then 2 sc in the next one. Repeat that 6 times for 24 stitches, and slip stitch to join.
Put round 3 and round 4 side by side, and you’ll spot one more cross between each pair of Vs. That single extra cross per round is what keeps your circle flat instead of turning it into a bowl.
Step 5: Round 5
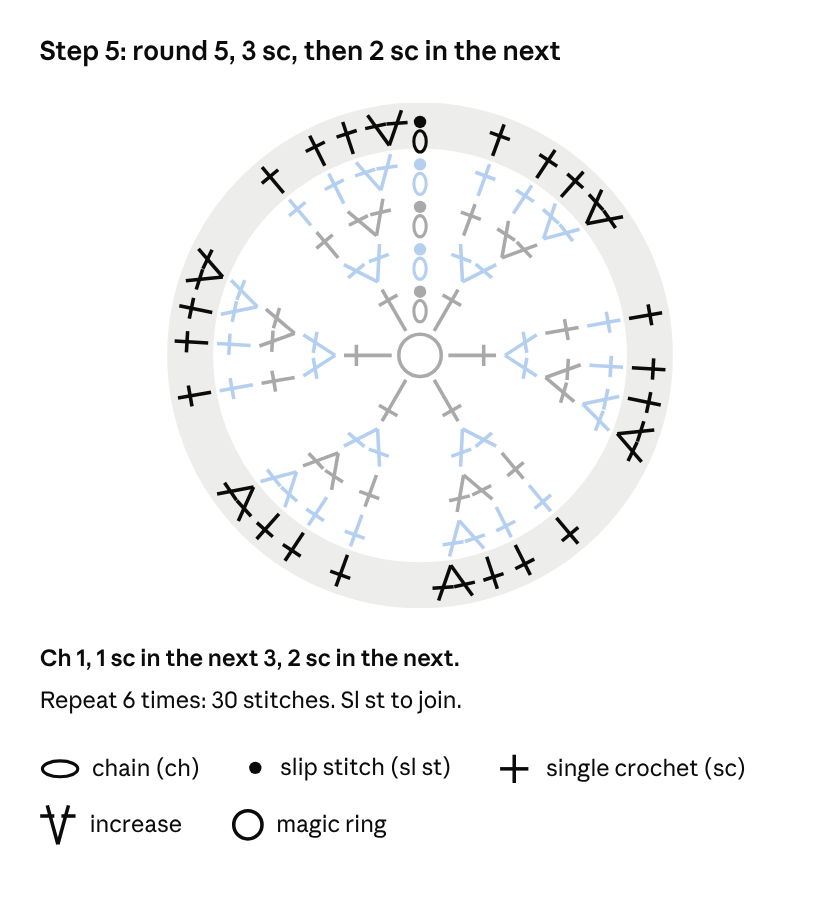
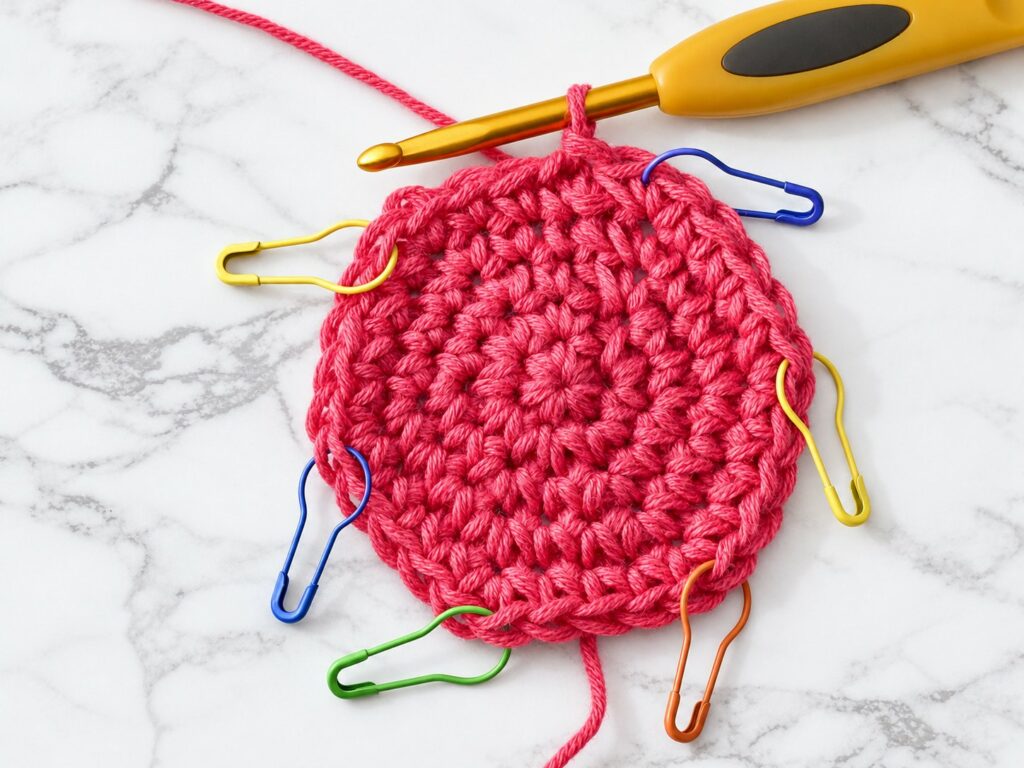
Chain 1, make 1 sc in each of the next 3 stitches and 2 sc in the next, and repeat that 6 times. You’ll have 30 stitches, so slip stitch to join and take a look at your circle.
Look at how the Vs line up in six straight lines, like spokes on a wheel. Every round adds one more sc between them, so round 6 would be 4 sc and an increase, for 36 stitches. Keep going like that, and your circle grows as big as you want it (my how to crochet a circle tutorial shows the full method).
Example 3: moss stitch in rows

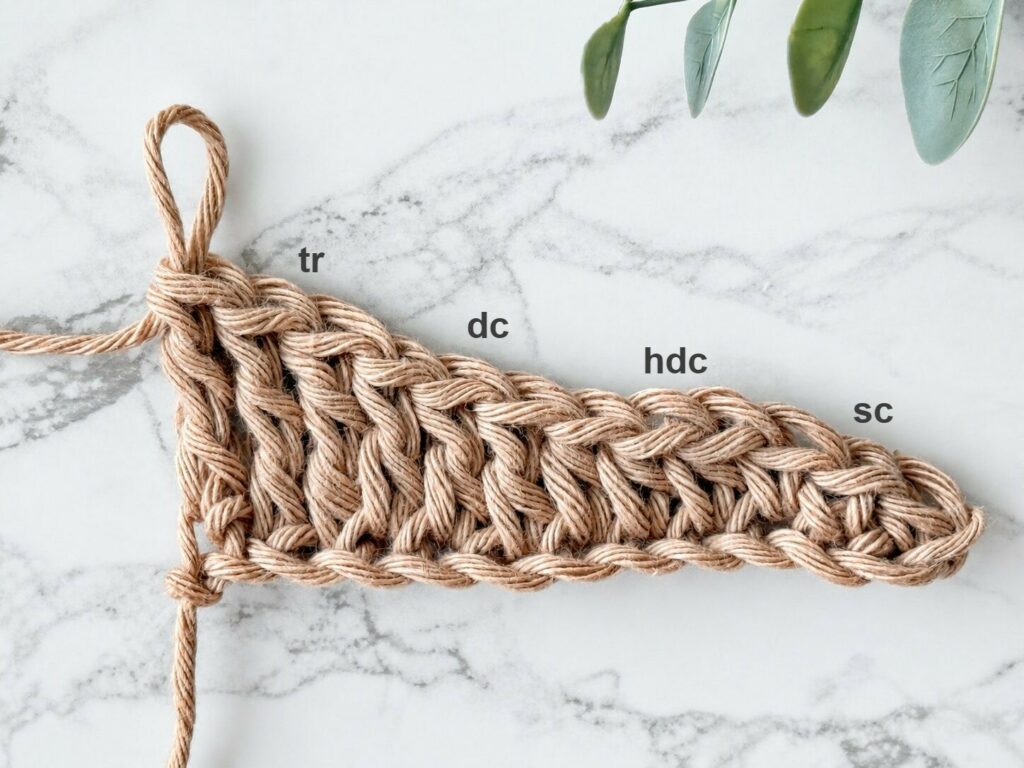
If you’ve followed me for a while, you’ve seen moss stitch everywhere, in my Willow Shawl, my Triangle Moss Stitch Shawl in the photo above, my Ombre Moss Stitch Beanie and plenty more. Crocheting the Willow Shawl in moss stitch felt like meditation to me, and it still does. On a chart it needs only two symbols, the plus for sc and the little oval for a chain, and it’s the best way to practice working into spaces.
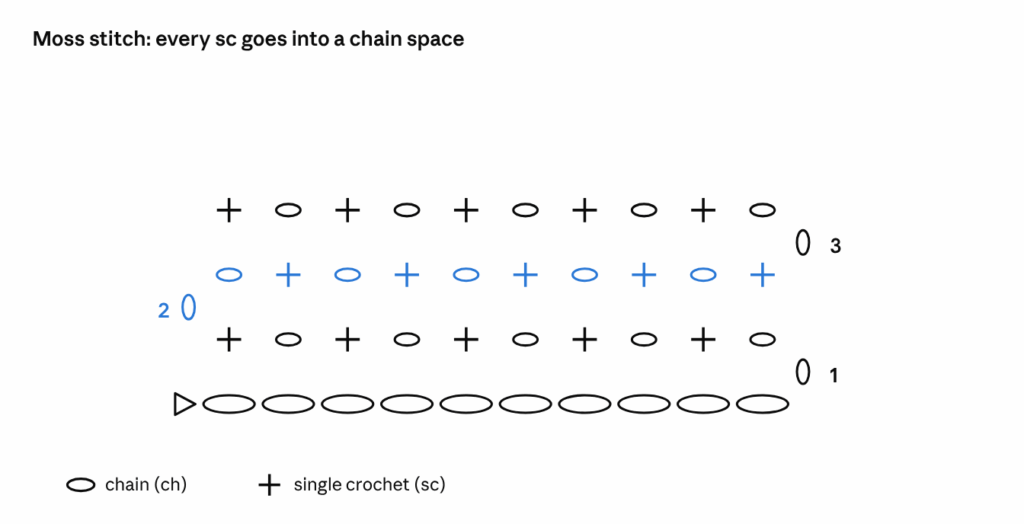
This chart comes with a bonus. Dashed lines show exactly where each sc goes, so follow them closely, because they hold the whole trick of moss stitch.
Step 1: Make the foundation chain
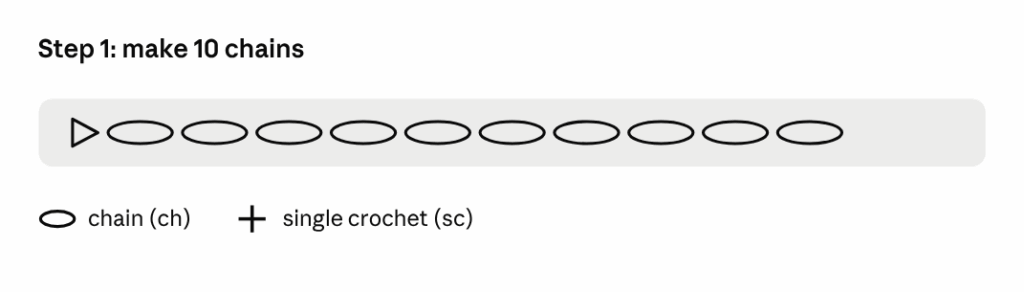
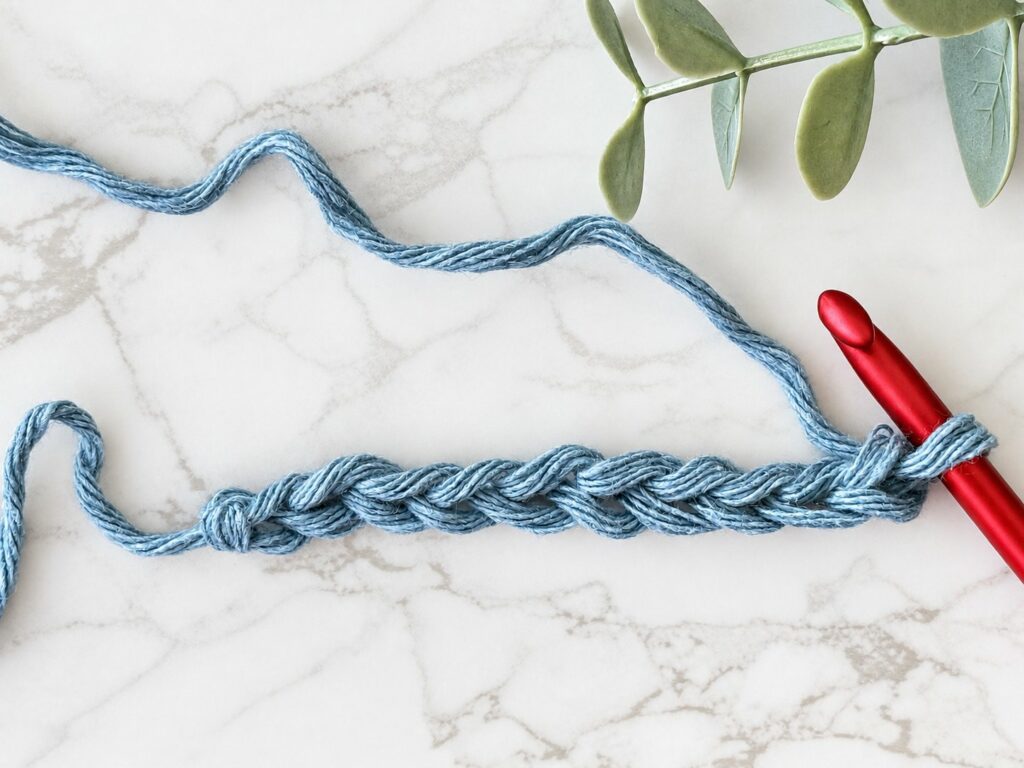
Chain 10, and don’t stress about the number. This chart works with any even number of chains, so you can make your piece wider later.
Step 2: Row 1, from right to left
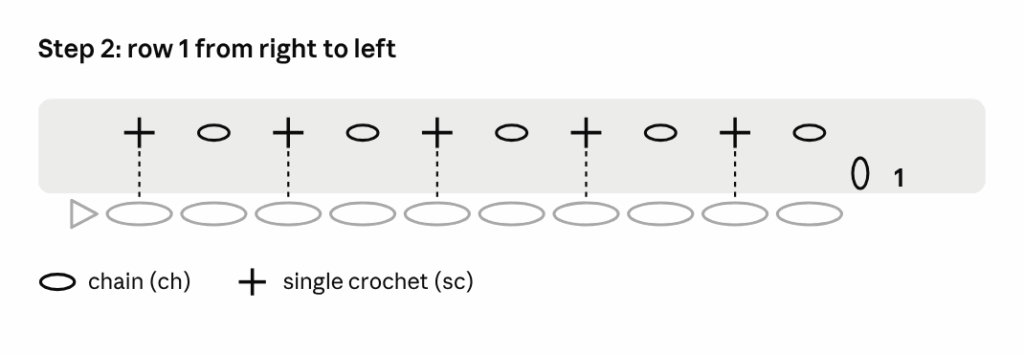
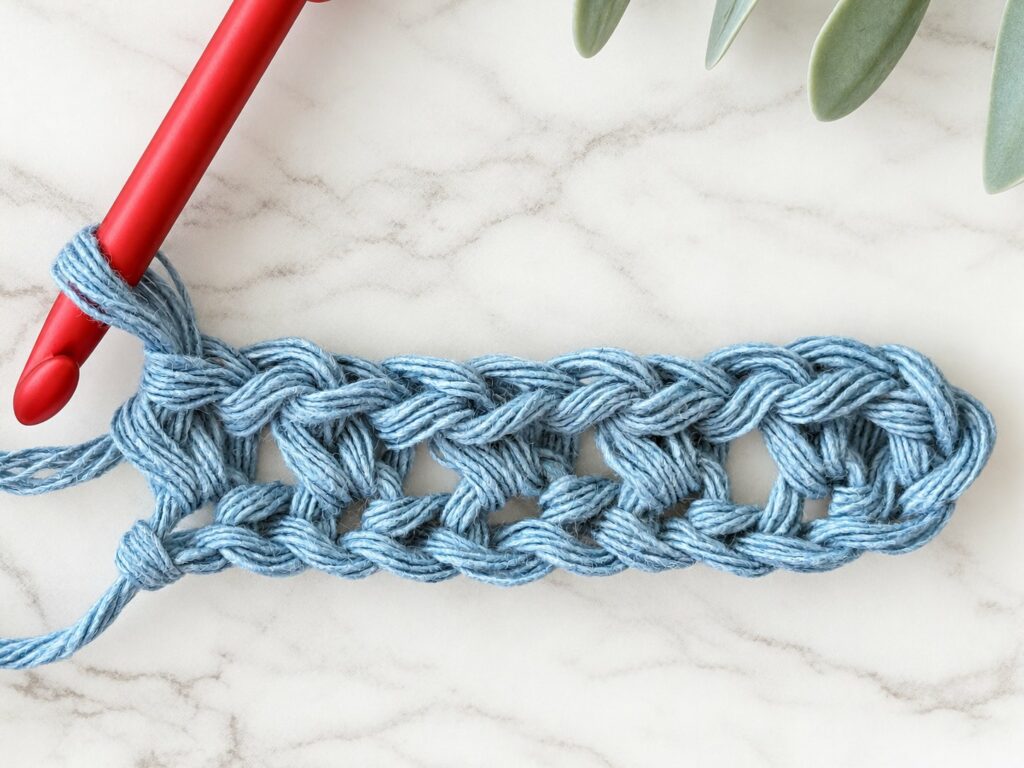
Chain 1 first. That’s the small standing oval on the right, next to the 1, and it doesn’t count as a stitch. Now chain 1 more, skip the last chain of your foundation and sc in the chain after that, and keep repeating ch 1, skip 1, sc in the next until your last sc lands in the very first chain you made.
Then take a peek at the chart, and you’ll see every chain in row 1 sitting right above a chain you skipped. Those little gaps are exactly where your hook goes in the next row.
Step 3: Row 2, from left to right
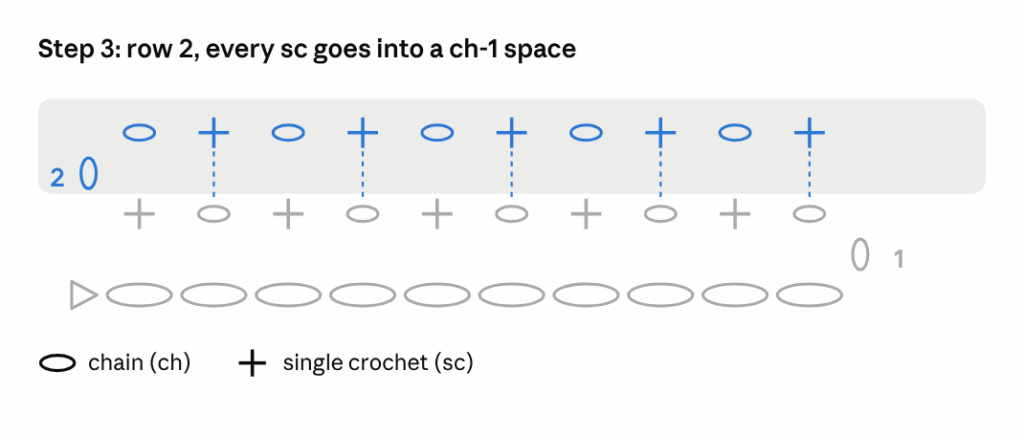
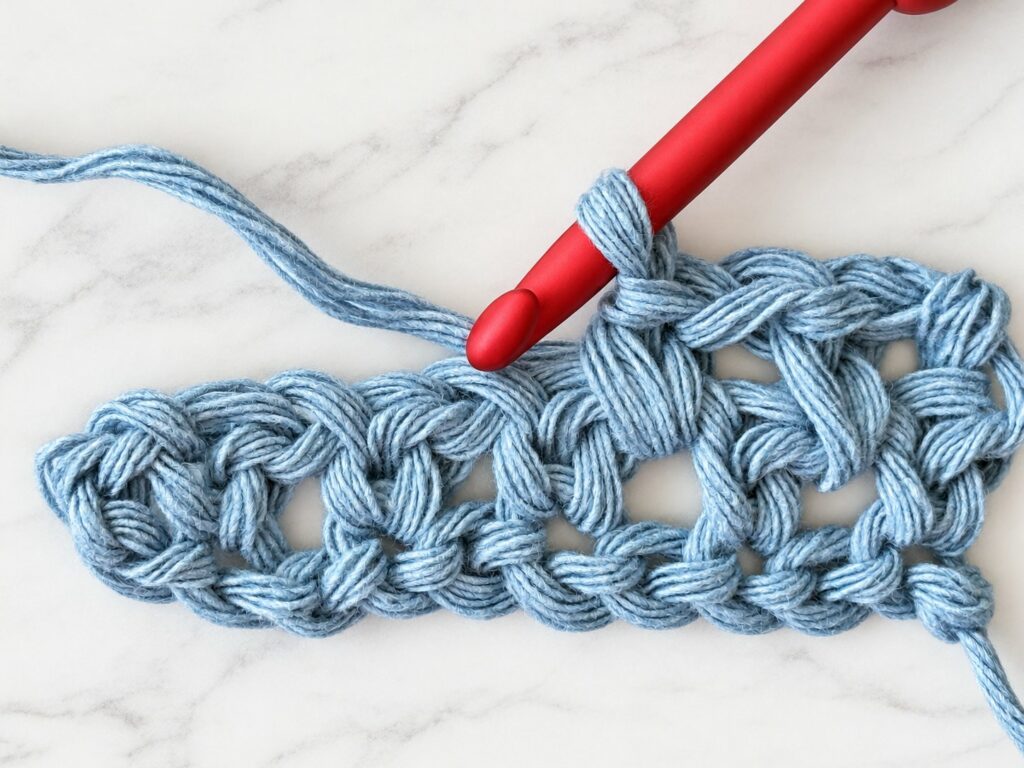
Row 2 is where moss stitch starts to look woven. Chain 1 and turn (the oval is on the left now, next to the 2), then chain 1, skip the first sc and sc into the ch-1 space.
From here, let the dashed lines guide you, because every sc goes into a chain space and never into a stitch. In between, chain 1 and skip the sc below. Your last sc goes into the last ch-1 space, and that’s row 2 done.
Step 4: Row 3 and beyond
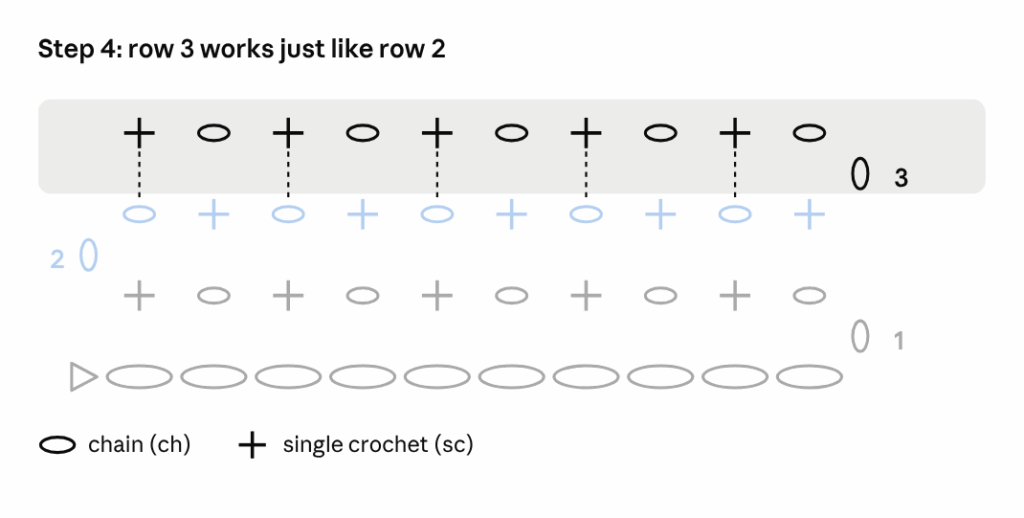
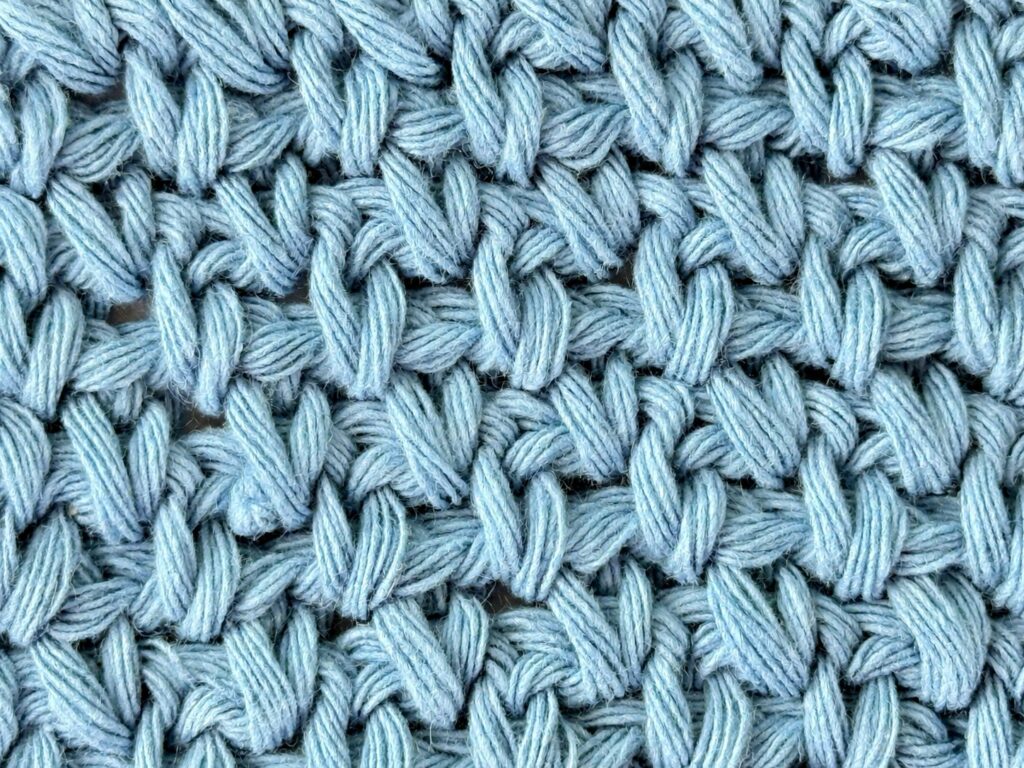
Chain 1 and turn, and the oval is back on the right, next to the 3. Work this row exactly like row 2 (ch 1, skip the sc, sc in the next ch-1 space) and repeat it until your piece is as tall as you want. For a closer look at the stitch itself, my moss stitch tutorial walks you through every move.
Example 4: a simple triangle shawl in double crochet
Now let’s leave rectangles behind, because this chart has a whole different shape. A top-down triangle shawl starts with a tiny ring at the neck and grows outward row by row, and it’s the shape behind a lot of my own shawl patterns. On the chart, the center line runs straight up from the ring, and each row has two halves that meet in a corner right on that line.
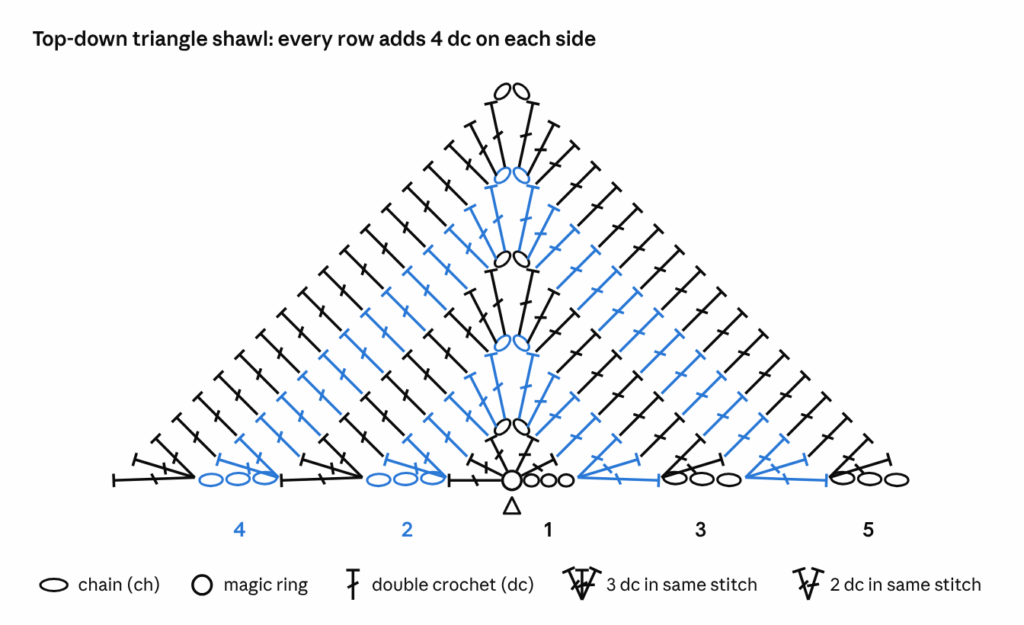
Here’s the shawl, row by row. Keep your eyes on two spots, because they do all the shaping. One is the fan of 3 dc at each end of a row, and the other is the ch 2 in the corner.
Step 1: The ring and row 1
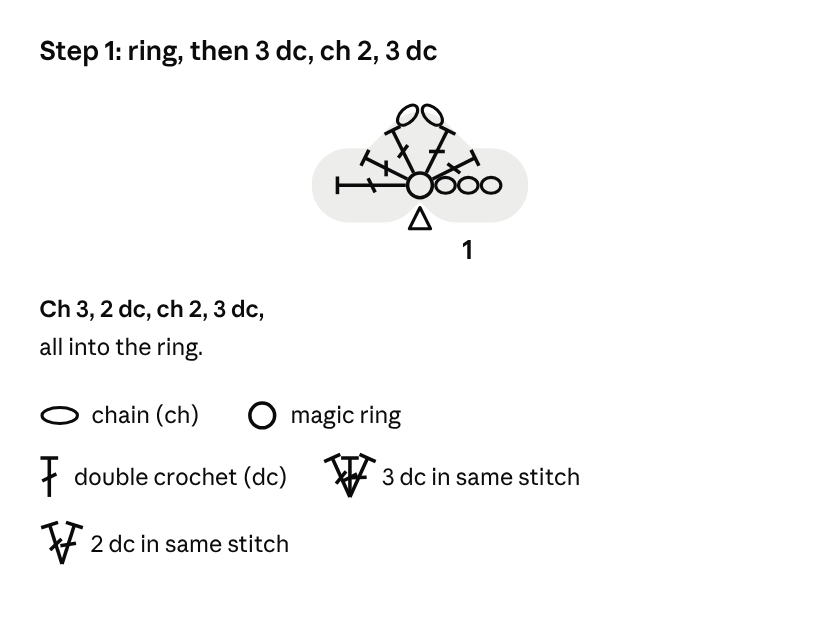
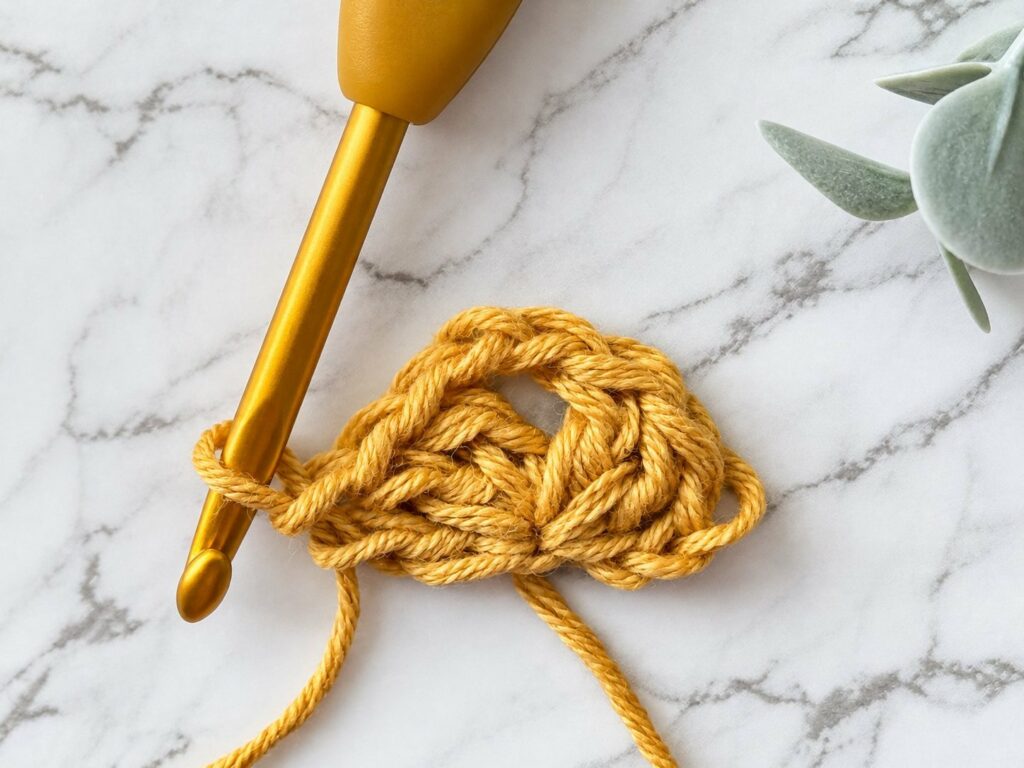
Make a magic ring and chain 3, which counts as your first dc (on the chart, it’s the three tiny ovals lying at the end of the row). Then make 2 dc, ch 2 and 3 dc, all into that same ring. That little ch 2 is the corner on the center line, and from now on it’s the middle point of your whole shawl.
Step 2: Row 2
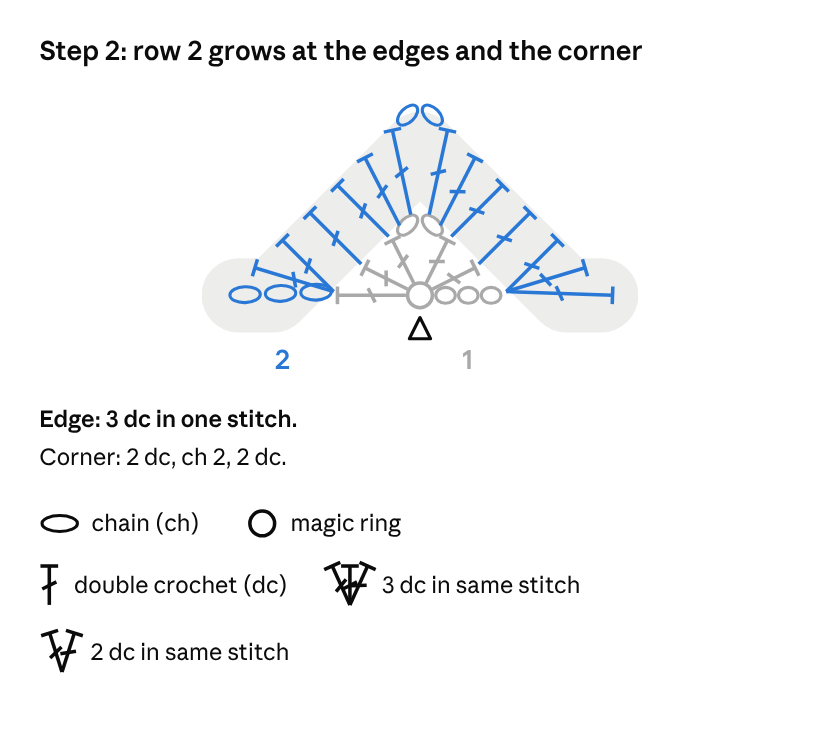
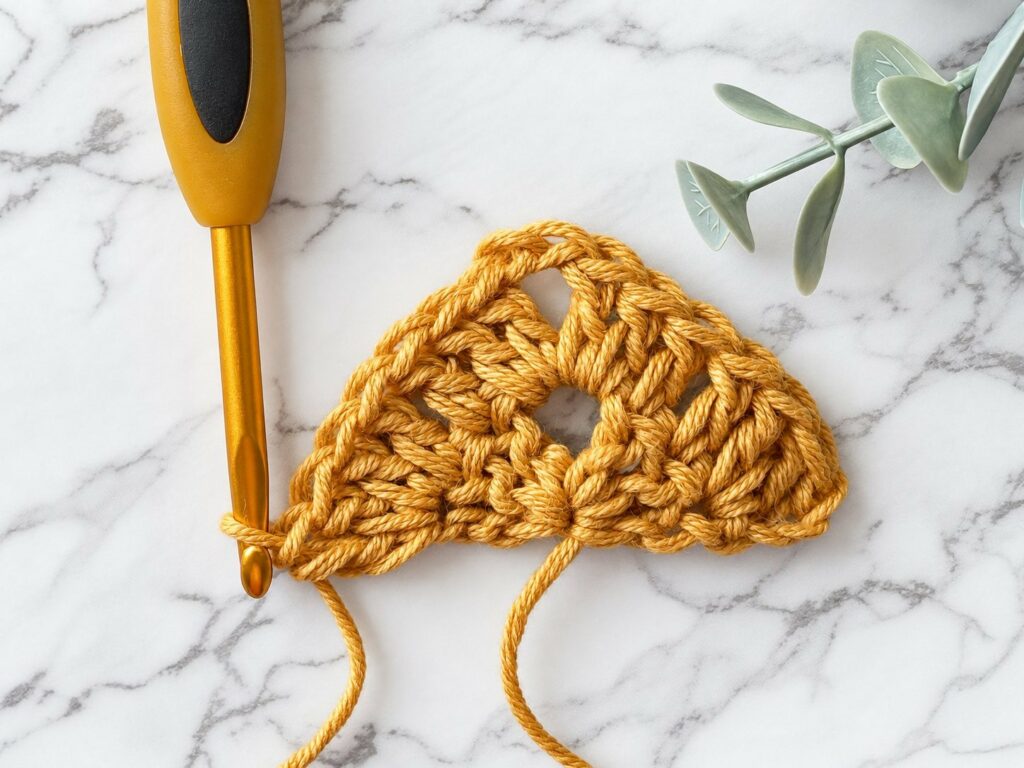
Chain 3 and turn, then make 2 dc in the first stitch. Count them together with the ch 3, and you’ve got 3 stitches in one spot, which is your edge increase. Now work 1 dc in each stitch until you reach the ch-2 space.
In that space, make 2 dc, ch 2, 2 dc, which is your center increase. Then work 1 dc in each stitch to the end, and finish with 3 dc in the top of the turning chain. Count each side, and you should have 7 stitches.
Step 3: Row 3
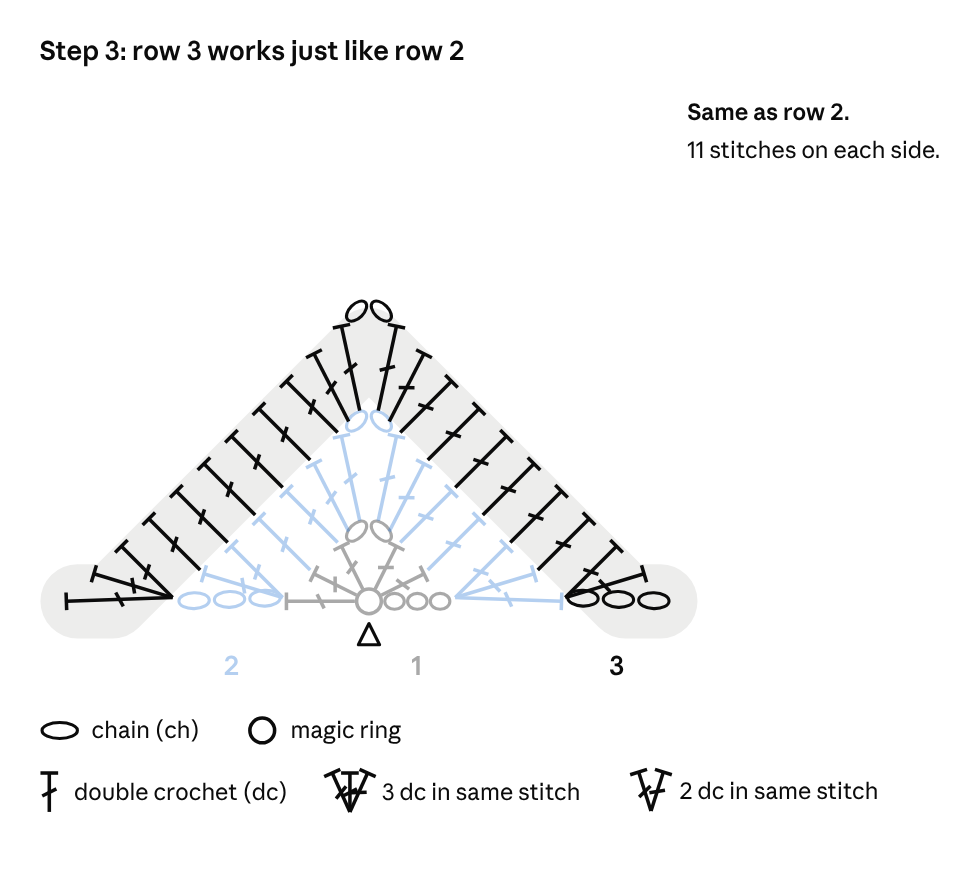
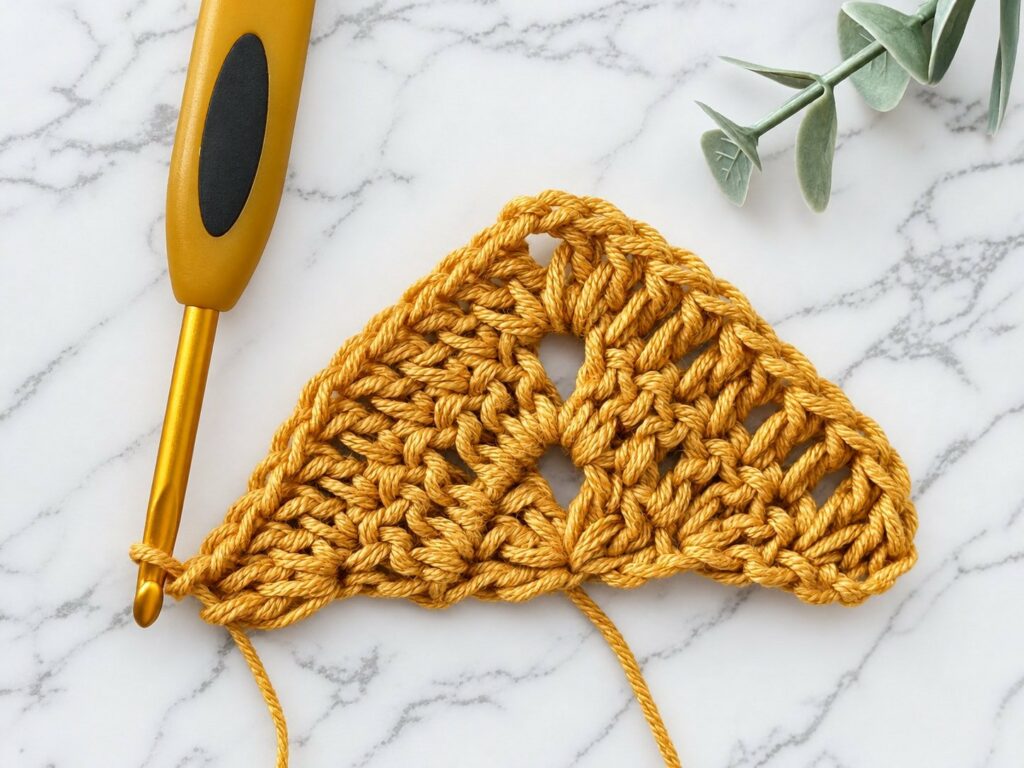
Row 3 is a copy of row 2, so you already know it. Edge fan, dc across, corner increase, dc across, edge fan, and each side grows from 7 to 11 stitches.
Step 4: Row 4
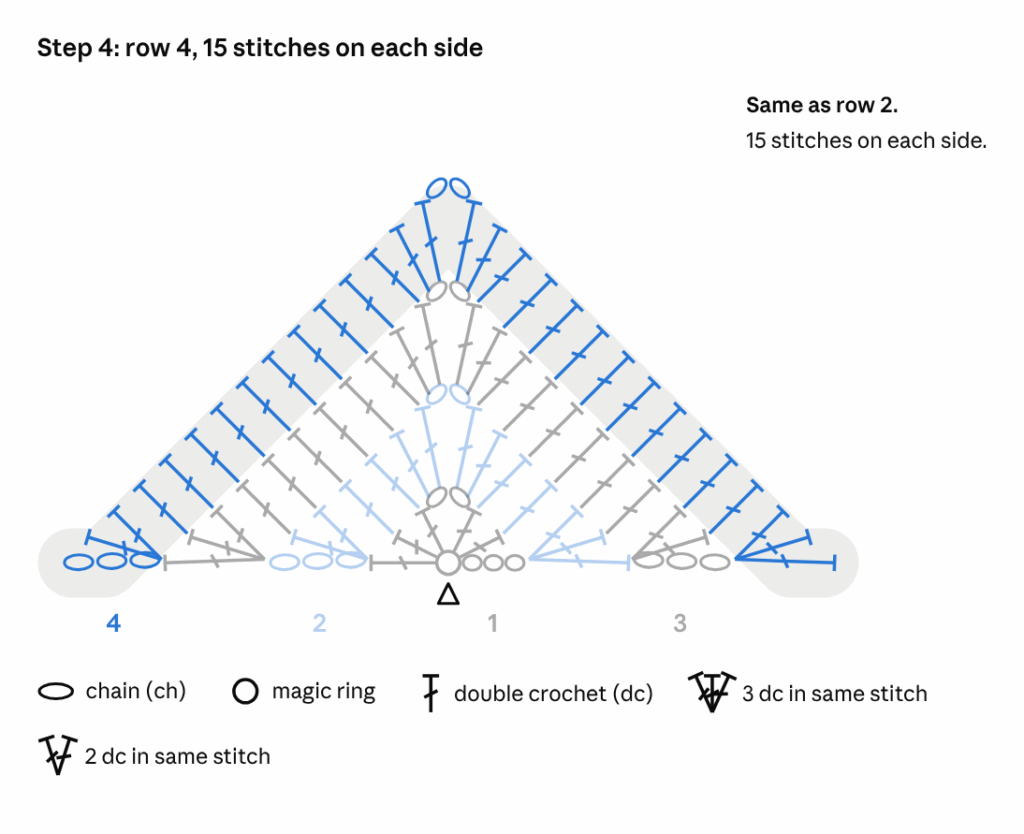
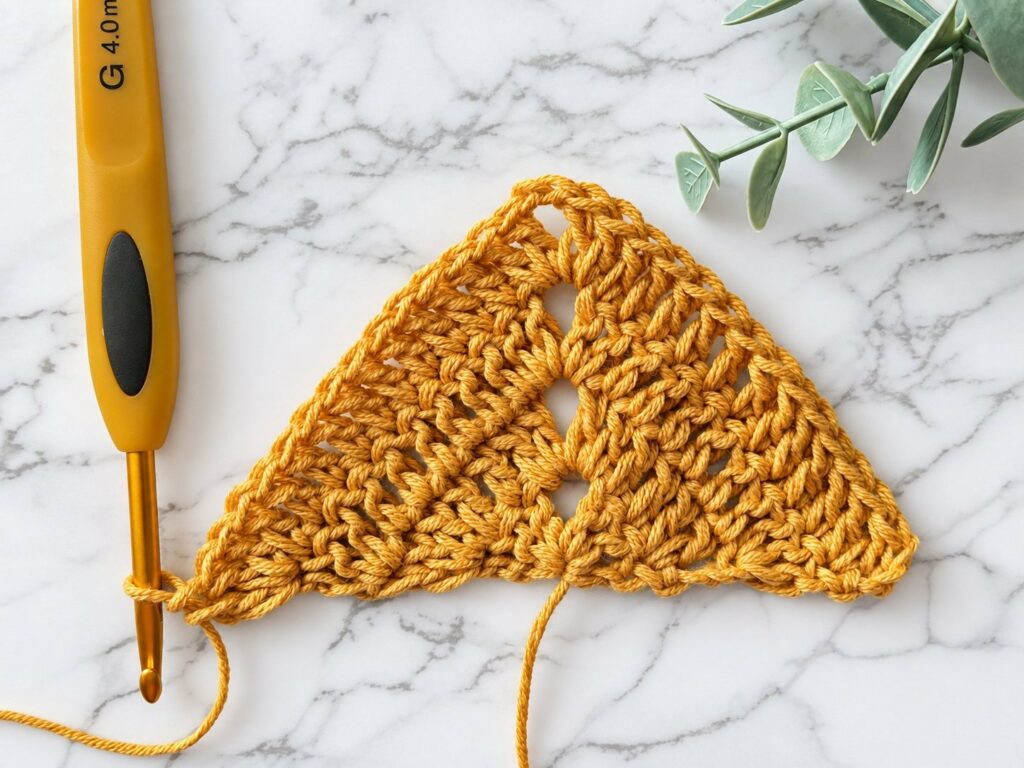
Chain 3, turn and work it like row 2 again, so each side now has 15 stitches. Then look closely at the chart, and you’ll see the corner ch 2 always sitting right on top of the corner from the row before. That’s why the middle line of a top-down shawl stays so straight.
Step 5: Row 5
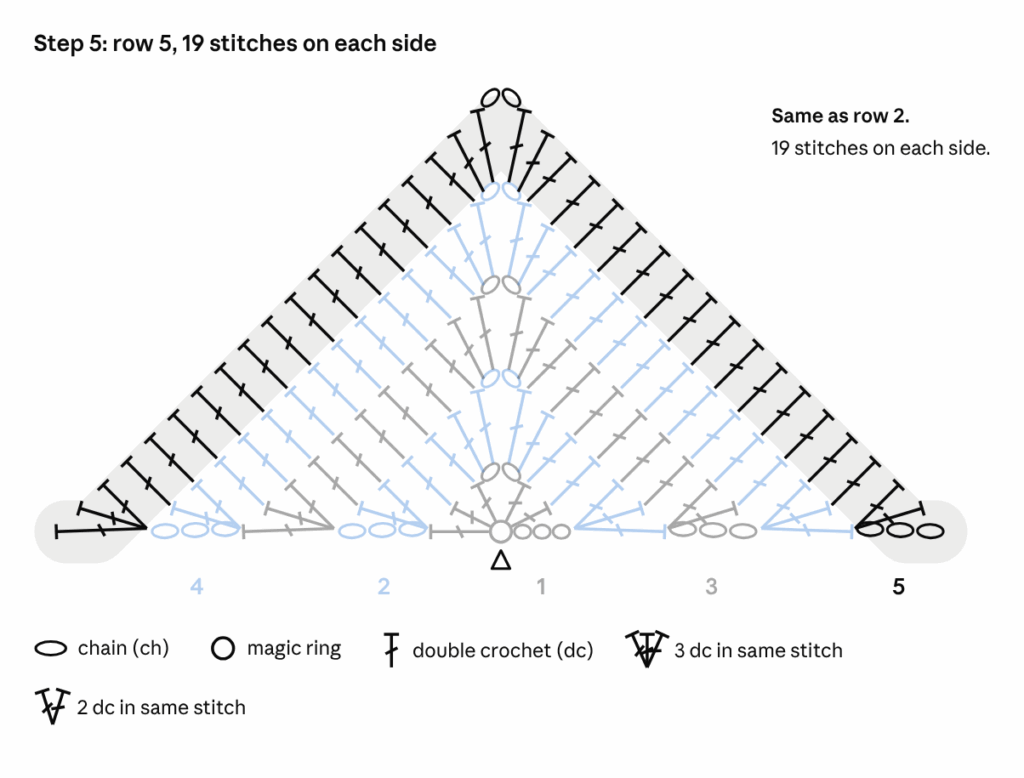
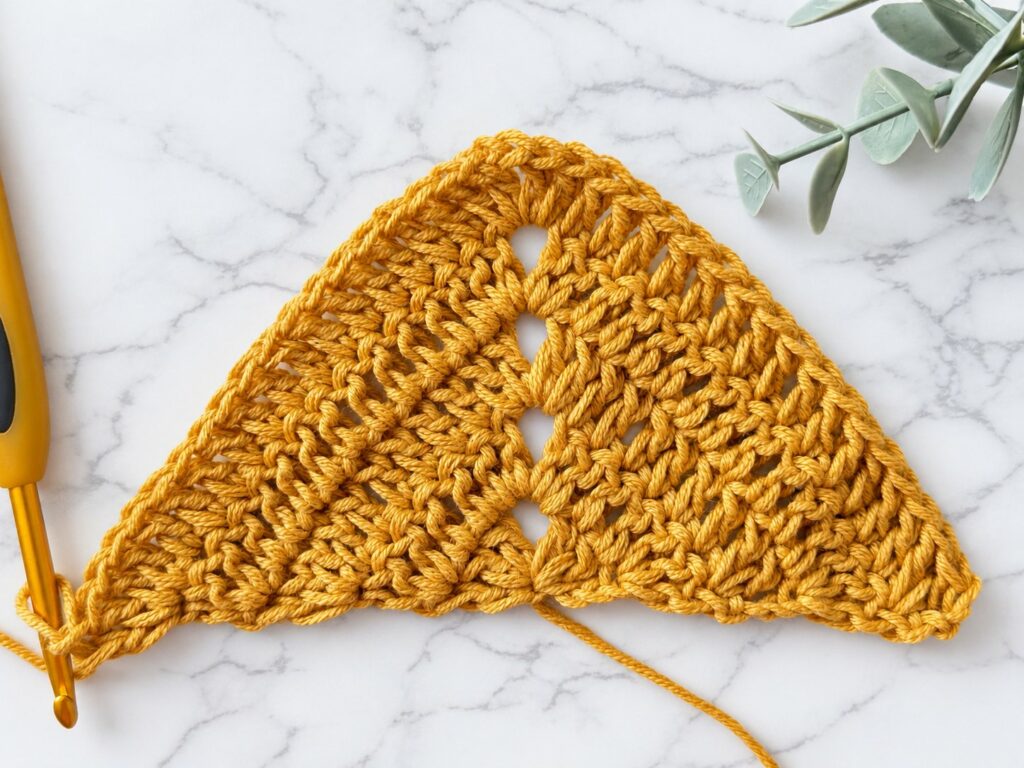
Chain 3, turn and do it one more time, for 19 stitches on each side. From here, every row adds 4 stitches per side, 2 at the edge and 2 at the corner, so your stitch count is easy to check. Keep going until the shawl is as big as you want, and if you’re curious about other shapes, my guide on how to crochet a shawl shows top-down plus three more methods.
Example 5: the Sunny Lace Cowl
This last chart is a little piece of my own design, the lace stitch from my Sunny Lace Cowl. I drew it as a small swatch in the same style as the other charts, and you already know every symbol on it. After four examples, this lace is just ovals, crosses and Ts in a new order.
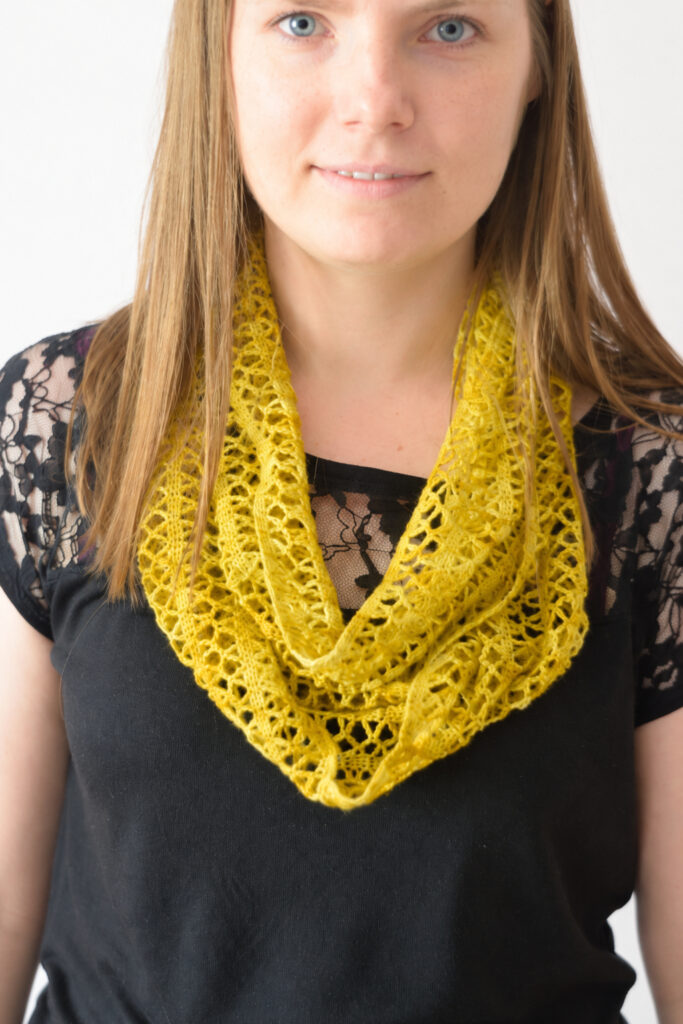
The real cowl starts with 60 chains, and I made mine in Malabrigo Lace on a 2.5 mm hook, in a mustard yellow close to the ochre I always reach for. Lace weight yarn scares a lot of crocheters, but I find it really satisfying to work with. For the full stitch counts and finishing, see the free Sunny Lace Cowl pattern, and use this swatch to practice reading the chart.
Grab some scrap yarn, and let’s go row by row.
Step 1: Make the foundation chain
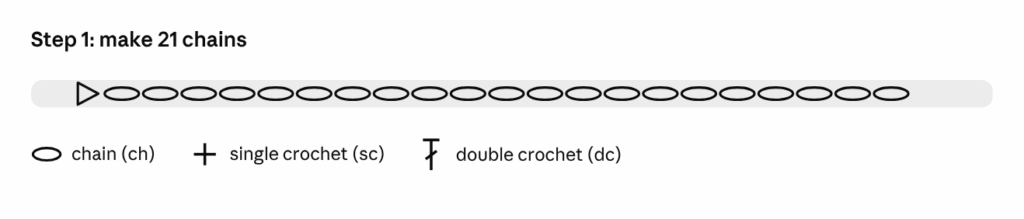
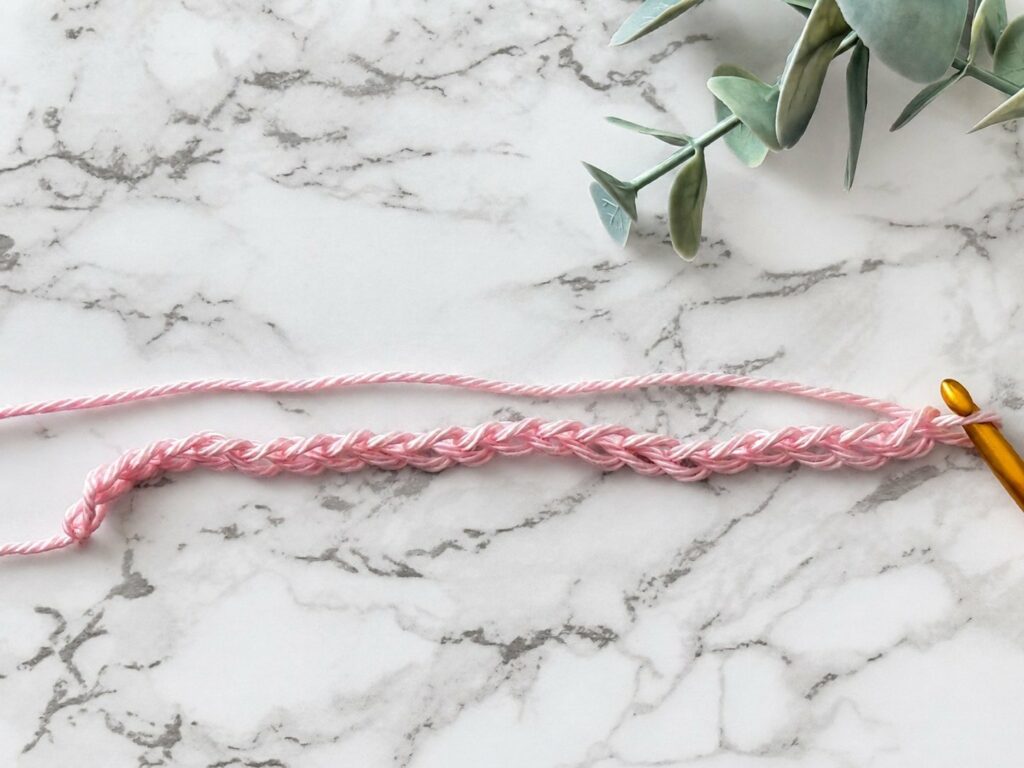
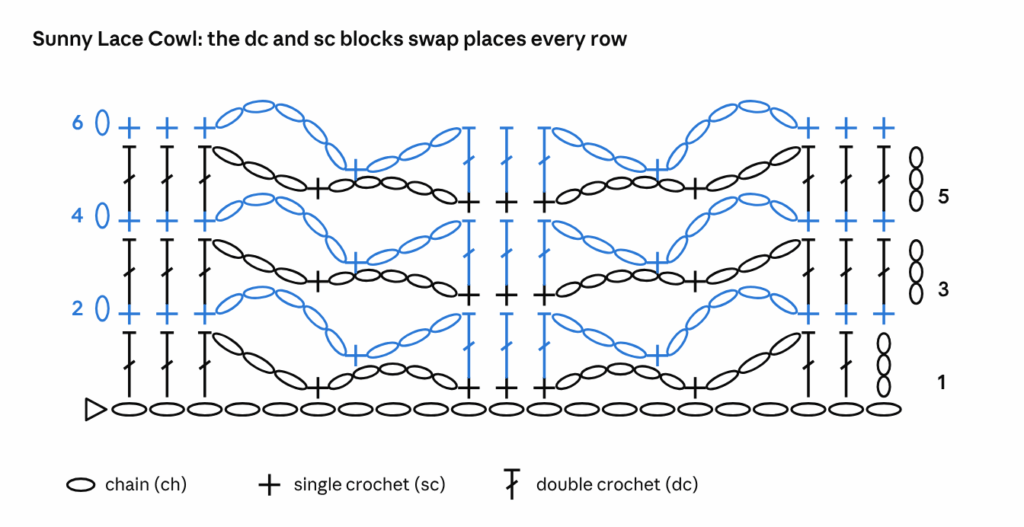
Start by counting the ovals along the bottom of the chart, and you’ll find 21. The lace has 3 blocks of stitches sitting 9 stitches apart, which is why 18 extra chains give you one more pair of blocks if you want a wider swatch.
Step 2: Row 1, from right to left
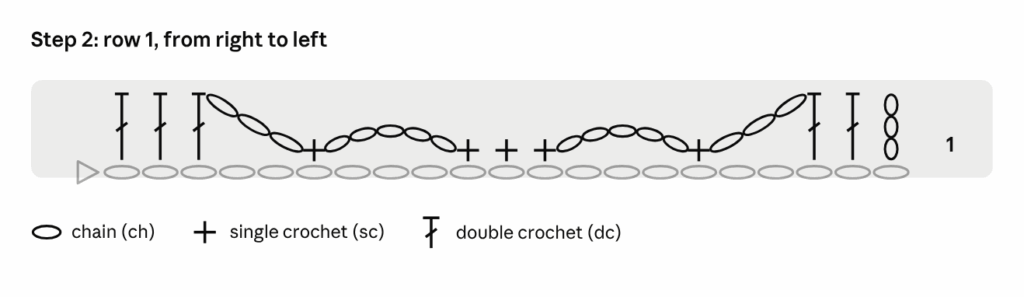
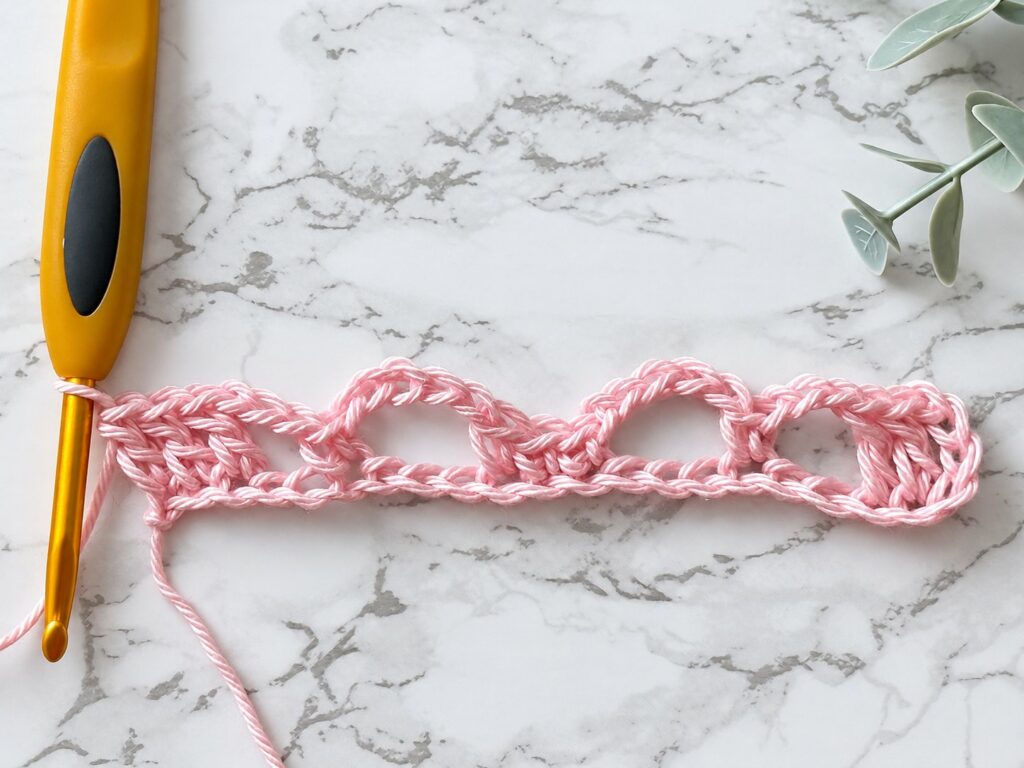
Row 1 starts on the right with three standing ovals, which is a ch 3. In this row only, that ch 3 counts as your first dc, so you just add a dc in each of the next 2 chains to finish your first block.
Now follow the line of ovals across. Ch 3, skip 2 chains and sc in the next, then ch 5, skip 3, make 3 sc in the next 3 chains, ch 5, skip 3 and sc in the next. To close the row, ch 3, skip 2 and make 3 dc in the last 3 chains.
Lay it flat and look at the little waves the row already makes, with tall dc blocks on top and sc blocks dipping down in between.
Step 3: Row 2, from left to right
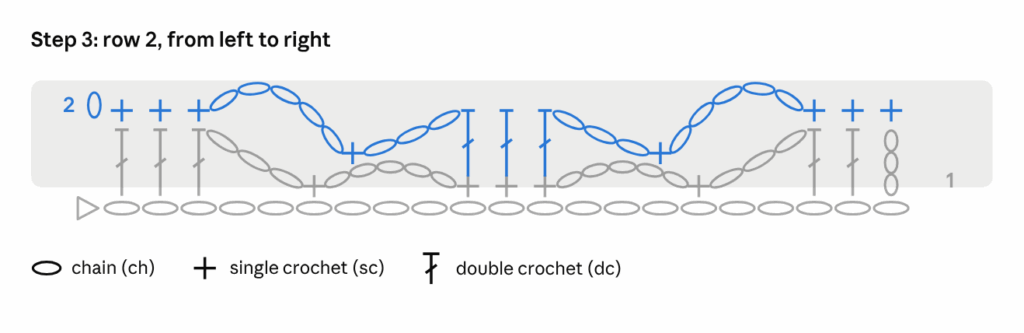
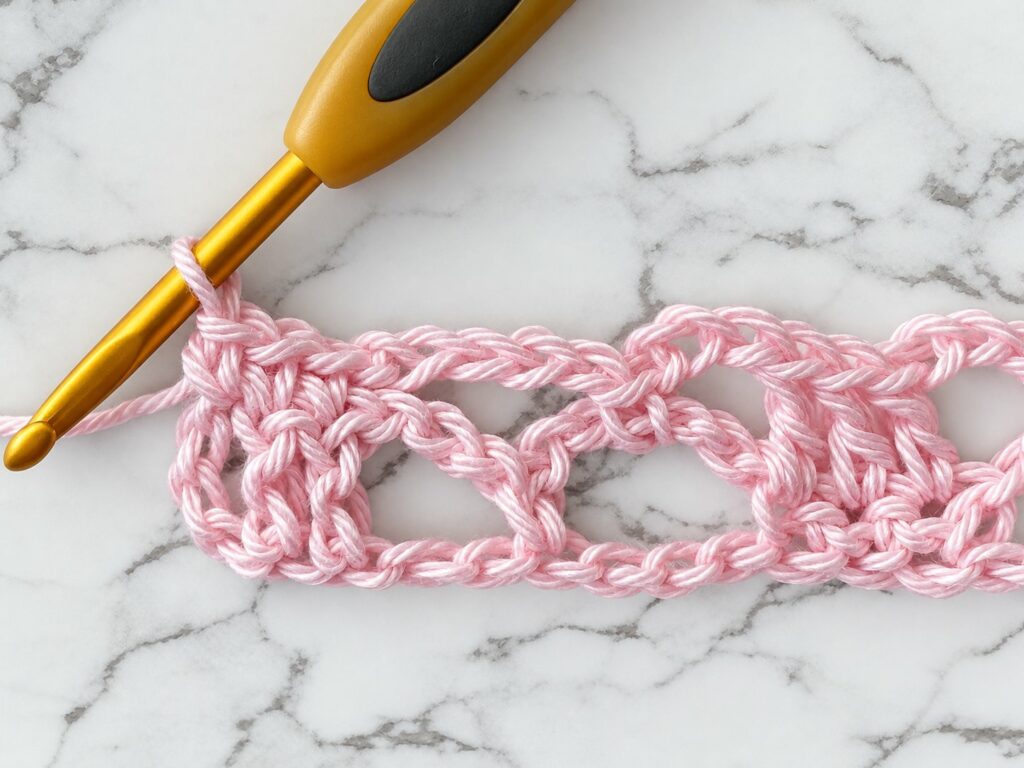
Row 2 is the blue one on the chart, and you read it from left to right. Chain 1 and turn, keeping in mind that this ch 1 doesn’t count as a stitch.
Then let the row below tell you what to do. Over the 3 dc, make 3 sc, then ch 5, sc in the middle of the ch-5 loop below, ch 3, and make 3 dc, one in each of the 3 sc from row 1. After that comes ch 3, sc in the next ch-5 loop, ch 5, and 3 sc over the last dc block, with the very last sc going into the top of the ch 3 from row 1.
This is the row where the lace comes together, because the dc blocks and the sc blocks just swapped places. Your new ch 5 also jumps right over the small ch-3 spaces from row 1.
Step 4: Row 3, from right to left
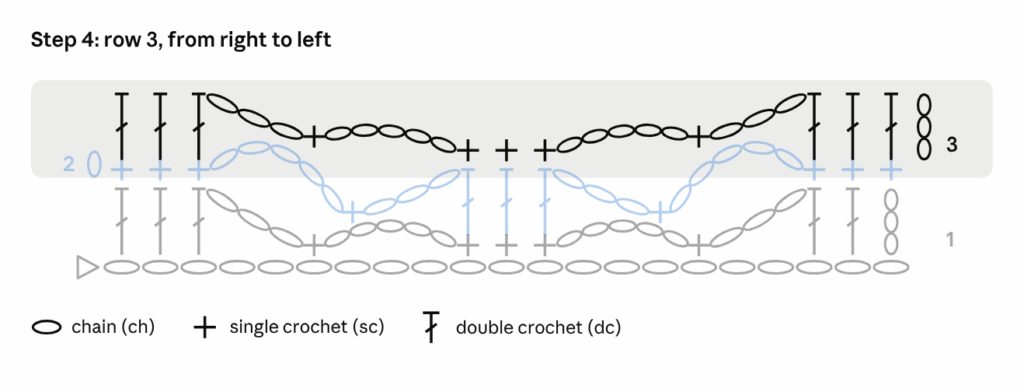
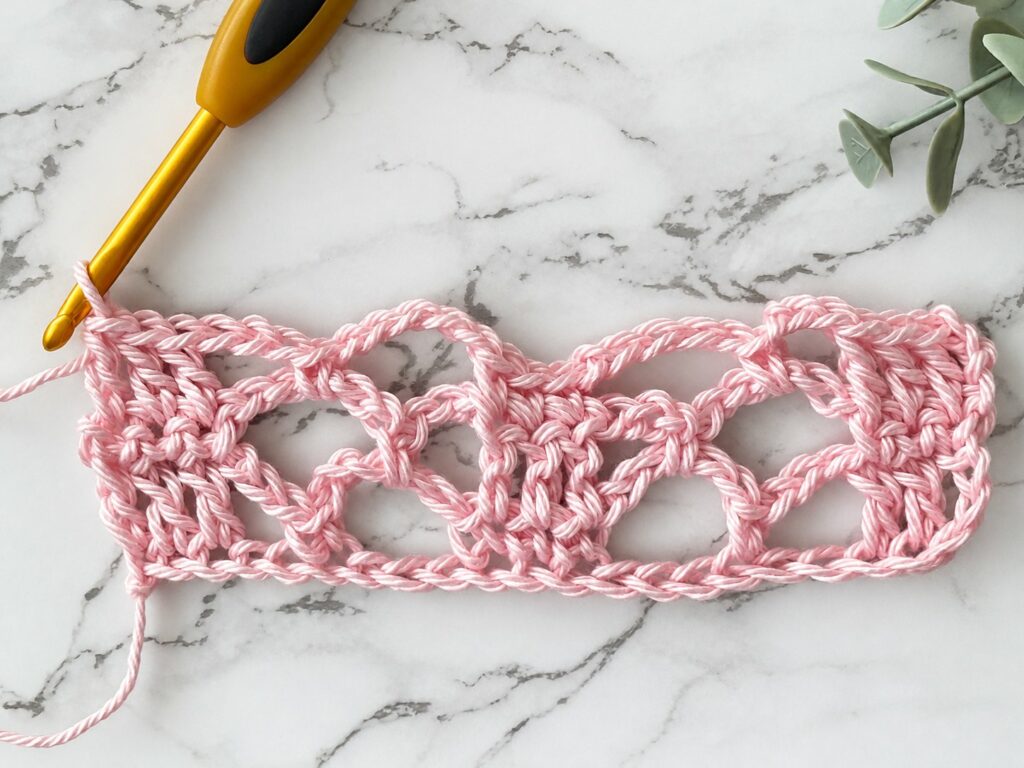
Chain 3 and turn, and pay attention here, because this ch 3 works differently. From this row on, it doesn’t count as a stitch, so on the chart it stands alone at the right edge and you make 3 dc into the 3 sc right after it.
Then ch 3, sc in the ch-5 loop below, ch 5, 3 sc over the next 3 dc, ch 5, sc in the next ch-5 loop, ch 3, and 3 dc over the last 3 sc. The blocks swap again, and now the lace really shows, with the sc in the middle of each loop sitting right above the sc from two rows down.
Step 5: Rows 4 to 6 (and beyond)
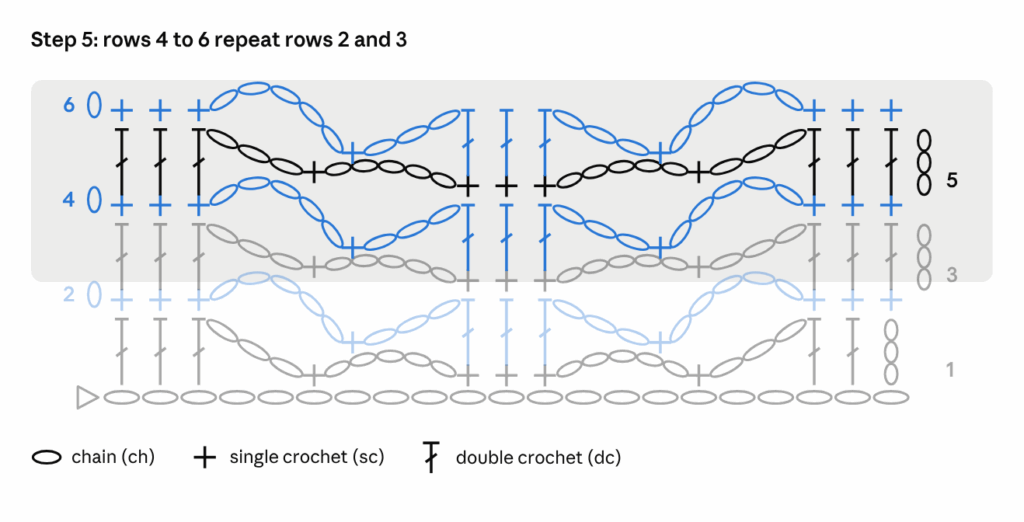
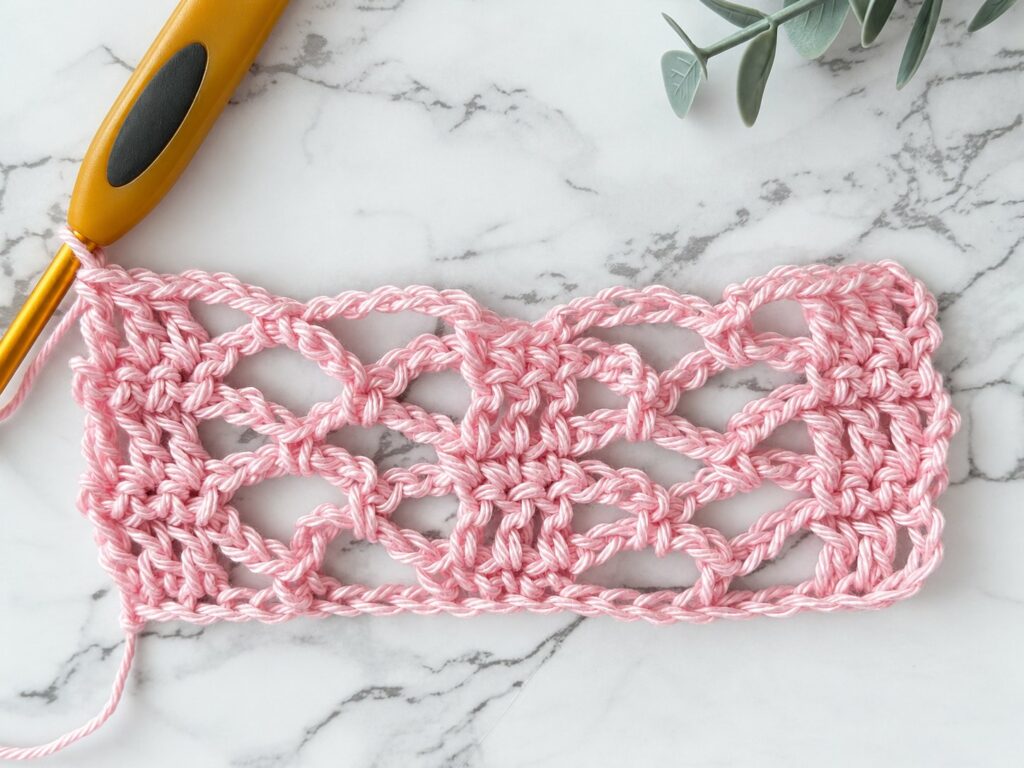
Now you know the whole pattern, because rows 2 and 3 are your repeat. Even rows start on the left with ch 1 and a block of sc, and odd rows start on the right with a ch 3 that doesn’t count, then a block of dc. Make a few more rows until the waves stack up, and once the swatch feels easy, move on to the real cowl.
Tips for learning how to read crochet charts
When you’re learning how to read crochet charts, the first tip sounds almost too simple. Make the chart big, because a tiny chart on a phone screen is hard on your eyes and easy to misread, so zoom in or print it on a full page. With a printout, you can also scribble stitch counts and little reminders right next to the rows.
Then mark your place, because your eyes jump to the wrong row the second you look away. A sticky note or a ruler under the current row holds your spot. On round charts, color each finished round with a highlighter, and you’ll watch your circle grow on paper too.
On a phone, take a screenshot of the chart and draw on it with the markup tool in your photos app. You can cross off rows and circle tricky spots without printing a single page.
Slip the printout into a clear sheet protector and mark it with a dry-erase marker. You can cross off rows as you go, wipe it clean and use the same chart for your next project. A sheet protector also survives a spilled cup of coffee much better than plain paper.
Keep the key where you can see it. If it sits on another page, copy it onto a sticky note or tape it next to the chart, so you don’t have to flip pages in the middle of a row.
Common mistakes (and how to fix them)
Slips happen on the first few charts, and most of them come from one of three mix-ups. Each one has a quick fix.
Reading row 1 from the wrong side. If your piece looks mirrored or the stitch count is suddenly off, check the row numbers first. They always sit where each row begins, so they tell you which way to read.
Counting the turning chain wrong. Some patterns count the turning chain as a stitch and some don’t, and the Sunny Lace Cowl showed you both in one chart. So check the chart and the pattern notes first, then count your stitches the same way.
If your edges keep slanting, my guide to straight crochet edges explains turning chains in more detail.
Working into the wrong spot. Look at where the bottom of each symbol touches the row below, because that’s where your hook goes in, into a stitch or a chain space. If you’re unsure, jump back to “Into the stitch or into the space?” for the full rule.
Crochet chart FAQ
Are crochet charts in US or UK terms?
The symbols work for both, and that’s one of the best things about charts. Only the key uses words, so check if it says US or UK terms before you start.
What do the oval, dot, T and V mean on a crochet chart?
An oval is a chain, and a small black dot is a slip stitch. A plain T is a half double crochet (US), one line across its stem makes it a double crochet and two lines a treble. A V is an increase, two stitches worked into the same stitch, and an upside-down V is a decrease.
What do the triangles on a crochet chart mean?
An open triangle usually marks where you join the yarn, and a filled triangle marks where you fasten off. Check the key to be sure, since a few designers use their own marks.
What does a small arc under a symbol mean?
It tells you which loop to work into. An arc under a symbol usually means the back loop or the front loop only, and a hook-shaped foot means a post stitch, but the key always has the final word.
Is a crochet chart better than a written pattern?
I’d say they work best as a team. The written pattern gives you the details and the chart shows you the shape, so many crocheters start with the words and slowly switch to the chart.
What if the chart and the written pattern don’t match?
Check the designer’s page for corrections first, because one of them may have a typo. Then count the stitches on the chart, compare them with the stitch count in the written row, and the one that adds up is usually right.
How long does it take to learn to read crochet charts?
Most people get the basics after one small project. Pick a small chart, like a granny square from my 60+ free crochet square patterns, crochet it this weekend, and you’ll see how quickly it starts to make sense.
Your turn
Those ovals and crosses that didn’t look like crochet at all now have names, directions and a place in your work. Pick one small chart for this week, keep this guide open next to it, and crochet it one row at a time. And if some of the stitches themselves are still new, my free crochet tutorials for beginners are all in one place.
Once that feels easy, my Arys Shawl is a great next step. It’s a triangle shawl pattern built around a diagram, so you’ll put your new chart reading skills to work on a full shawl. The pattern is free for my newsletter subscribers.
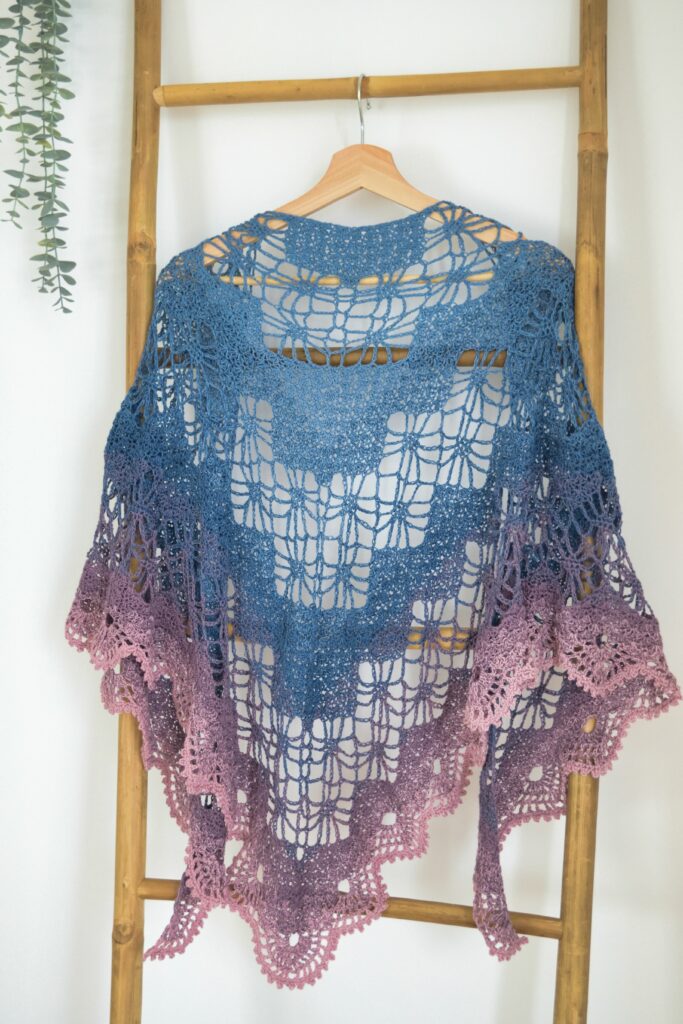
Want more patterns with charts? Sign up in the newsletter box on this page, and I’ll send you new patterns and tutorials as soon as they’re out.
And tell me in the comments which of the five charts you crocheted first and where you got stuck. Your questions help me make the next tutorial better.
Before you go, save this guide to Pinterest, so you can find it again the next time a pattern comes with a chart. You’ll find me there as MyCrochetory, with lots more crochet ideas.
Leave a Reply