Updated: 30 April 2025 by Sylwia (MyCrochetory)
Try intarsia crochet today! Learn how to create stunning colorwork with easy patterns, clear tips, and a step-by-step tutorial.
Hi there!
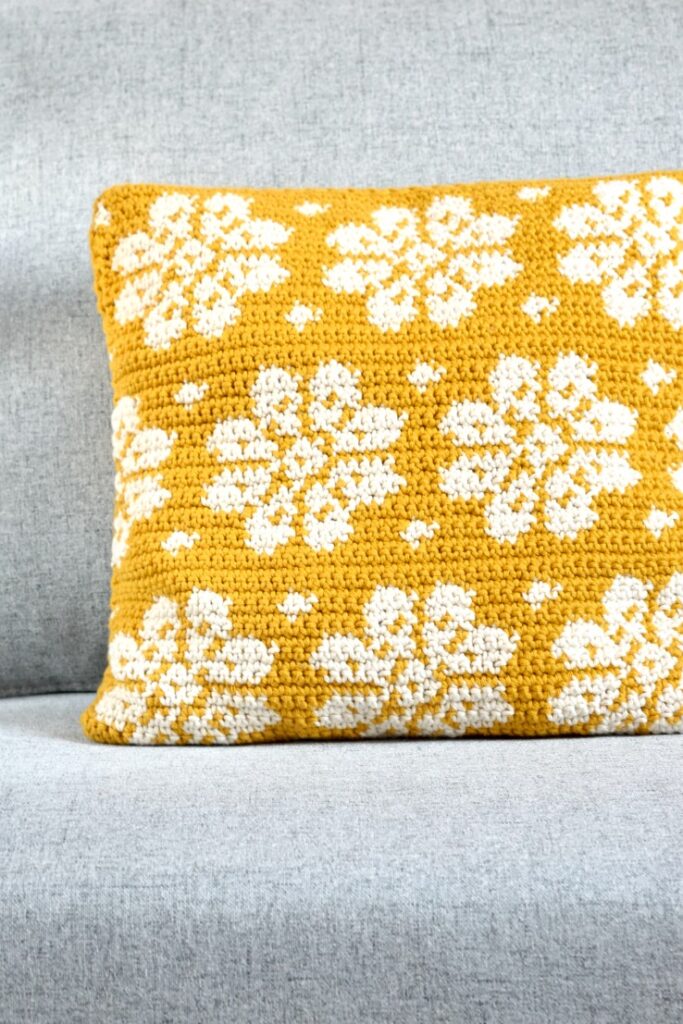
Let me tell you something – I still remember the very first time I tried intarsia crochet. I had this vision of making a mustard pillow with ecru flowers, and I just couldn’t stop thinking about it.
I loved the idea of turning my imagination into reality. That’s when I discovered intarsia, and it quickly became one of my favorite colorwork techniques.
What makes it so great? It’s simple, fun, and keeps the back of your work looking neat while you create beautiful patterns with different colors of yarn.
Plus, learning how to handle color changes the right way makes the process even easier.
In my post, How to Join Yarn Ends: 4 Easy Ways, I explain the different techniques, and The Slip Stitch Join (Method 4) is my absolute favorite. It’s quick, secure, and perfect for intarsia crochet patterns.
In this post, I’ll show you everything step by step – helpful tips, a beginner-friendly tutorial, and even a video tutorial to guide you along. Let’s dive in and make something amazing together!

What Is Intarsia Crochet?
Let me tell you why I love intarsia crochet – it’s one of the most exciting and creative ways to add bold, vibrant colors to your projects.
This colorwork technique lets you work with distinct color sections without dragging unused yarn across every stitch like in tapestry crochet. Instead, the strands of yarn float neatly along the back of your work, waiting for their turn.
It’s such a simple concept, but it makes a world of difference in keeping your design clean and lightweight.

What makes intarsia so special is how it unlocks endless possibilities. From bold geometric shapes to fun pixel patterns or bright, colorful designs, it’s a technique that helps you turn your ideas into something real.
I love how intarsia crochet opens up so many creative possibilities. You can use it for geometric shapes, playful pixel patterns, or bold color blocks that truly stand out.
It’s perfect for cozy blankets, unique sweaters, or even decorative wall hanging – whatever project feels exciting to you!
And the best part? It’s not complicated at all. Grab your crochet hook, pick a couple of yarn colors, and give it a try.
Once you see those color sections come together, you’ll be hooked (pun totally intended).

Intarsia vs. Tapestry Crochet
If you’re wondering how intarsia crochet colorwork is different from tapestry crochet, here’s a quick explanation:
- Tapestry Crochet: In tapestry crochet, you carry the unused yarn along every stitch, which means it gets worked into the fabric as you go. While this can be handy, it often makes the fabric thicker and less flexible.
- Intarsia Crochet: With intarsia, the unused strands float along the back of the work, only being picked up when needed. This keeps the crochet fabric smooth and lightweight, making it great for designs with large color sections or bold patterns.
What I really love about intarsia is how neat it keeps the back of the piece while still giving you the freedom to create bold, intricate designs.
It’s perfect for crochet projects where you want the colors to pop without the bulk – plus, it’s just so satisfying to see those clean color blocks come together!
So, if you’ve been working with tapestry crochet and are ready to try something different, intarsia crochet might just be your new favorite crochet colorwork technique.
Free Intarsia Crochet Patterns
Before jumping into the tutorial, let’s talk inspiration!
These free patterns are perfect for trying out intarsia crochet:

Both patterns make use of the intarsia technique, with unused colors floating along the back of the work for a polished finish.
Watch the Video Tutorial and Access the Diagram
The video tutorial provides a visual walkthrough of the Intarsia crochet technique, making it easier for you to grasp the process.
Additionally, you can access a downloadable PDF with a helpful diagram to have as a reference while working on your projects.
TIP: To view this intarsia crochet video tutorial properly, please disable any ad-blocker you have running.
Get hooked on intarsia crochet and let your imagination soar!
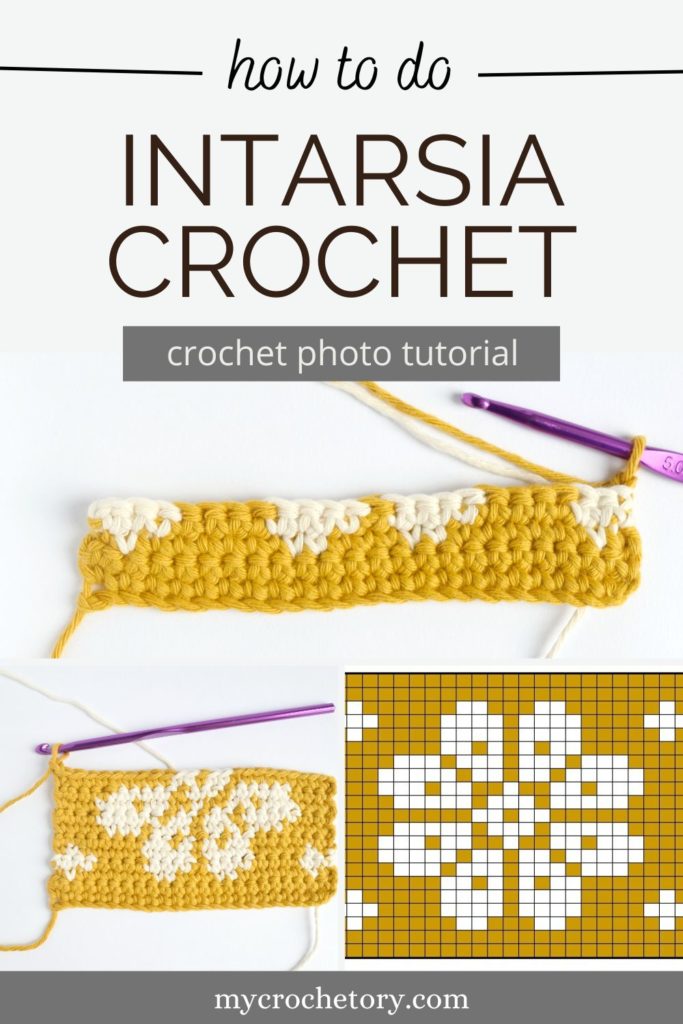
INTARSIA CROCHET CHART

Notes:
- The most important thing: 1 square equals 1 single crochet (sc).
- On the right side of your project, all tails should remain on the wrong side of your work.
- On the wrong side of your project, keep all tails on the wrong side, positioned in front of you.
- When working the right side of your project, read the chart from right to left.
- When working the wrong side of your project, read the chart from left to right.
For Left-Handed Crocheters
You can totally do this too! Just remember to read the chart in the opposite directions – left to right for the right side rows and right to left for the wrong side rows.
INTARSIA CROCHET TUTORIAL
Yarn A is mustard and Yarn B is ecru.
Step 1: Start with Yarn A
Take your mustard yarn (Yarn A) and make a slip knot. Chain 23 stitches, then add 1 extra for turning. This gives you 24 chains in total.
Step 2: Build Your Base Rows
Work 1 single crochet stitch (sc) in each chain across. That’s it! You’ve just finished the first single row. Nice work – this will be the base for your colorwork technique.
Step 3: Let’s Add Color Changes
Now comes the fun part! Look at your intarsia crochet chart for Row 3. It starts with one mustard block (Yarn A), then switches to an ecru block (Yarn B). Here’s how to change colors smoothly:
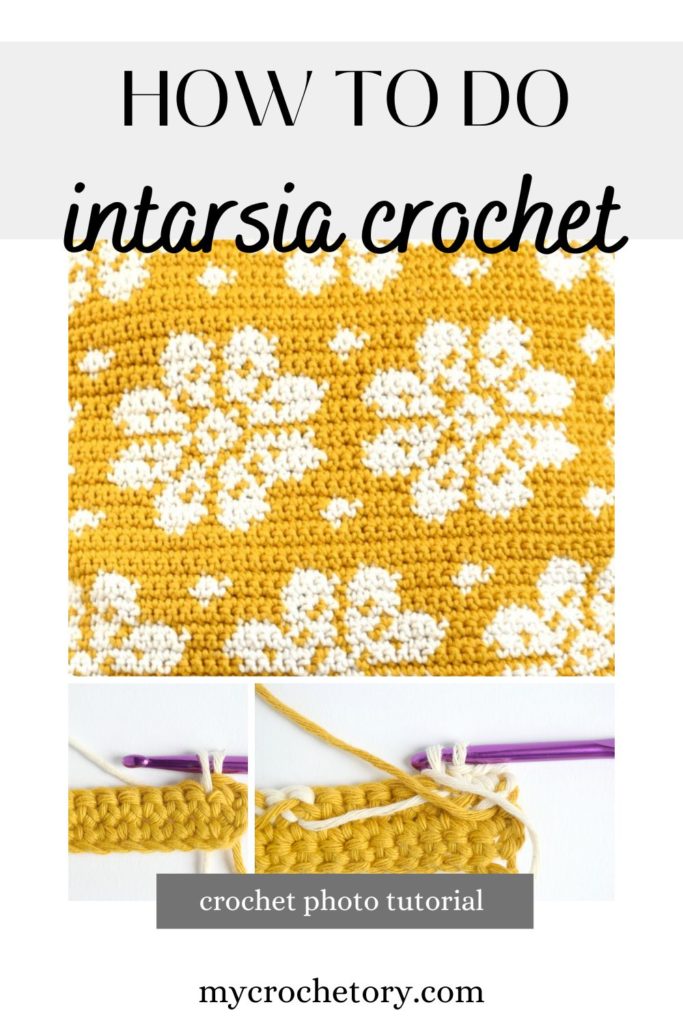
a. When you get to the last stitch of the mustard block, don’t finish it – leave two loops on your hook.

b. Grab your new yarn color (Yarn B) and wrap it over the hook.
c. Pull Yarn B through the two loops to finish the stitch.

As you work with Yarn B, let Yarn A float along the back of your work, as shown in the photo. This keeps the unused strand ready for the next color section without adding unnecessary weight.
Helpful Tip: Keep your floats (the unused strands) loose but not too loose. You want them to lie flat along the back of the piece without pulling the fabric.
Step 4: Keep Following the Chart
Keep working through Row 3, switching colors when the chart tells you to. In this row, you’ll only use one ecru block before going back to mustard (Yarn A).
Repeat the same steps for each next row, always checking your chart to see where each color block goes.
Helpful Tip: Let the unused yarn flow naturally along the back of your work. There’s no need to cut or reattach strands for every color change – just pick up the unused color as needed.
According to the chart you should work only one ecru block and then change color in the same way.


Step 5: Finish Strong
Keep working row by row until you’ve completed all 21 rows. By the time you’re done, you’ll have a gorgeous design made with clean colorwork patterns. Doesn’t that sound amazing?
The back of your work will look something like this:

You can also follow written instructions:
Make ch 24 with Yarn A.
Row 1: with Yarn A sc in second st from the hook and in each ch across . Turn.
Row 2: with Yarn A ch 1 (doesn`t count as sc here and throughout), sc in each hdc across, turn,
Row 3: ch 1and sc 1 with Yarn A, sc 1 with Yarn B, sc 6 with Yarn A, sc 2 with Yarn B, sc 3 with Yarn A, sc 2 with Yarn B, sc 6 with Yarn A, sc 1 with Yarn B and sc 1 with Yarn A.Turn.
Row 4: ch 1 and sc 3 with Yarn B, sc 4 with Yarn A, sc 4 with Yarn B, sc 1 with Yarn A, sc 4 with Yarn B, sc 4 with Yarn A, sc 3 with Yarn B. Turn.


Row 5: ch 1 and sc 1 with Yarn A, sc 1 with Yarn B, sc 5 with Yarn A, sc 4 with Yarn B, sc 1 with Yarn A, sc 4 with Yarn B, sc 5 with Yarn A, sc 1 with Yarn B, sc 1 with Yarn A. Turn.

Row 6: ch 1 and sc 7 with Yarn A, sc 2 with Yarn B, sc 1 with Yarn A, sc 1 with Yarn B, sc 1 with Yarn A, sc 1 with Yarn B, sc 1 with Yarn A, sc 2 with Yarn B, sc 7 with Yarn A. Turn.
Row 7: ch 1 and sc 4 with Yarn A, sc 3 with Yarn B, sc 1 with Yarn A, sc 3 with Yarn B, sc 1 with Yarn A, sc 3 with Yarn B, sc 1 with Yarn A, sc 3 with Yarn B, sc 4 with Yarn A. Turn.
Row 8: ch 1 and sc 3 with Yarn A, sc 5 with Yarn B, sc 1 with Yarn A, sc 2 with Yarn B, sc 1 with Yarn A, sc 2 with Yarn B, sc 1 with Yarn A, sc 5 with Yarn B, sc 3 with Yarn A. Turn.

Row 9: ch 1 and sc 3 with Yarn A, sc 3 with Yarn B, sc 1 with Yarn A, sc 2 with Yarn B, sc 2 with Yarn A, sc 1 with Yarn B, sc 2 with Yarn A, sc 2 with Yarn B, sc 1 with Yarn A, sc 3 with Yarn B, sc 3 with Yarn A. Turn.
Row 10: ch 1 and sc 4 with Yarn A, sc 5 with Yarn B, sc 1 with Yarn A, sc 3 with Yarn B, sc 1 with Yarn A, sc 5 with Yarn B, sc 4 with Yarn A. Turn.
Row 11: ch 1 and sc9 with Yarn A, sc 2 with Yarn B, sc 1 with Yarn A, sc 2 with Yarn B, sc 9 with Yarn A. Turn.

Row 12: Repeat Row 10.
Row 13: Repeat Row 9.
Row 14: Repeat Row 8.
Row 15: Repeat Row 7.
Row 16: Repeat Row 6.
Row 17: Repeat Row 5.
Row 18: Repeat Row 4.
Row 19: Repeat Row 3.
Row 20: Repeat Row 2.
Row 21: Repeat Row 2.
If you have any questions, please feel free to email me at mycrochetory@gmail.com
Using this technique I made a beautiful and very stylish cushion. You can find the free pattern here.
Frequently Asked Questions (FAQs)
Q1: Can beginners try intarsia crochet?
A: Yes, for sure! Intarsia crochet is great for beginners. Start with a small project and practice color changes. Once you get the hang of keeping the back of your work neat, it’s super easy and fun.
Q2: How do I work with more yarns in intarsia crochet?
A: If you’re using lots of yarn colors, keep the unused strands floating along the back of your work. You can wind smaller balls of yarn to stay organized. Just take it slow, and keep your yarn from tangling.
MORE CROCHET PRO TECHNIQUES
If you found this tutorial helpful, you might also like posts:
- How to foundation single crochet
- How to do a Russian Join
- How to double crochet 2 row at once
- How to Crochet an Invisible Decrease
- How to crochet standing stitches
- How to crochet ribbing
Don’t forget to save this Pin for easy reference: 📌
I’d love to hear about your crochet adventures and see your beautiful creations. Drop a comment below sharing your thoughts, questions, or even your favorite crochet tips! Your voice adds a vibrant thread to our forum community.
Sharing is caring! If you found this guide helpful, consider spreading the love. Click the share button and inspire other crocheters.
Happy crocheting, and may your yarn always be tangle-free!
Thank you for using photos instead of a video. I have internet issues and cannot watch videos online very often. This tutorial is very easy to follow. I plan to make the pillow covering for the guest room bed. This reminds me so much of things my grandparents had in their homes. I love vintage and this will fit in perfectly.
I’m glad you find this tutorial helpful.
Stunning. I’m definately going to try this. Maybe for the front panel of a handbag
Muy buenas explicación. Videos complementando.
Great job on the tutorial!
Thank you so much!
Hai thank you for making this tutorial intarsia crochet. Its very easy to follow.
Beautiful pillow and great tutorial. I will surely try making it 🙂
Thank you!
Very nice tutorial, but strictly speaking this is stranded or Fair Isle crochet rather than Intarsia crochet. Intarsia is work with a separate ball of yarn or each area of color and unused colors are not floated across the back.
Thank you! I was so confused.
Thank you for the pictorial tutorials. I am finding it much easier to follow then videos. In this period of extended isolation, I am enjoying learning new skills. Thanks
Thank you so much. I have been trying to do a Fair Isle crocheted blanket. I have searched the internet trying to find out how I do it in rows and the only information I can, before now, is in rounds.
This has really helped.
Michelle