
Updated: 13 November 2026 by Sylwia (MyCrochetory)
This post contains affiliate links. If you buy through them, I may earn a small commission at no extra cost to you. Read my affiliate disclosure.
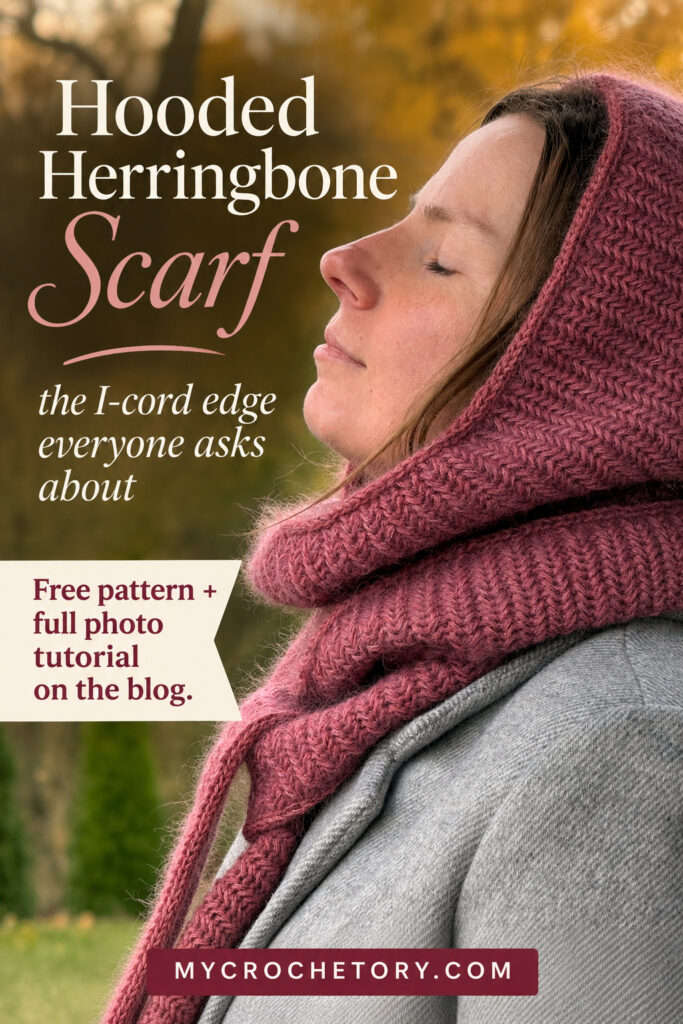
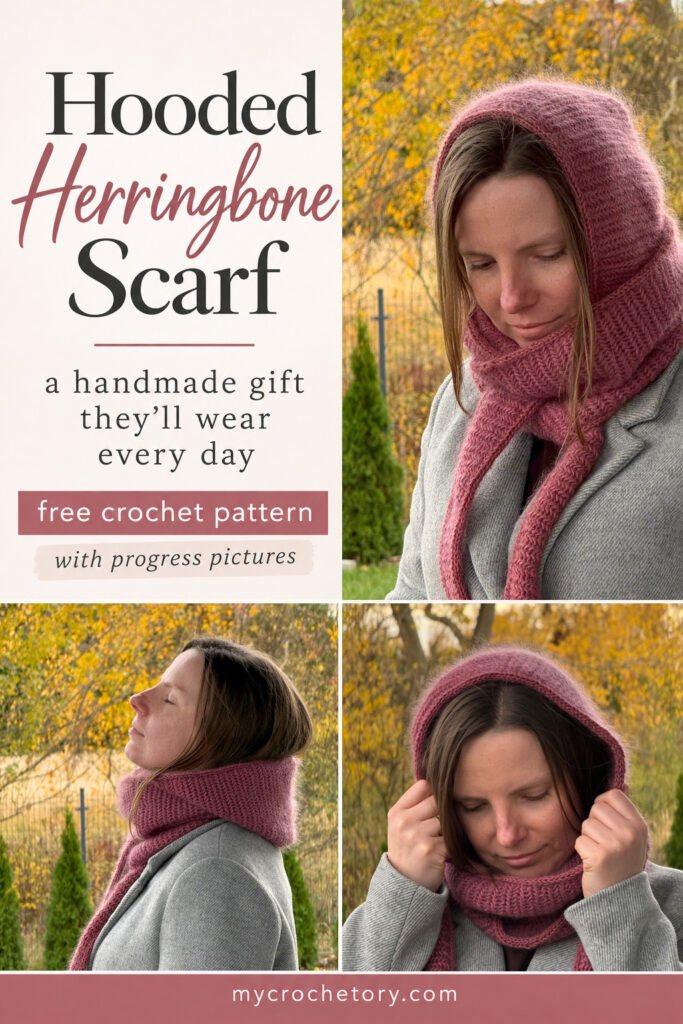
This crochet hooded scarf started with a little envy. Knitters have been flooding the internet with hooded scarves, each one practical and fun to make. I wanted one too, so I made mine in crochet.
Herringbone has been my favorite stitch for years, and this scarf is the newest member of my herringbone family. The hood and both long ends come off the hook as one piece with zero sewing, and a round I-cord runs along all the edges.
Today the full pattern and the step-by-step photo tutorial are free right here on the blog. Jump to the free crochet hooded scarf pattern.
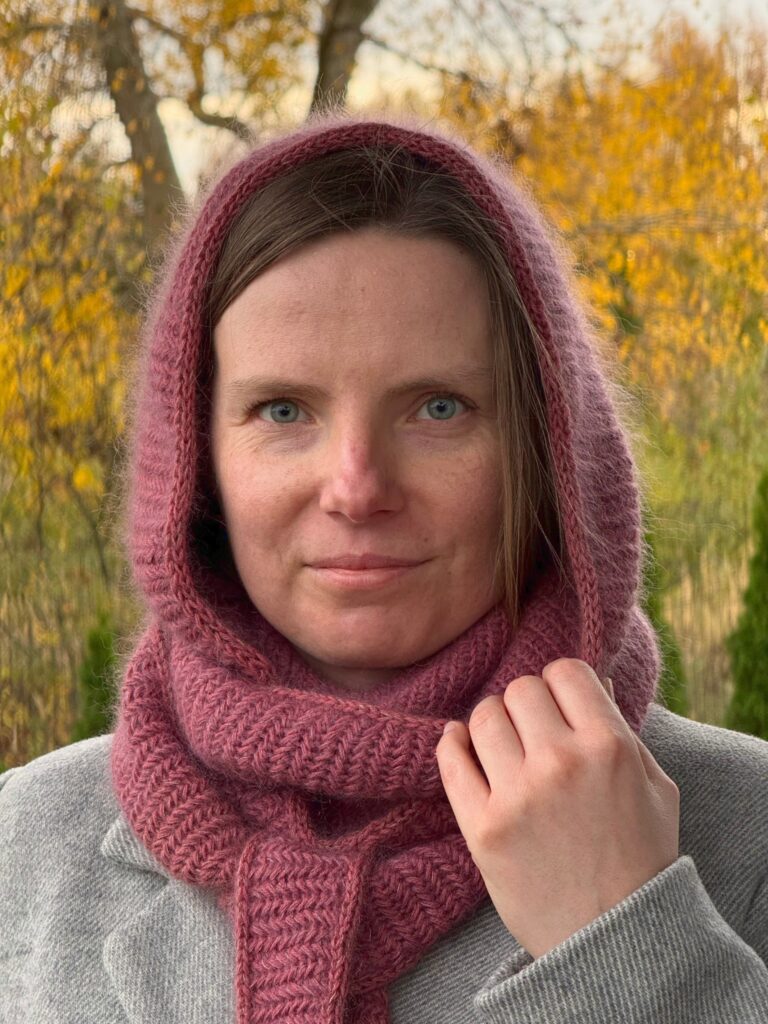
How a crochet hooded scarf grows from one rectangle
My first crochet hooded scarf went straight back into a yarn ball. That version started at the tip of one end, went up through the hood and finished at the tip of the other end. I wasn’t happy with how it turned out, so I frogged it.
For the second try I went for a completely different construction, and it was spot on. This one starts with a small rectangle worked in rows, and that rectangle sits on top of your head.
Its foundation chain turns into the edge around your face. Slip stitches go around the other three sides, and the hood rows grow straight out of them, with no increases at all.
The two square corners fold the flat fabric into a hood for you. That’s the clever bit, and you can see it start in the very first hood row.
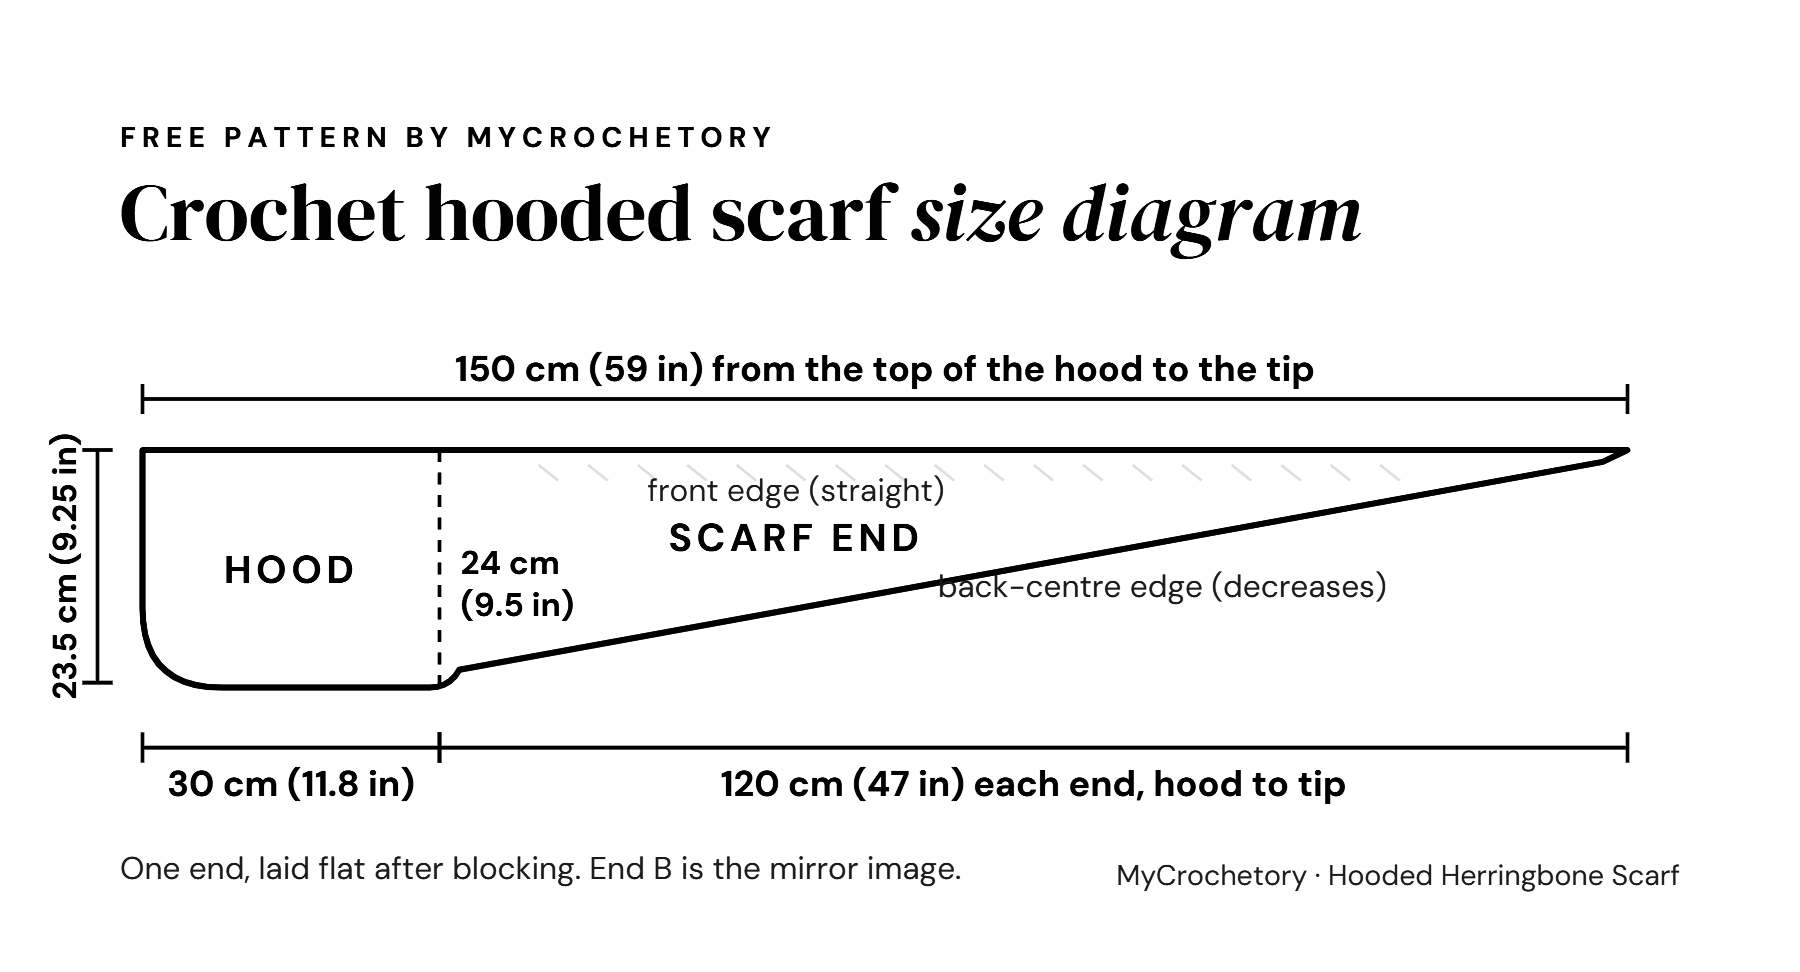
At the nape of your neck the last hood row splits into End A and End B. Each end decreases only along the back edge, so it tapers to a point while the front edge stays straight for the I-cord.
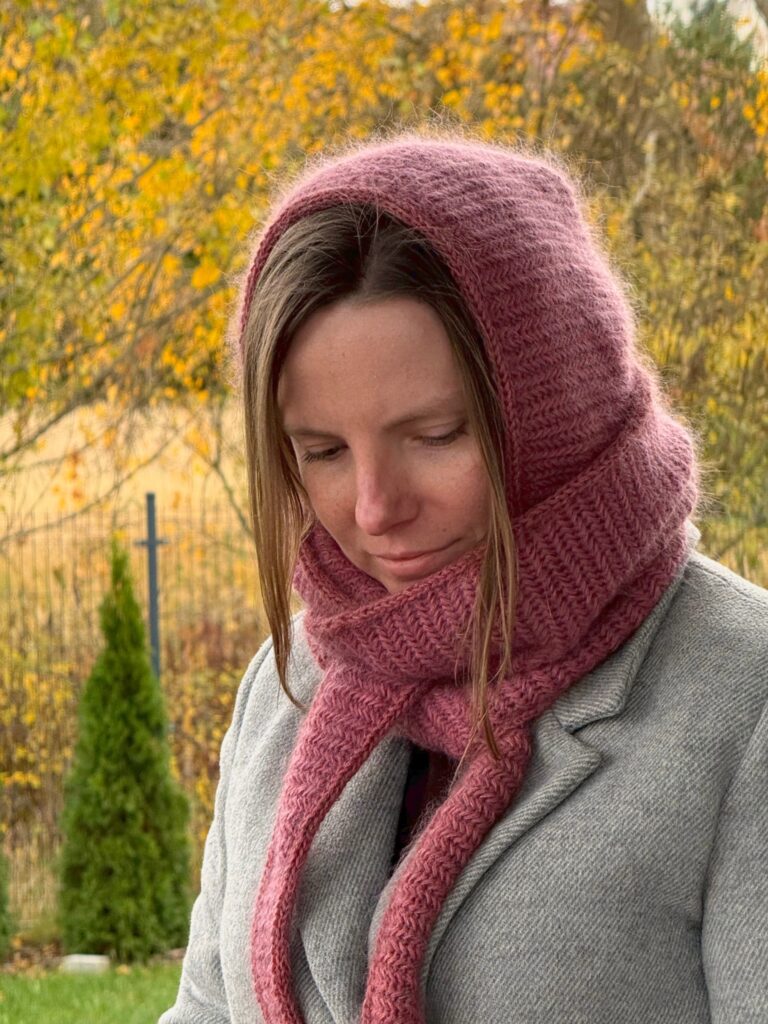
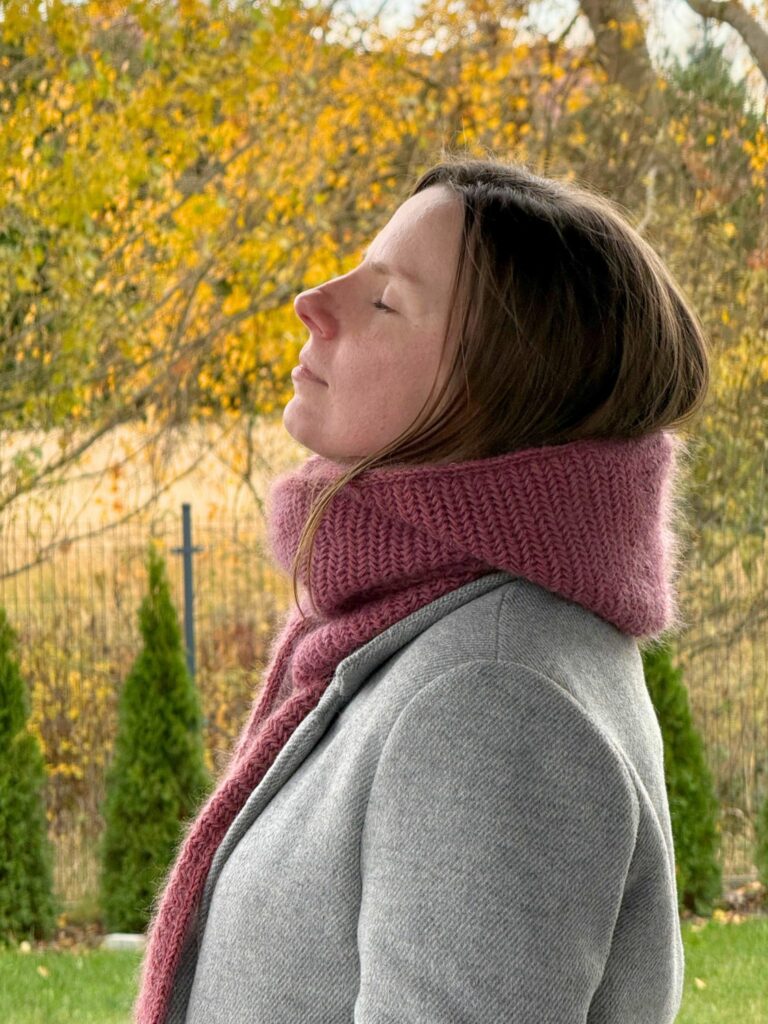
What herringbone does for a hood
Each herringbone stitch grabs the leg of the stitch before it, so the rows pack in tight and lean into tiny fishbones. That’s exactly what a hood needs, because the firm fabric keeps its shape around your face.
Never tried it? My herringbone stitch tutorial walks through it photo by photo, and the pattern below covers both the right-side and the wrong-side version.
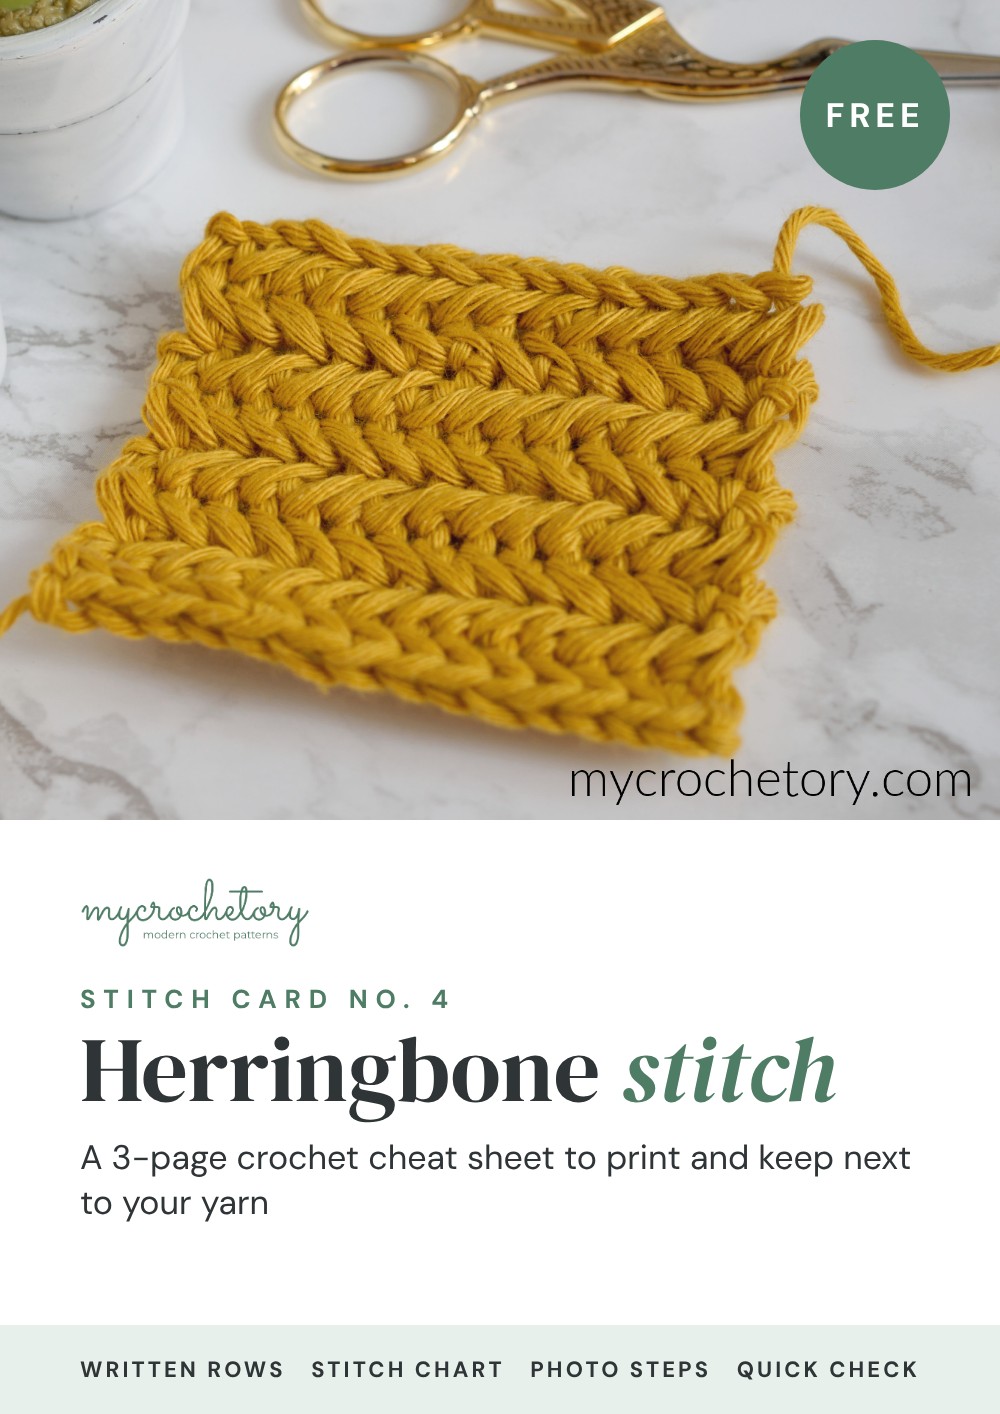
Free printable
Herringbone cheat sheet
Get the free printable Herringbone Card with the written rows, the stitch chart, photo steps and a quick checklist. Sign up below and the password for my Freebie Vault lands in your inbox.
Already subscribed? Use the Freebie Vault password from my newsletter.
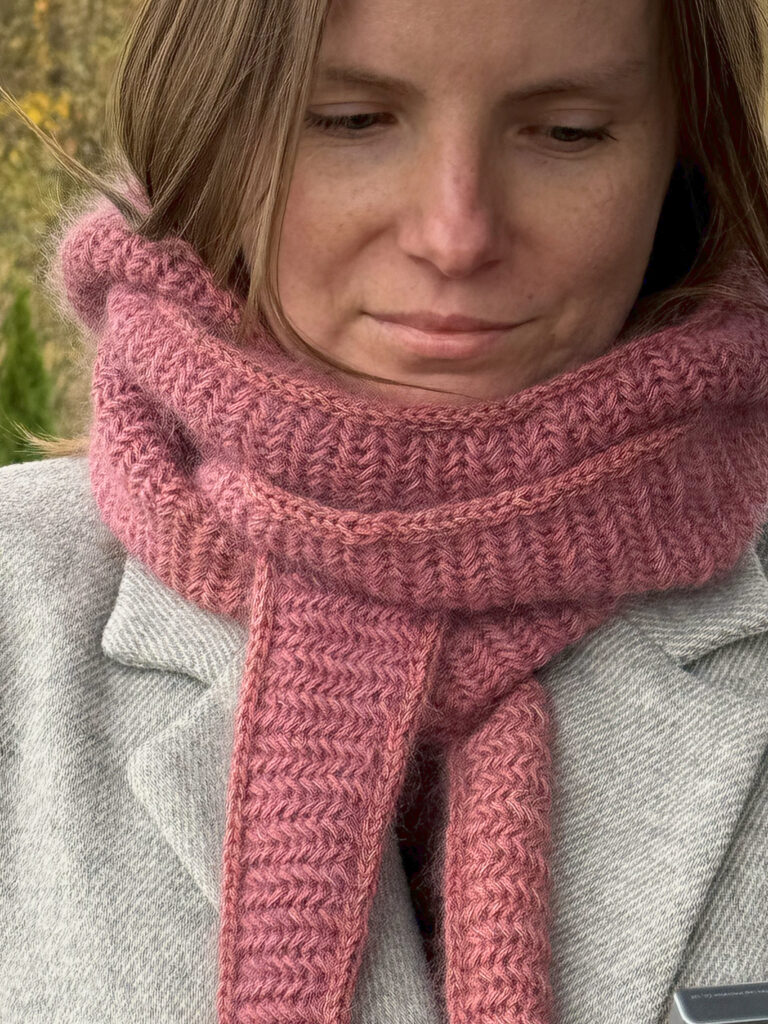
Yarn for your crochet hooded scarf
Anything that touches my neck has to be soft and not itchy, so your crochet hooded scarf uses two soft yarns held together.
I paired Knitting for Olive Merino in Wild Berries with DROPS Kid-Silk in 31 Mauve, so the merino builds a firm base and the mohair-silk adds a light halo over the zigzags.
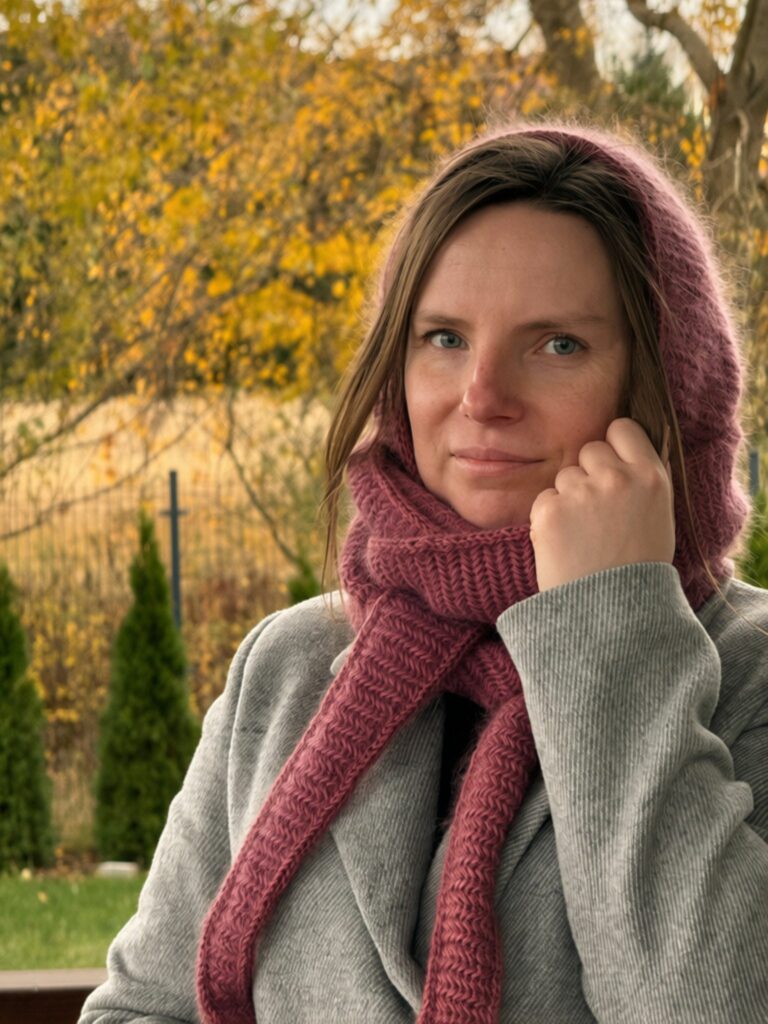
My scarf took 262 g, a bit over 3 skeins of the Merino and almost 4 of the Kid-Silk. Got another fingering wool and a lace mohair-silk in your stash? Swatch them together, and if you hit 24 stitches and 15 rows in 4 inches, you can start.
Can’t find Knitting for Olive Merino or DROPS Kid-Silk where you live? Malabrigo Sock is a soft fingering merino, and Rowan Kidsilk Haze is a lace mohair-silk with the same 229 yards per 25 g ball as Kid-Silk. Swatch the pair first, because a different merino can change your gauge.
With 4 skeins of each yarn you’ll add new yarn a few times on the way. My guide on how to join yarn ends shows 4 ways to do it.
Since it’s wool and mohair, I wet block it. Soak, pin to size, then leave it alone until it’s completely dry.
Is the I-cord edging worth it?
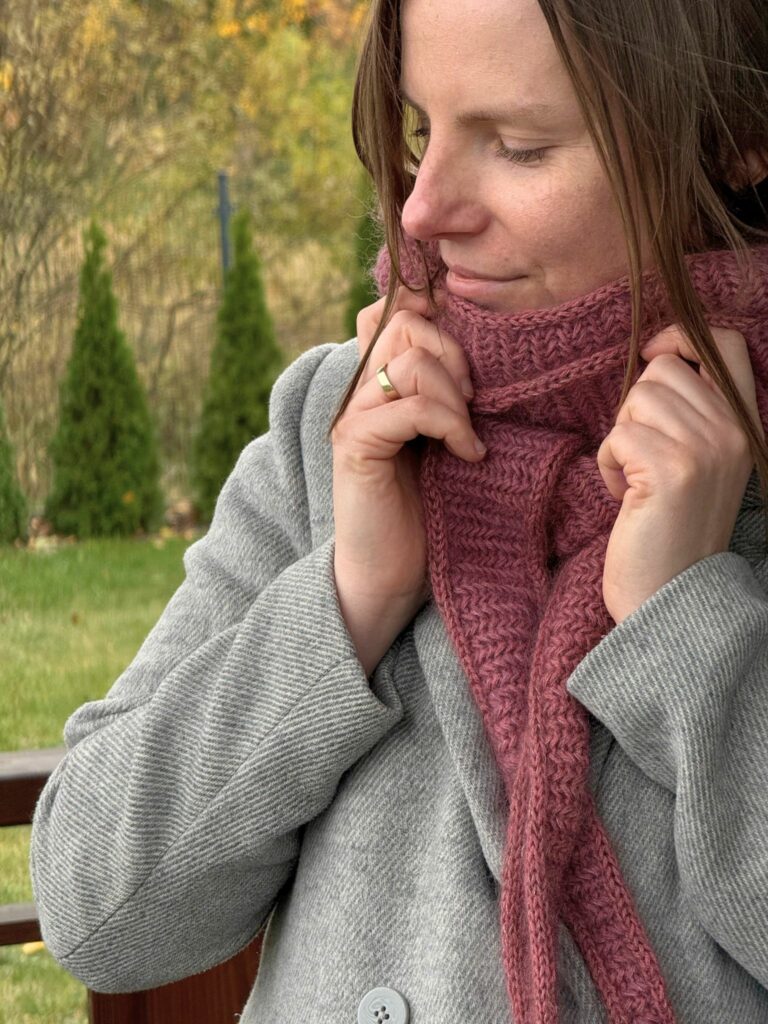
Yes, a hundred times yes. I haven’t crocheted anything this satisfying in a long time, and nothing lately has given my projects the same wow effect.
This applied I-cord works differently from the one in my herringbone drawstring bag. There the I-cord is a separate strap, and here you attach it to the edge as you go, all around the scarf in one pass. You hold two hooks and really knit the loops off one hook onto the other.
I know it looks fussy, but it’s doable. If you’d rather skip it, the scarf already counts as finished after End B, or you can add any edging you like.
Still, I warmly recommend the I-cord, and the video I followed for this applied version is linked in the pattern below.
How hard is this crochet hooded scarf?
This crochet hooded scarf is an intermediate pattern. The stitches are simple, but each end runs 199 rows, so markers and counting come with the deal.
You count 87, then 88, then you count again. That’s why I photographed every stage, from the first chain to the last sewn loop.
Most of those rows start with a plain single crochet in the first stitch, and that first stitch is the easiest one to skip. My tips for straight crochet edges keep the front edge of the hood neat for the I-cord later.
Planning this one for later? Pin it to your Pinterest board so you can find it the moment your hook is free.
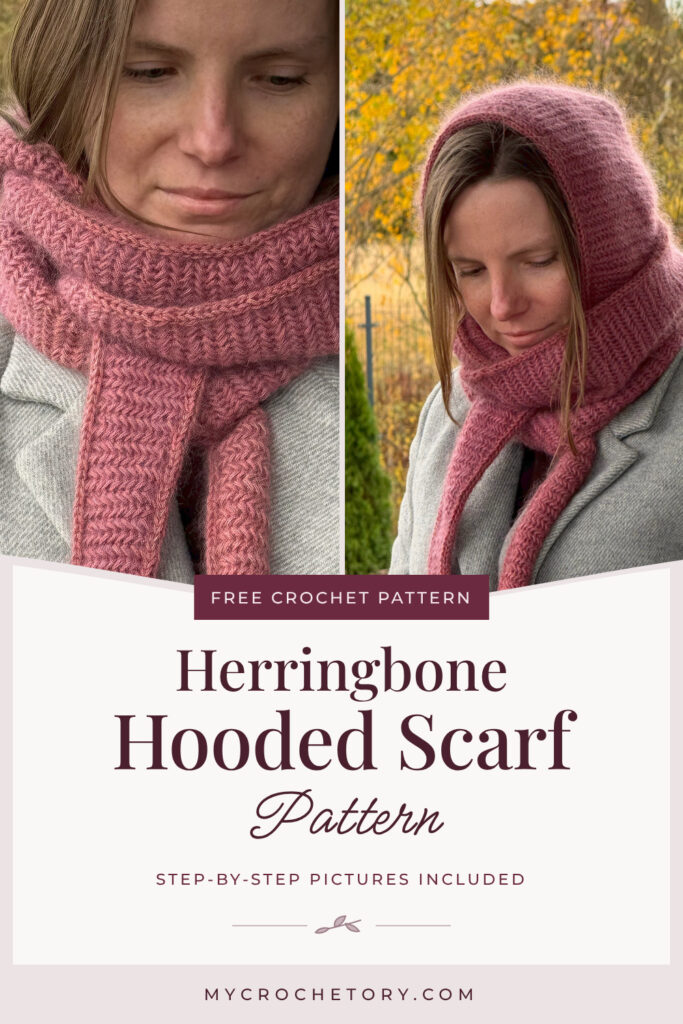
Crochet hooded scarf free pattern
- Pin it for later.
- Get the ad-free, printable PDF (in English and Polish) on Etsy or Ravelry.
- Add this pattern to your Ravelry queue.
Copyright 2026 MyCrochetory. All rights reserved. This pattern is the property of Sylwia Kawczyńska @MyCrochetory. Please DO NOT sell the pattern or claim it as your own. The pattern is for personal use only and may not be translated or reproduced in another language. Please respect my rights and DO NOT share or publish this pattern anywhere without my permission.
The scarf you make following this pattern is yours, and you are free to sell it, as long as you credit MyCrochetory as the original designer. For more information, please read the Terms Page.
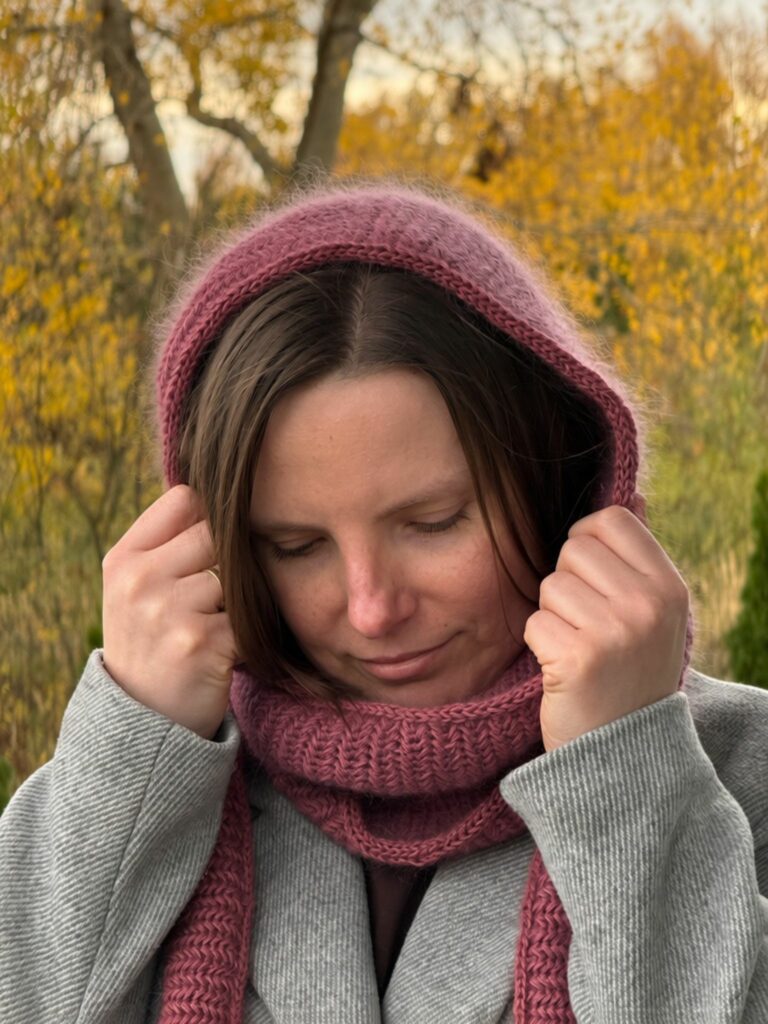
Materials & tools
- Yarn: fingering-weight wool held together with a lace-weight mohair-silk, approx. 820 m (900 yd) of each, 262 g in total.
- Suggested yarn: Knitting for Olive Merino (100% non-mulesed merino wool; 250 m / 50 g) in Wild Berries, 4 skeins, held together with DROPS Kid-Silk (75% mohair, 25% silk; approx. 210 m / 25 g) in 31 Mauve, 4 skeins. The sample took about 164 g of Merino (3⅓ skeins) and 98 g of Kid-Silk (just under 4 skeins). 4 skeins of Kid-Silk leave very little spare, so buy a 5th if your gauge runs looser.
- Hook: 4 mm (US G-6). Adjust the hook size if needed to get the correct gauge.
- For the I-cord edging: a second hook in the same size (a 0.5 mm difference is fine). Smooth metal hooks without a grip work best, so the loops slide off the back end. I use 3.5 mm and 4 mm, because I don’t have two metal 3.5 mm hooks.
- 3 stitch markers, a tapestry needle and scissors.
Level
Intermediate: working in rows, herringbone single crochet on both sides, decreases, applied I-cord with two hooks.
Gauge after blocking
24 sts × 15 rows = 4 × 4″ (10 × 10 cm) in herringbone single crochet with a 4 mm hook.
Gauge matters for this pattern. The number of slip stitches along the sides of the top rectangle is worked out from it, and a different gauge changes the size and the yardage.
Size after blocking
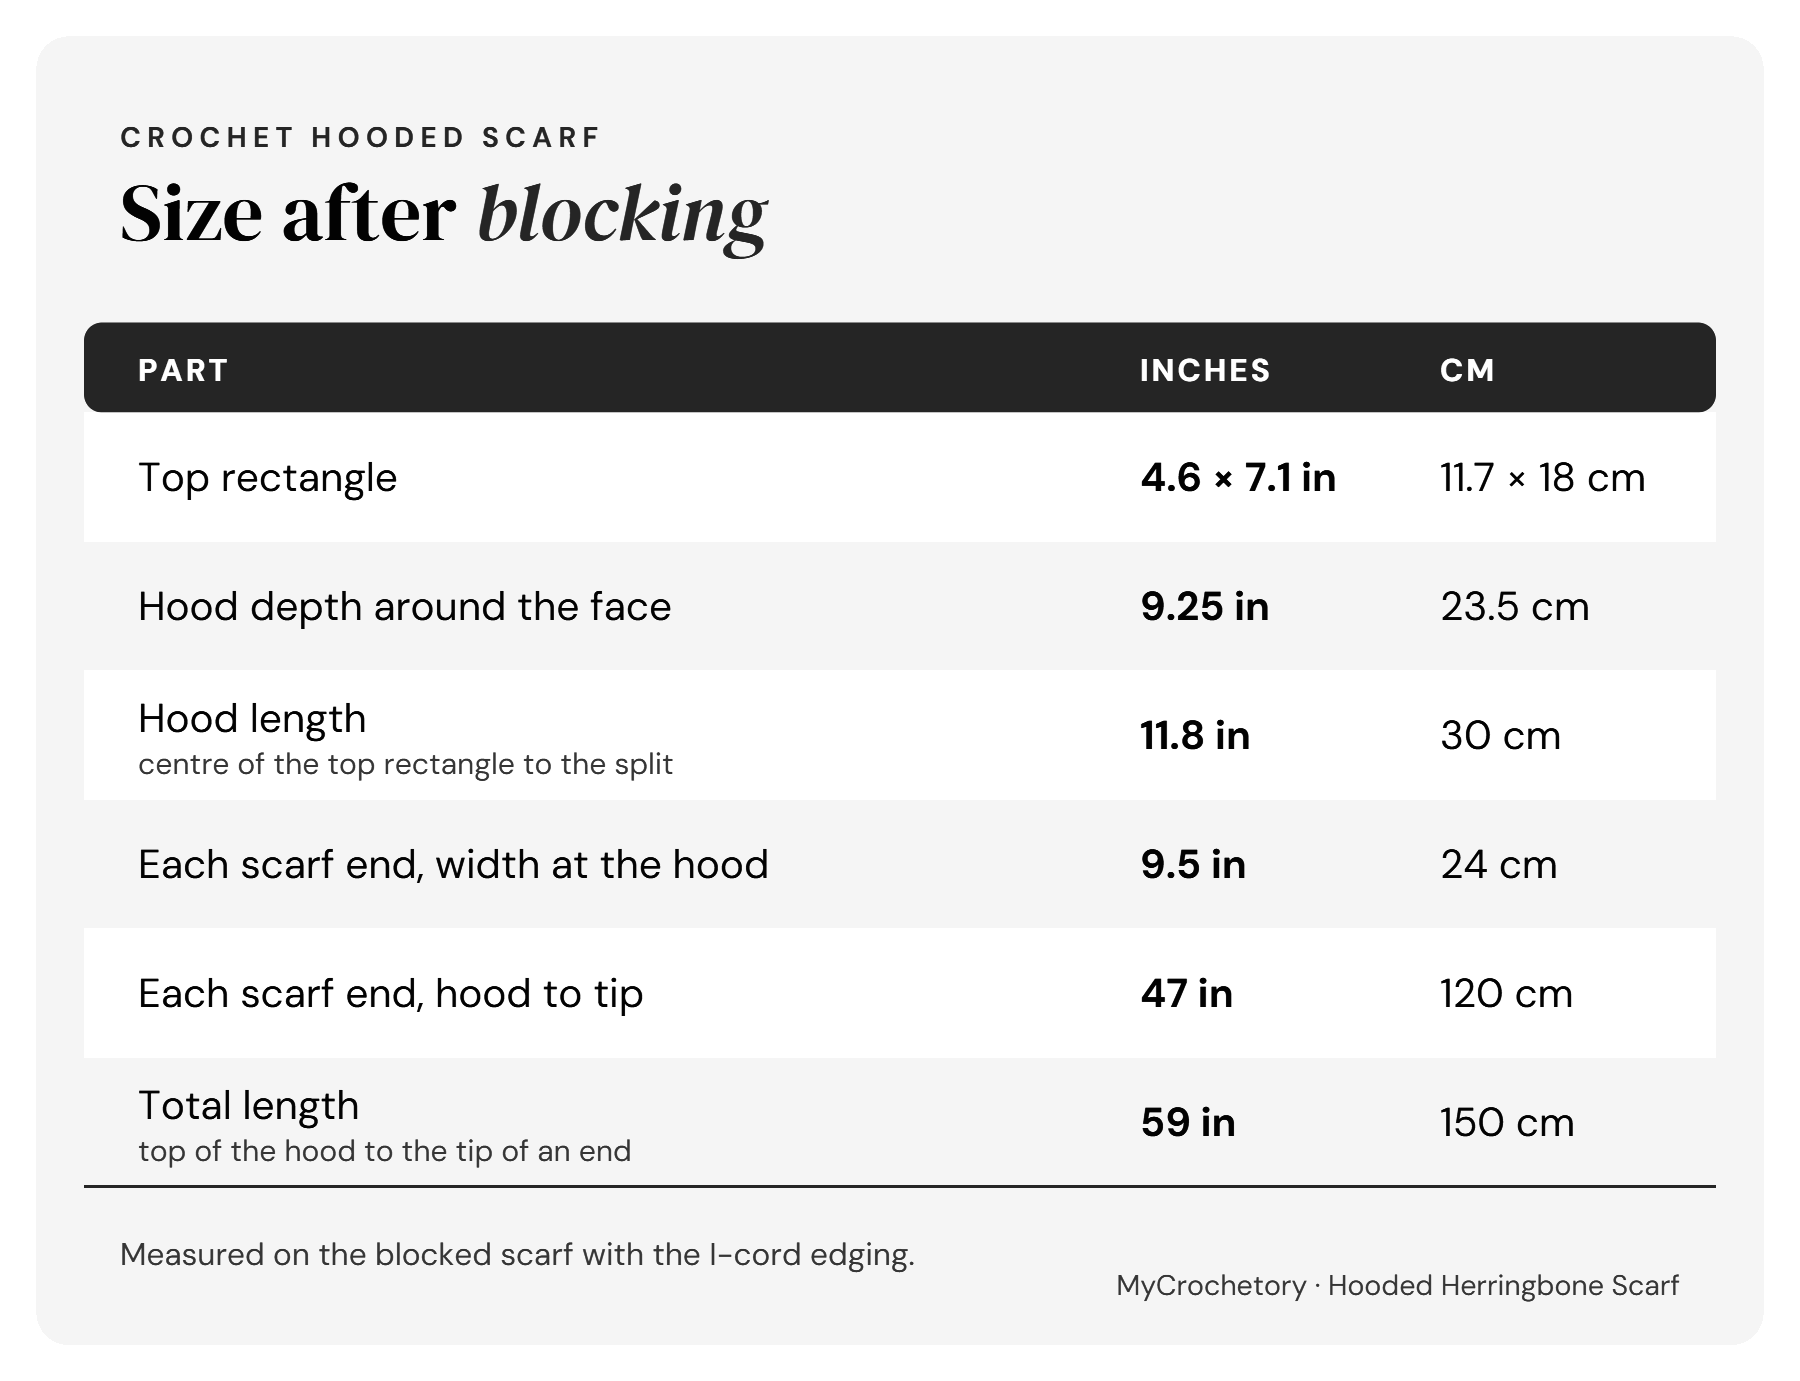
Measured on the finished, blocked scarf with the I-cord.
Notes
- The pattern uses US crochet terms.
- The scarf is worked in one piece, in rows back and forth. There is no sewing.
- The ch1 at the beginning of each row does not count as a stitch.
- Every row starts with ch1 and a regular sc in the first stitch, then herringbone stitches to the end. On RS rows that first sc is worked by inserting the hook from front to back; on WS rows, from back to front.
Construction
- A small rectangle is worked first. It sits on top of the head, and its foundation chain becomes the front edge of the hood, around the face.
- Slip stitches are worked around 3 sides of the rectangle: both long sides and the last row. The foundation chain is left free.
- The hood is worked in rows into those slip stitches, around the 3 sides, with no increases. The square corners make the fabric fold into a hood.
- The last hood row is split in half at the back. Each half becomes one scarf end.
- Each end decreases on the back-centre edge only, so it tapers to a point while the front edge stays straight.
- An applied I-cord edging goes around the whole scarf in one pass.
If your hood stitch count is odd
If you change the stitch counts and the hood comes out odd (for example 117 sts), split it into 58 sts + 1 middle st + 58 sts, and place the back-centre marker in the middle st. The middle st is shared by both ends: one leg of the first decrease on each end goes into it.
End A then starts with 59 sts and End B joins in the middle st. Each end has 1 st more than in the pattern, so it gets 4 more rows before 1 st is left.
Stitches & abbreviations (US terms)
ch(s) – chain(s)
st(s) – stitch(es)
slst – slip stitch
sc – single crochet
yo – yarn over
rep – repeat
RS / WS – right side / wrong side
Hsc – herringbone single crochet worked on RS: insert hook in left leg of previous stitch, insert hook in next st from front to back and pull up a loop, yarn over and pull through all three loops on the hook.
RHsc – herringbone single crochet worked on WS: flip your work so the RS is facing you, insert hook in left leg of previous stitch, insert hook in next st from back to front and pull up a loop, yarn over and pull through all three loops on the hook.
sc2tog – single crochet 2 together: [insert hook in indicated st and pull up a loop, yo] twice, pull through all 3 loops on hook.
Hsc2tog – herringbone single crochet 2 together worked on RS: insert hook in left leg of previous stitch, [insert hook in indicated st from front to back and pull up a loop, yo] twice, pull through all 4 loops on hook.
Instructions in square brackets [ … ] are worked as many times as indicated.
Top rectangle
Ch29.
Row 1 (RS): sc in the 2nd ch from hook, working in the ch, [insert hook in left leg of previous stitch, insert hook in next ch and pull up a loop, yarn over and pull through all three loops on the hook] to end. Turn. (28 sts)
Row 2 (WS): ch1 (doesn’t count as a st here and throughout), sc in first st by inserting hook from back to front, RHsc in each st to end. Turn. (28 sts)
Row 3 (RS): ch1, sc in first st by inserting hook from front to back, Hsc in each st to end. Turn. (28 sts)
Repeat Rows 2–3 until Row 27. (28 sts after Row 27)
The rectangle measures about 4.6 × 7.1″ (11.7 × 18 cm). Fasten off. The edging starts at the other end of the rectangle, so the yarn is cut here.
Slip stitch edging
The slip stitches on the long sides are spread to match the herringbone gauge, so the hood lies right: 43 slst on each long side, 28 slst on the short side.
Hold the rectangle with the RS facing you and the foundation chain at the bottom. Join the yarn with a slst in the row-end of Row 1 on the right-hand long side.
- Right long side, going up: work 2 slst in the row-end of every odd row and 1 slst in the row-end of every even row, except Rows 10 and 18, which also get 2 slst. (43 slst, counting the joining slst)
- Corner: 1 slst in the corner.
- Short side: 1 slst in each st of Row 27. (28 slst)
- Corner: 1 slst in the corner.
- Left long side, going down: 2 slst in the row-end of every odd row and 1 slst in the row-end of every even row, and 2 slst in Rows 18 and 10. (43 slst)
Do not fasten off. (116 slst: 43 + 1 + 28 + 1 + 43) The foundation chain stays free: it is the face opening of the hood.
Hood
The hood is worked in rows into the 116 slst, around the 3 sides of the rectangle. There are no increases, not even at the corners.
Row 1 (WS): ch1, turn, sc in first slst by inserting hook from back to front, RHsc in each slst to end. Turn. (116 sts)
Row 2 (RS): ch1, sc in first st by inserting hook from front to back, Hsc in each st to end. Turn. (116 sts)
Row 3 (WS): ch1, sc in first st by inserting hook from back to front, RHsc in each st to end. Turn. (116 sts)
Repeat Rows 2–3 until Row 35. (116 sts after Row 35)
The hood is about 9.2″ (23.3 cm) deep. Do not fasten off.
Place a marker in st 58 of the last row, the last st of End A. The back centre is right after it.
Scarf ends
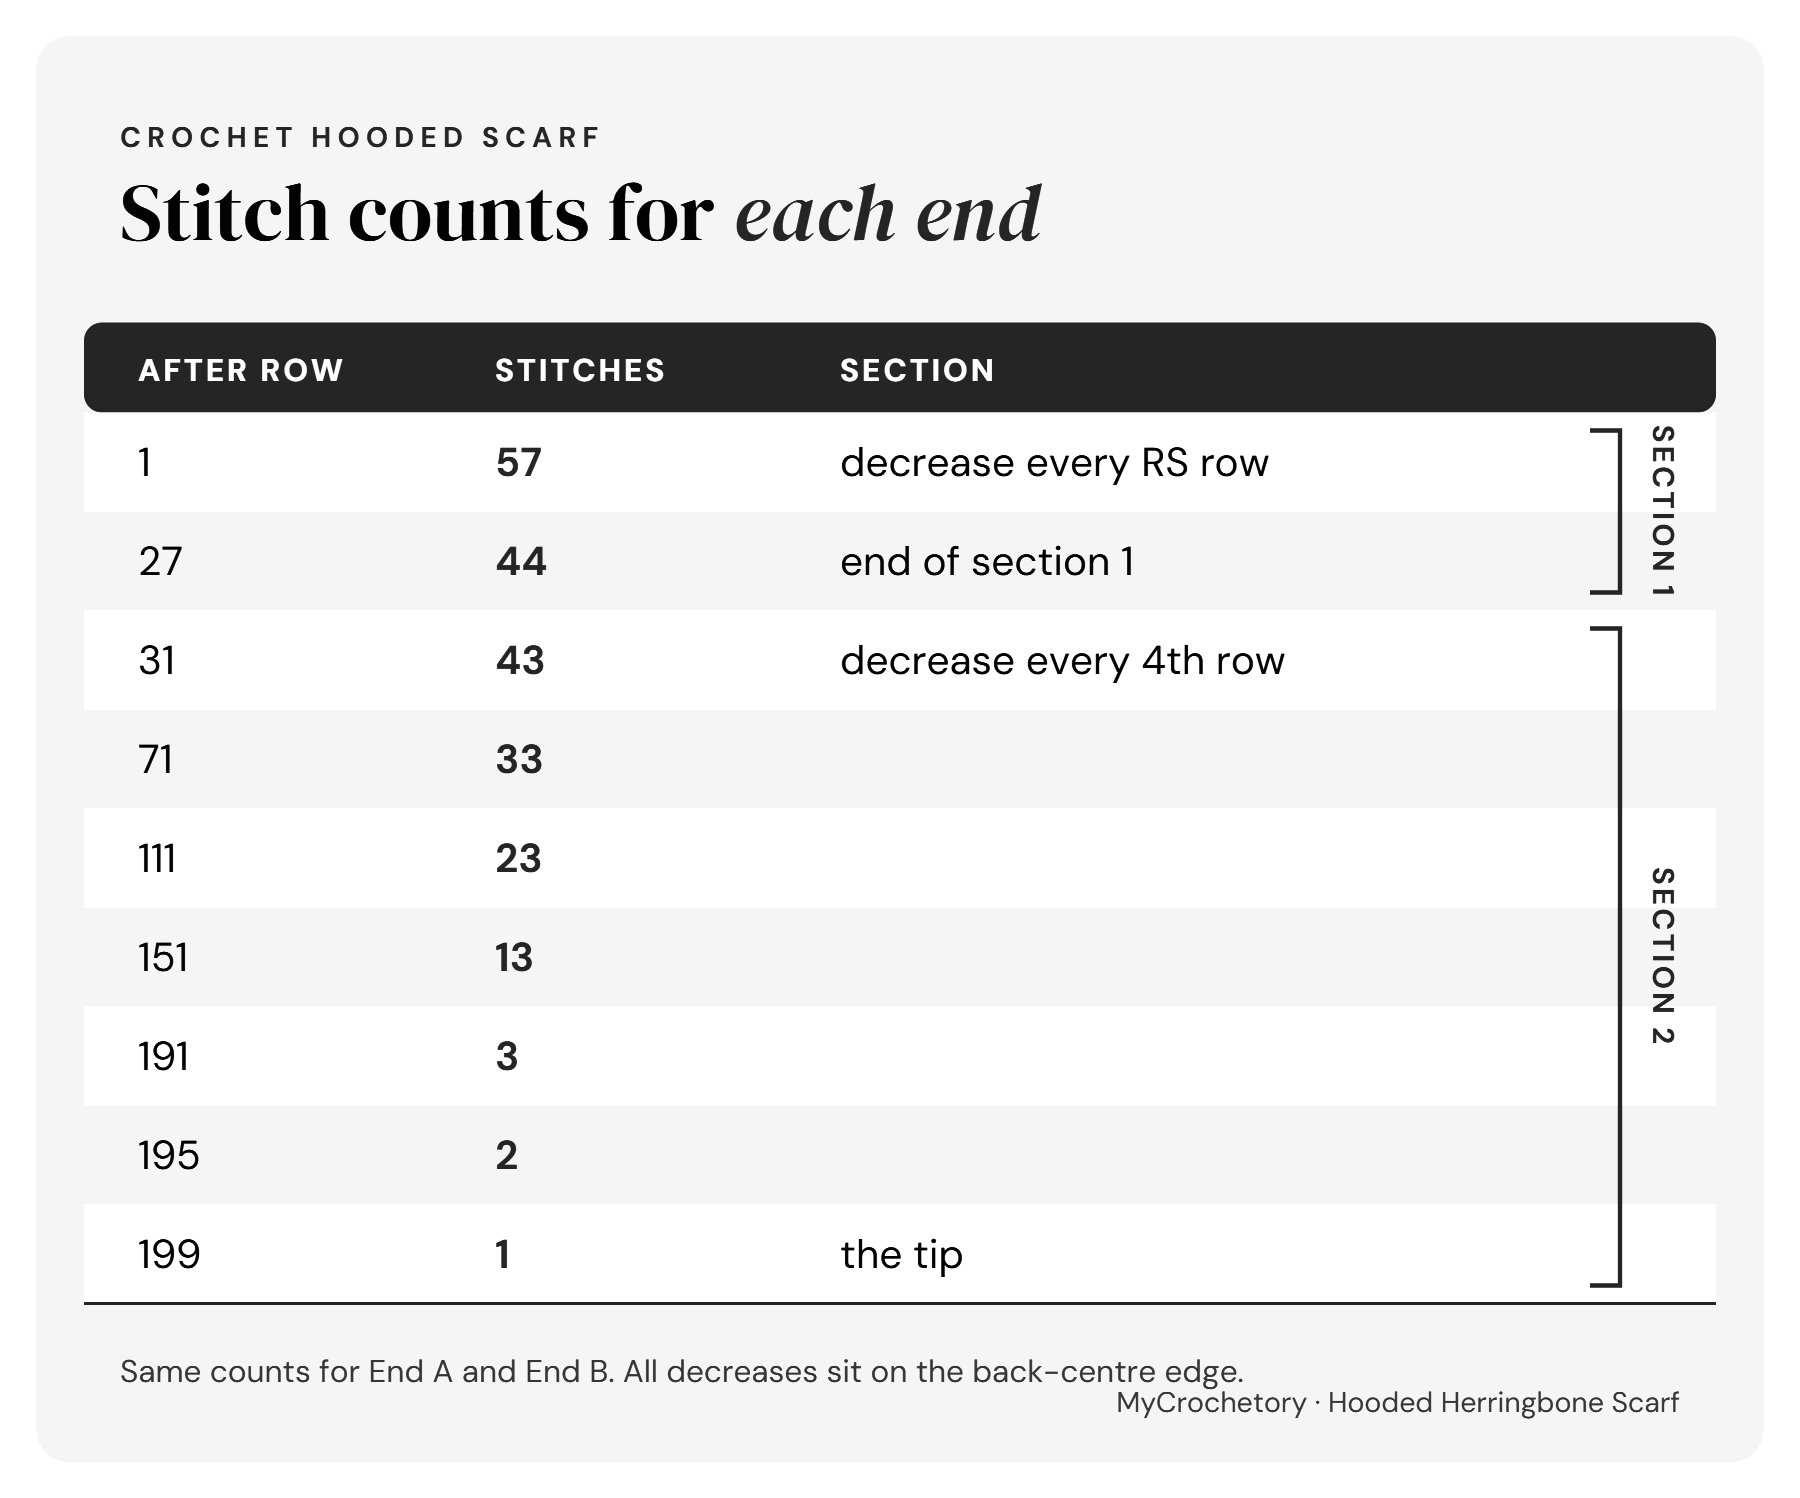
Each end is worked over half of the hood stitches (58 sts). All decreases are worked on RS rows at the back-centre edge, and the front edge stays straight.
Each end has 2 decrease sections: a decrease on every RS row for the first 27 rows, then a decrease on every 4th row to the tip.
End A
End A is worked over sts 1–58, from the front edge up to the marked st 58.
Row 1 (RS): ch1, turn, sc in first st by inserting hook from front to back, Hsc in each st until 2 sts remain before the back centre, Hsc2tog over st 57 and the marked st 58. Turn. Leave the other 58 sts unworked for End B. (57 sts)
Row 2 (WS): ch1, sc in first st by inserting hook from back to front, RHsc in each st to end. Turn. (57 sts)
Row 3 (RS): ch1, sc in first st by inserting hook from front to back, Hsc in each st until 2 sts remain, Hsc2tog. Turn. (56 sts)
Repeat Rows 2–3 until Row 27. (44 sts after Row 27)
Rows 28–30: work 3 rows even, starting with a WS row: ch1, sc in first st, then RHsc (WS) or Hsc (RS) in each st to end. Turn. (44 sts)
Row 31 (RS): ch1, sc in first st by inserting hook from front to back, Hsc in each st until 2 sts remain, Hsc2tog. Turn. (43 sts)
Repeat Rows 28–31 until 1 st remains after Row 199. When only 2 sts are left, the decrease row is ch1, sc2tog. Fasten off.
End B
End B is worked over sts 59–116, from the back-centre marker out to the other front edge. Joining here keeps End B a mirror of End A: the same side faces out, and the decreases fall on the same rows at the back-centre edge.
With the RS facing you, join the yarn in st 59, the first st after the marked st.
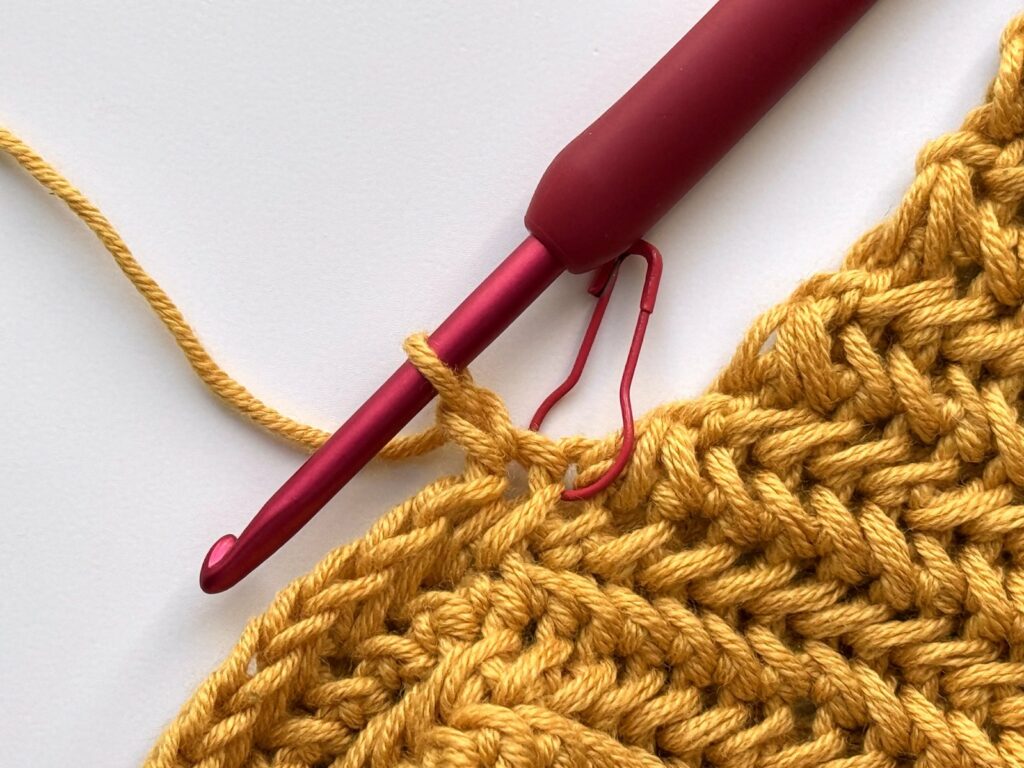
Row 1 (RS): ch1, sc2tog over sts 59 and 60, Hsc in each st to end. Turn. (57 sts)
Row 2 (WS): ch1, sc in first st by inserting hook from back to front, RHsc in each st to end. Turn. (57 sts)
Row 3 (RS): ch1, sc2tog, Hsc in each st to end. Turn. (56 sts)
Repeat Rows 2–3 until Row 27. (44 sts after Row 27)
Rows 28–30: work 3 rows even, starting with a WS row. (44 sts)
Row 31 (RS): ch1, sc2tog, Hsc in each st to end. Turn. (43 sts)
Repeat Rows 28–31 until 1 st remains after Row 199. Do not fasten off. The I-cord edging starts from this loop.
Stitch counts for each end
I-cord edging
An applied I-cord goes around the whole scarf in one pass, worked with 2 hooks. The technique follows Crochet I-Cord Edging // Easy Applied I-Cord Border by The Cozy Knot, a great video to watch along.
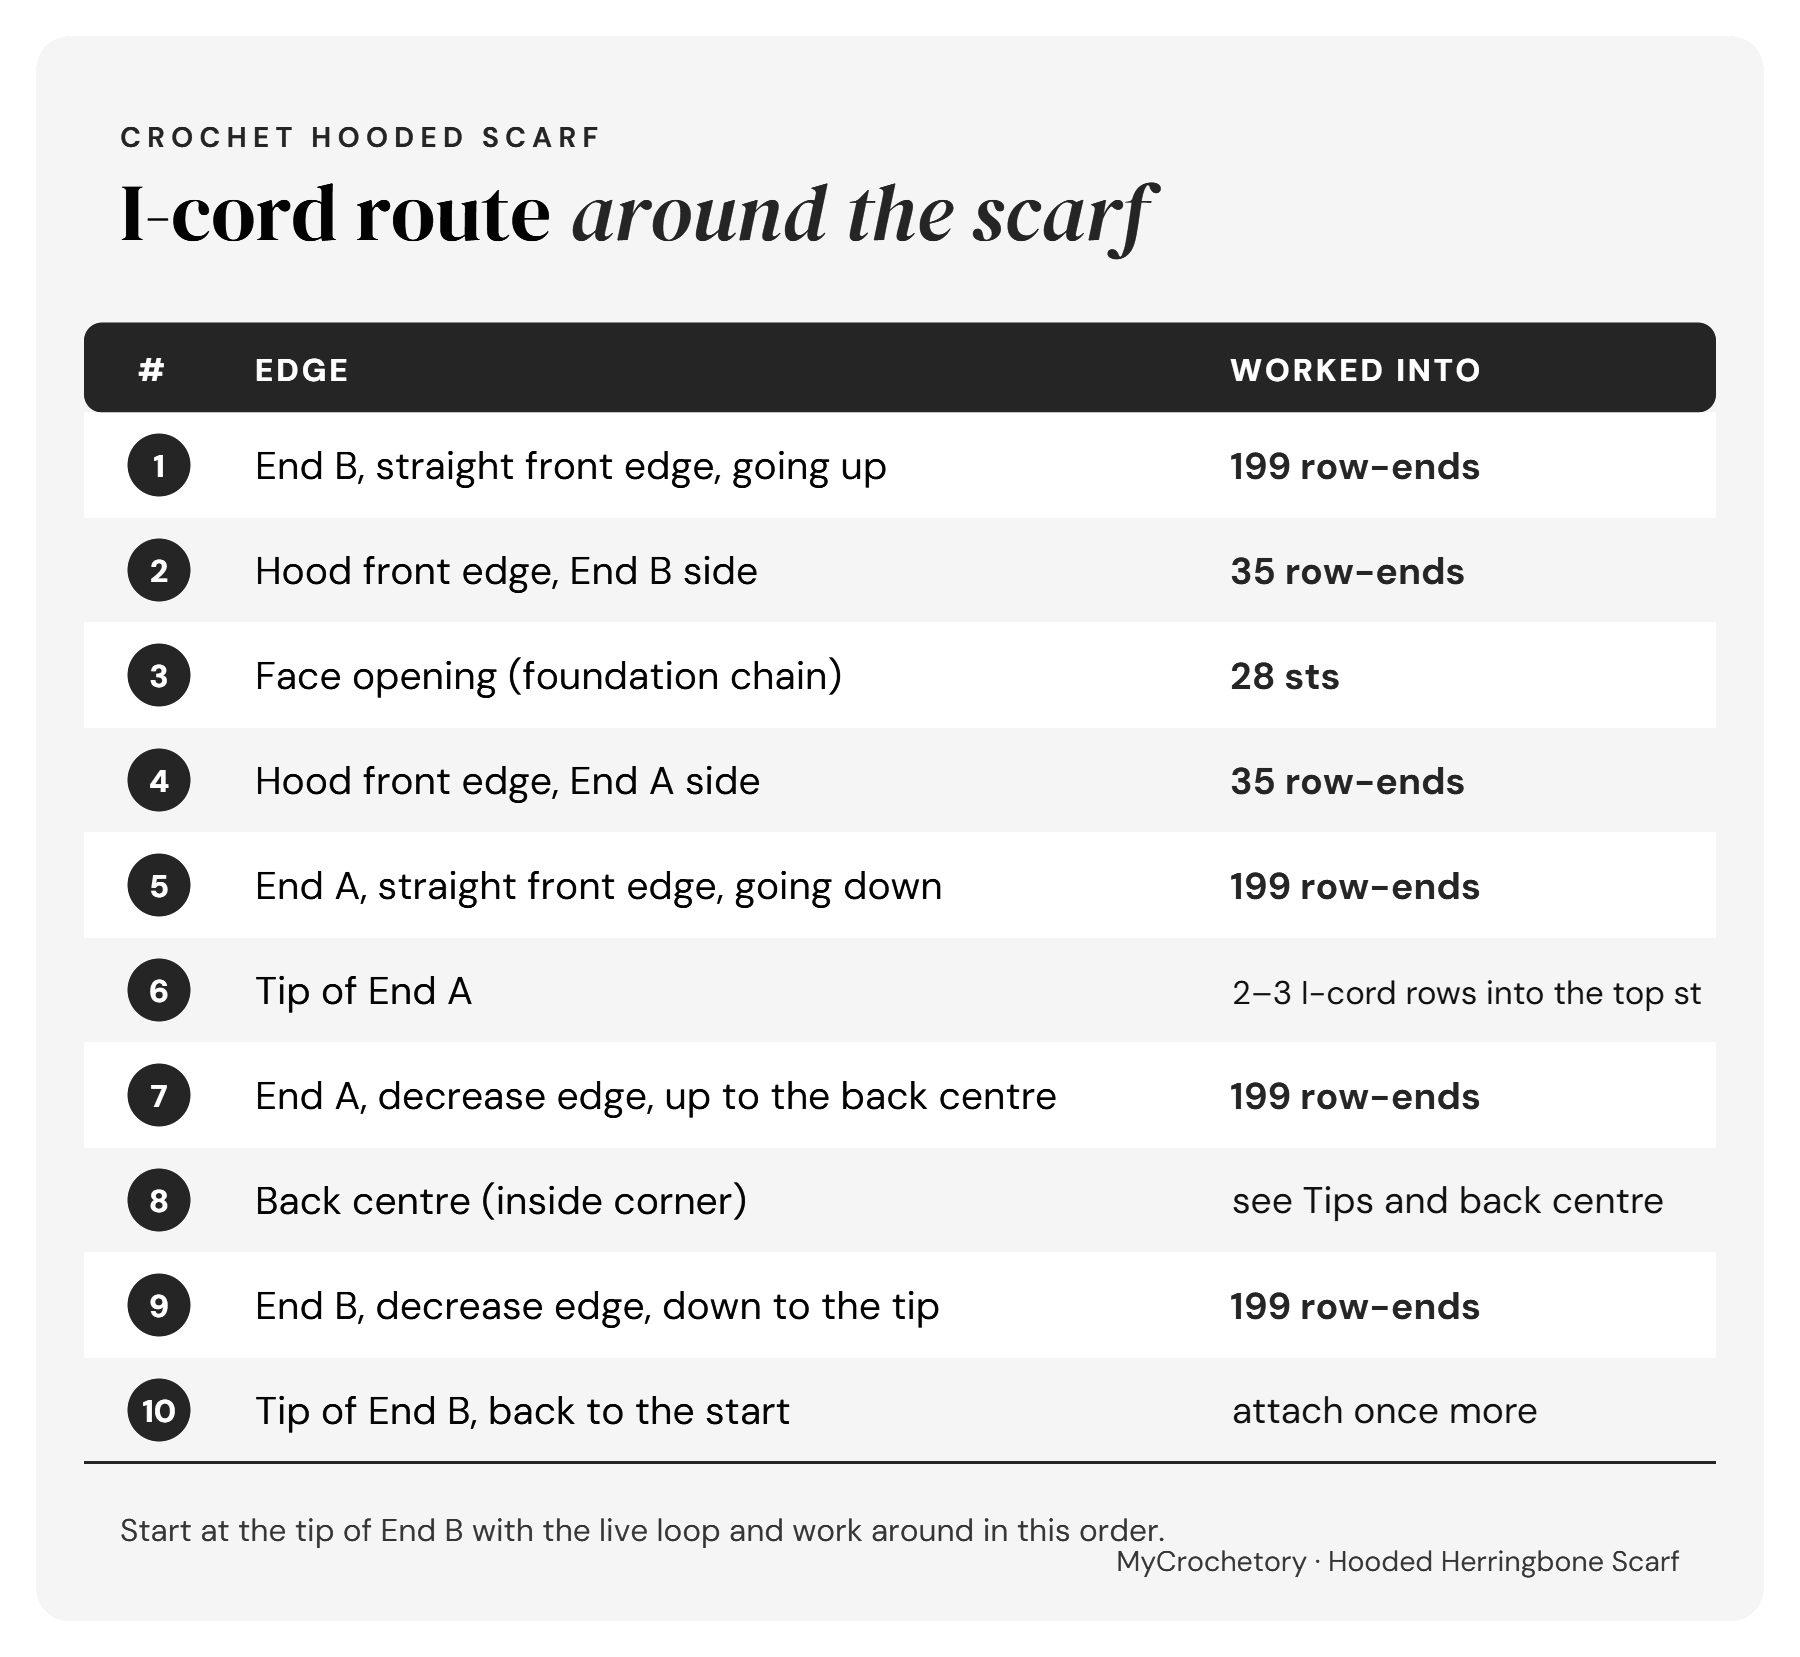
Route around the scarf
Start at the tip of End B and work in this order:
Set-up
With the live loop of End B: ch4. Insert hook in the 2nd ch from hook, yo, pull up a loop. Pull up a loop the same way in the next 2 ch. (4 loops on hook)
Insert hook in the first row-end of the front edge of End B, yo, pull up a loop. (5 loops on hook)
Slide all loops to the other end of the hook. Take the first loop off and hold it on a stitch marker: you will need it to close the cord at the end.
I-cord row
The I-cord row works like knitting with two hooks. The hook with the loops is your left needle; the empty hook is your right needle and knits the loops off the back end of the first one.
- Slide the loops to the back end of the hook that holds them (the end without the hook).
- Knit 1: insert the empty hook into the first loop at the back end as if to knit, yo, pull through and let the old loop slip off.
- Knit 1 more the same way.
- Knit 2 together: insert into the last 2 loops at once, yo, pull through and let both slip off. (3 loops on the new hook)
- Attach: with the same hook, insert in the next row-end or st, yo, pull up a loop. (4 loops)
The hooks swap after every row: the hook that now holds the 4 loops is your left needle for the next row, and the empty one knits.
Repeat the I-cord row around the scarf. Spread the I-cord rows evenly along each edge, so the edge lies flat. Start with about 1 I-cord row per row-end and check after about 4″ (10 cm): if the edge ruffles, attach a little less often; if it pulls in, attach a little more often. Keep the stitches loose, because you will work into the back of the cord at the end.
Tips and back centre
- Tip of End A: work 1 I-cord row into the last row-end of the front edge, then 2 I-cord rows into the top of the last st (3 if the cord pulls at the tip), then 1 I-cord row into the first row-end of the decrease edge.
- Back centre: here the two decrease edges meet in an inside corner, where the back-centre marker is. Remove the marker. Pull up a loop in the row-end before it and another in the row-end after it (5 loops on hook). On the next I-cord row, knit 1, knit 1, then knit the last 3 loops together (3 loops on the new hook) and attach as usual.
Closing the cord
Back at the tip of End B, attach to the tip one last time (4 loops on hook). Put the 4 loops on a stitch marker and take the hook out. You’ll come back to them later.
Fourth column: put the held loop from the first marker on your hook and turn the scarf over. Pull the first loose horizontal bar on the back of the cord through the loop on your hook. Repeat with every bar all the way around. When you pull the last bar, the loops on the end marker move.
Cut the yarn, leaving a long tail, and thread it on a tapestry needle. Take it through the loop that came off the hook and pull tight. Then sew the held loops one by one to the columns at the start of the cord, so the join looks like the rest of the cord. The photo tutorial below shows every stitch of the join.
Finishing
Weave in all ends and wet block the scarf to the measurements: soak it, pin it to shape and let it dry.
Crochet hooded scarf photo tutorial
Below are the step photos for the crochet hooded scarf, part by part. Keep the written pattern above open in another tab for the stitch counts.
Top rectangle
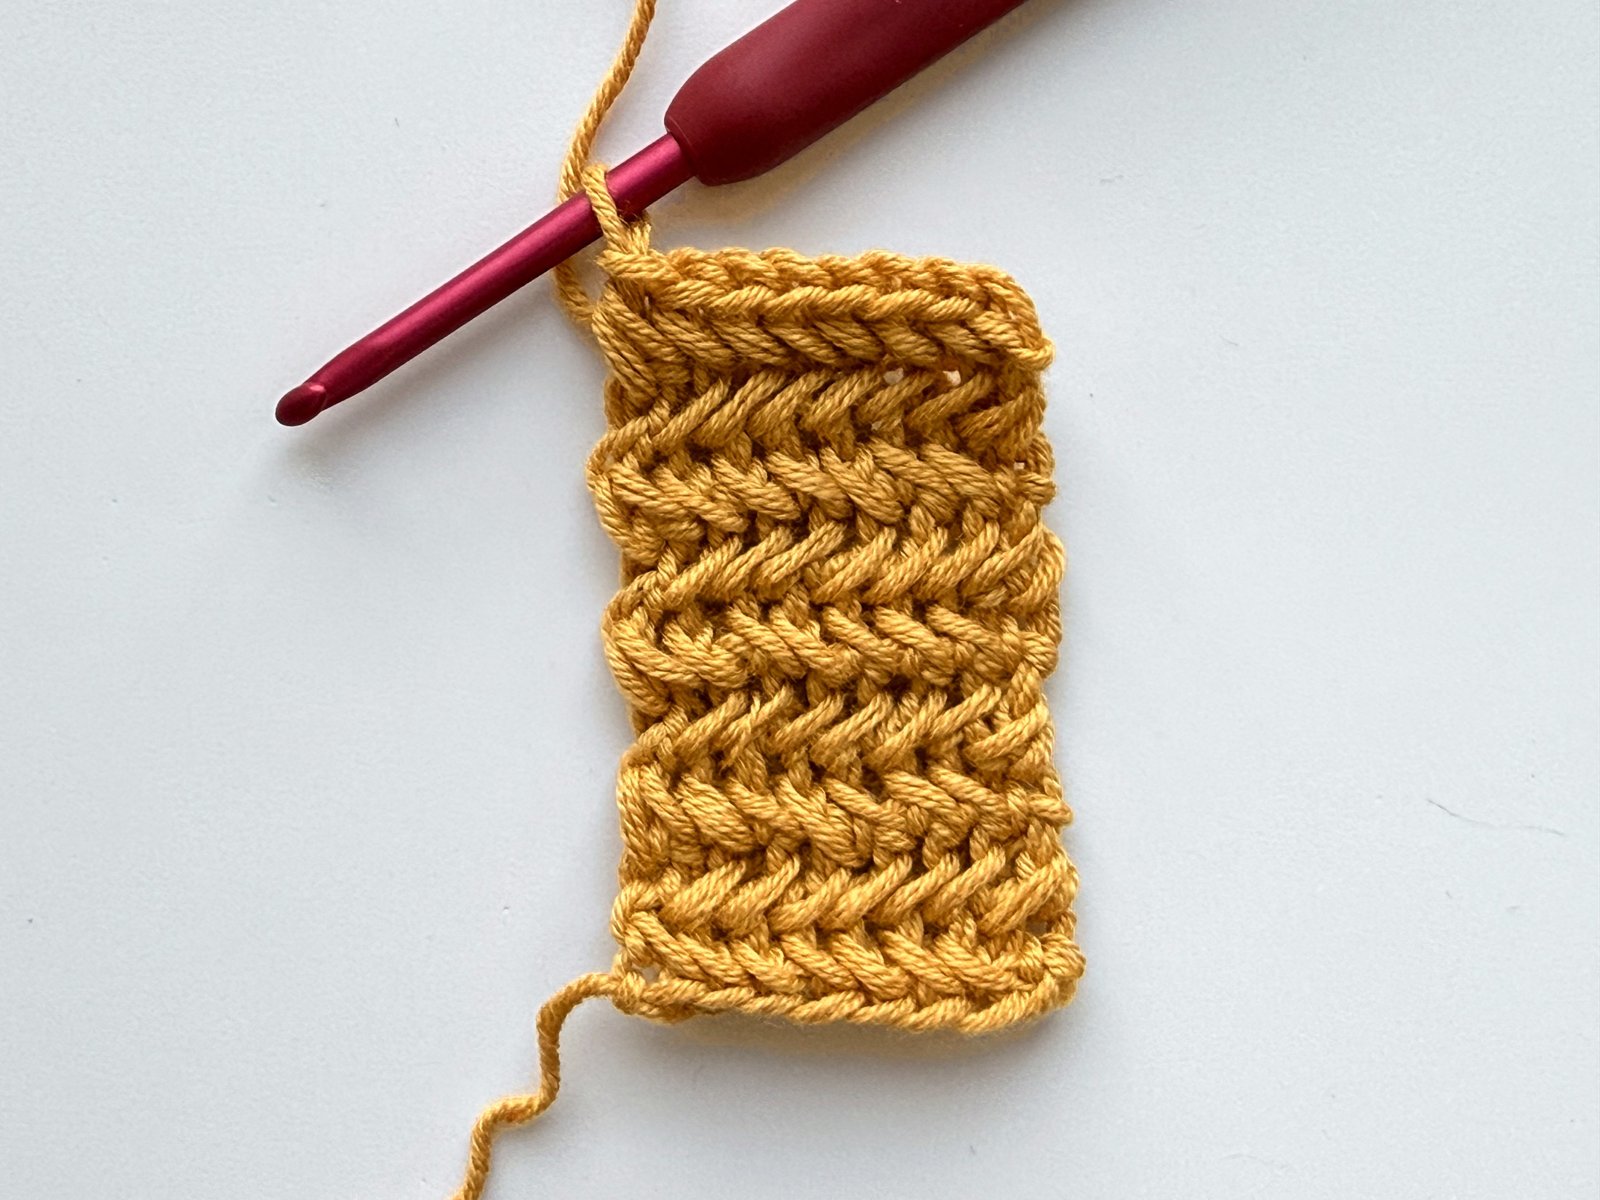
- Make the top rectangle. Work the rectangle in rows of herringbone single crochet. In this small sample the little rectangle is all you need. When it’s done, fasten off and cut the yarn.
Slip stitch edging
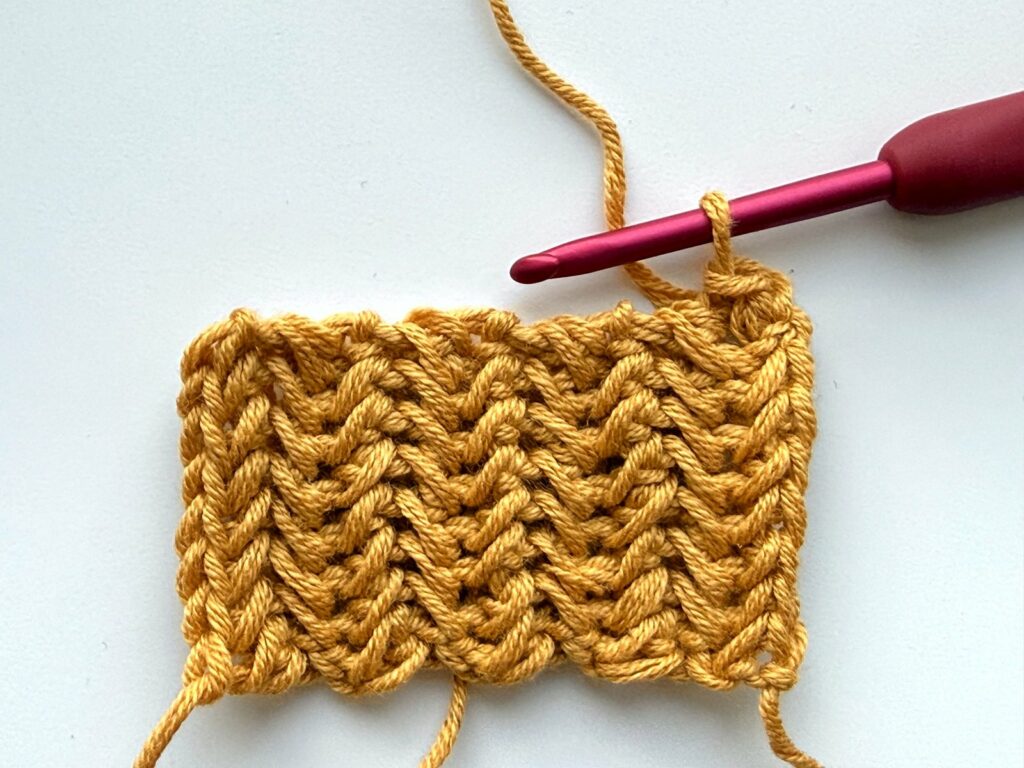
- Join the yarn and slip stitch along the long edge. Join the yarn at the corner of a long edge and rotate your work so you can slip stitch along it. Spread the slip stitches evenly, but make sure you end up with the right number on each of the three sides: the hood is worked into them, so the count matters. The pattern gives the exact number for each side.
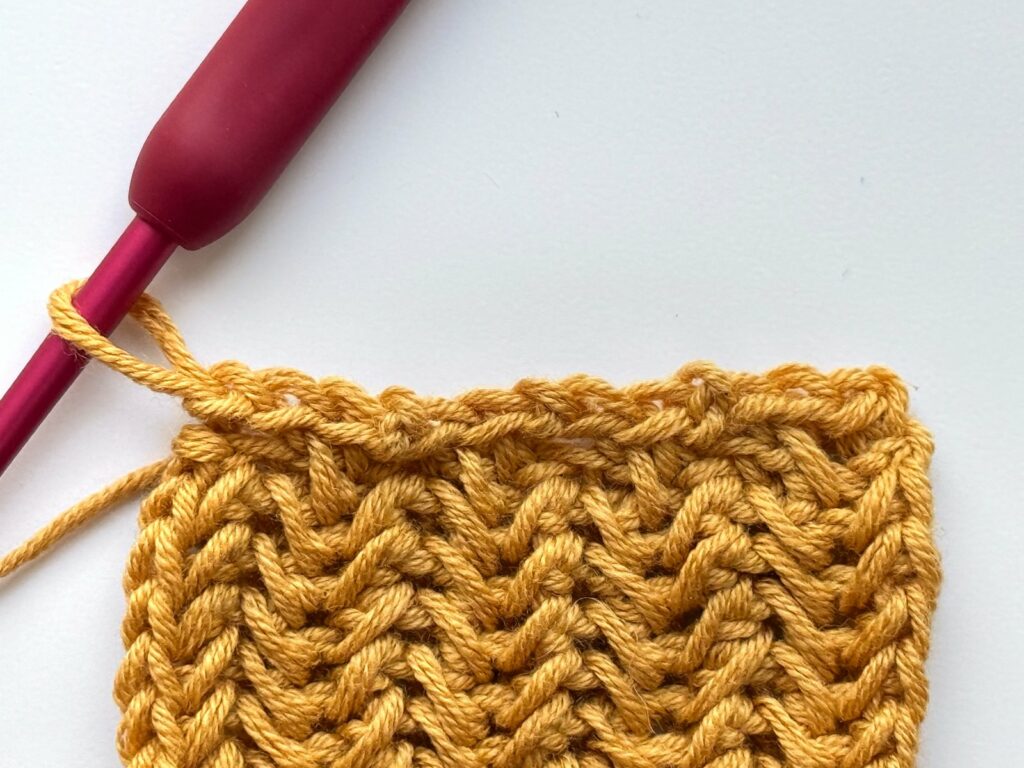
- Add an extra slip stitch in the corner. At the end of the long edge, work 1 extra slip stitch into the corner.
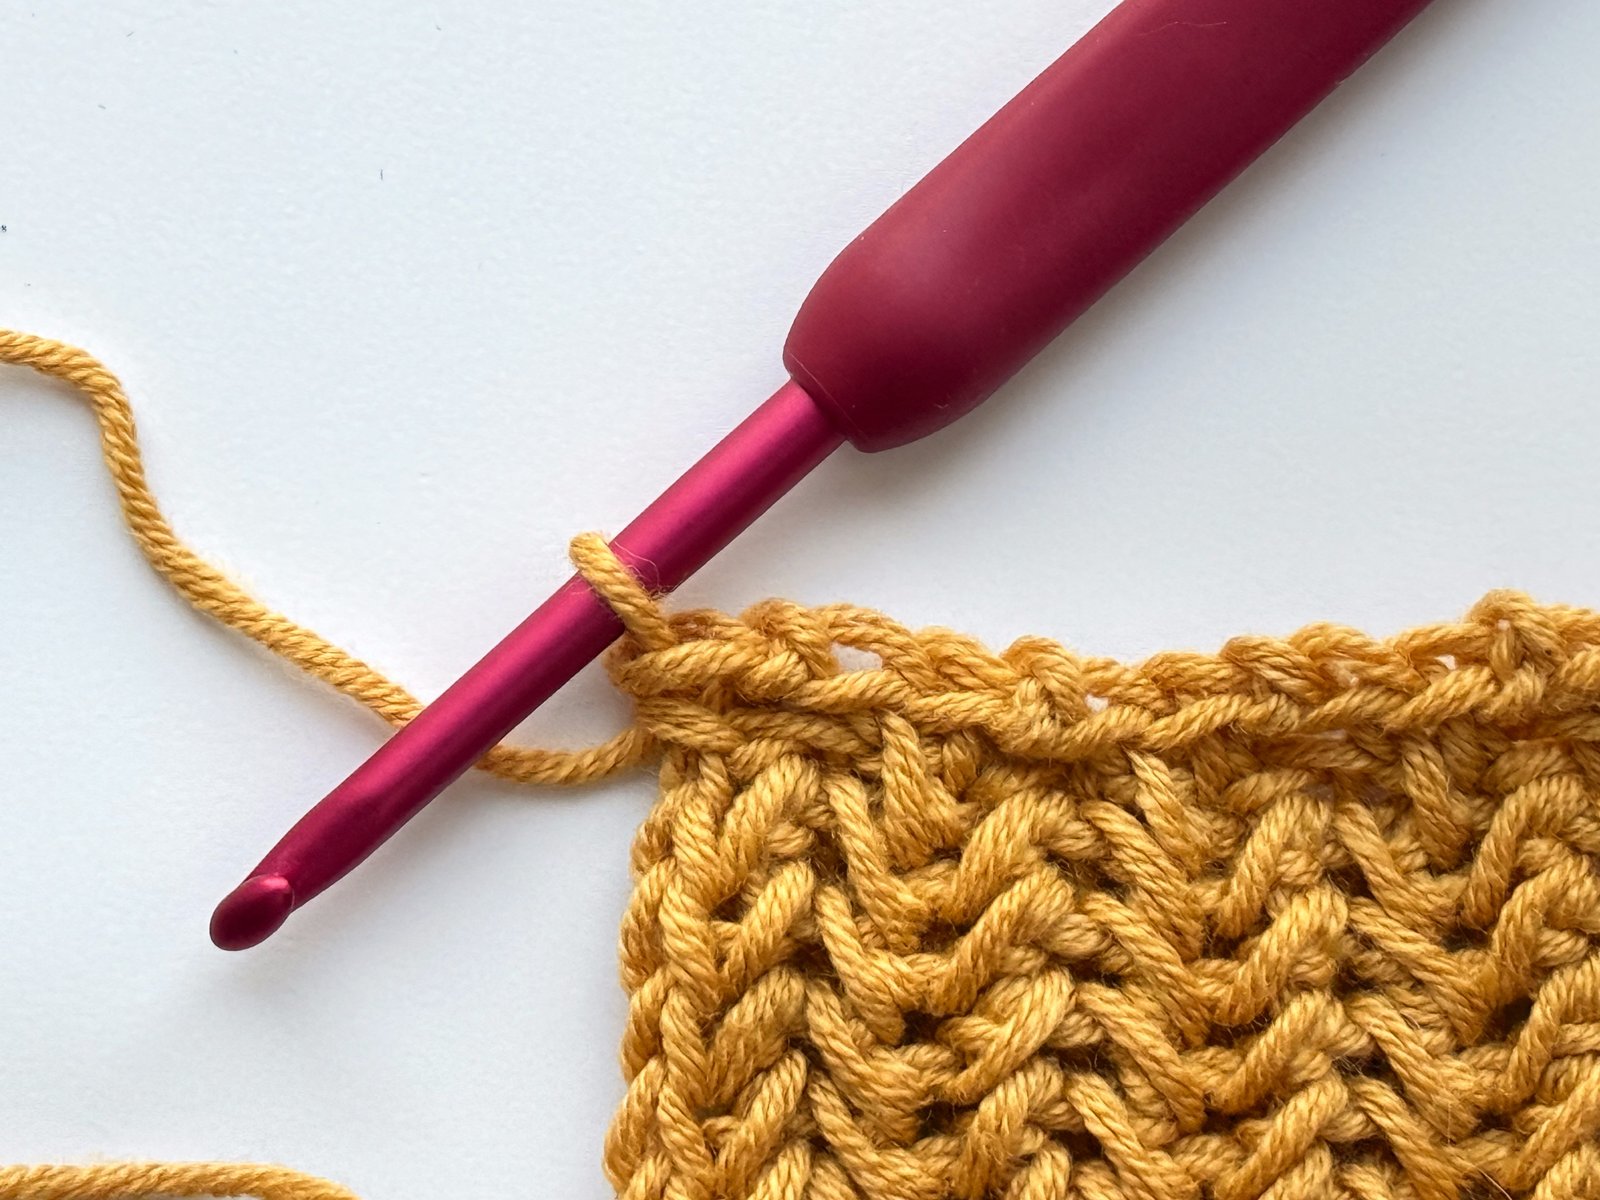
- Rotate and slip stitch along the short side. Rotate your work again and slip stitch along the shorter side, 1 slst in each stitch.
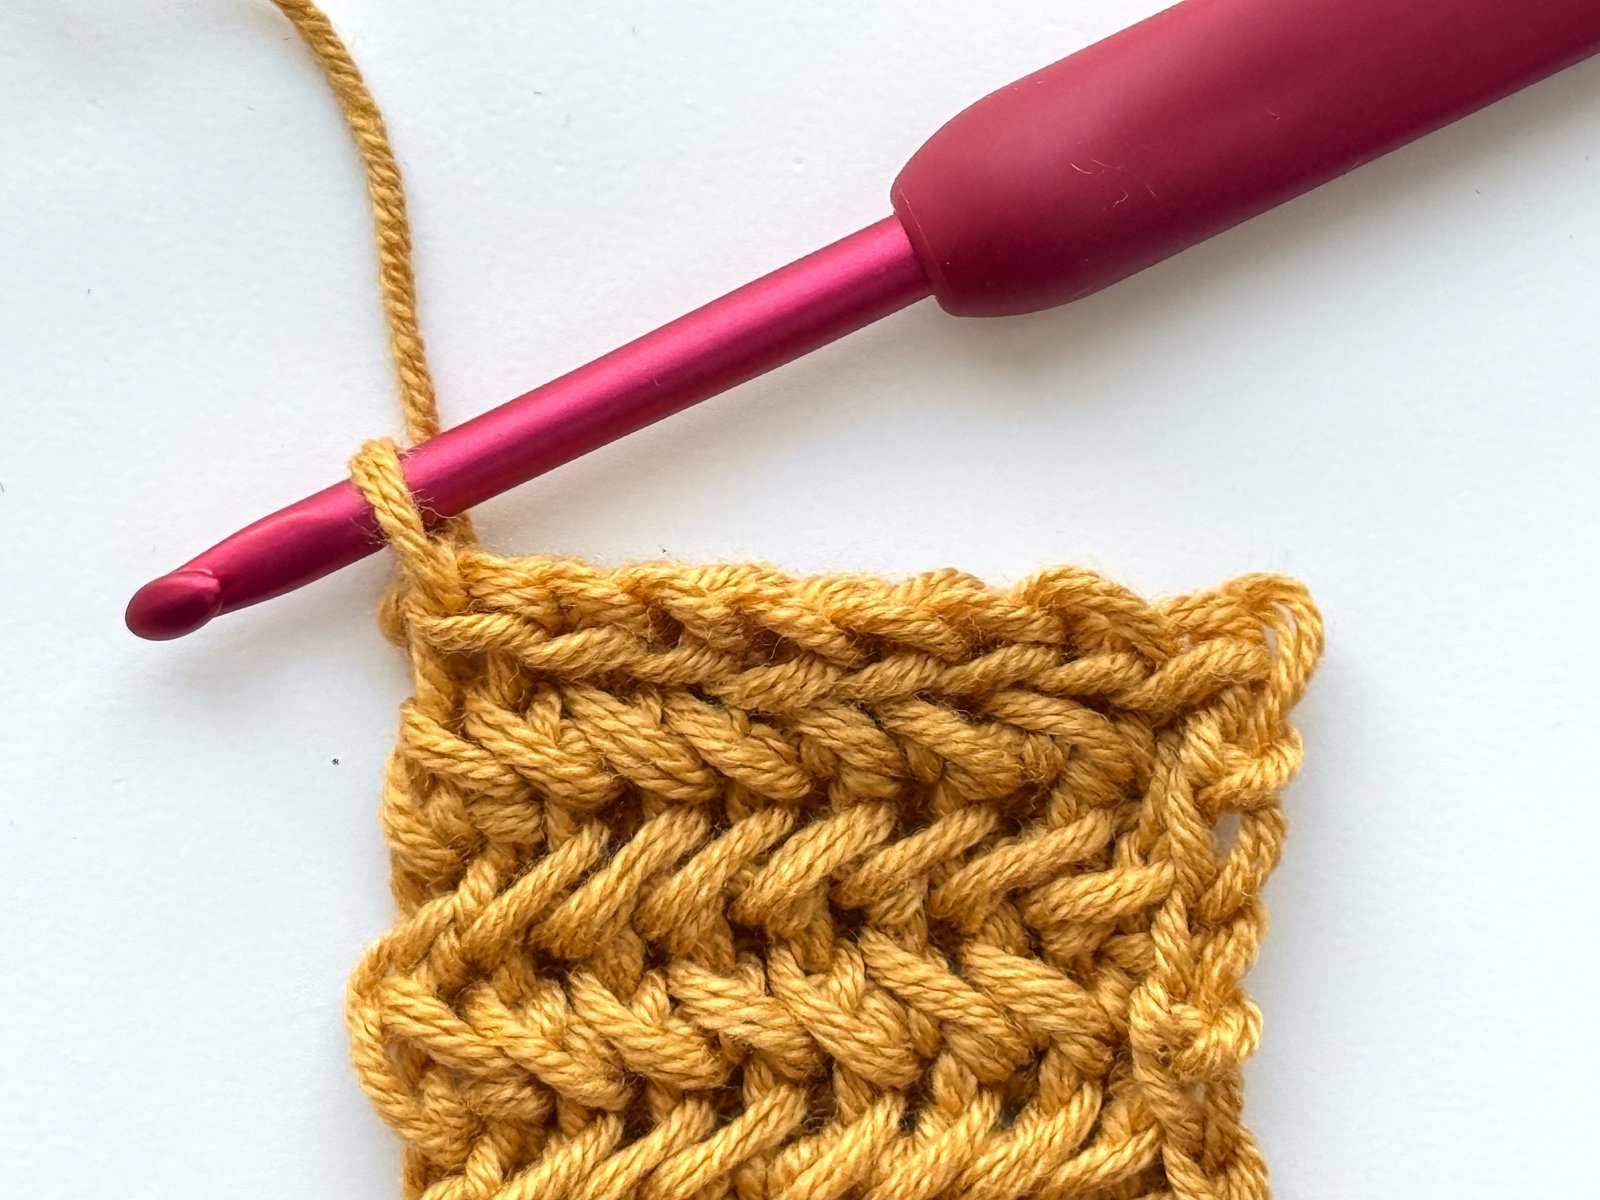
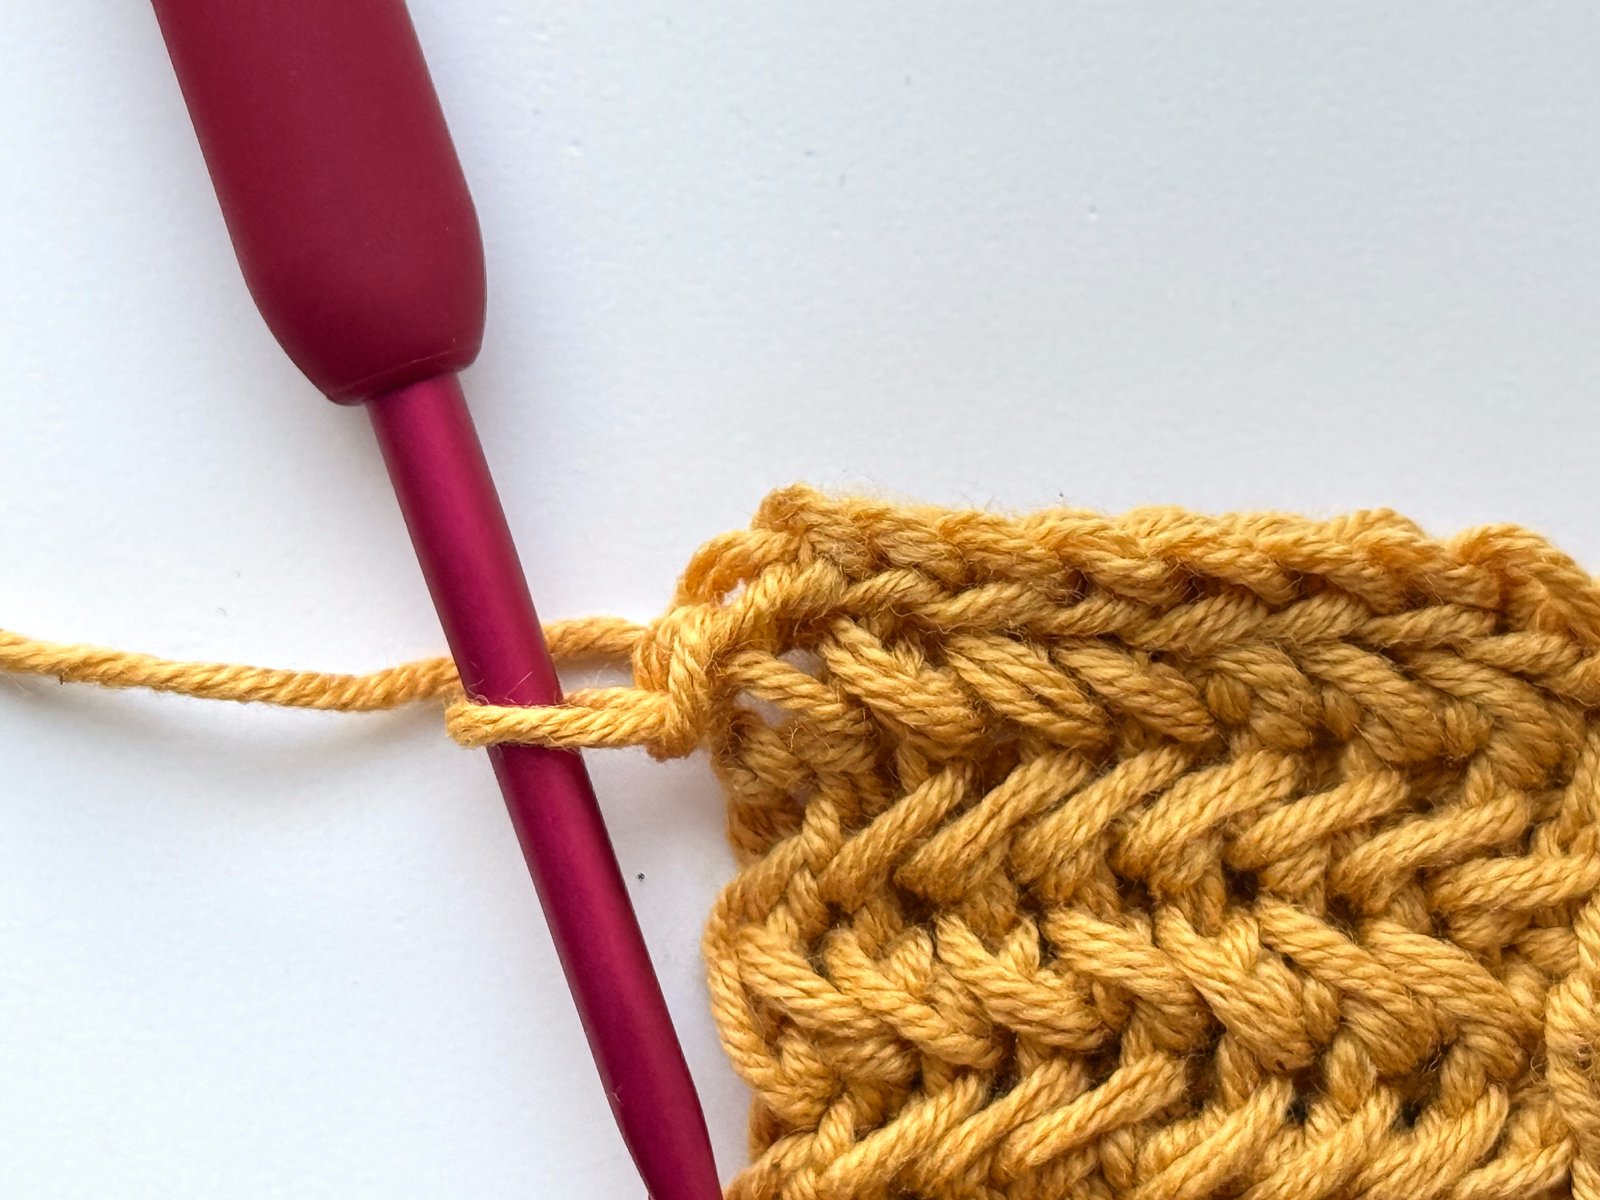
- Add an extra slip stitch in the second corner. At the end of the short side, work 1 extra slip stitch into the corner, then slip stitch down the other long edge.
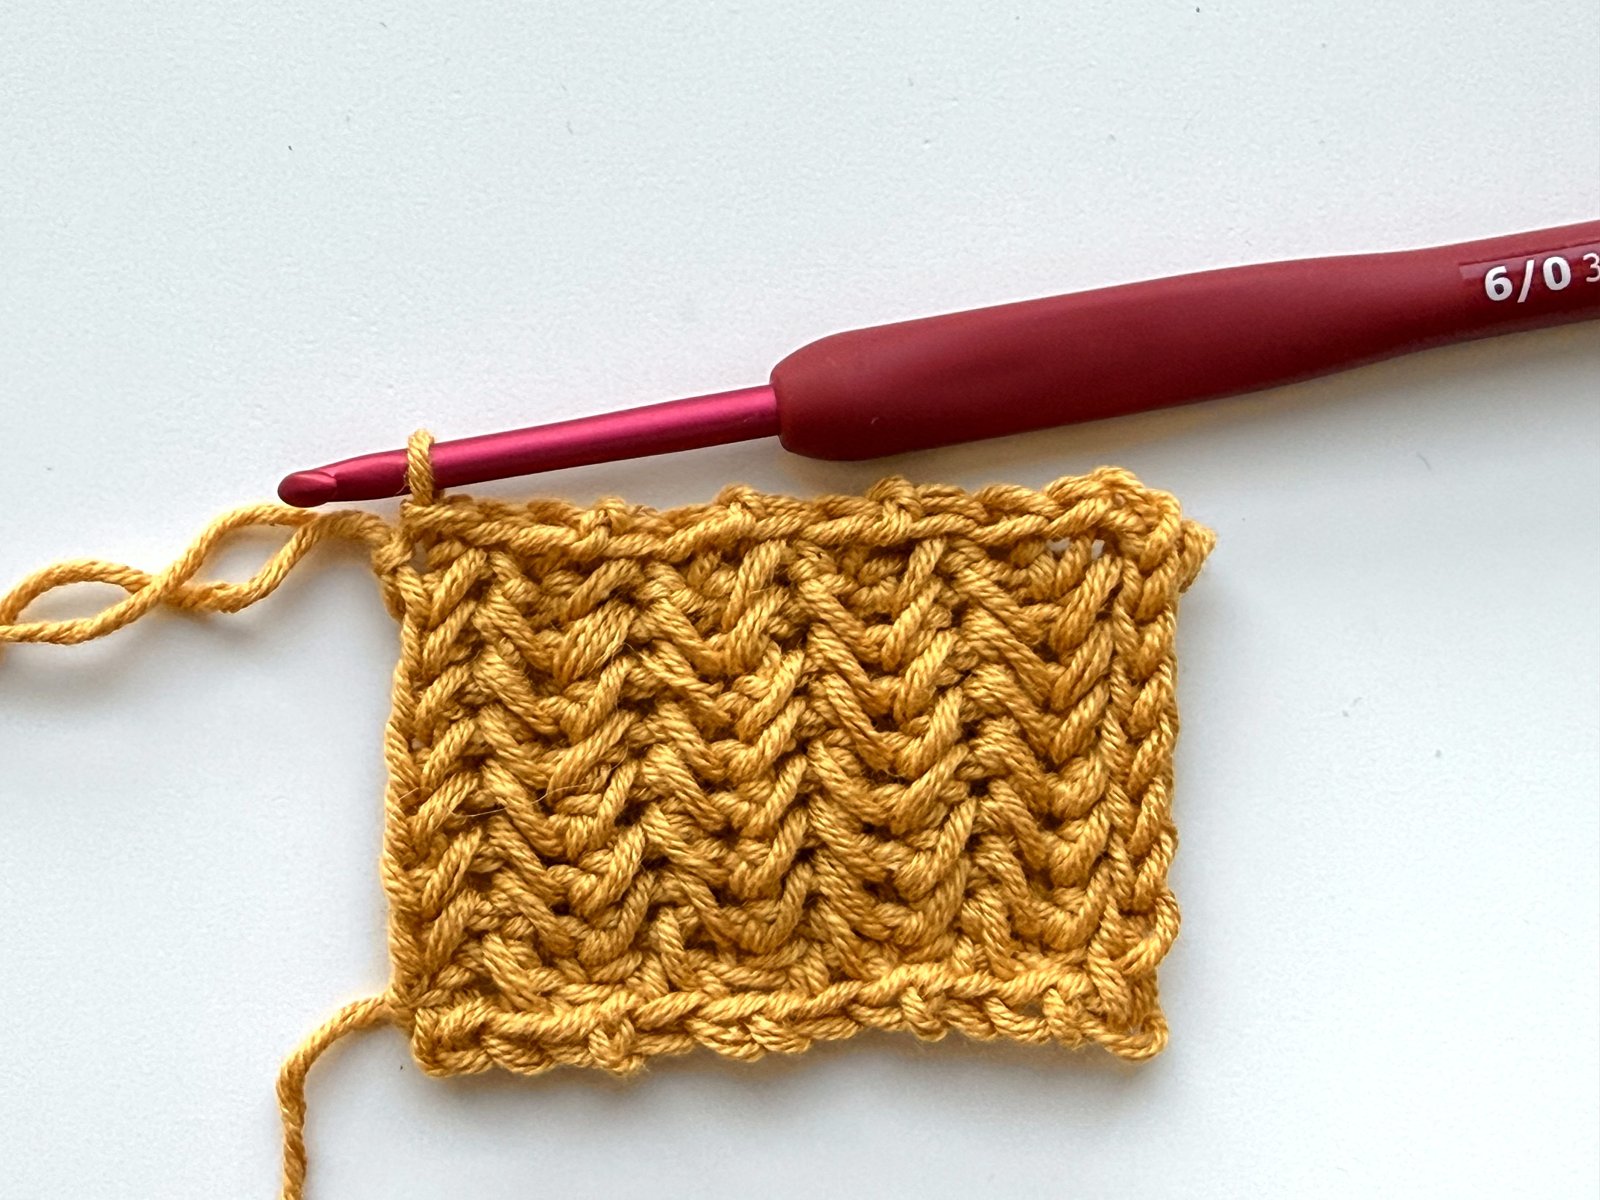
- Slip stitch edging finished. Now there are slip stitches on three sides. The foundation chain stays free: it becomes the face edge of the hood.
Hood
- Work the hood rows. Turn your work, ch 1 and work herringbone stitches into the slip stitches, following the rules for a WS row. Keep working rows back and forth around all three sides, with no extra stitches at the corners.
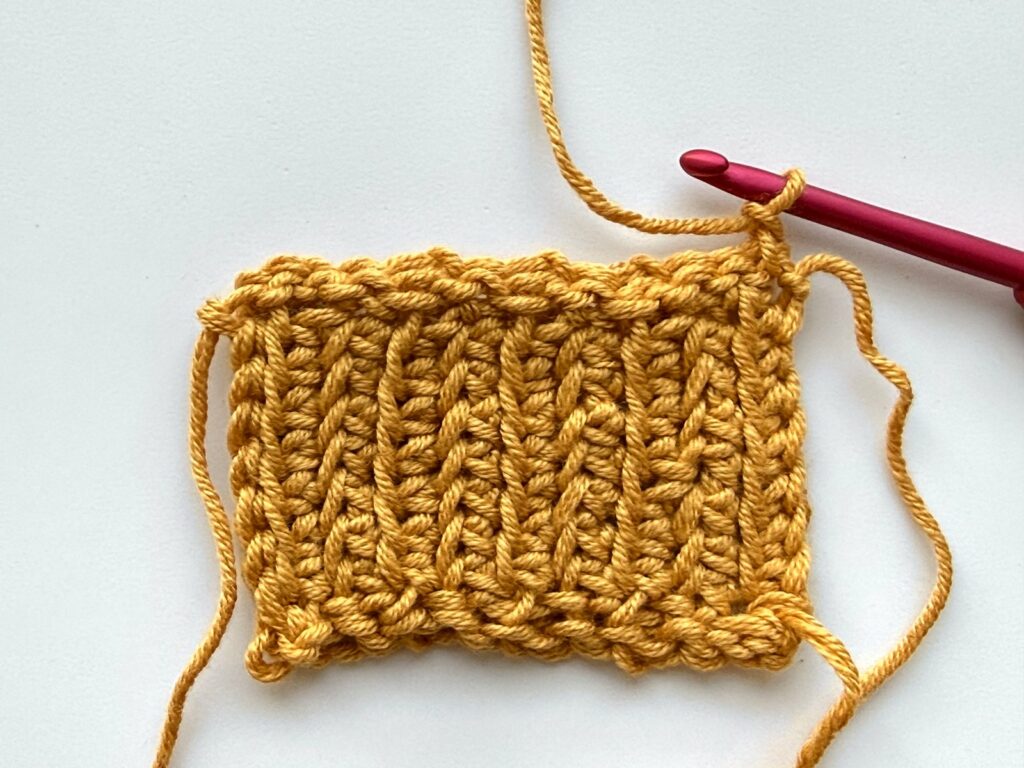
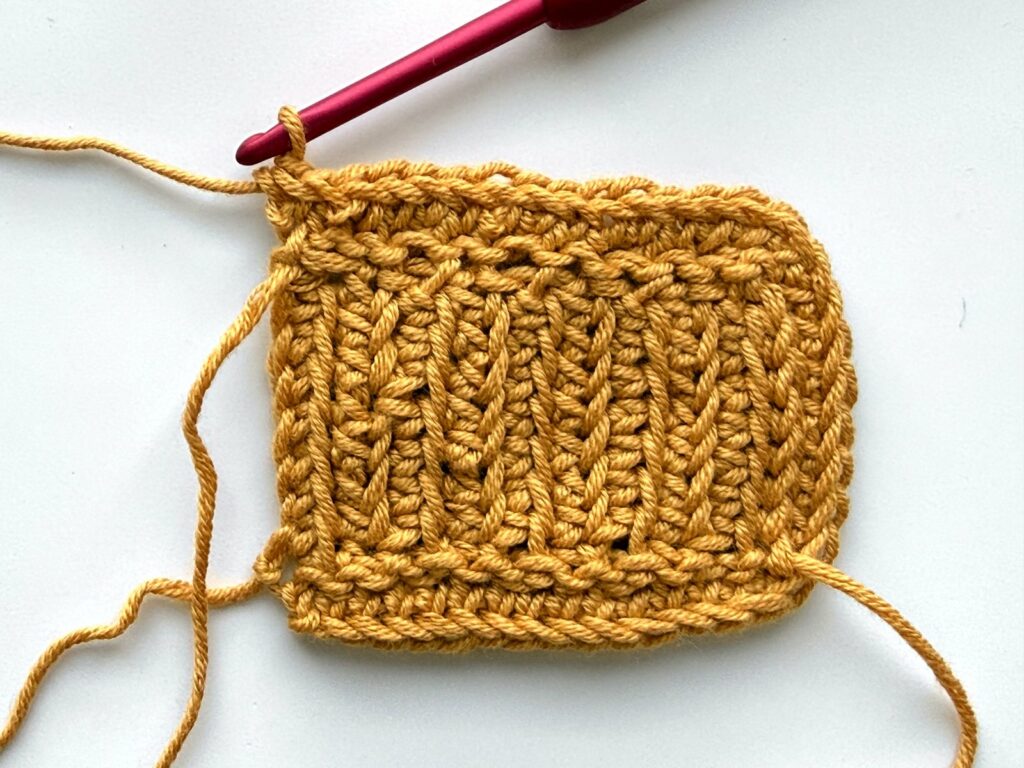
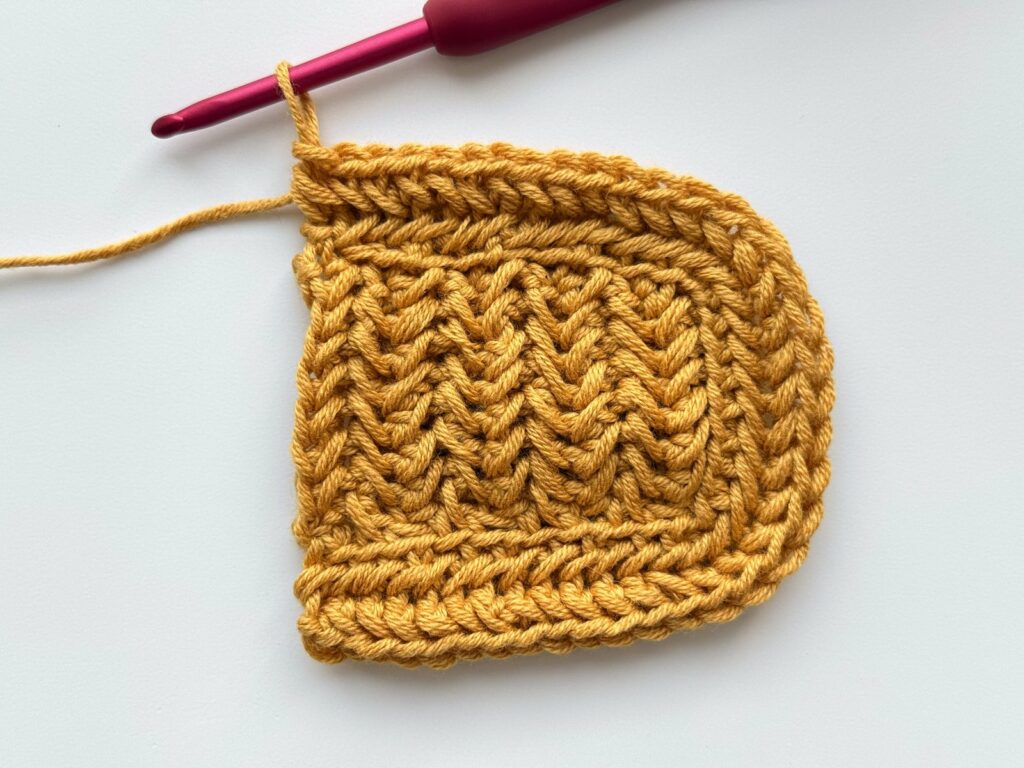
- Hood finished. Keep going until the hood has all its rows. Hold it in your hand and you can see the hood shape.
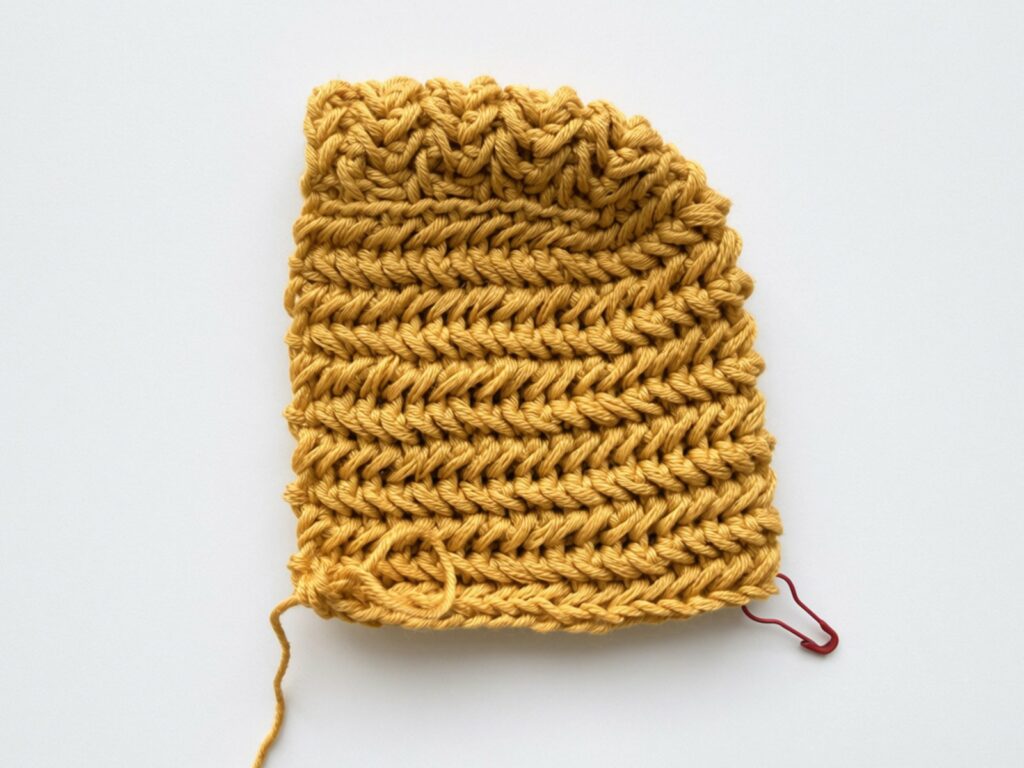
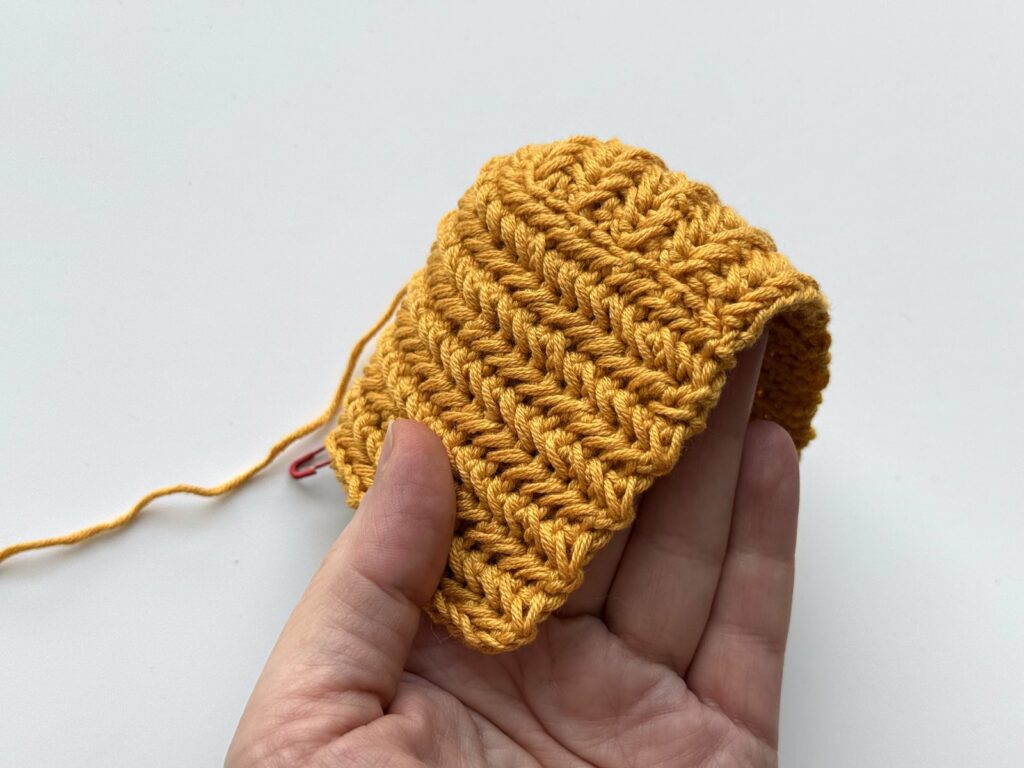
- Mark the middle of the hood. Place a stitch marker in the middle stitch of the last row. It splits the hood in half: one half becomes End A, the other End B.
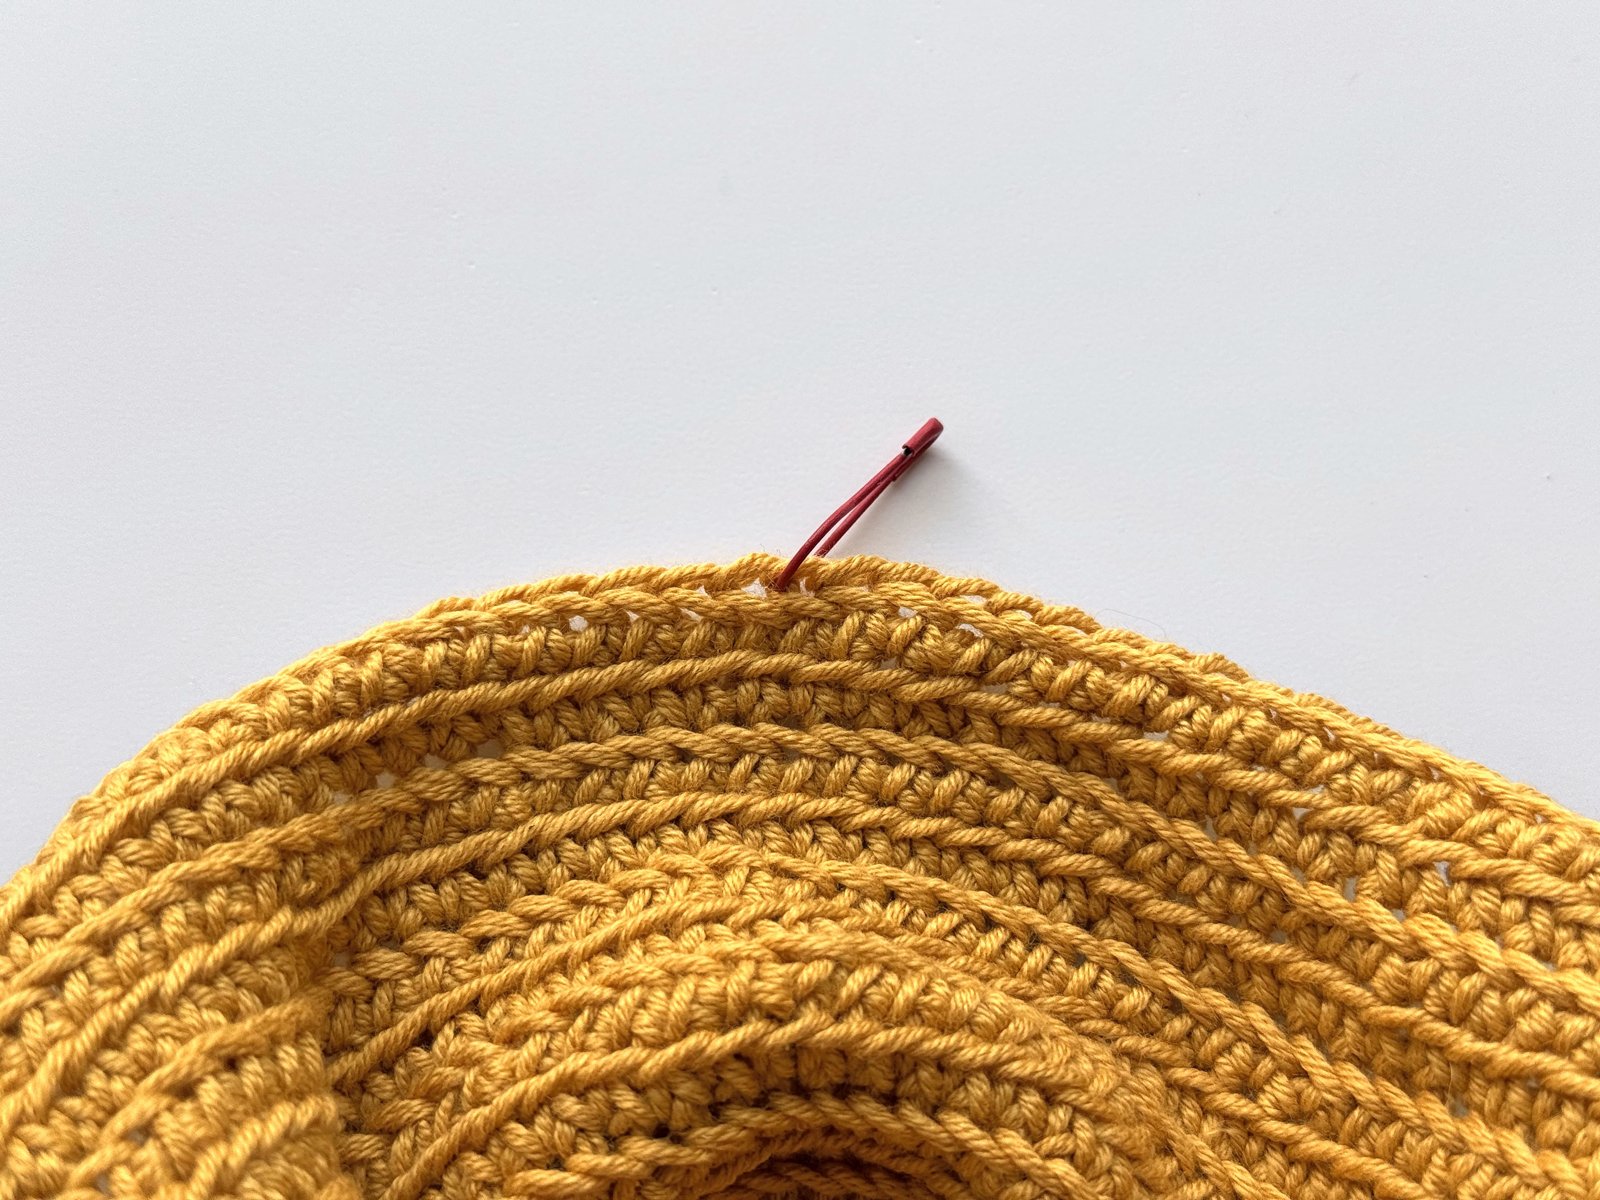
End A
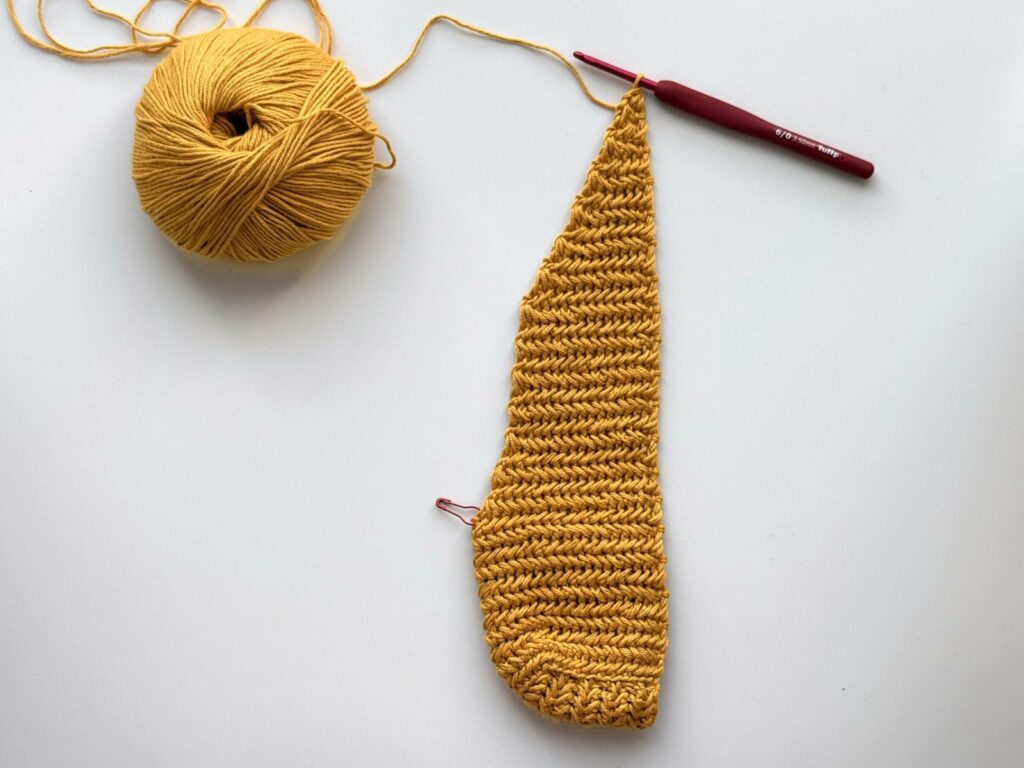
- Row 1 of End A: decrease at the marker. Work across to 2 sts before the back centre and finish with Hsc2tog into the last stitch and the marked stitch. You’ll have 4 loops on the hook before the final yarn over. Leave the other half unworked for End B.
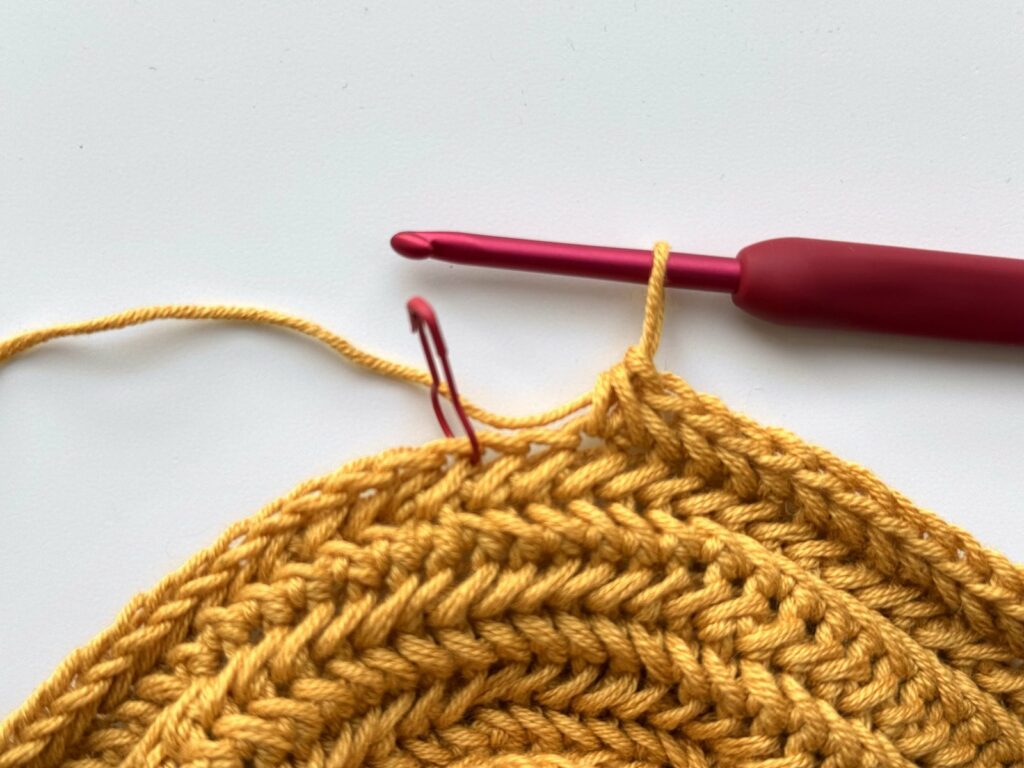
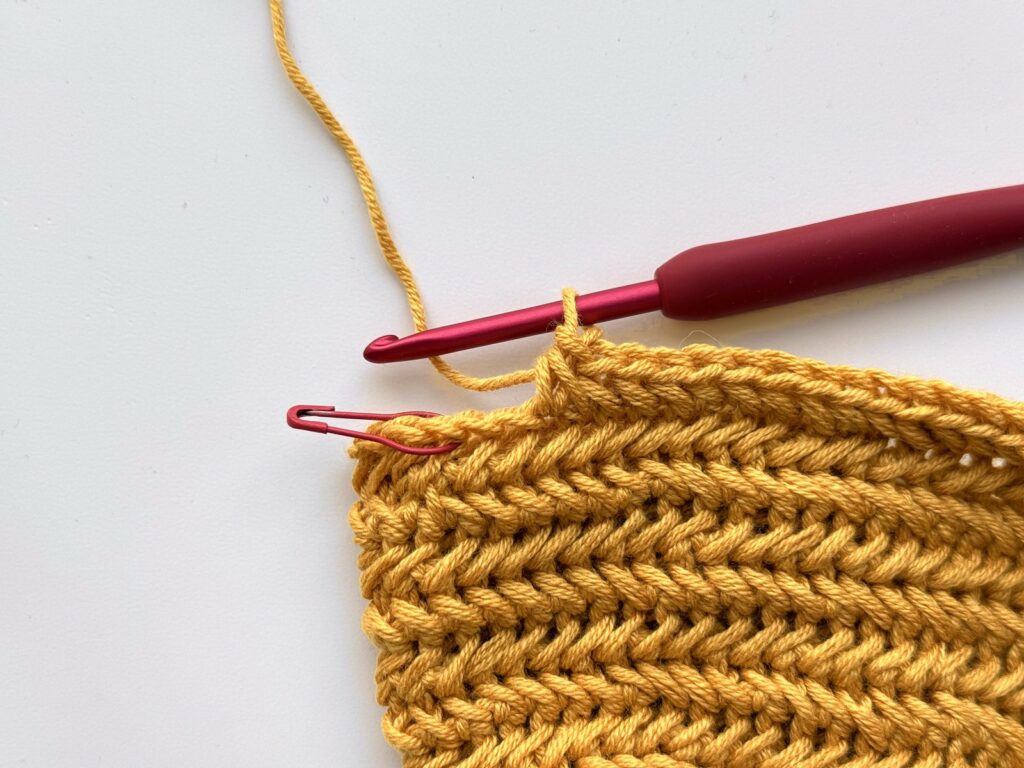
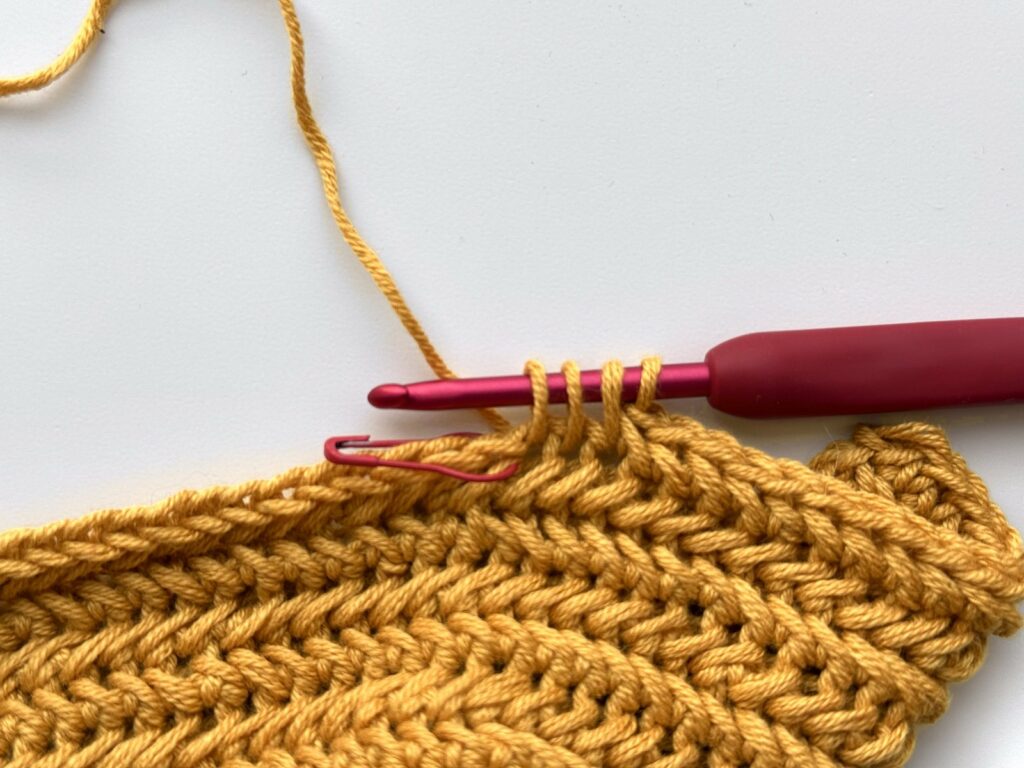
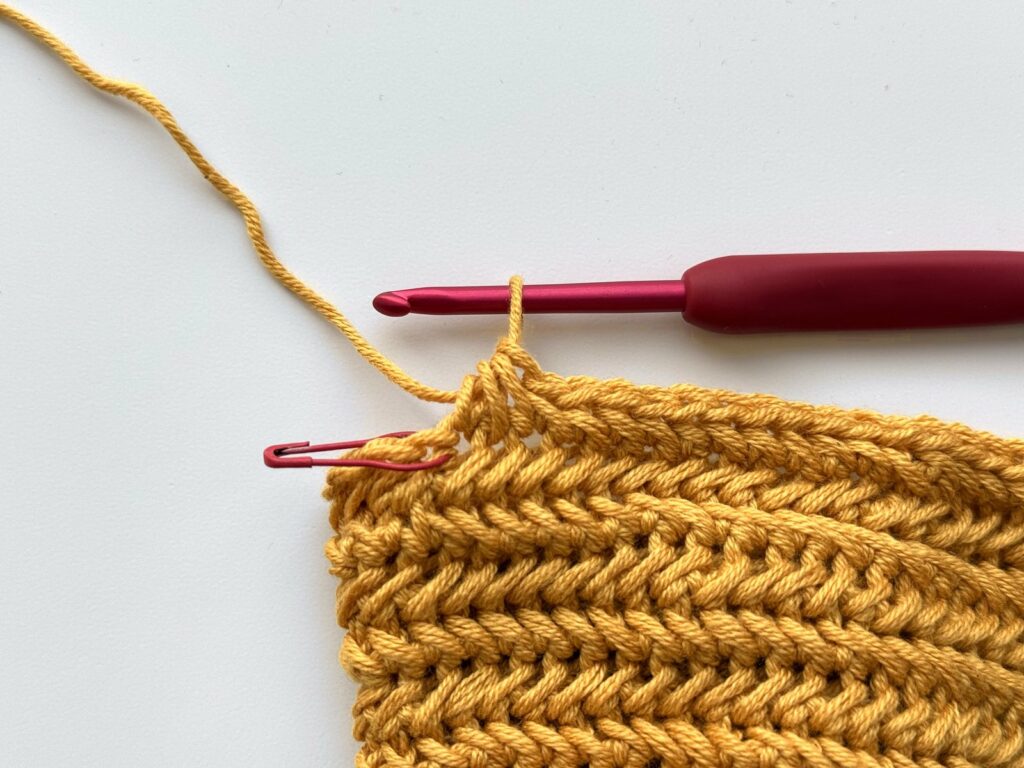
- Taper End A to a point. Decrease at the back-centre edge only. The front edge stays straight, so the end slowly turns into a point. In my sampler I worked the decreases a bit closer together towards the end: for this tutorial the ends don’t need to be long.
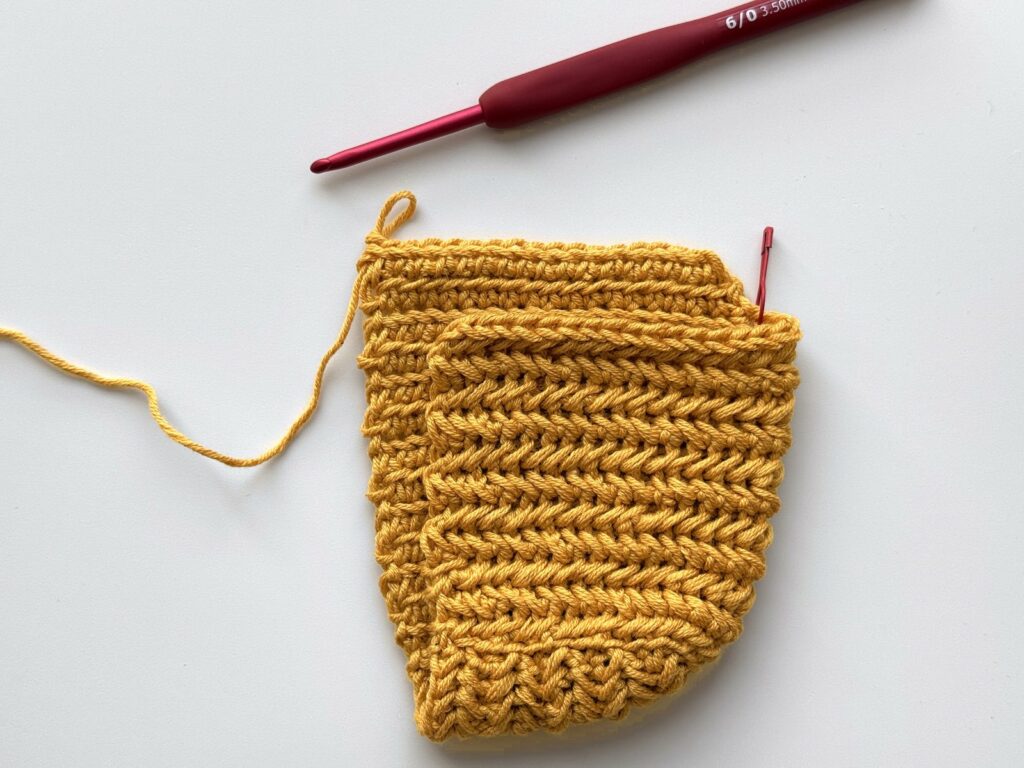
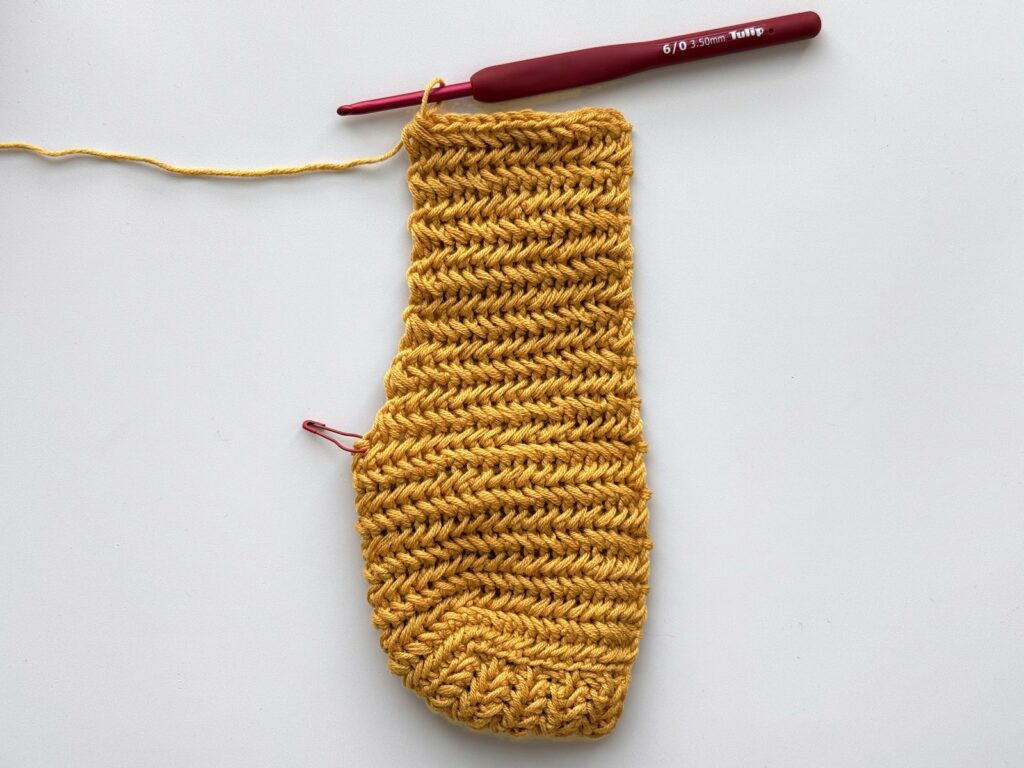
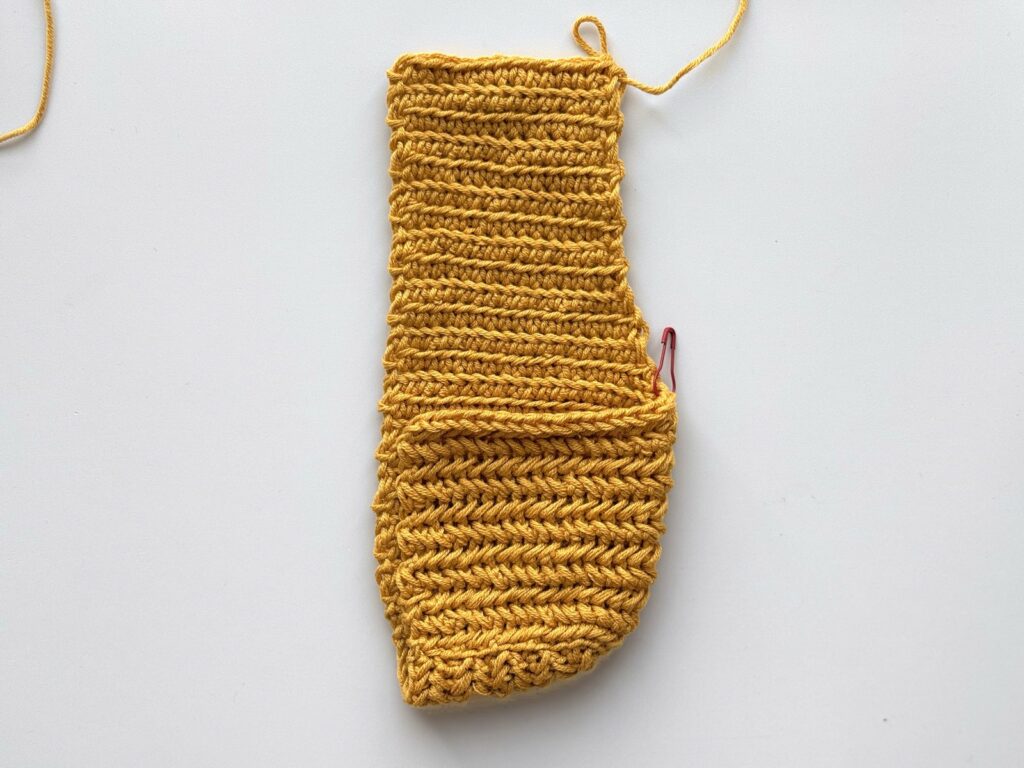
End B
- Join the yarn for End B. With the RS facing you, join the yarn in the first stitch after the marker and start Row 1 with a decrease, so End B also decreases at the back-centre edge.
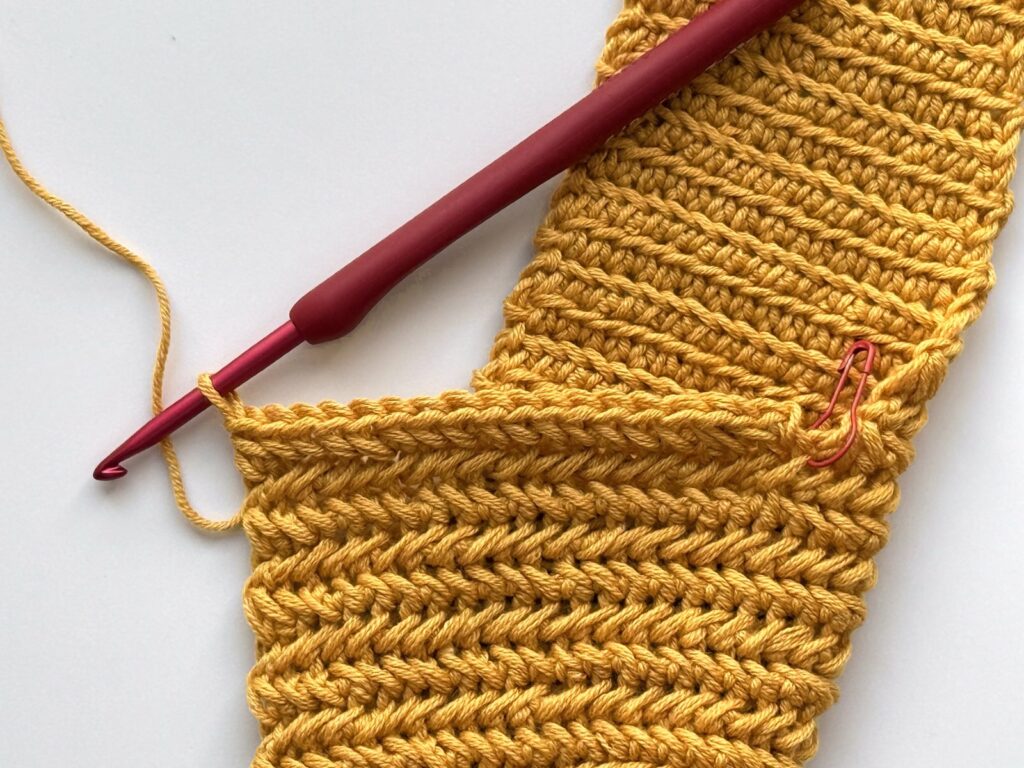
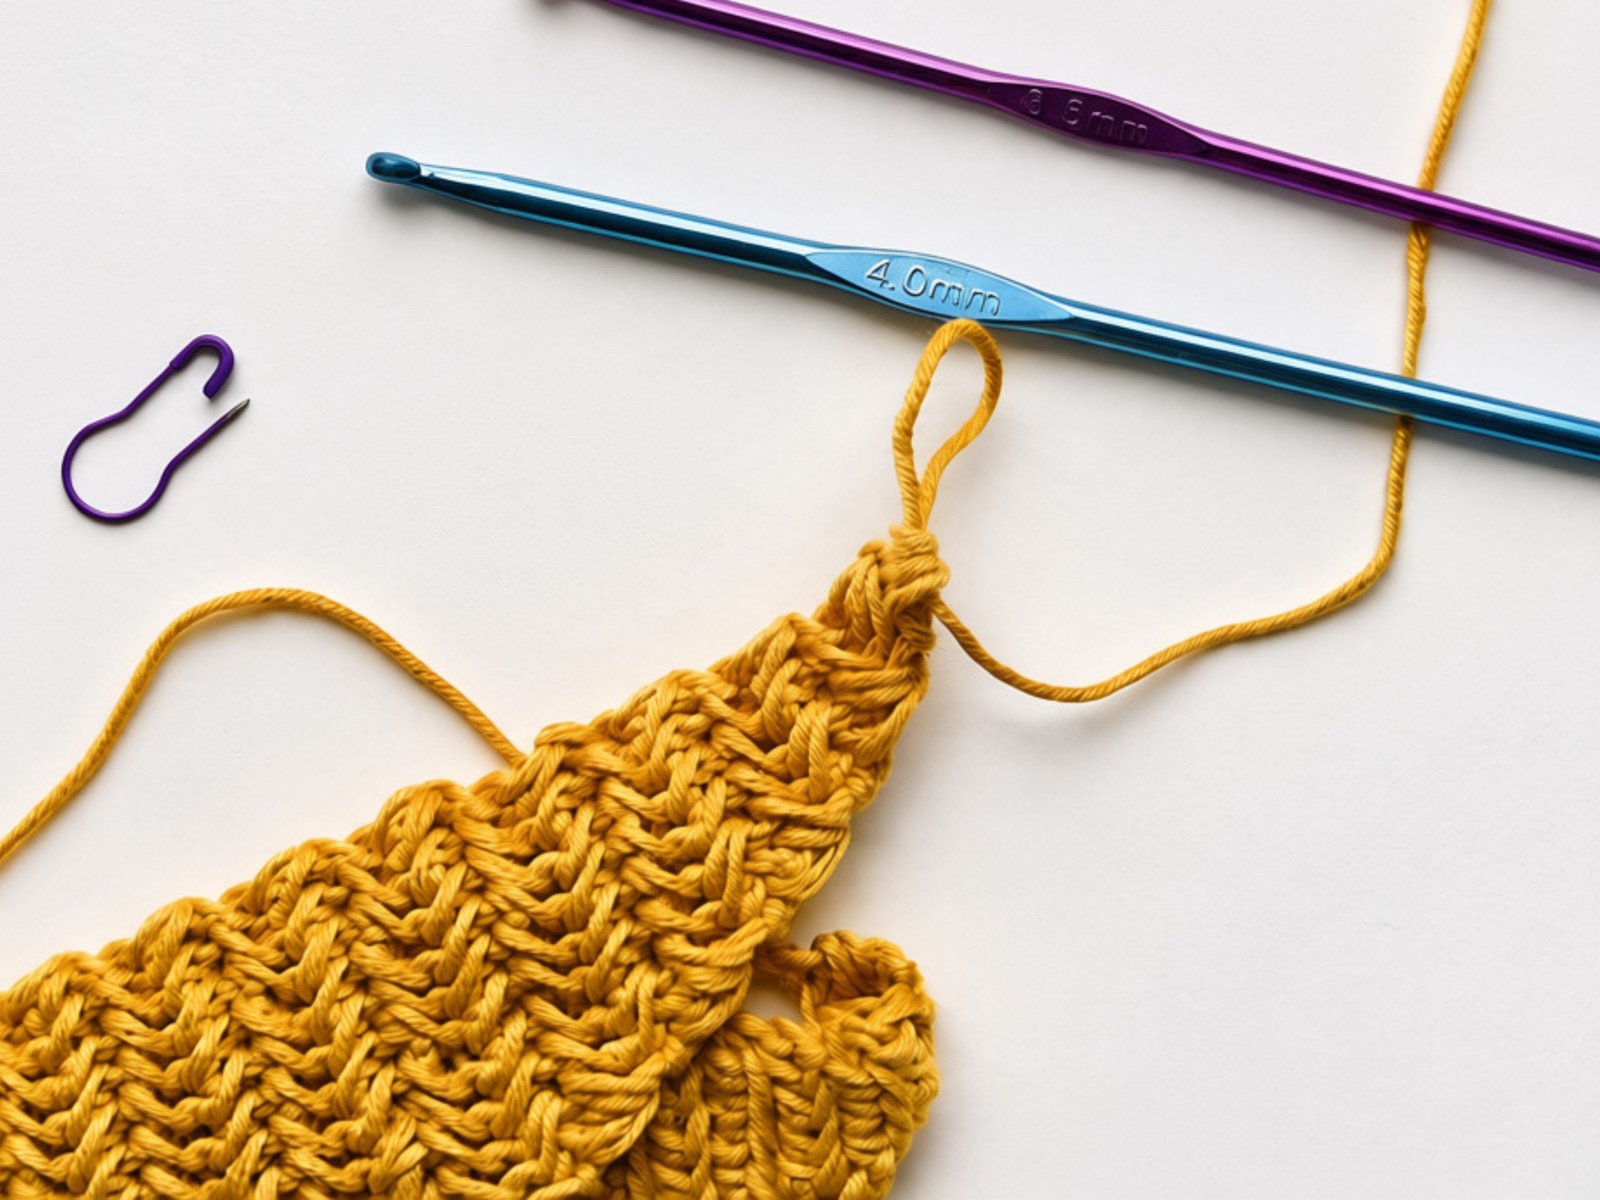
- End B finished. Work End B to a point like End A. Don’t fasten off: the live loop at the tip is where the I-cord starts. At this point I swap the hook I’ve been using for two metal hooks. I use 3.5 mm and 4 mm, because I don’t have two metal 3.5 mm hooks.
I-cord edging
- Chain 4. From the live loop at the tip of End B, chain 4.
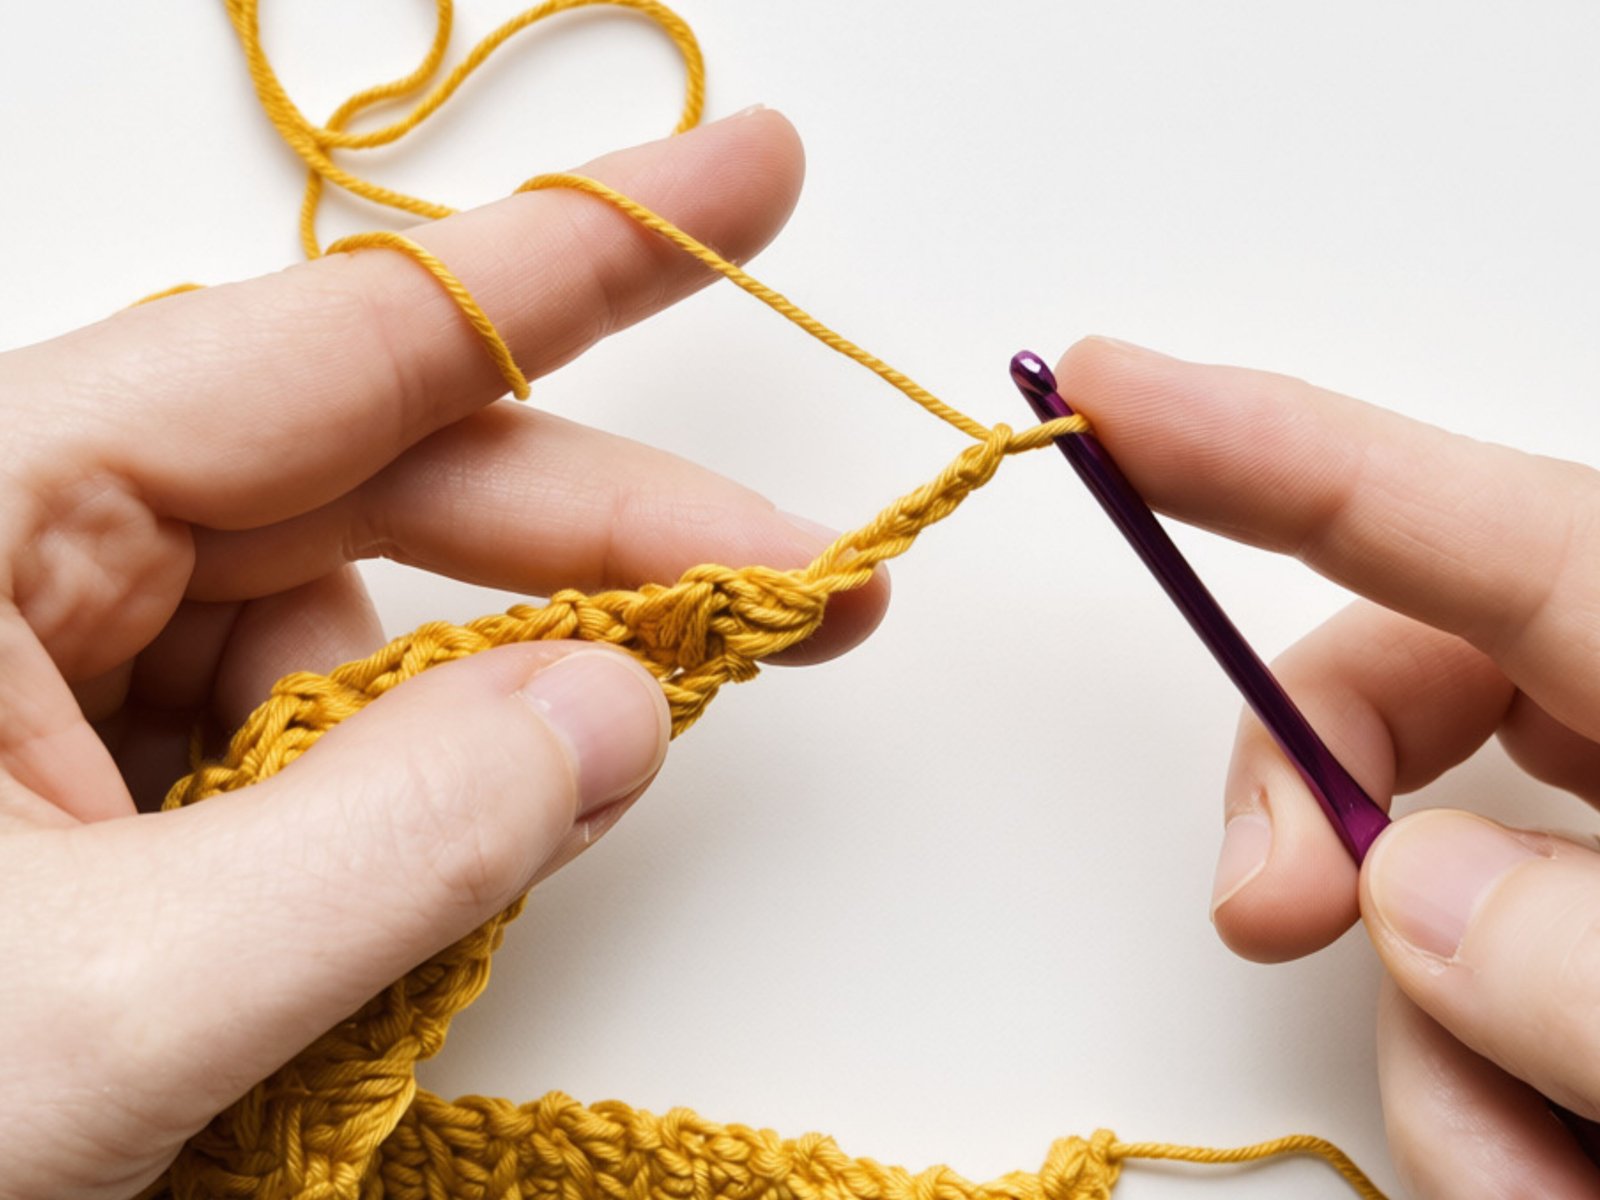
- Pull up loops in the chains. Insert the hook in the 2nd ch from the hook and pull up a loop. Repeat in the next 2 ch. You now have 4 loops on the hook.
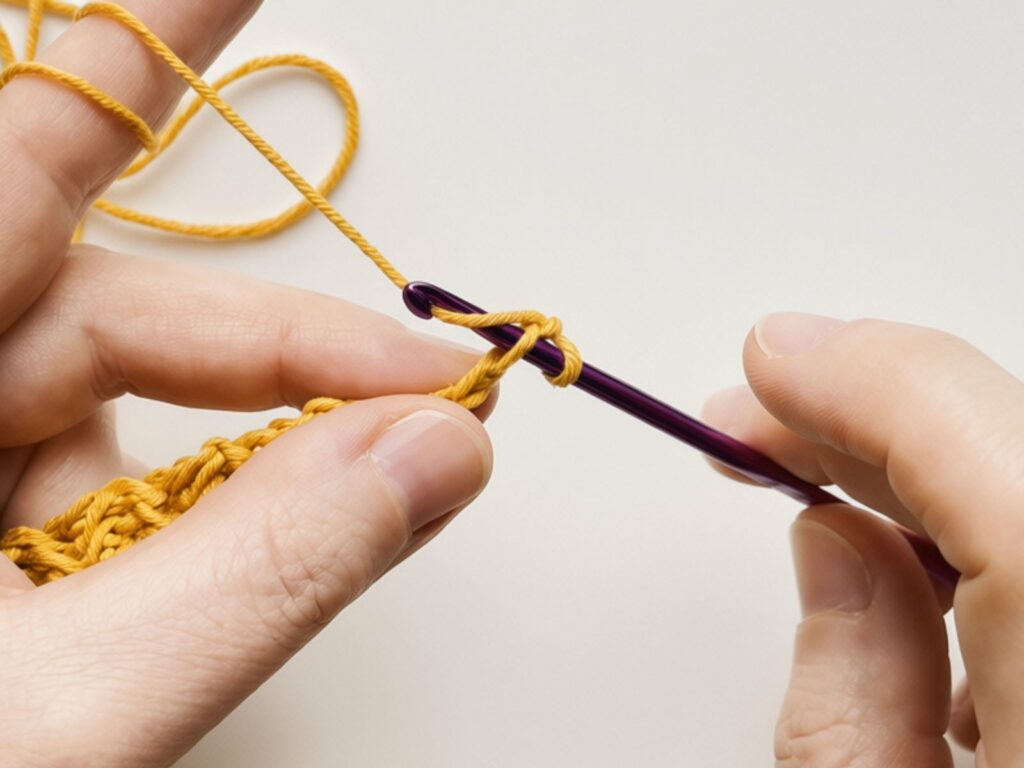
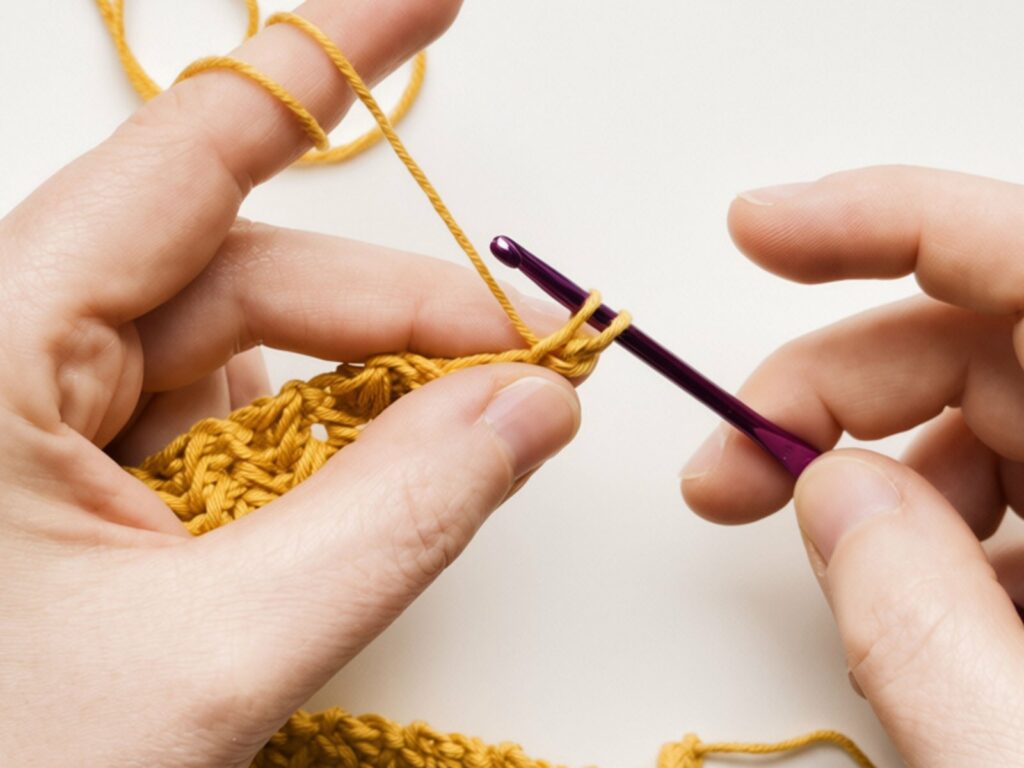
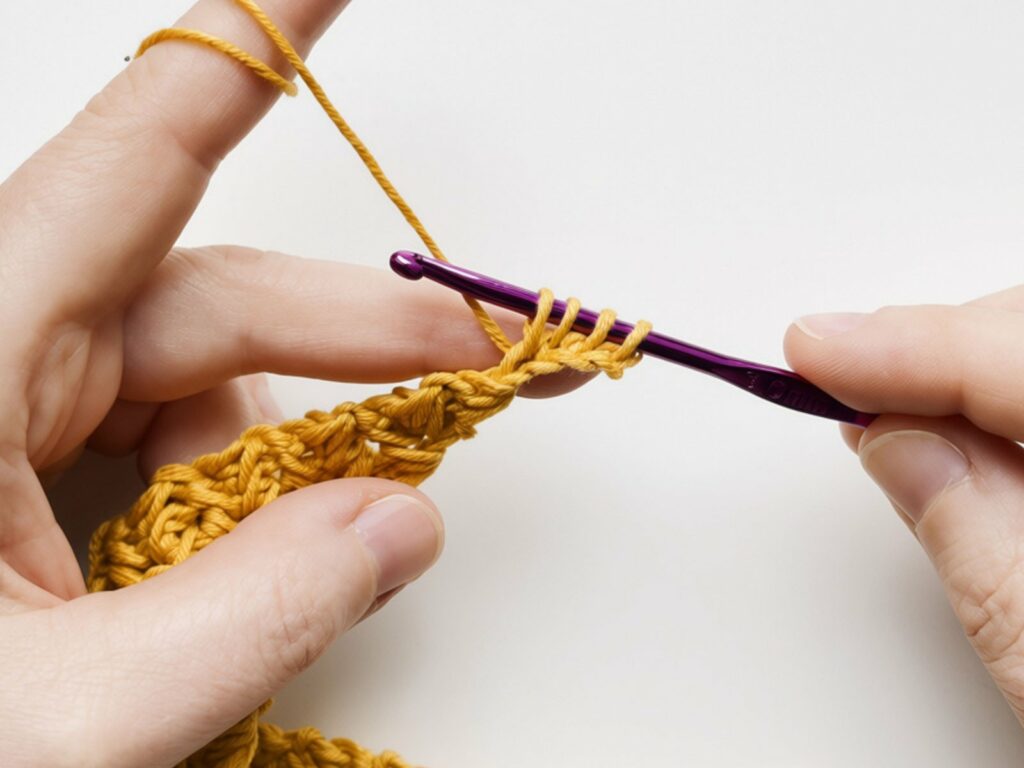
- Pull up a loop in the edge. Pull up a loop in the first row-end of the edge. Now you have 5 loops on the hook.
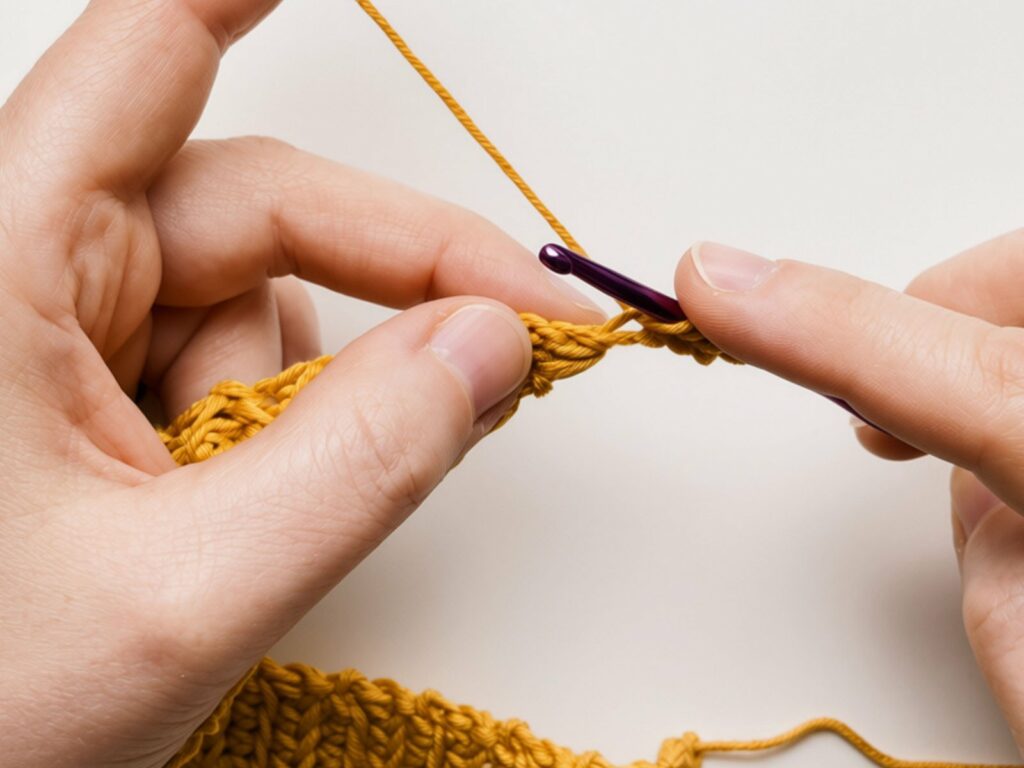
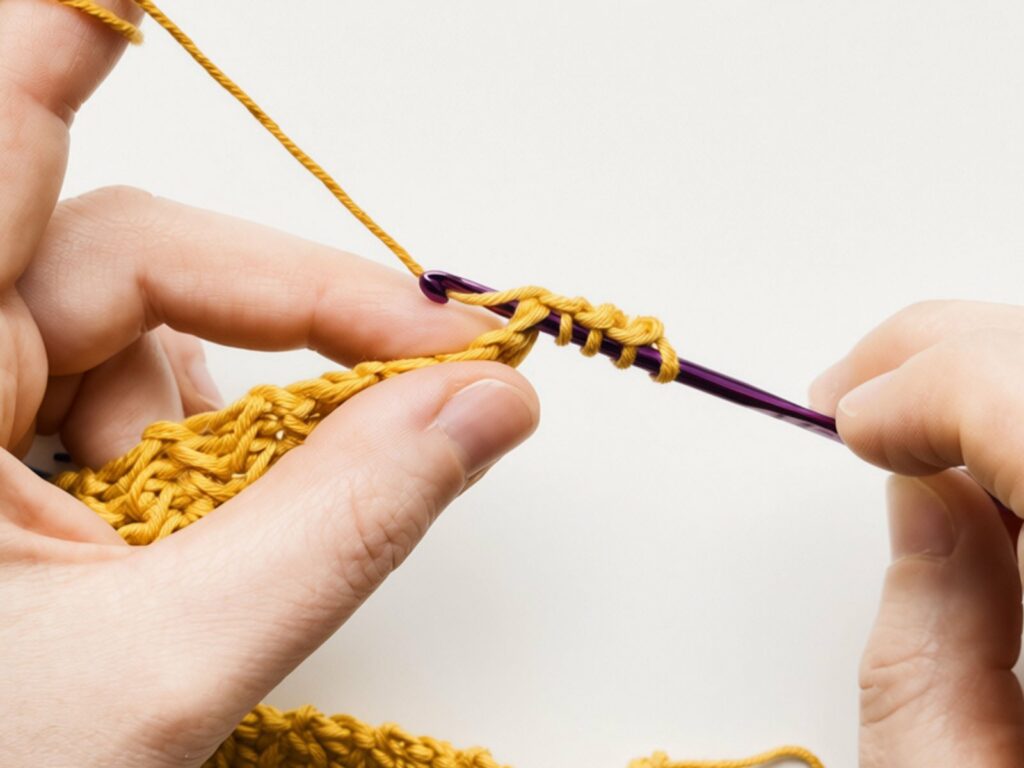
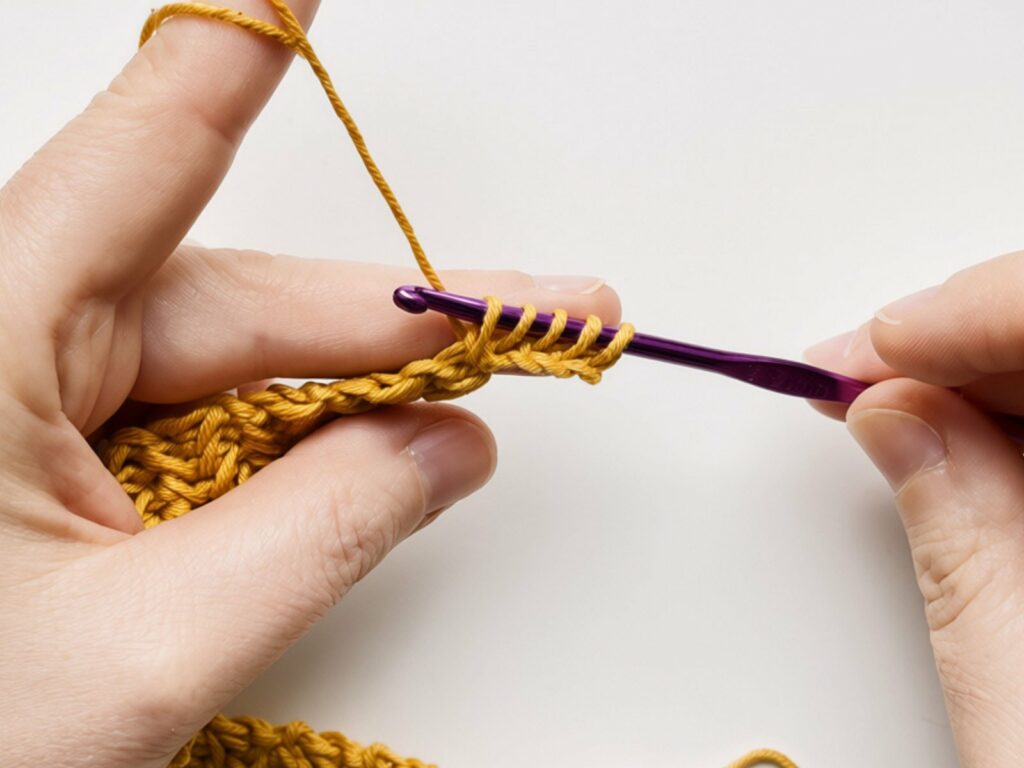
- Put the first loop on a marker. Slide the loops to the other end of the hook, take the first loop off and put it on a stitch marker. You’ll need it to close the cord at the very end.
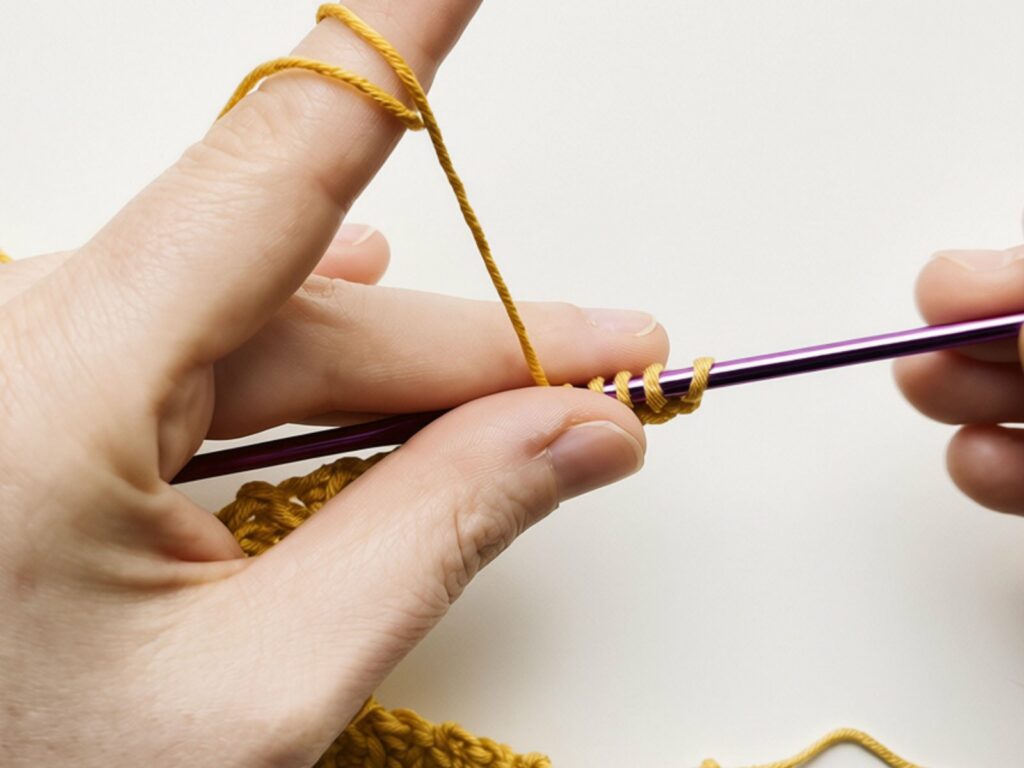
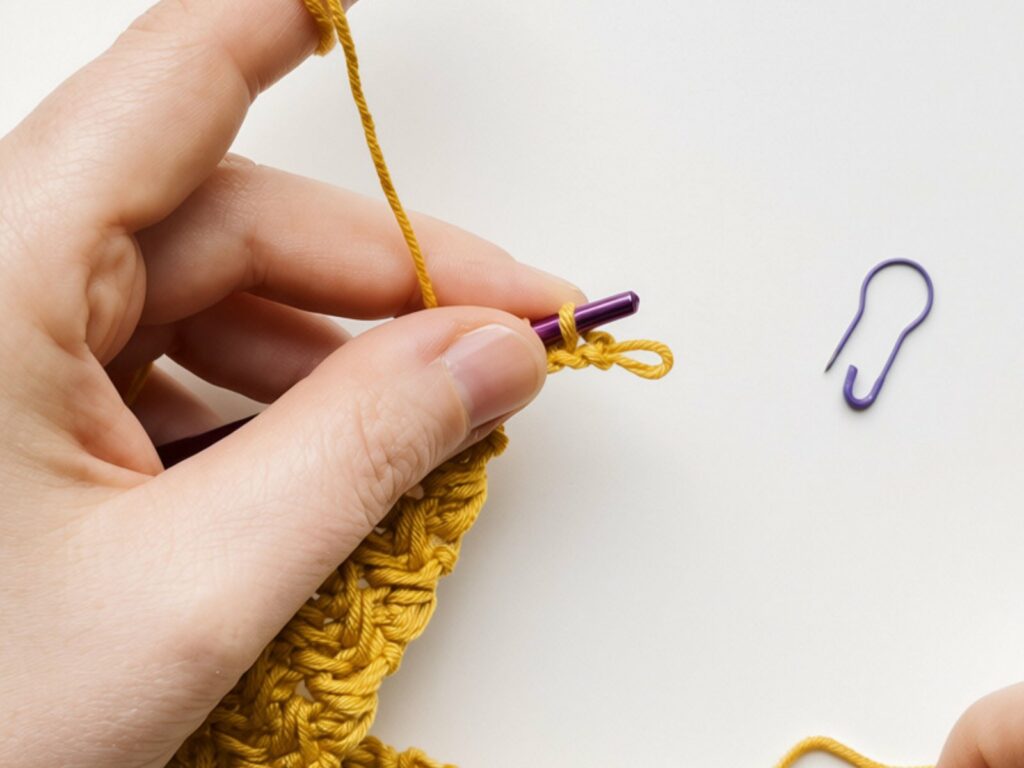
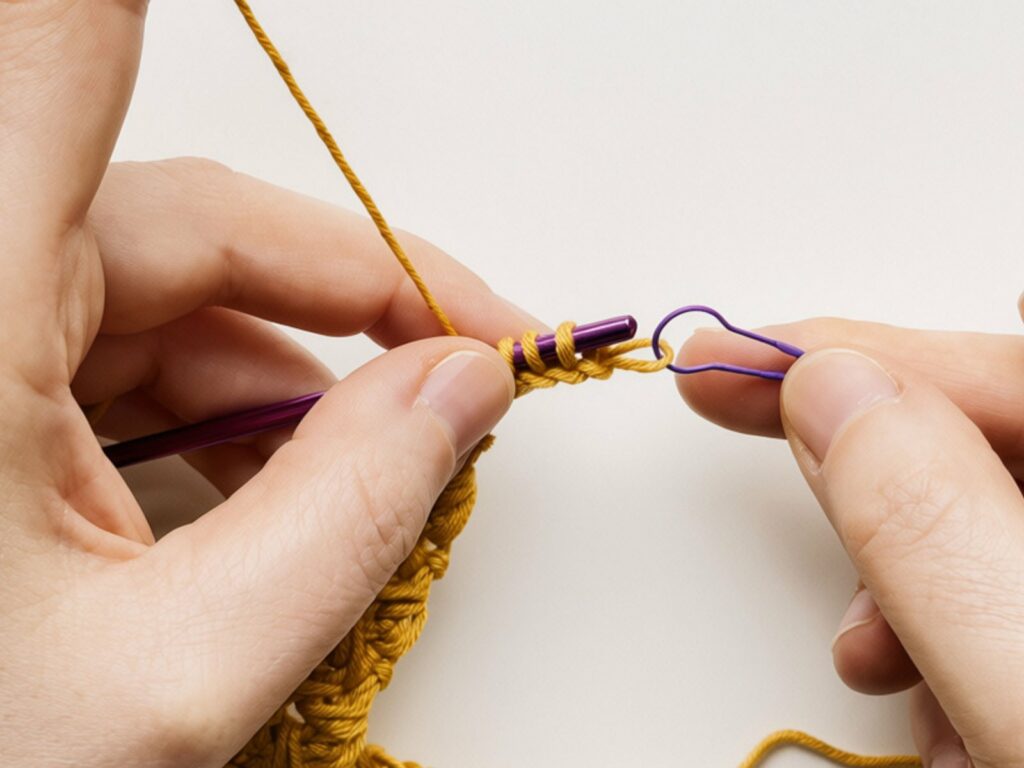
- Knit 1, knit 1. This part works like knitting. The hook with the loops is your left needle and the empty hook is your right needle. Insert the empty hook into the first loop as if to knit, yarn over, pull through and let the old loop slip off. Do the same with the next loop.
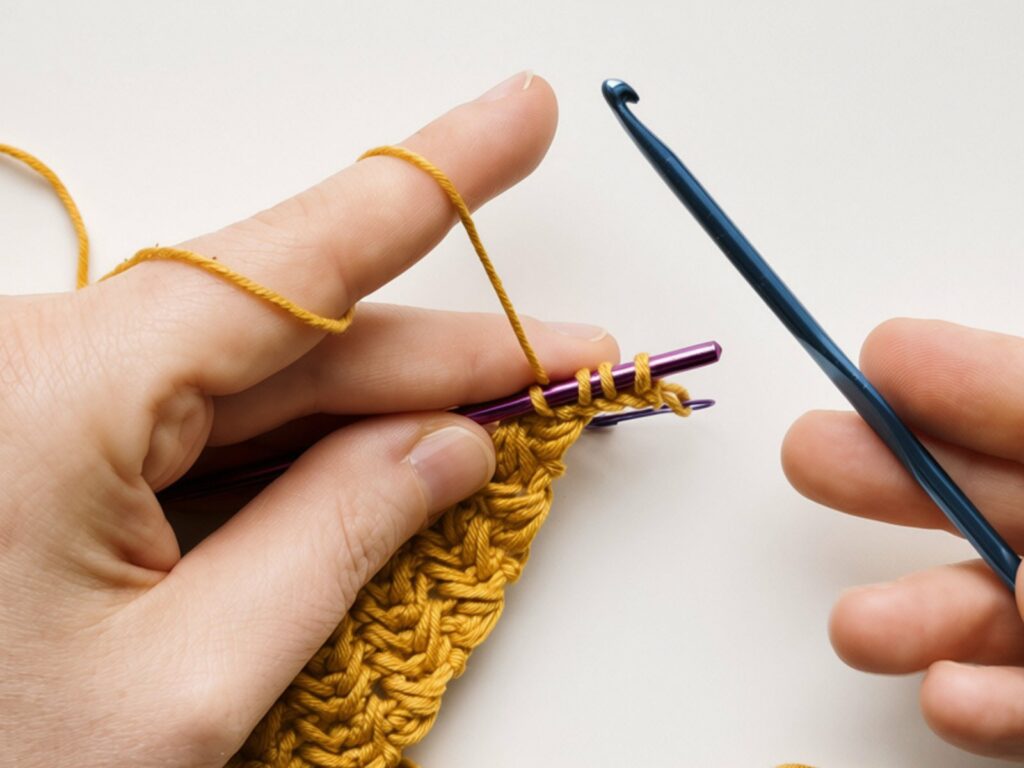
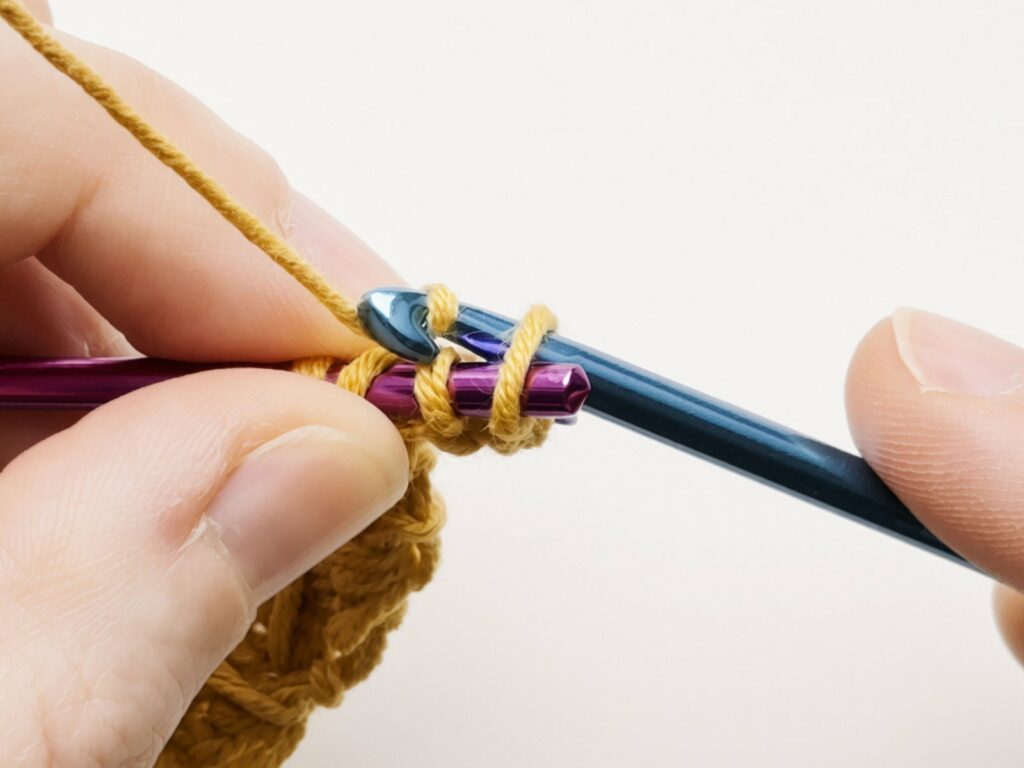
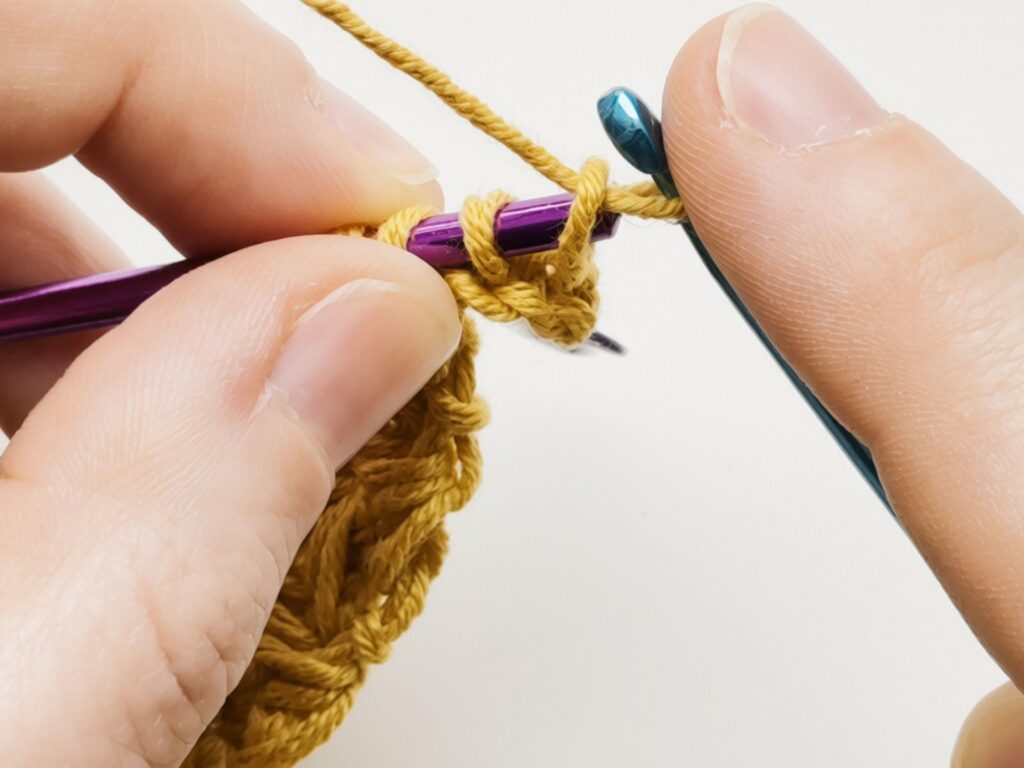
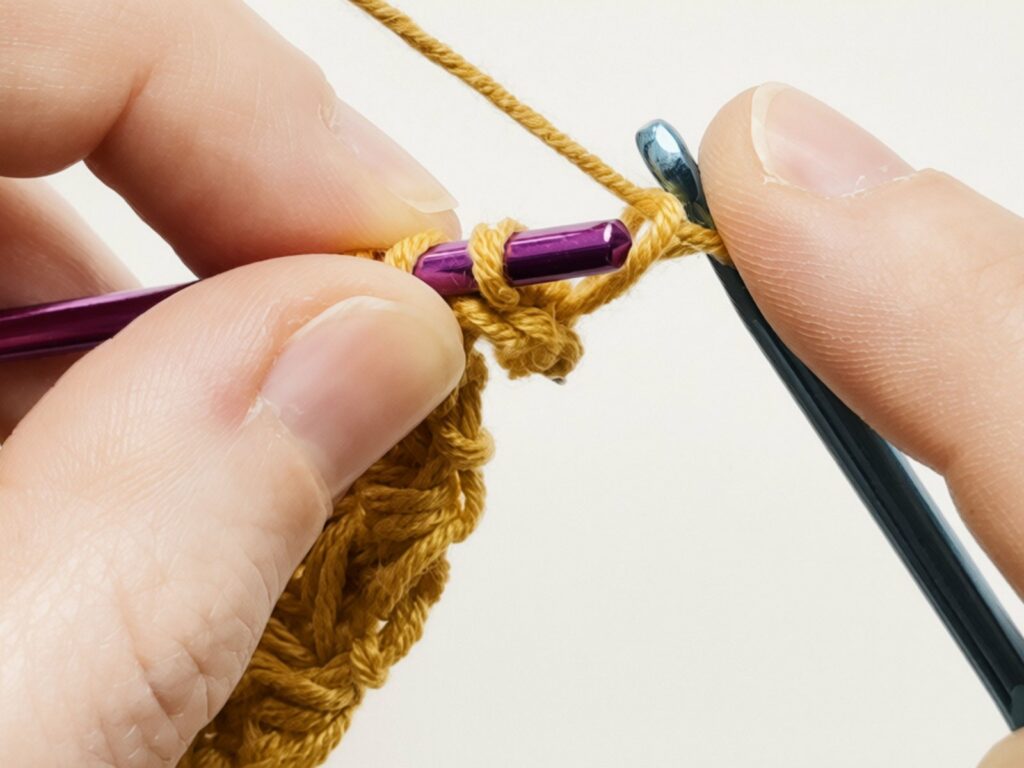
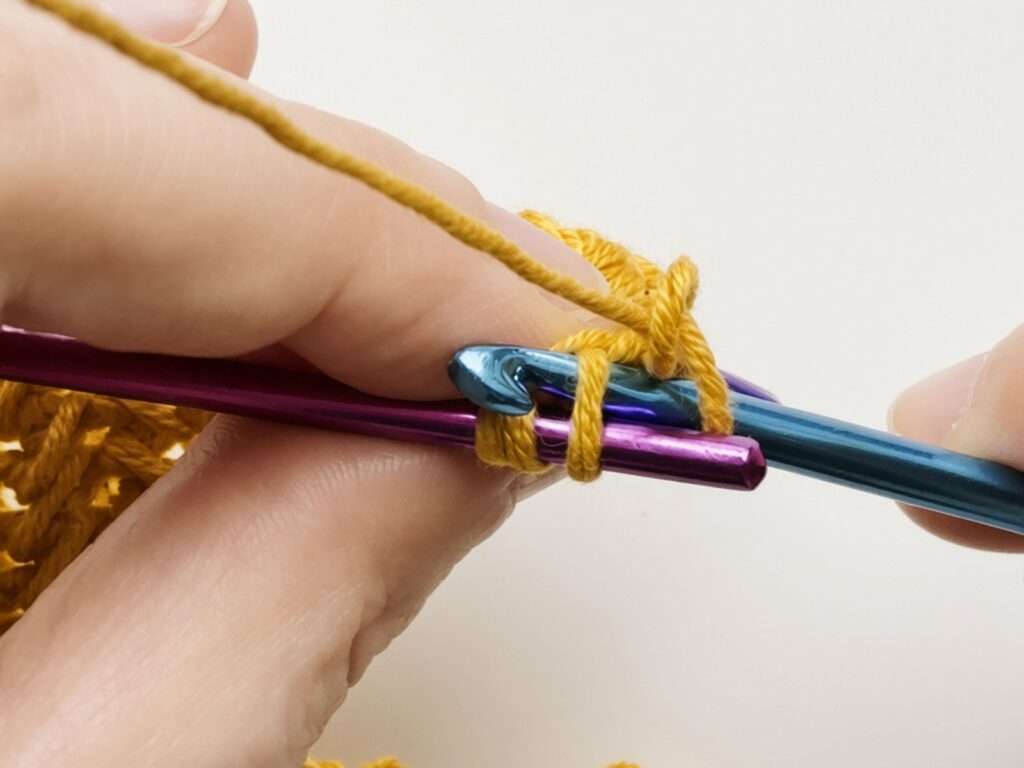
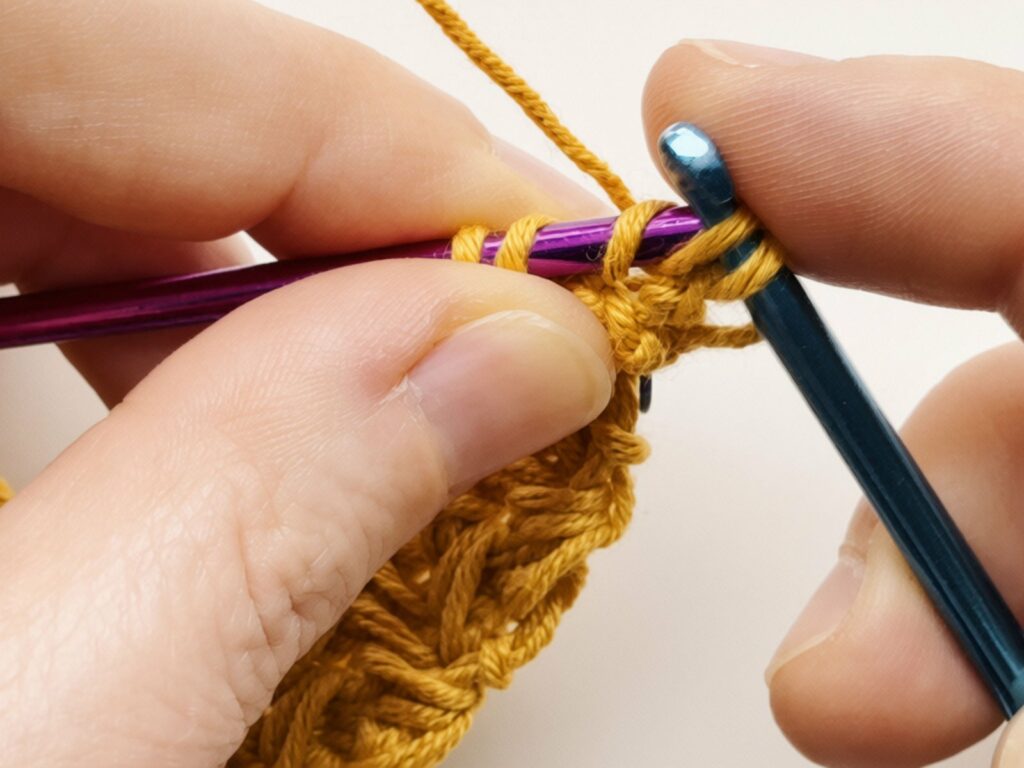
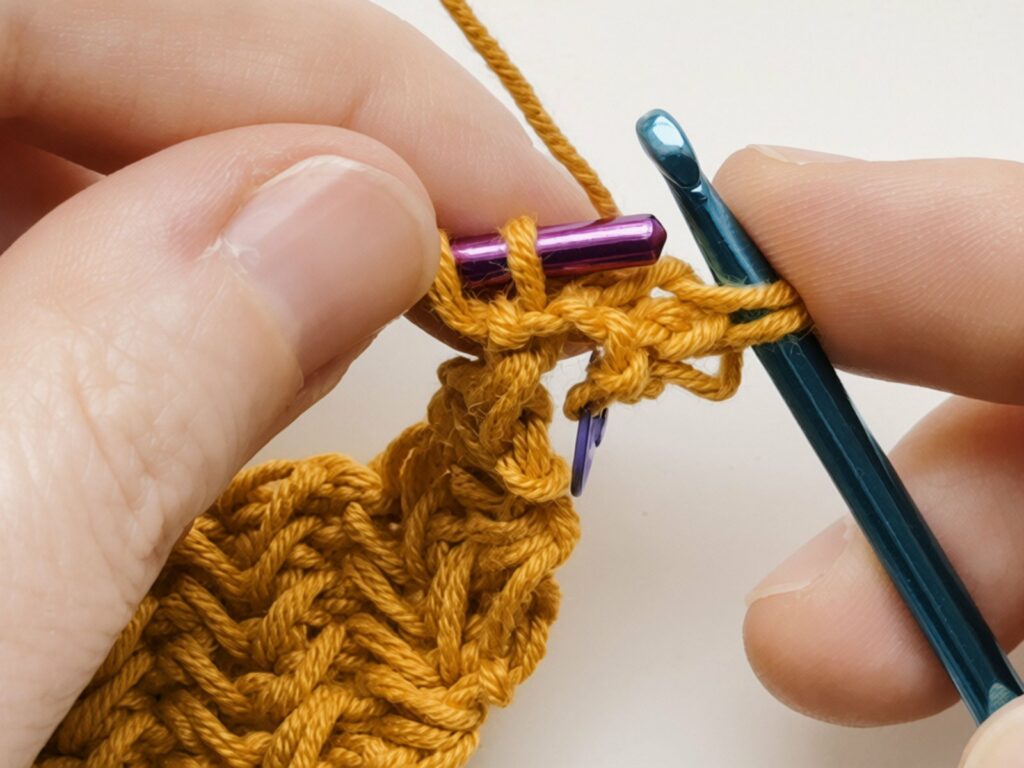
- Knit 2 together. Insert the empty hook into the last 2 loops at once, yarn over and pull through. Now 3 loops sit on the new hook.
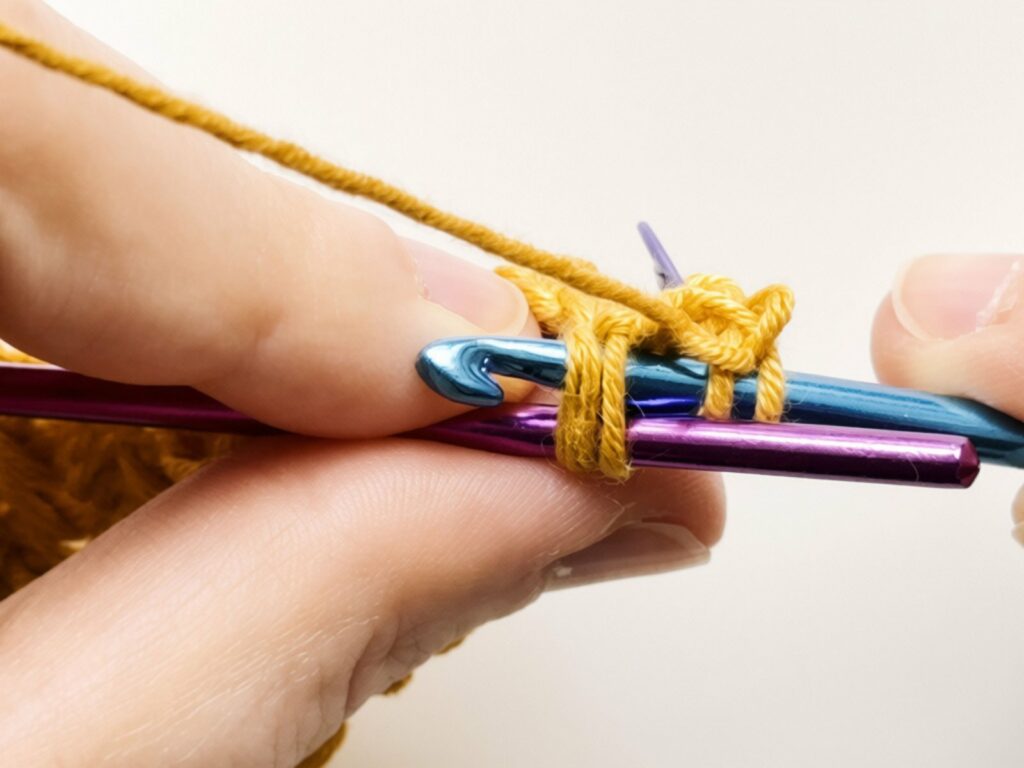
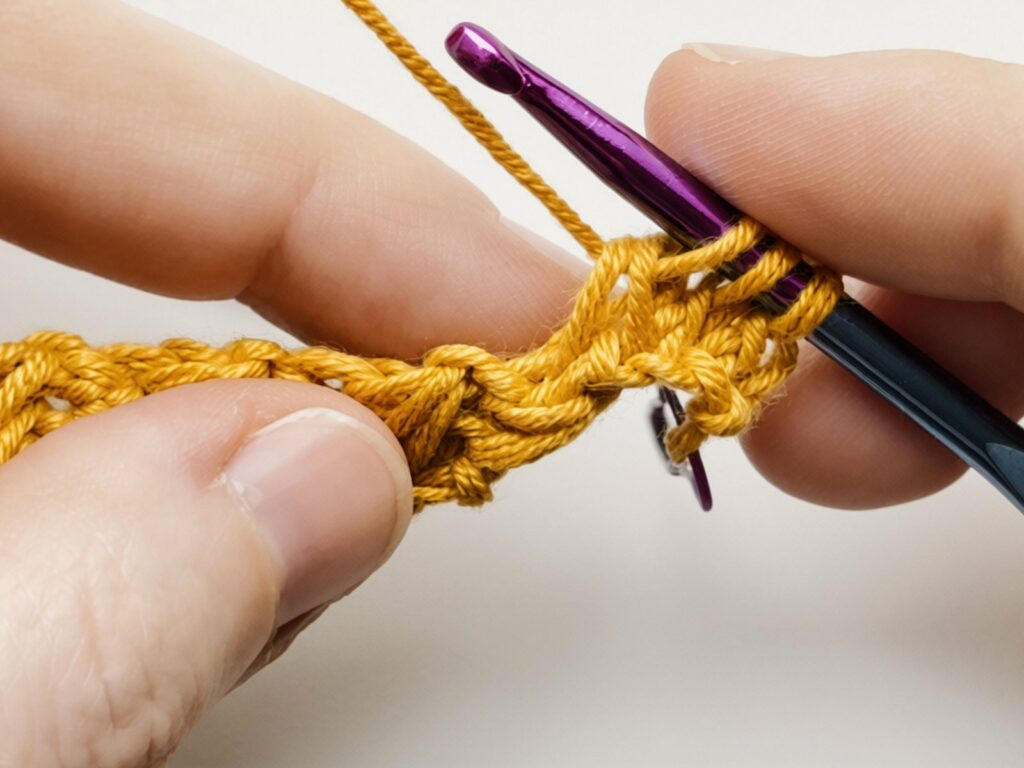
- Attach in the same place. Pull up a loop in the same place as before: you’re at the tip of the scarf, and the corner needs a bit more cord here so it doesn’t pull. You have 4 loops again.
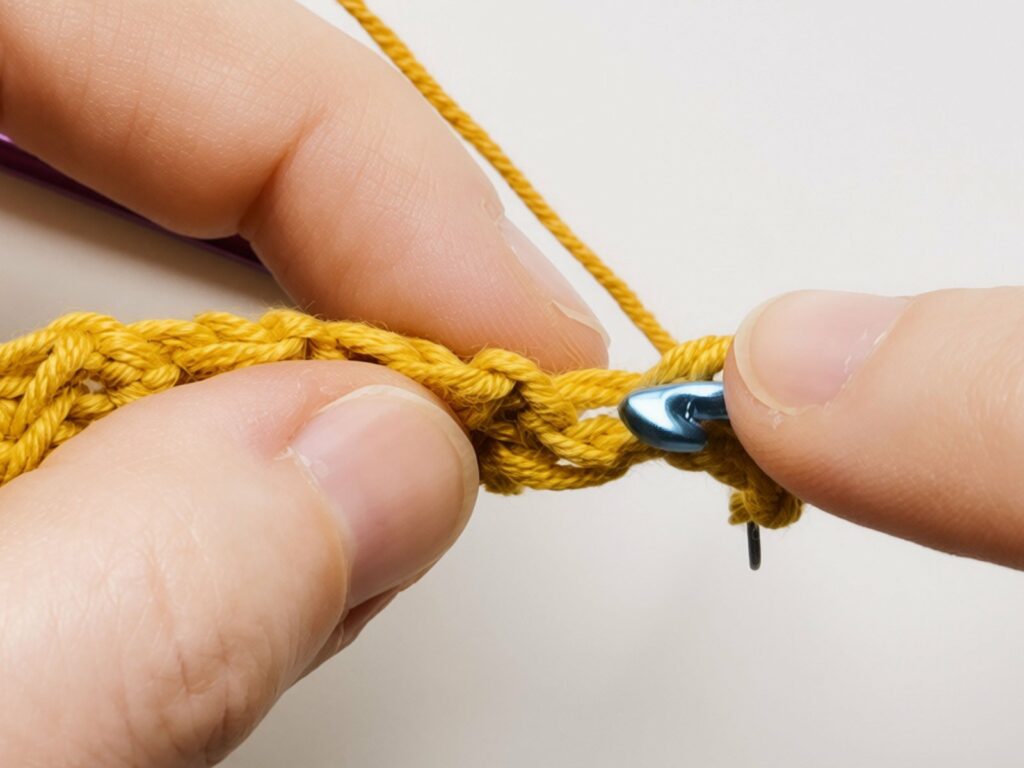
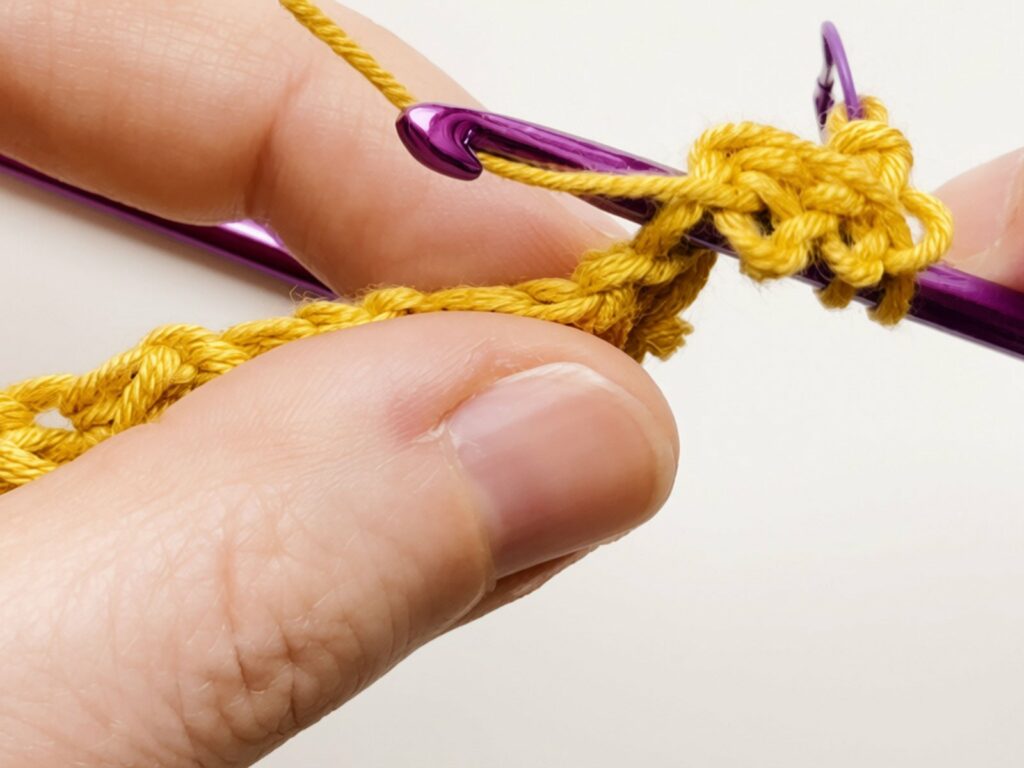
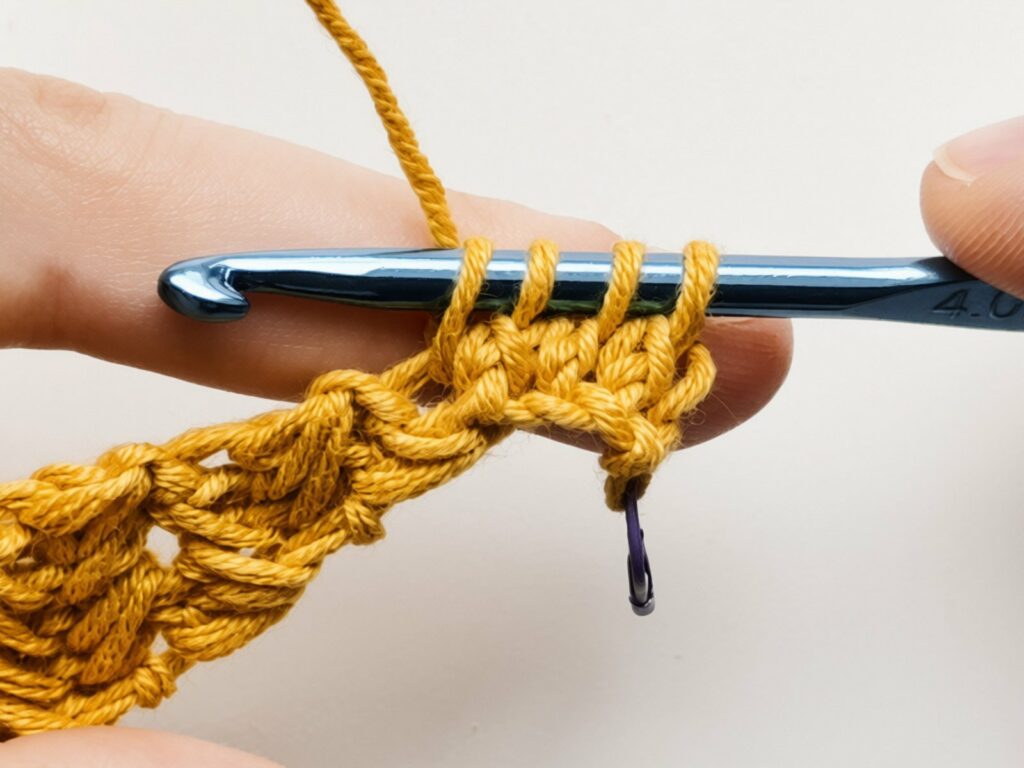
- Swap hooks and repeat. The hooks swap roles every row: the hook that now holds the loops is your left needle, and the empty one knits. Repeat the same moves: knit 1, knit 1, knit 2 together.
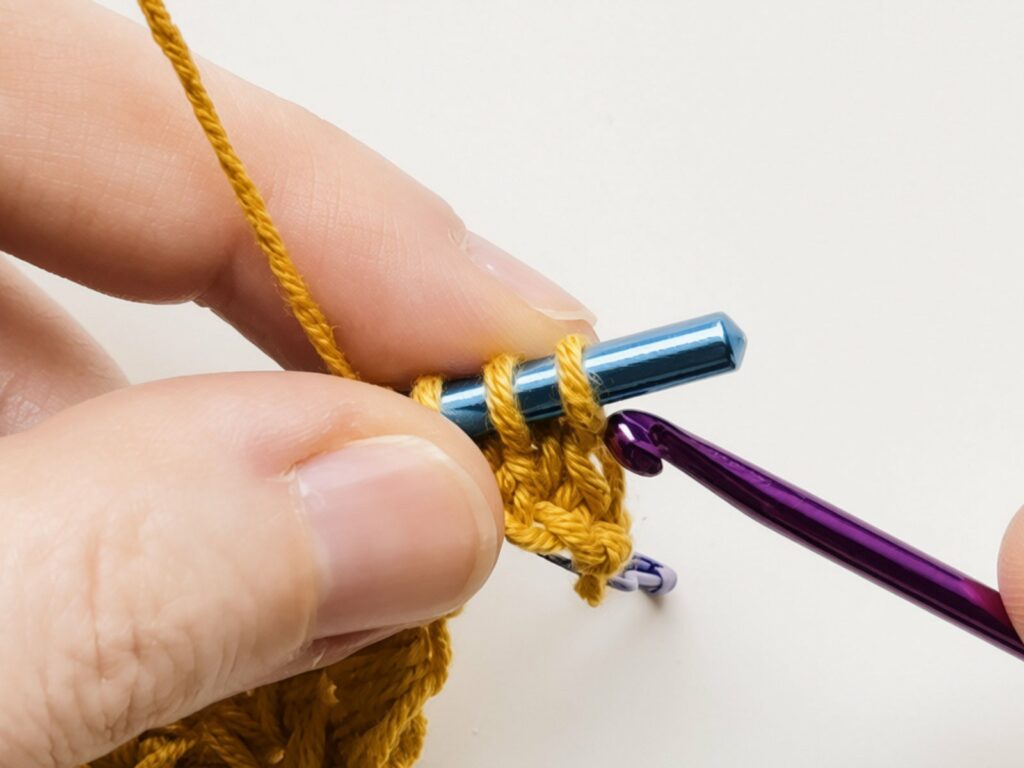
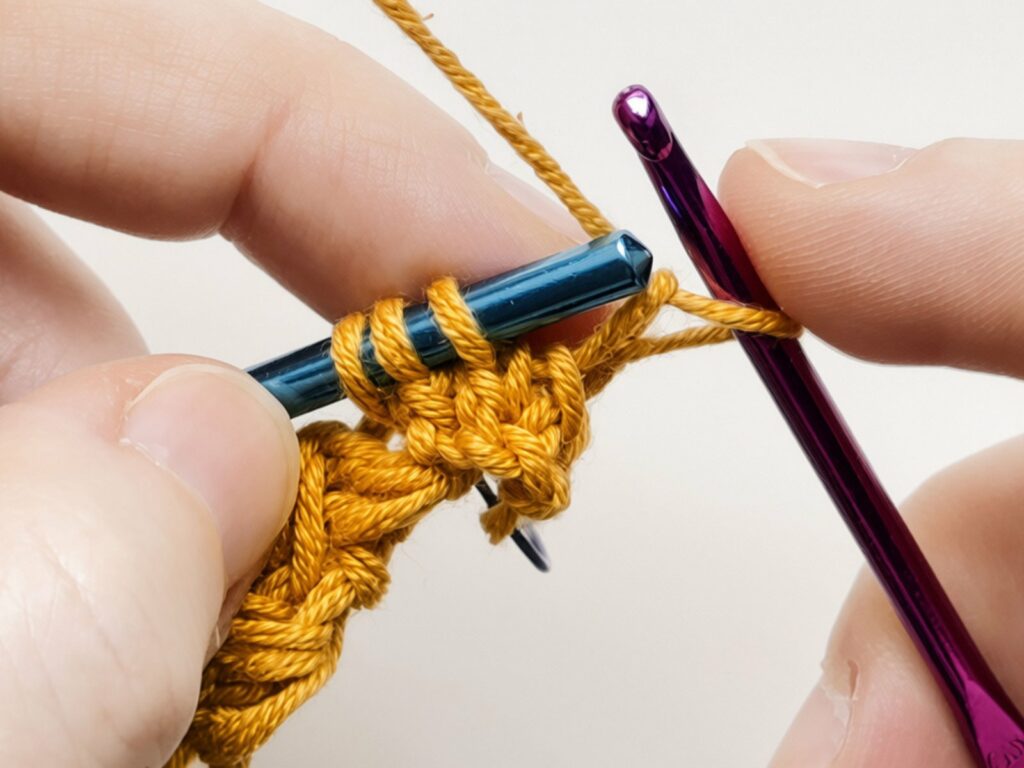
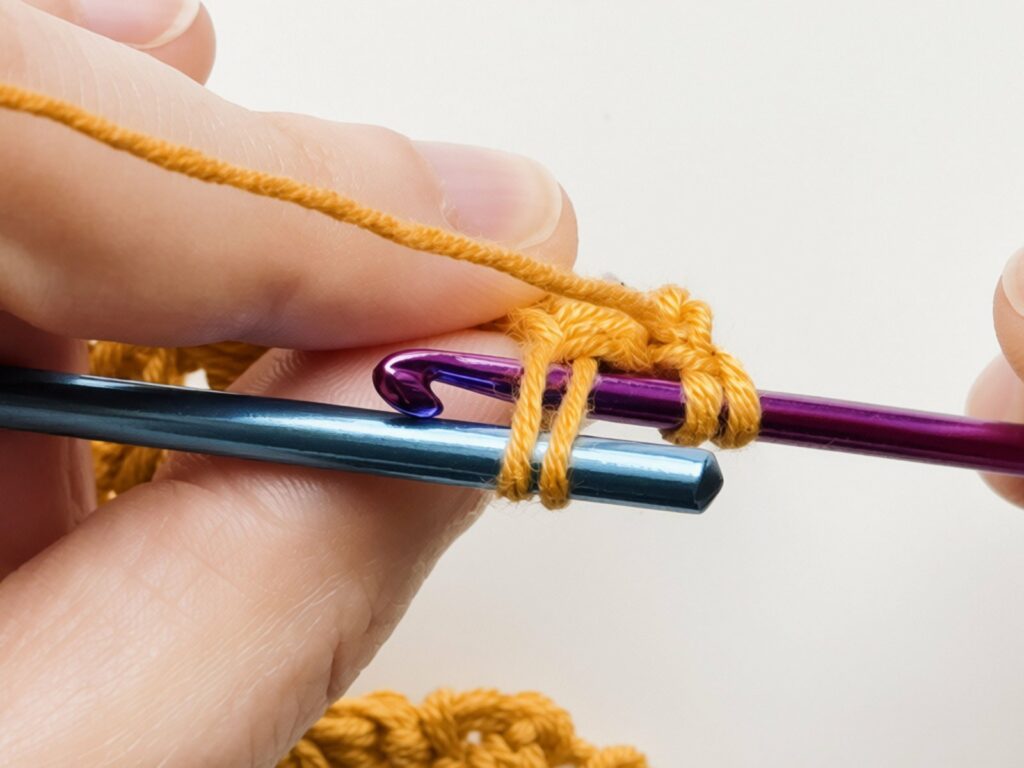
- Attach to the next place along the edge. Now attach to the next row-end or stitch along the edge, so you’re back to 4 loops.
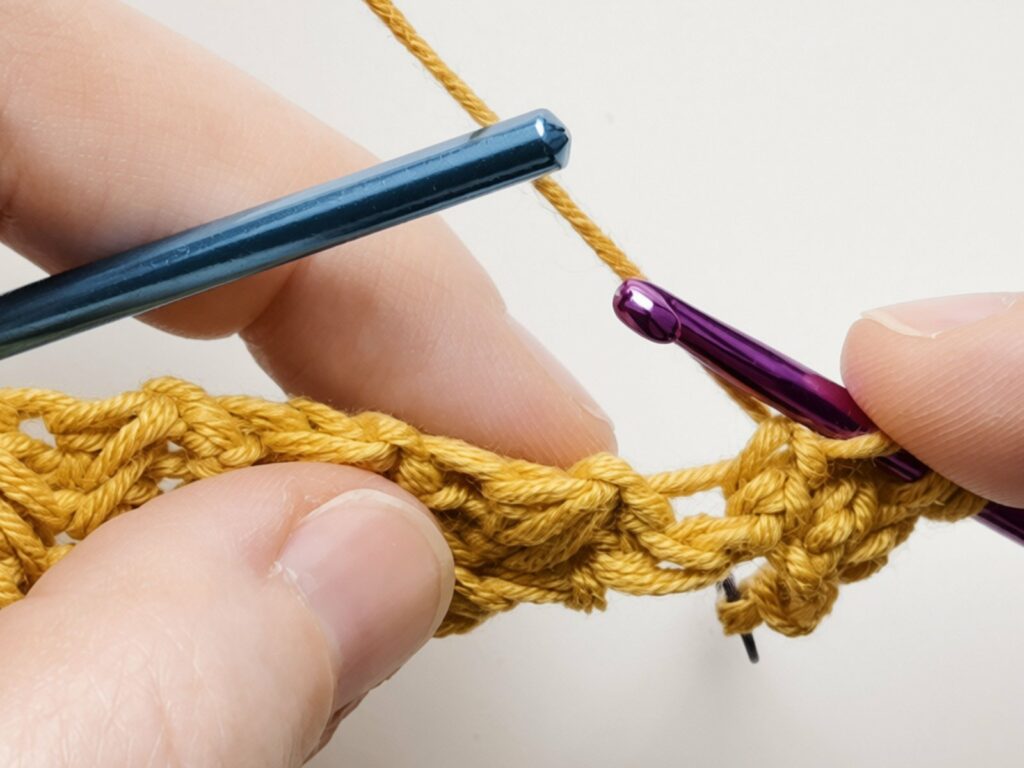
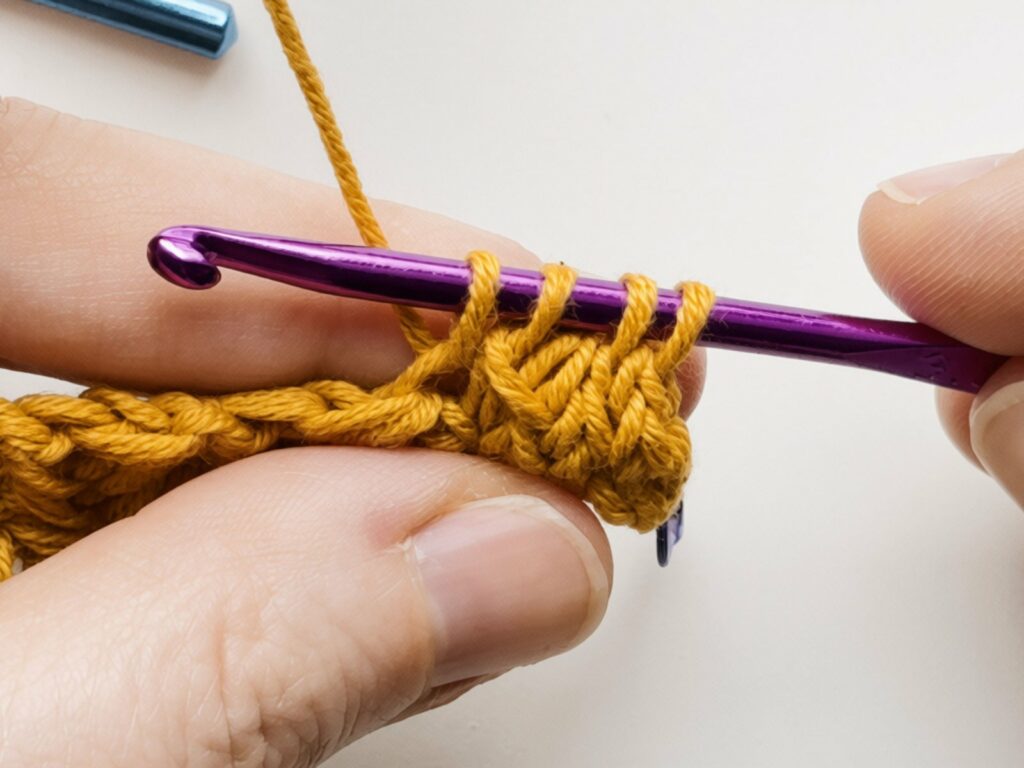
- Keep working along the edge. Keep repeating these moves along the edge, about one I-cord row per row-end. Check after about 10 cm: if the edge ruffles, attach a little less often; if it pulls in, attach a little more often.
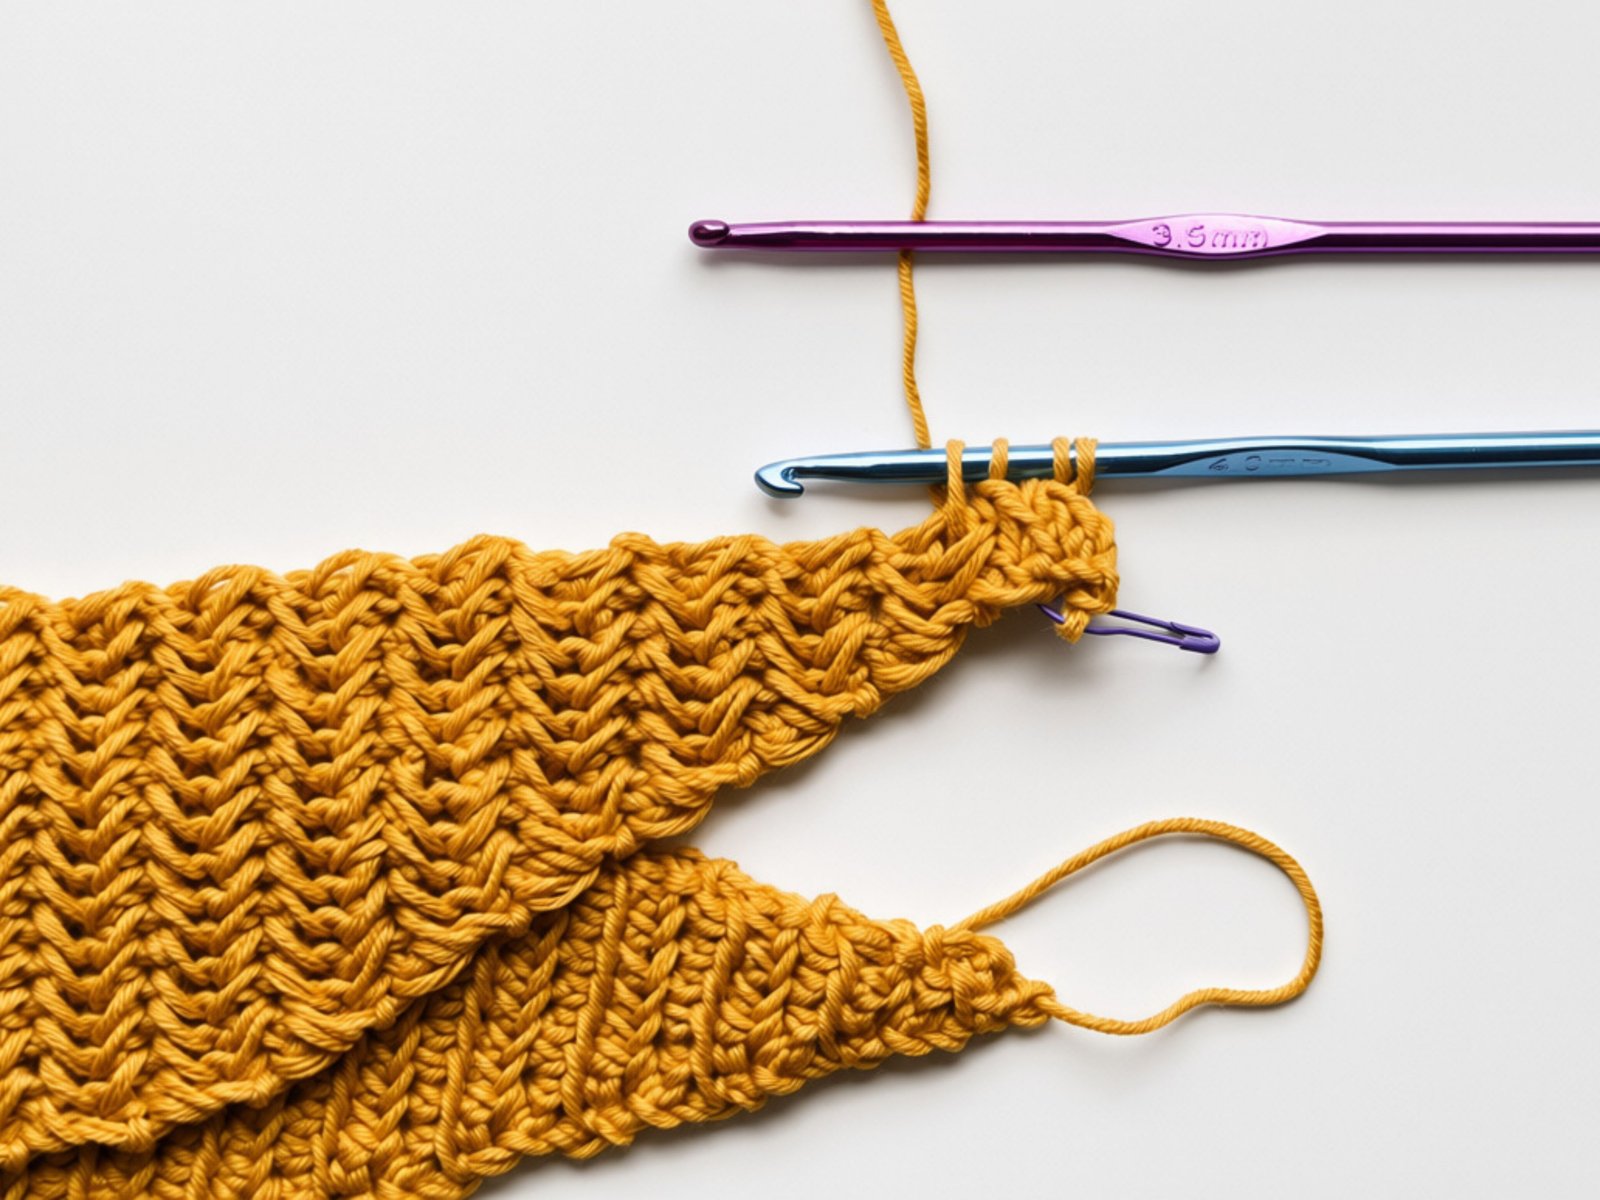
- Arrive at the tip of End A. When you get to the tip of End A, attach to the edge right next to the last row.
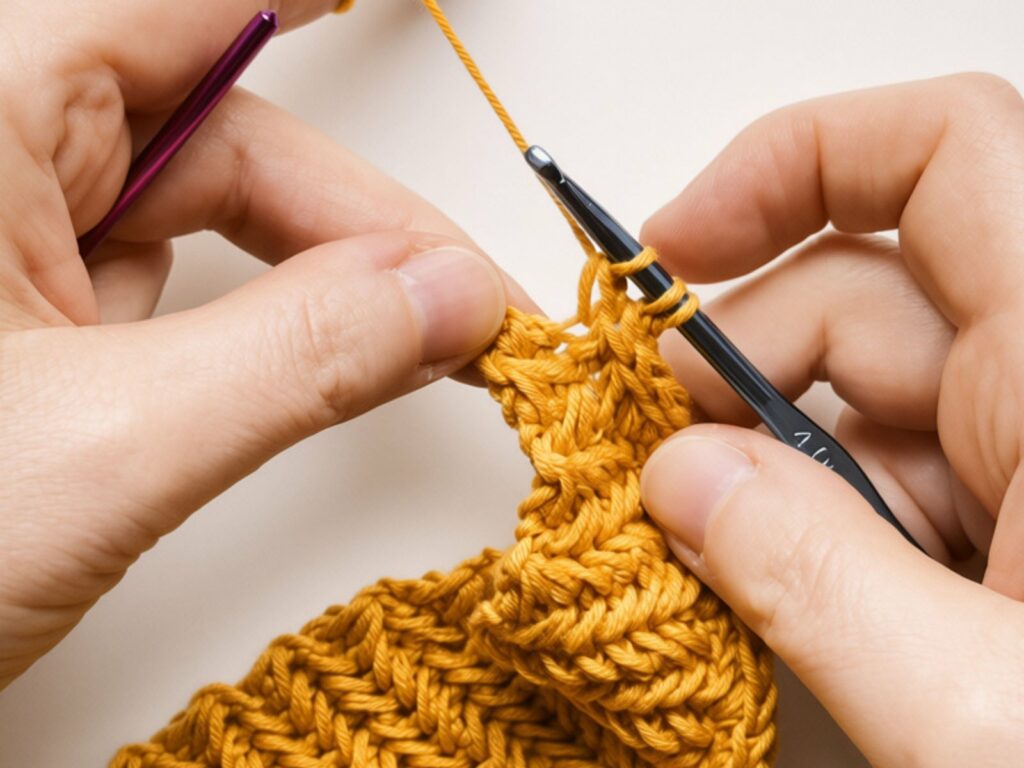
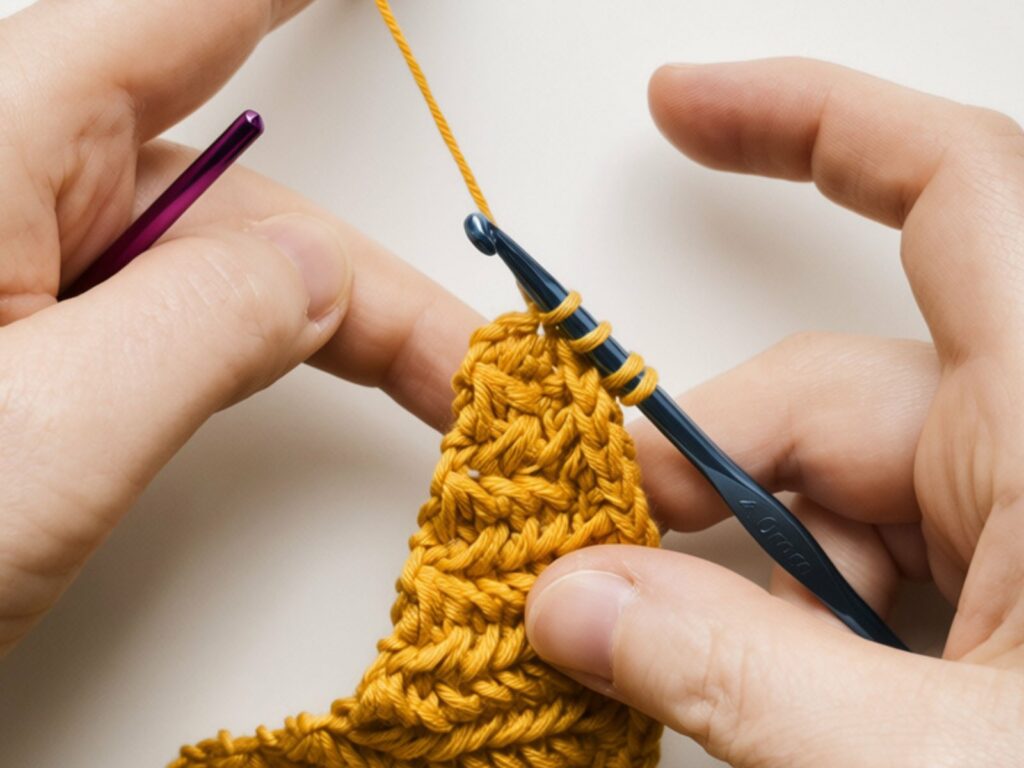
- Work around the tip. Work around the tip itself and attach twice into the same stitch, so the cord turns the point without pulling. If you see the cord pulling, you can even attach a third time into the same place.
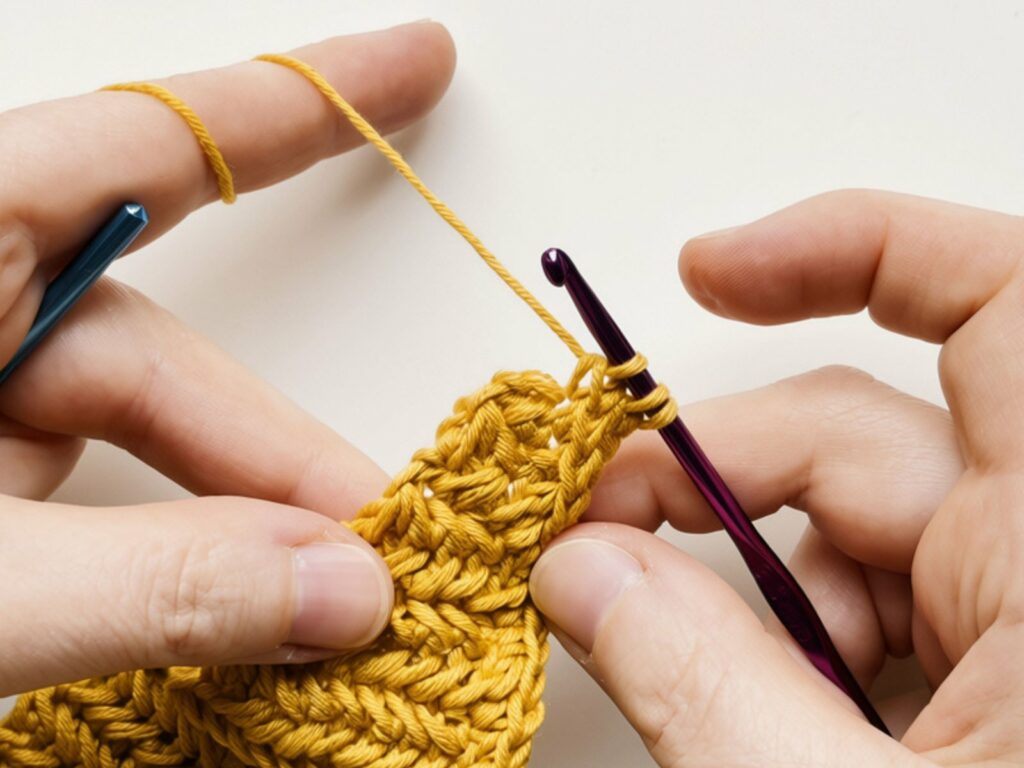
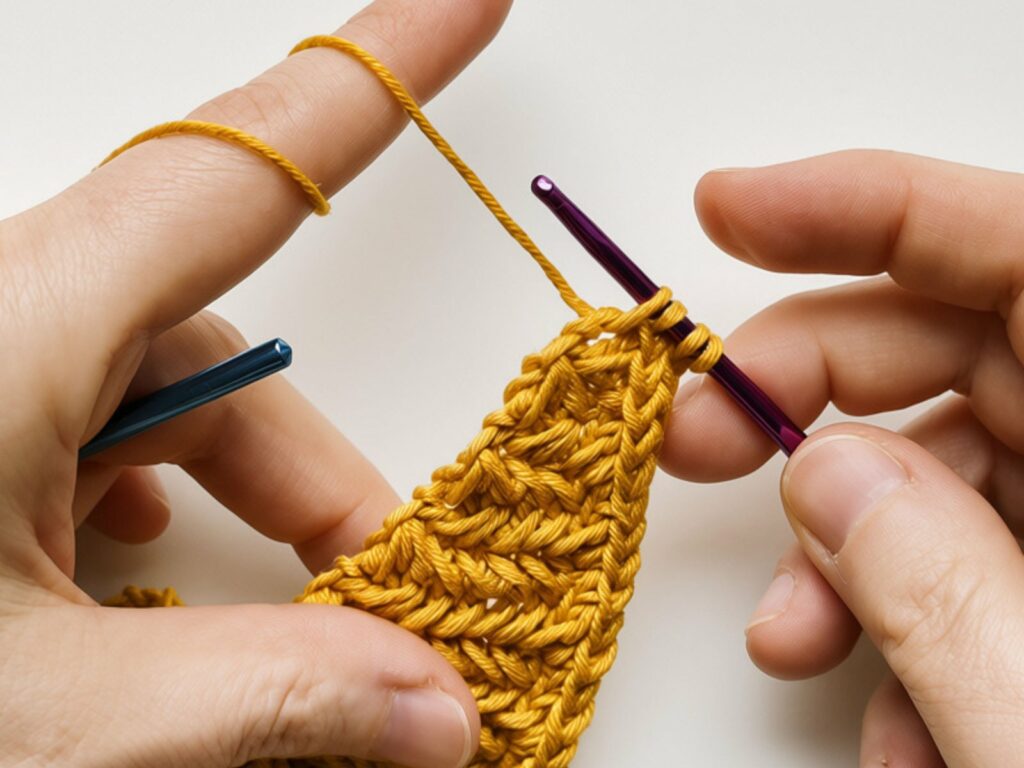
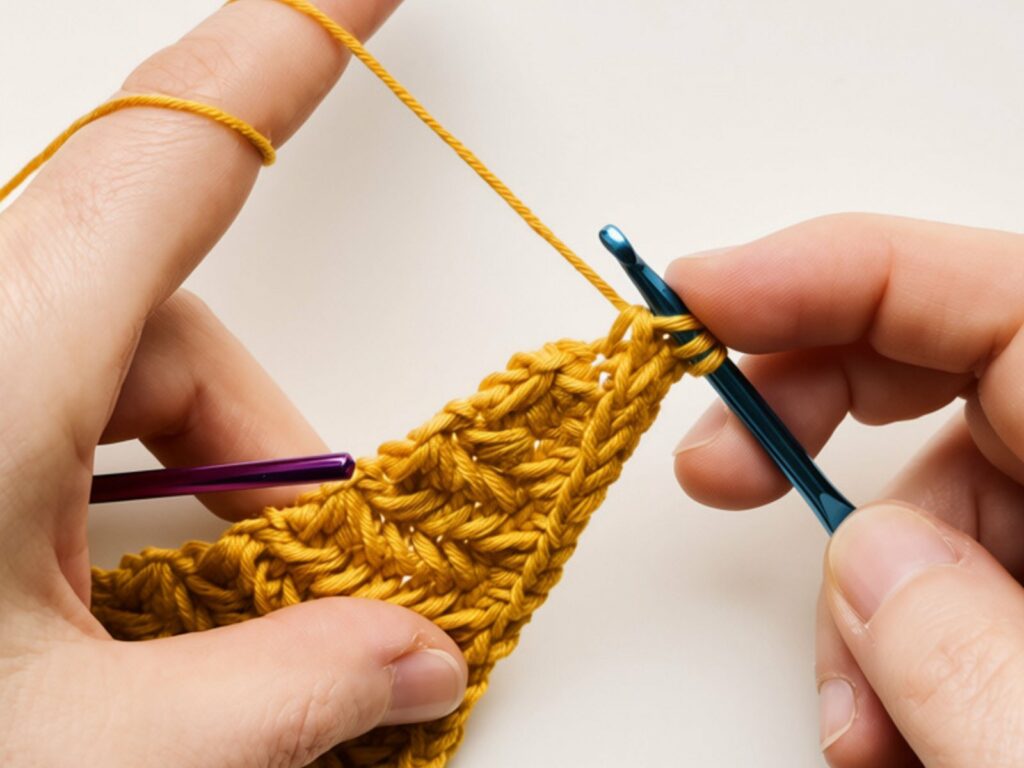
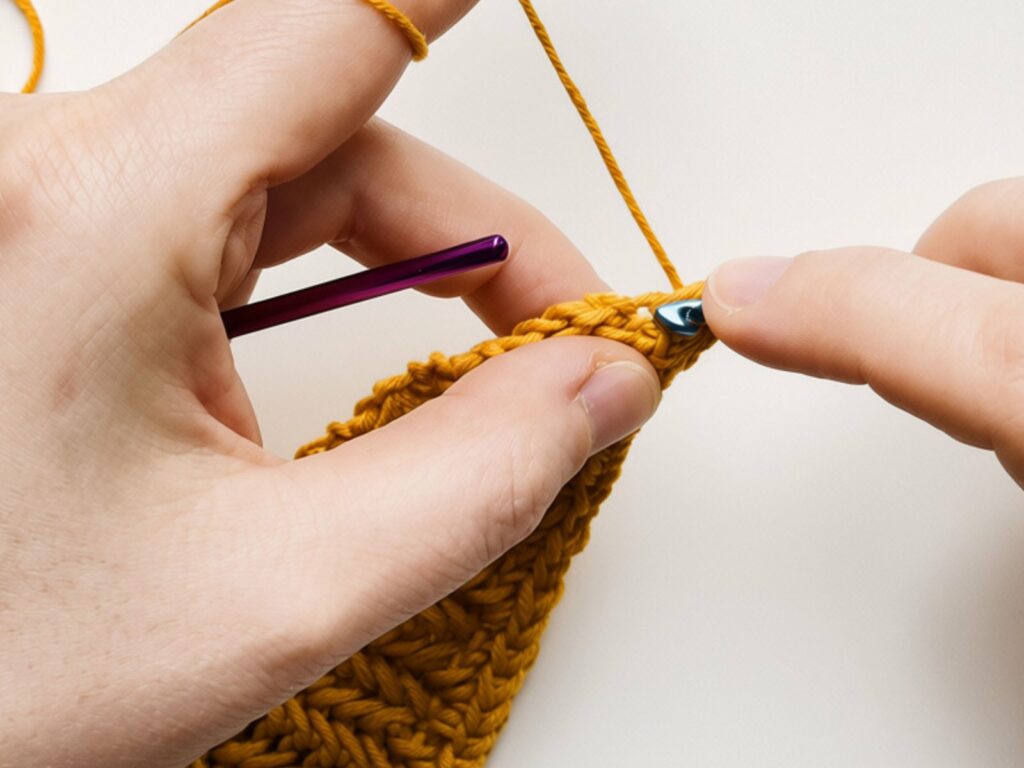
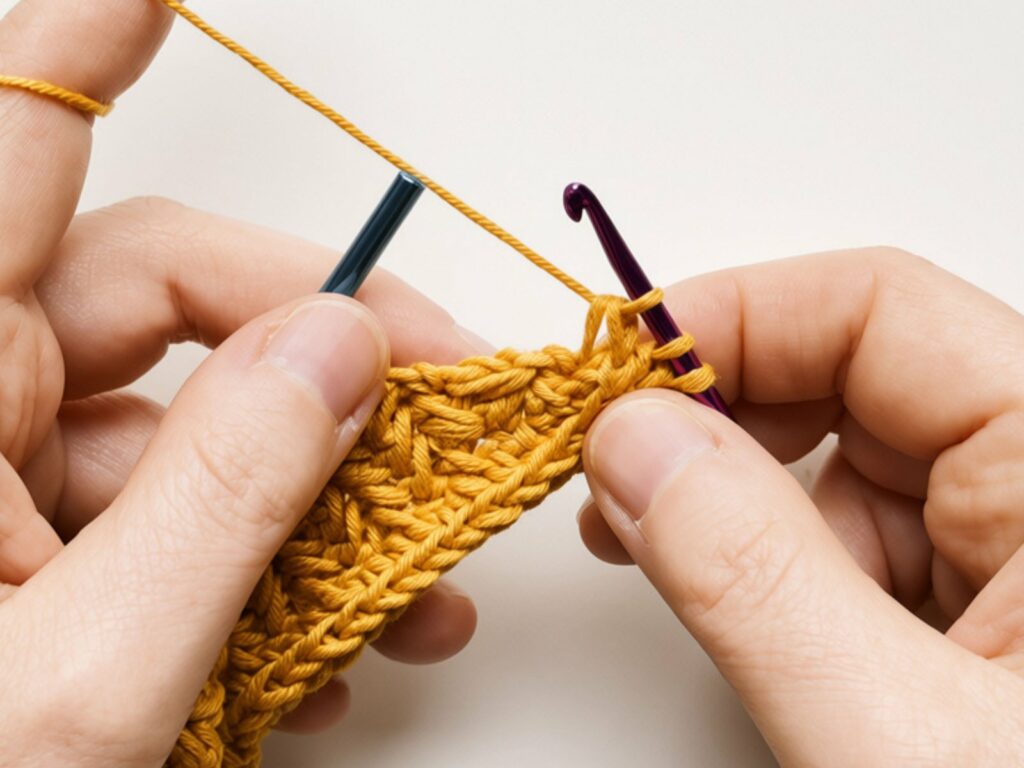
- Work to the marker at the back centre. Keep going along the edge of End A until you reach the place where the hood splits into the two ends, where your stitch marker is.
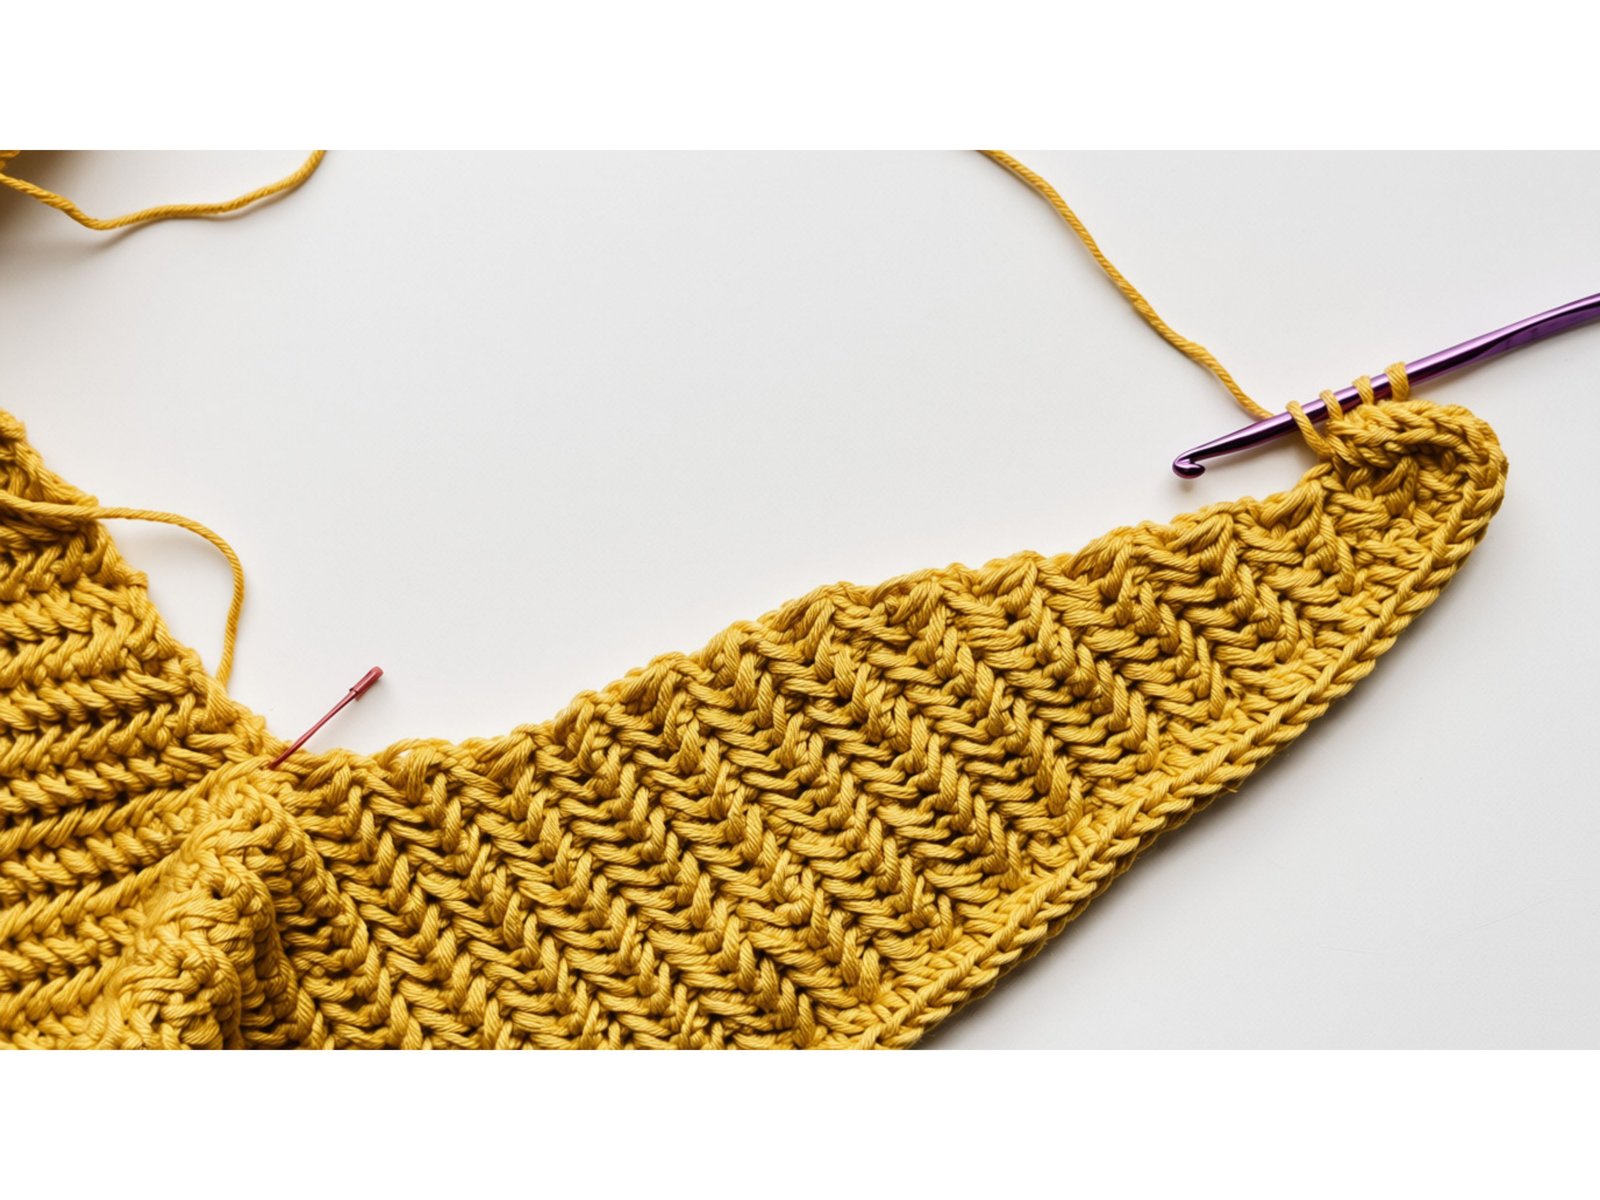
- Attach in two places together. Take out the marker. Pull up a loop in the row-end before it and another in the row-end after it, one after the other. It works like a decrease: you now have one loop more than usual.
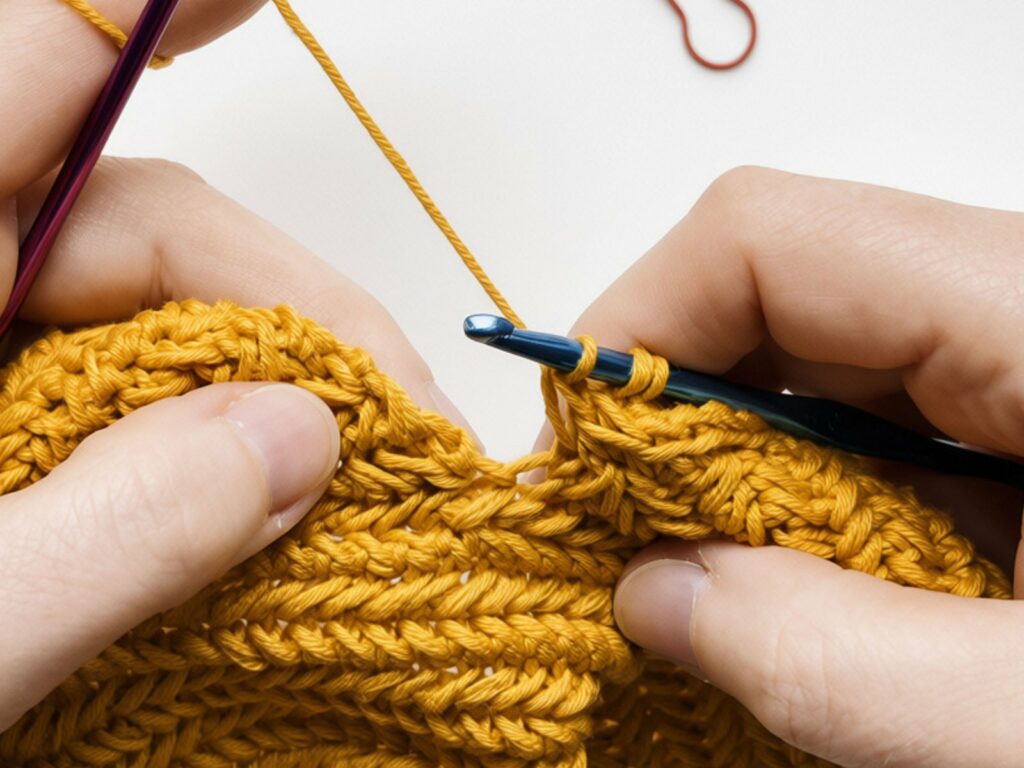
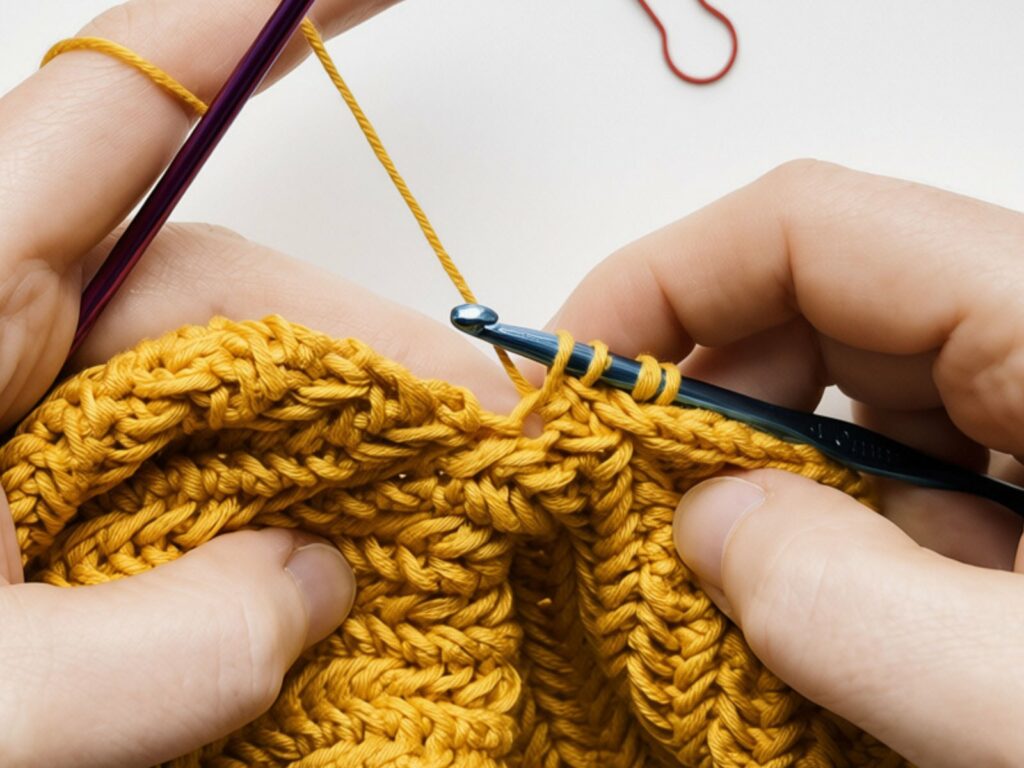
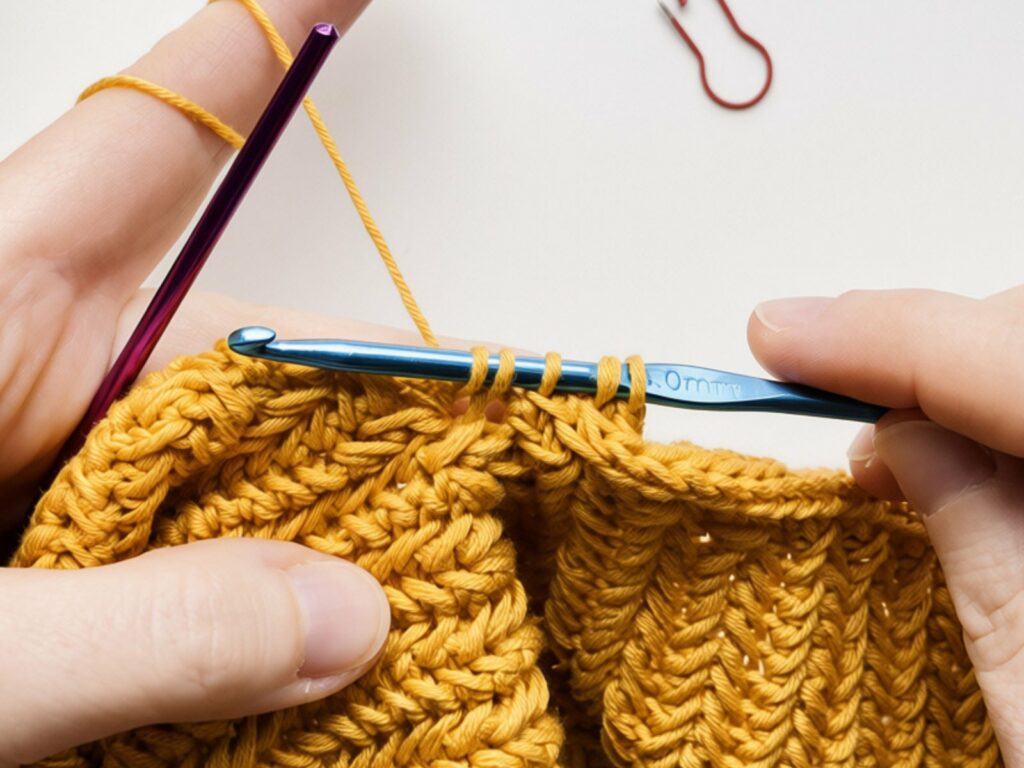
- Knit the last 3 loops together. On the next row, knit 1, knit 1, then insert the hook into the last 3 loops on the hook and knit them together. You’re back to the usual number of loops.
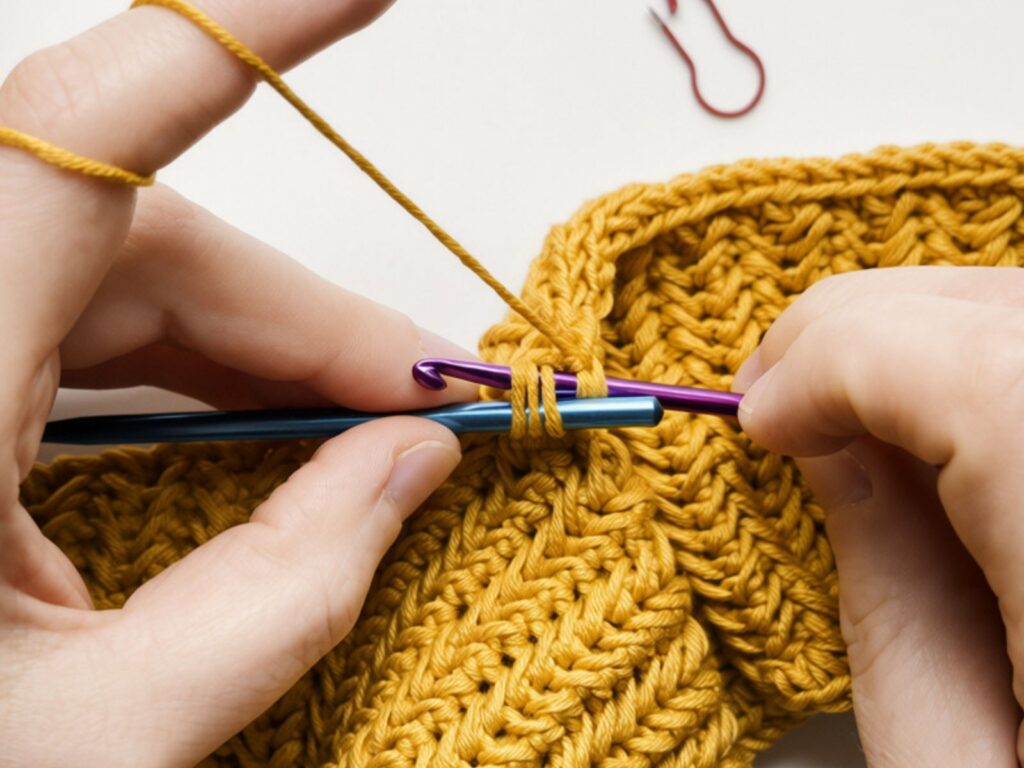
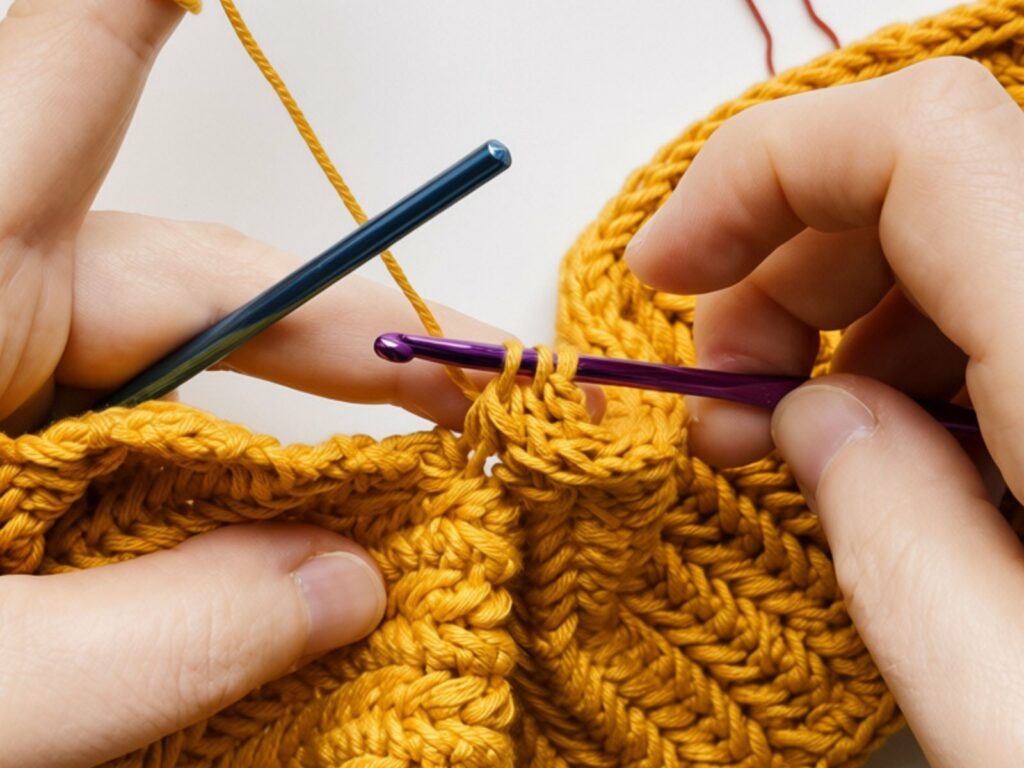
- Work back to the start. Carry on the same way along End B until you reach the tip where you started the I-cord.
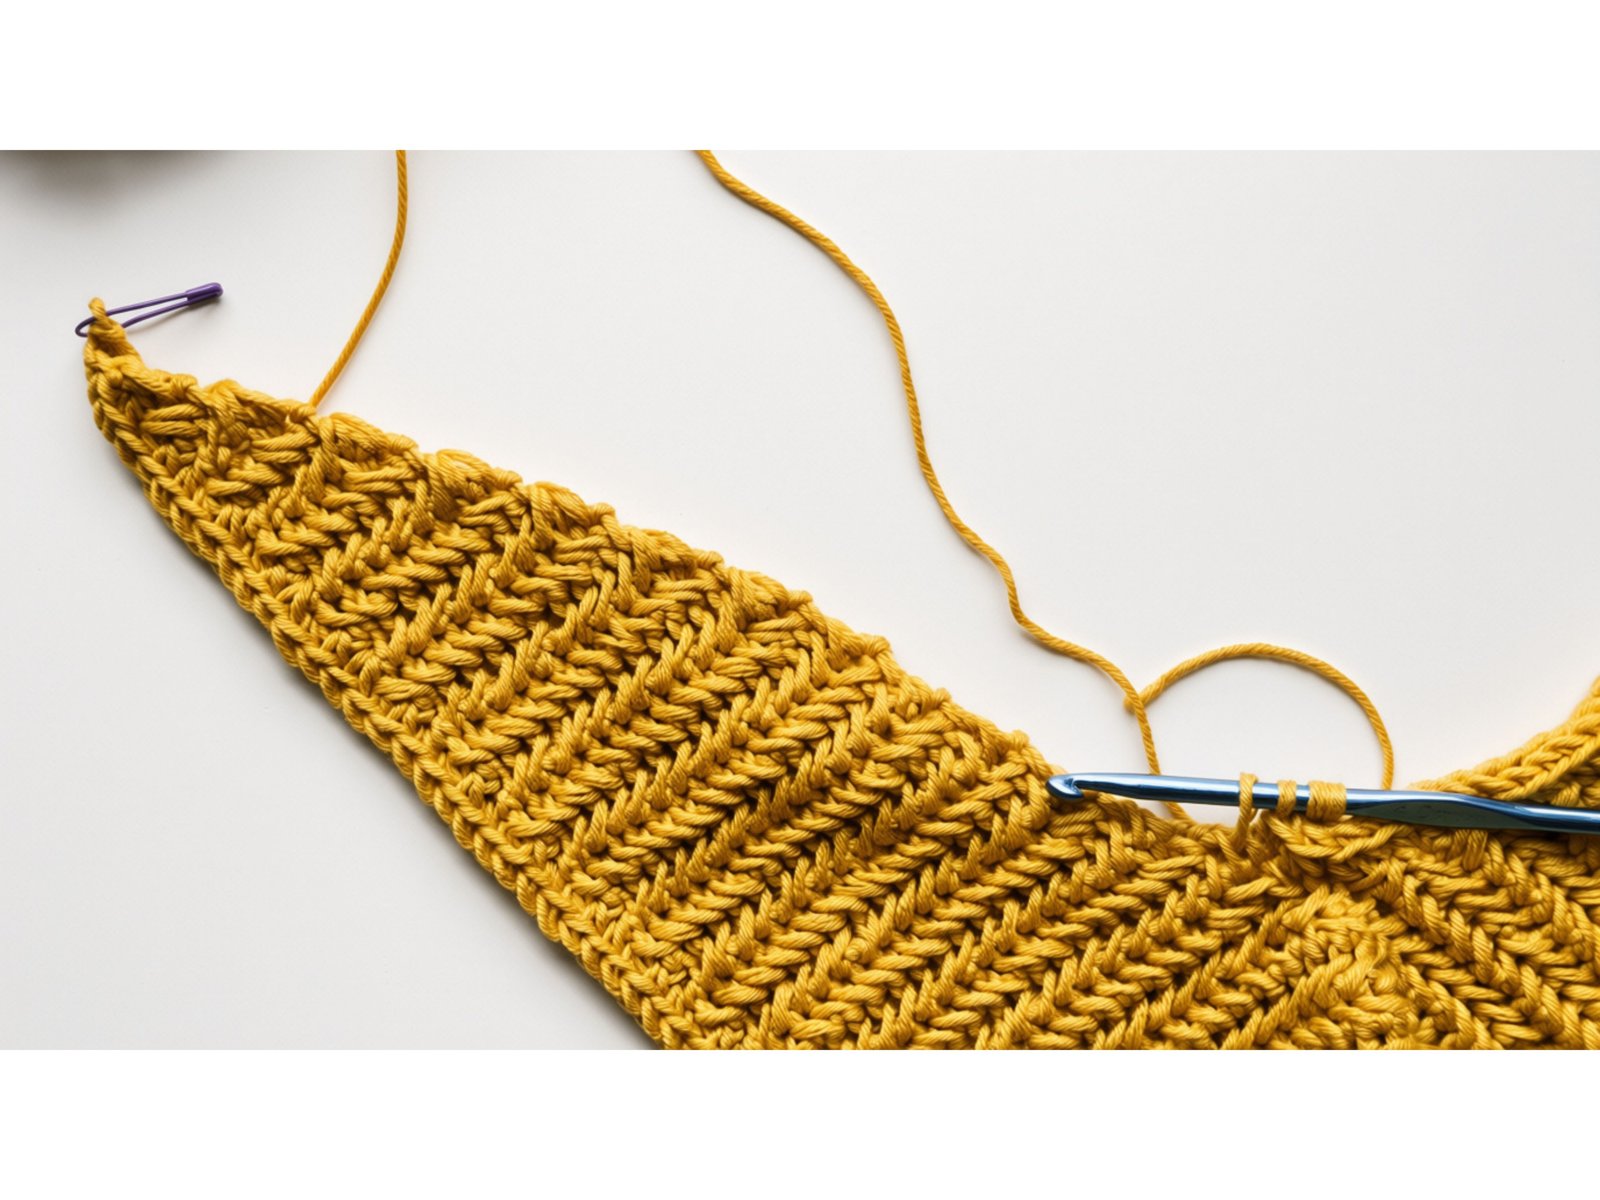
Closing the cord
- Attach to the tip. Attach to the tip one last time. Now 4 loops remain on the hook.
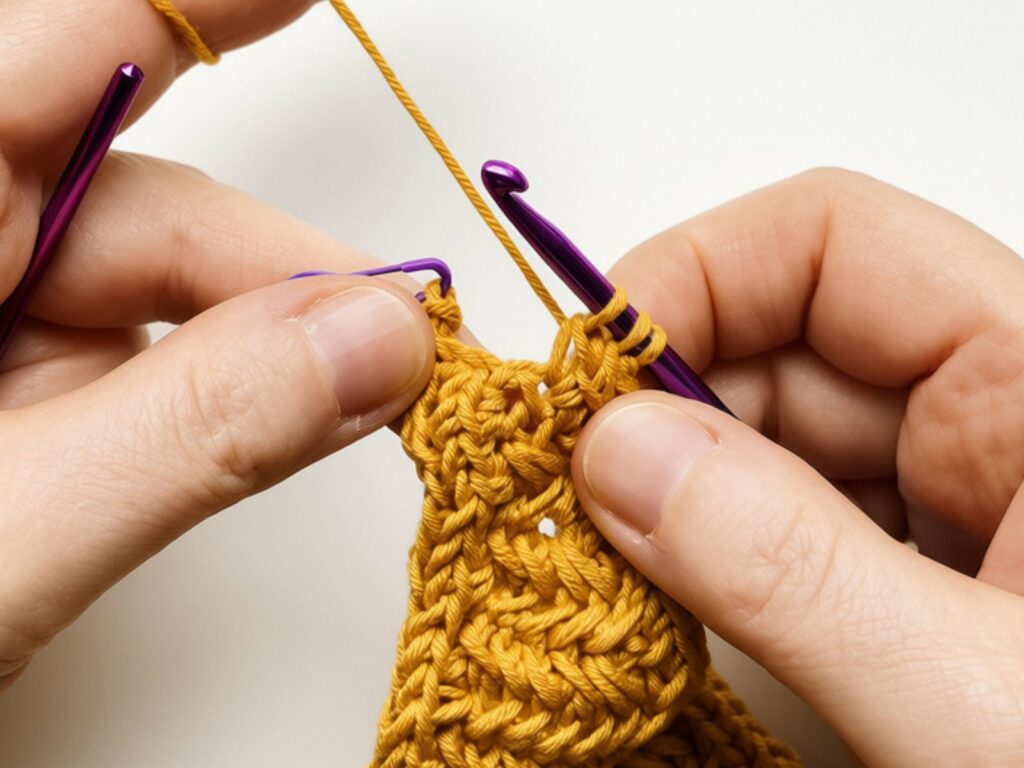
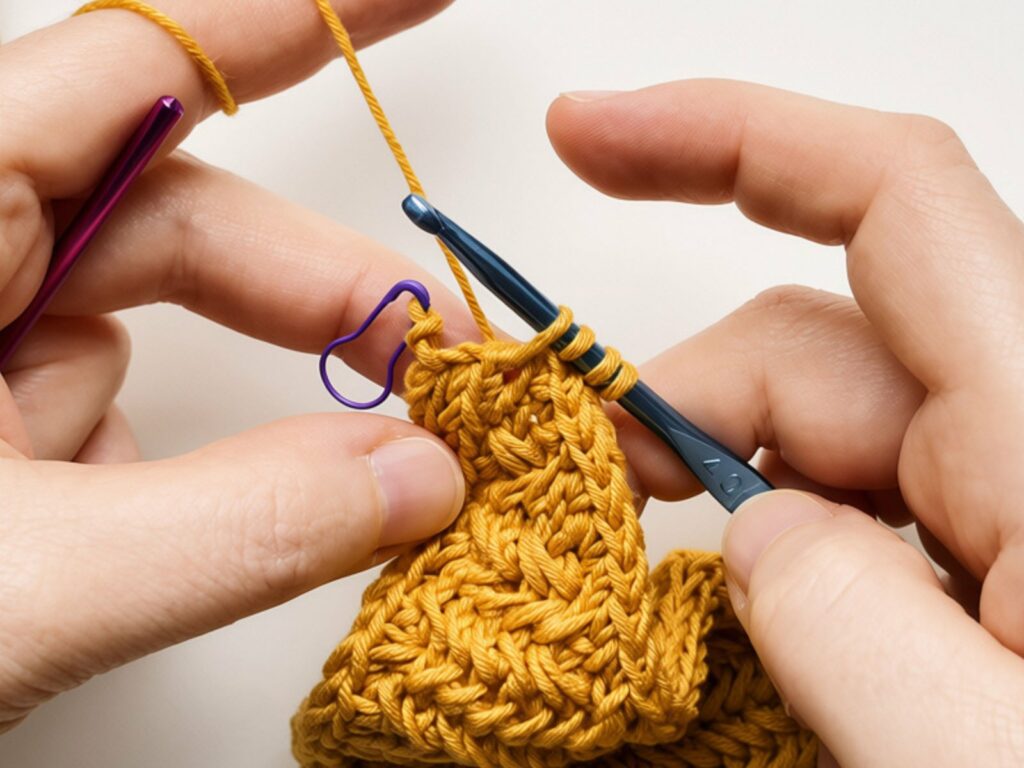
- Put the 4 loops on a marker. Put the 4 loops on a stitch marker and take the hook out. You’ll come back to them later.
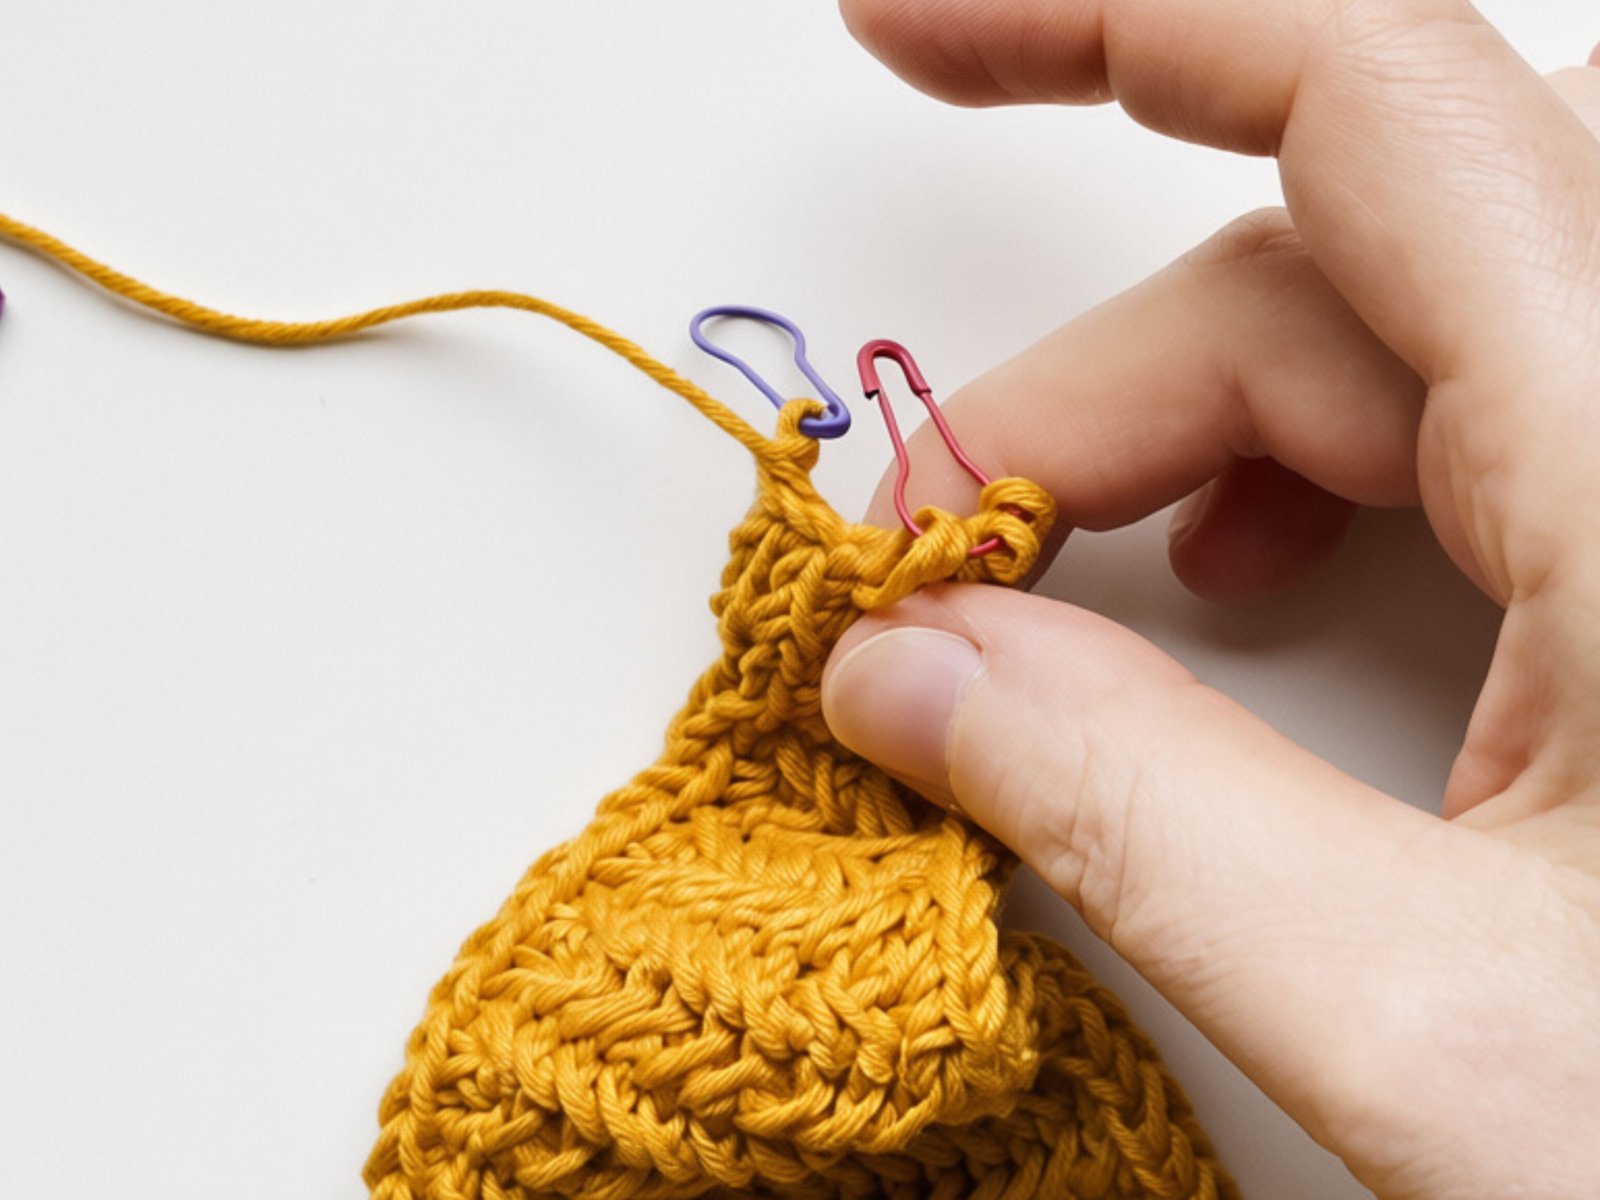
- Go back to the first loop. Now go back to the loop you put on a marker at the very start of the cord.
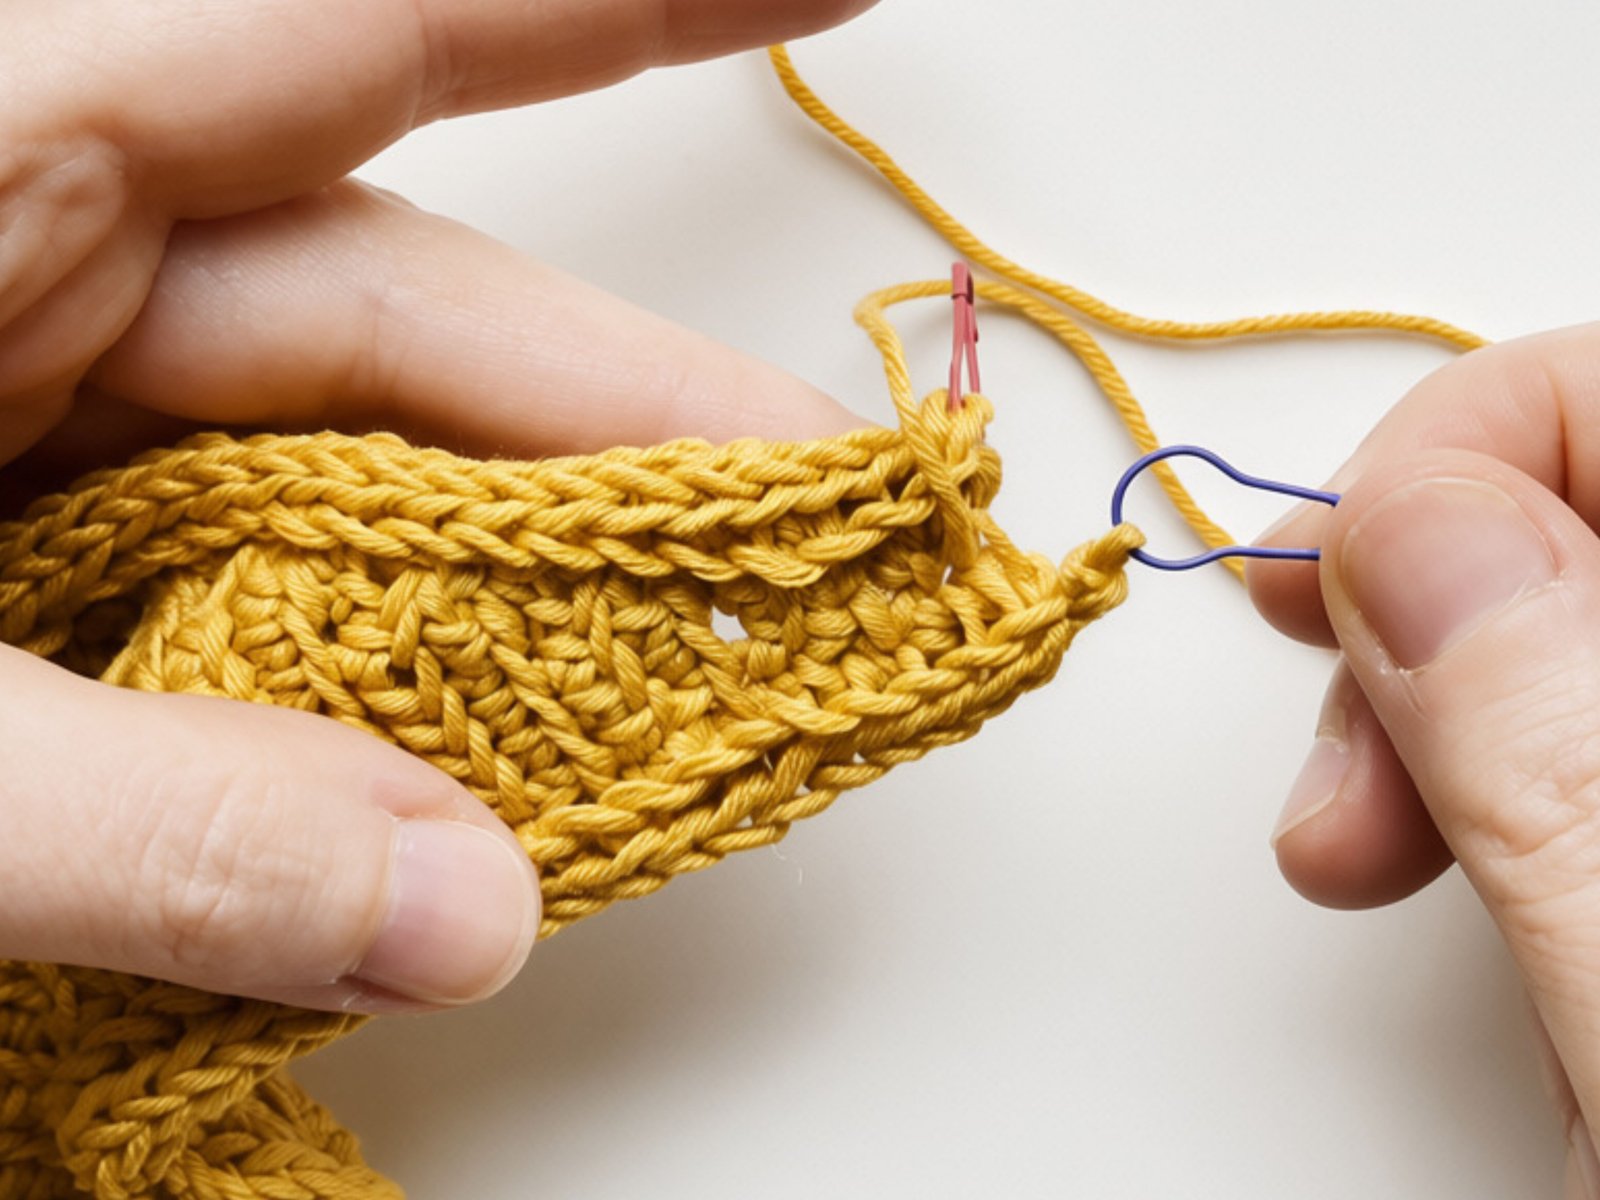
- Put the loop on your hook. Take the loop off the marker and put it on your hook.
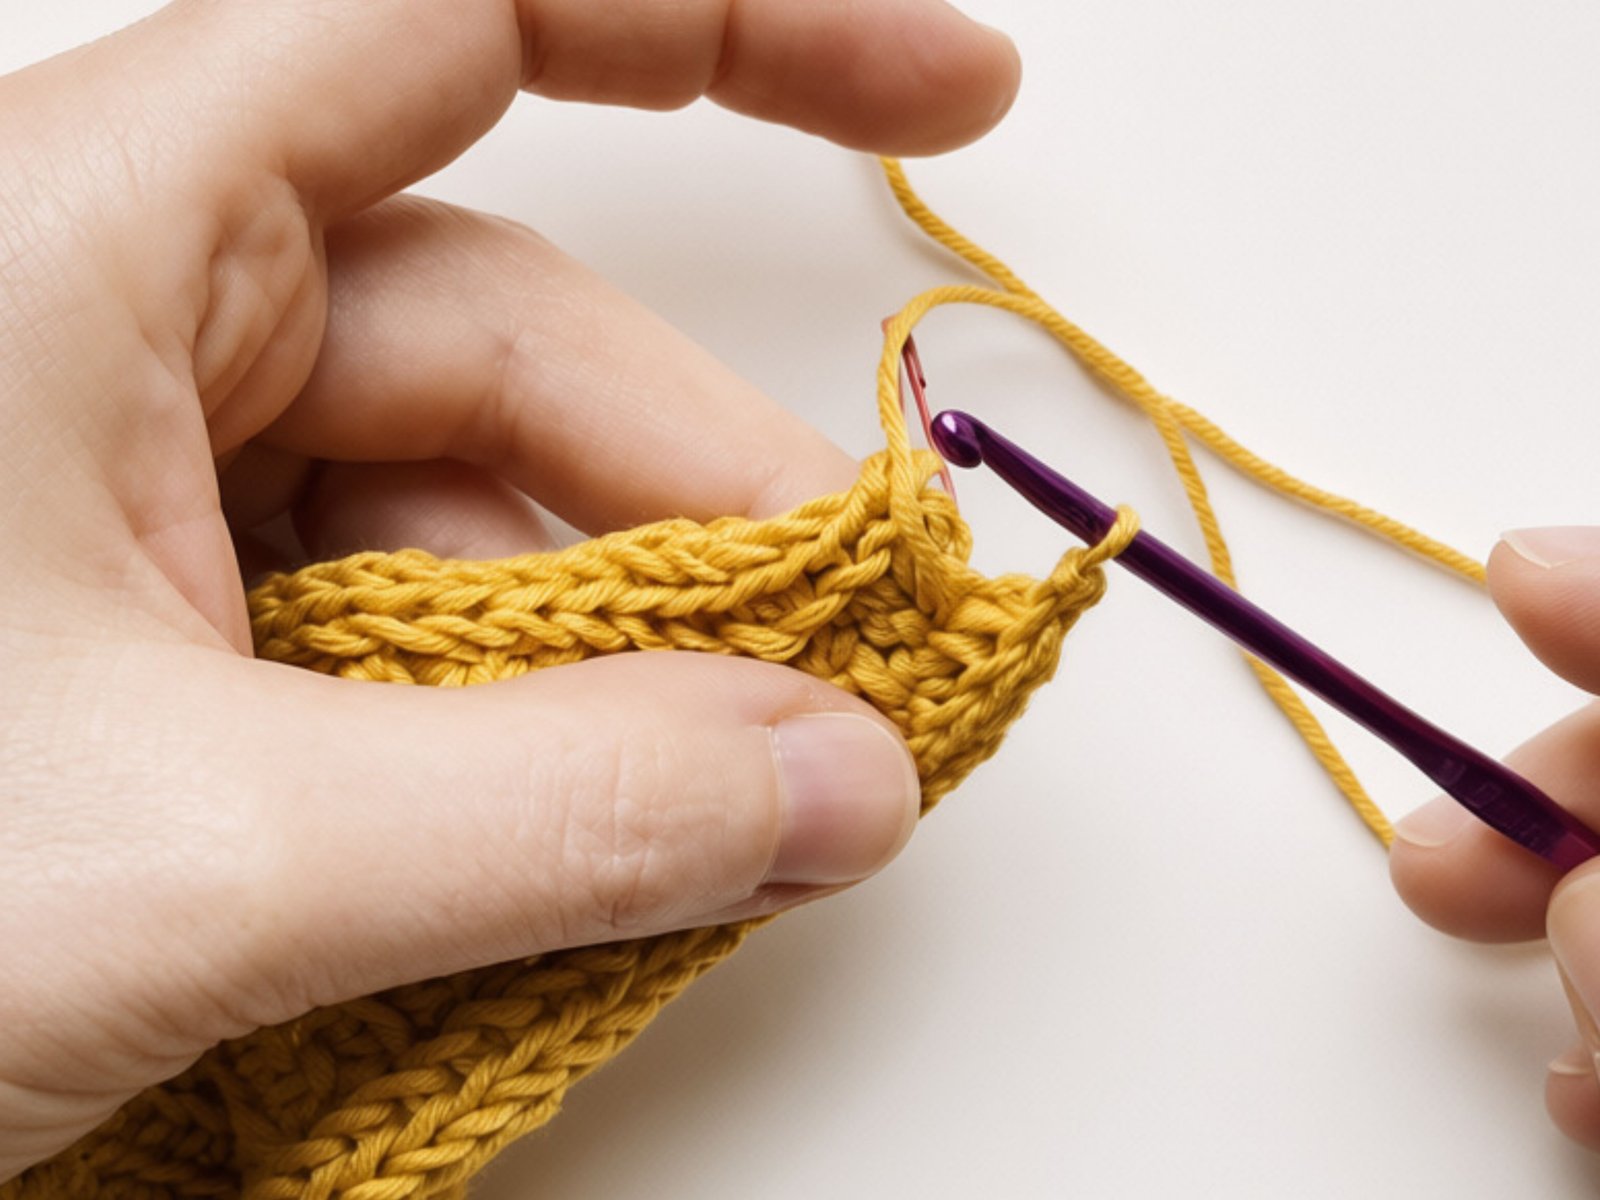
- Find the bars. Turn the scarf so you can see the back of the cord. Spread it a little: you’ll see loose horizontal bars between the columns.
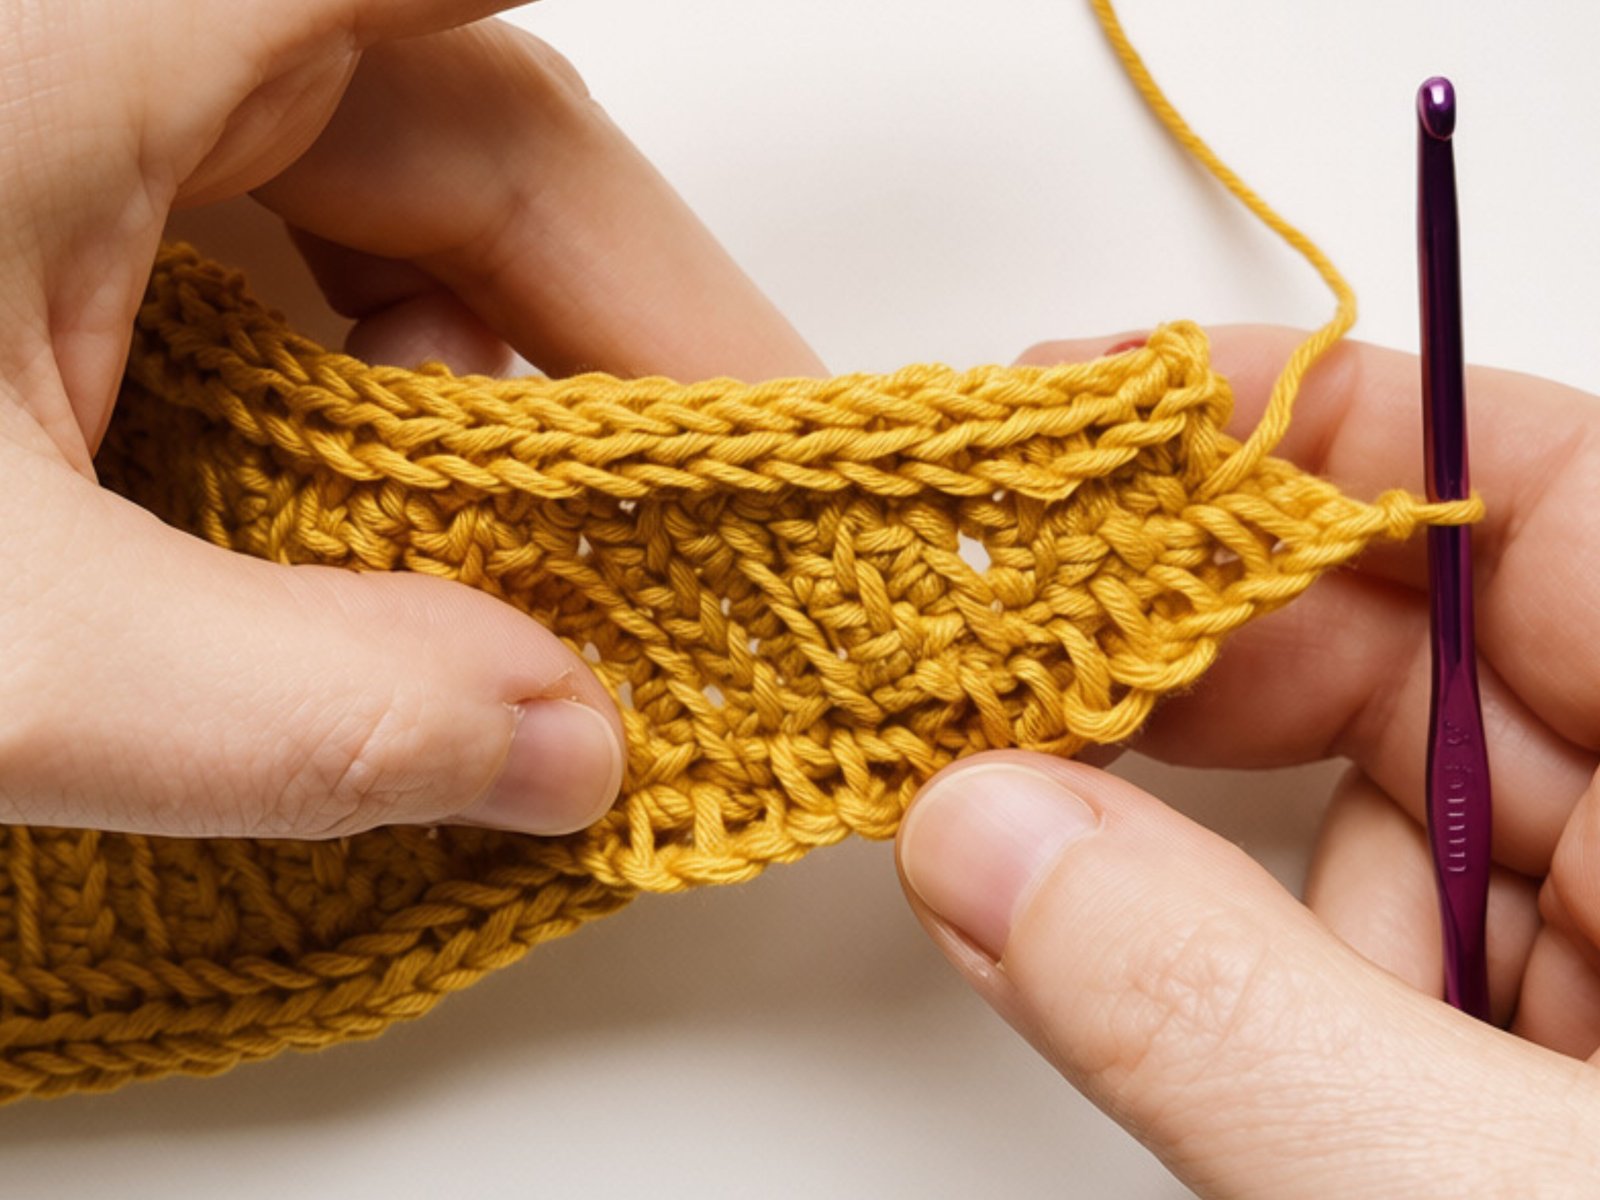
- Pull a bar through. Catch the first bar with the hook and pull it through the loop on the hook.
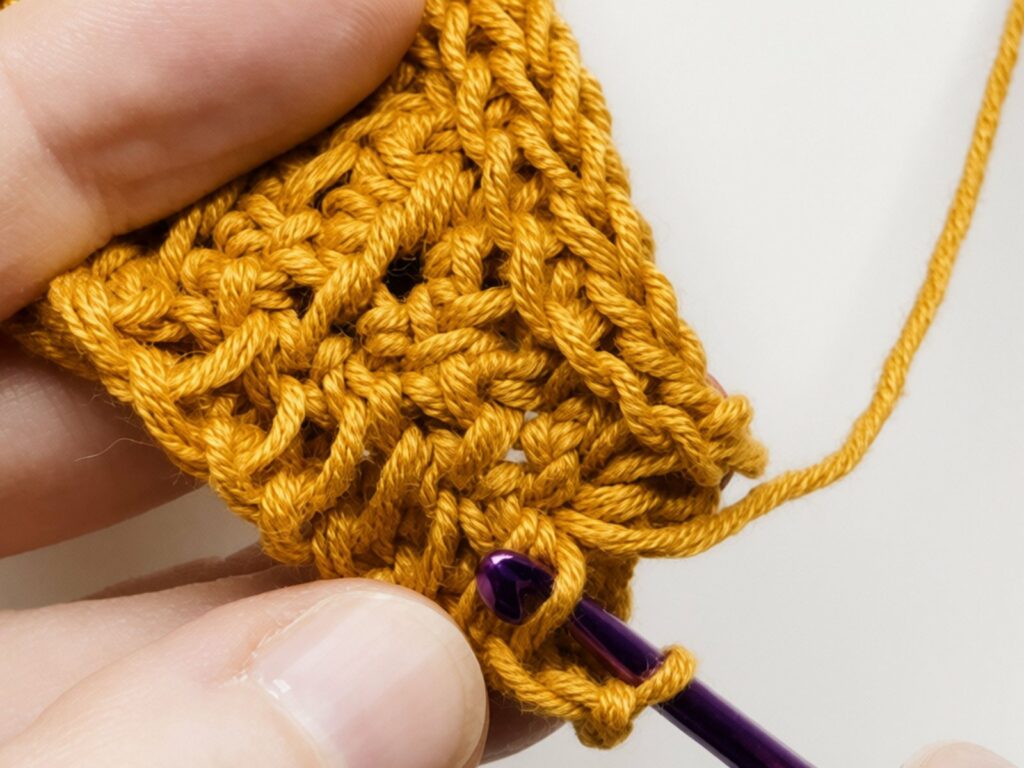
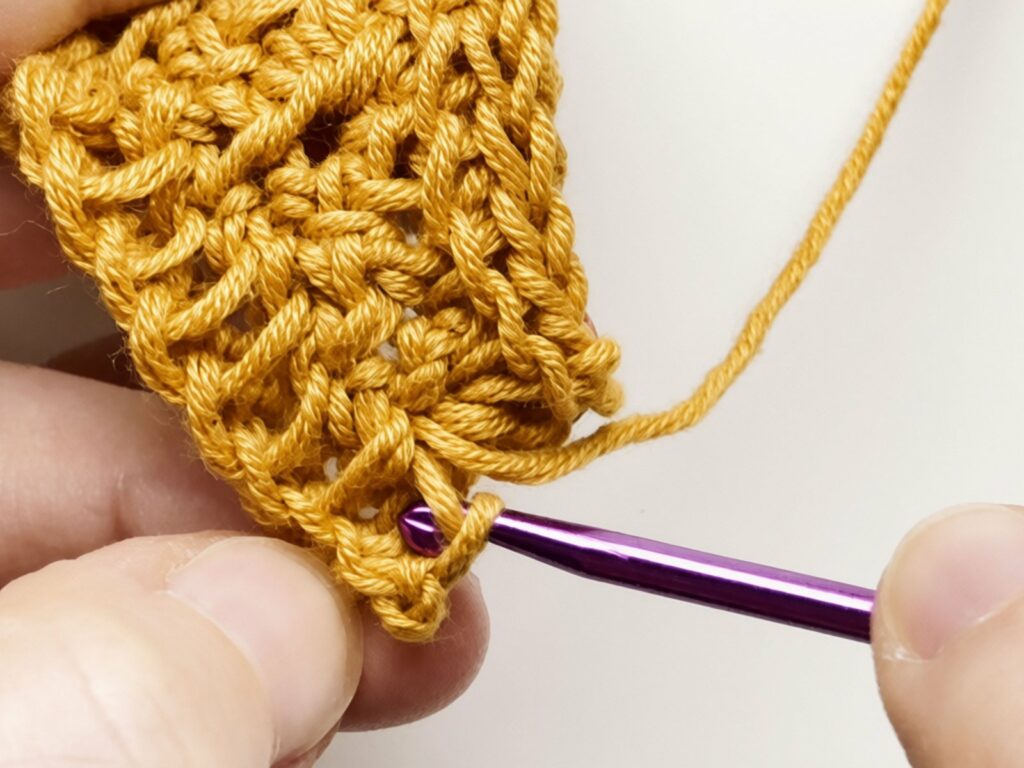
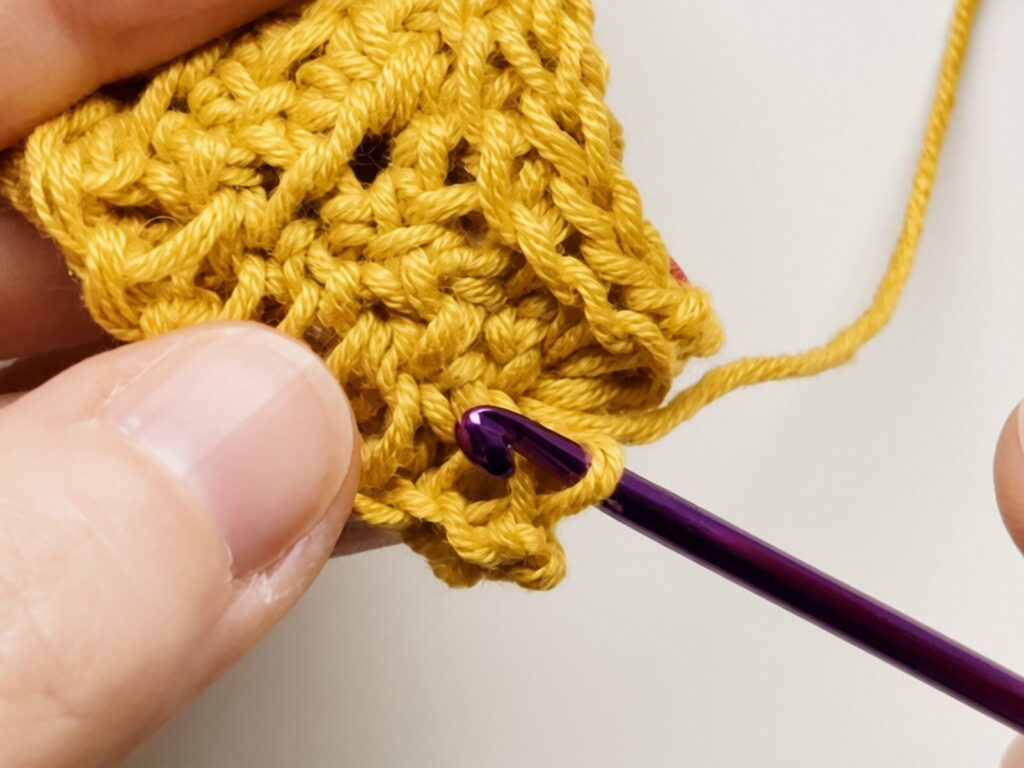
- Pull the next bar through. Do the same with the next bar, and keep going along the cord. This makes the fourth column of the cord.
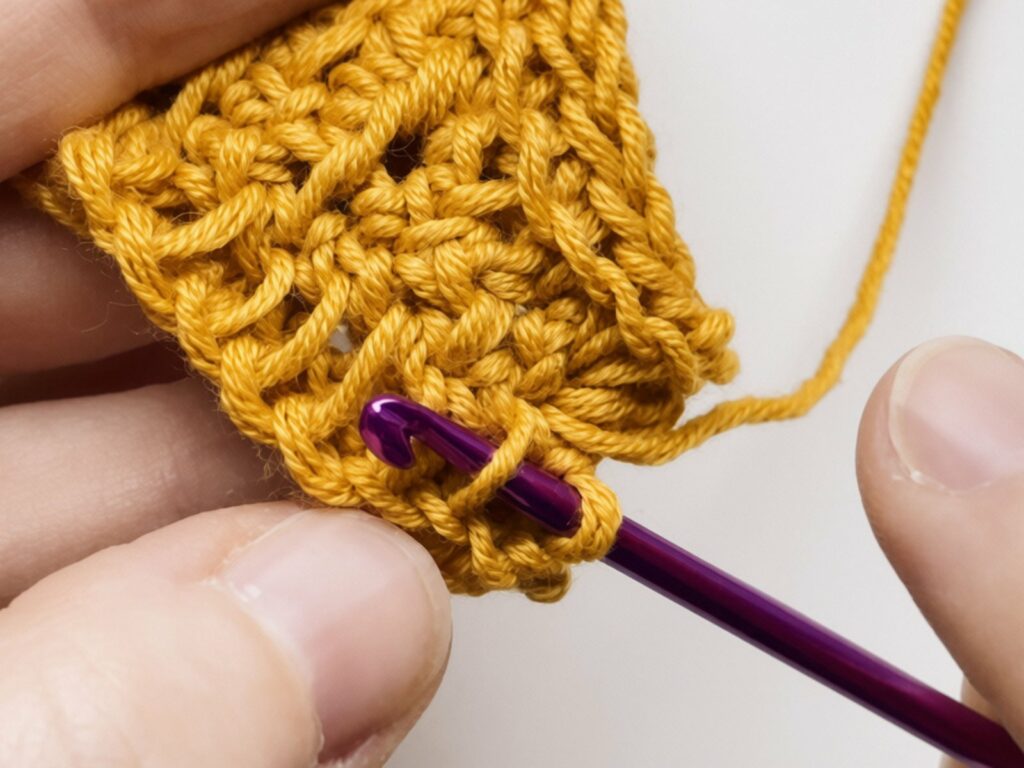
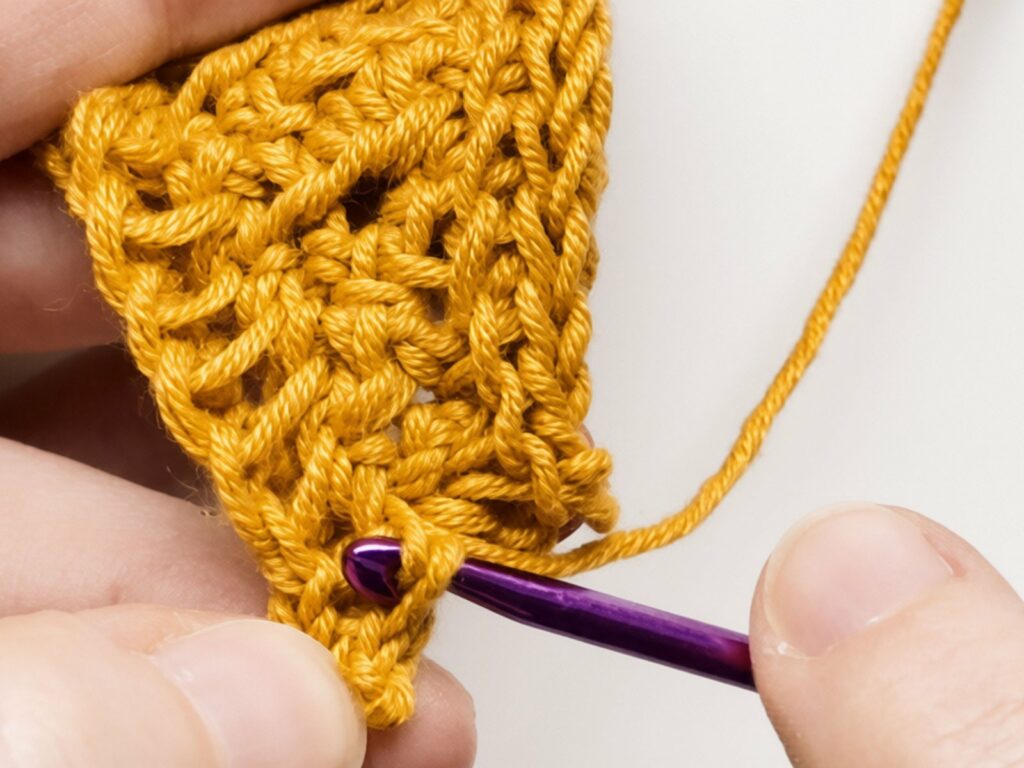
- Keep going along the cord. Keep pulling the bars through one by one along the whole cord.
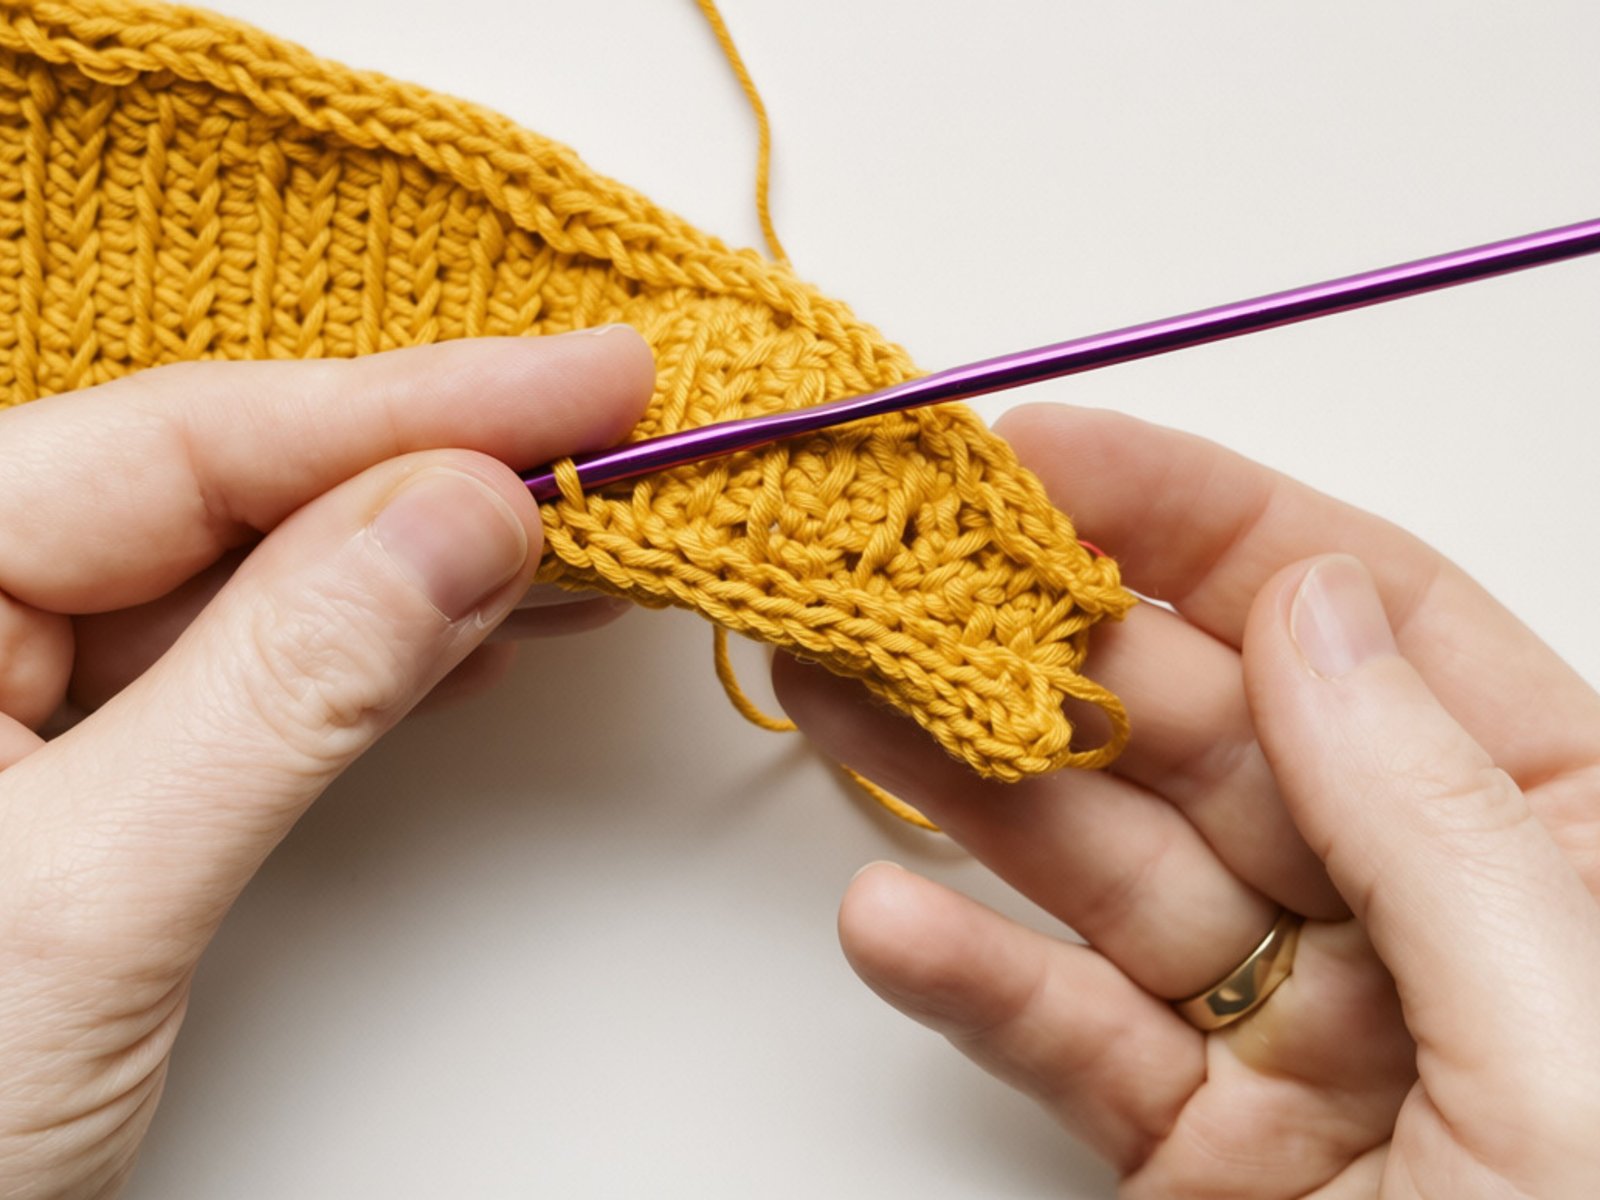
- Join the last bar to the held loops. Pull the last bar through.
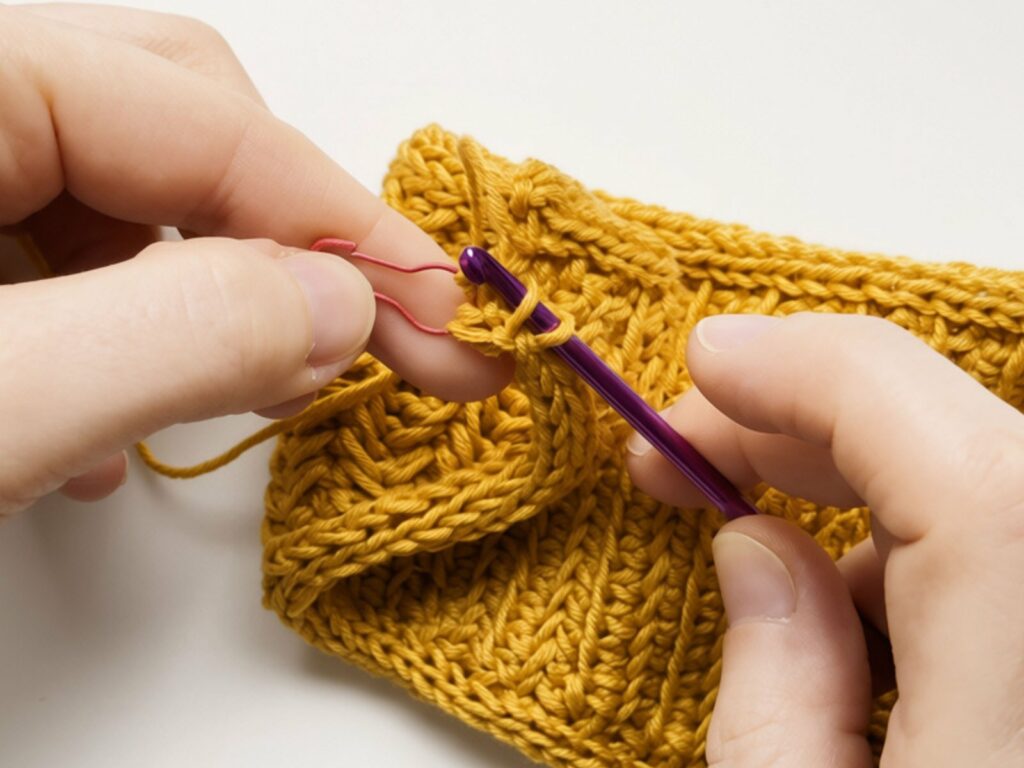
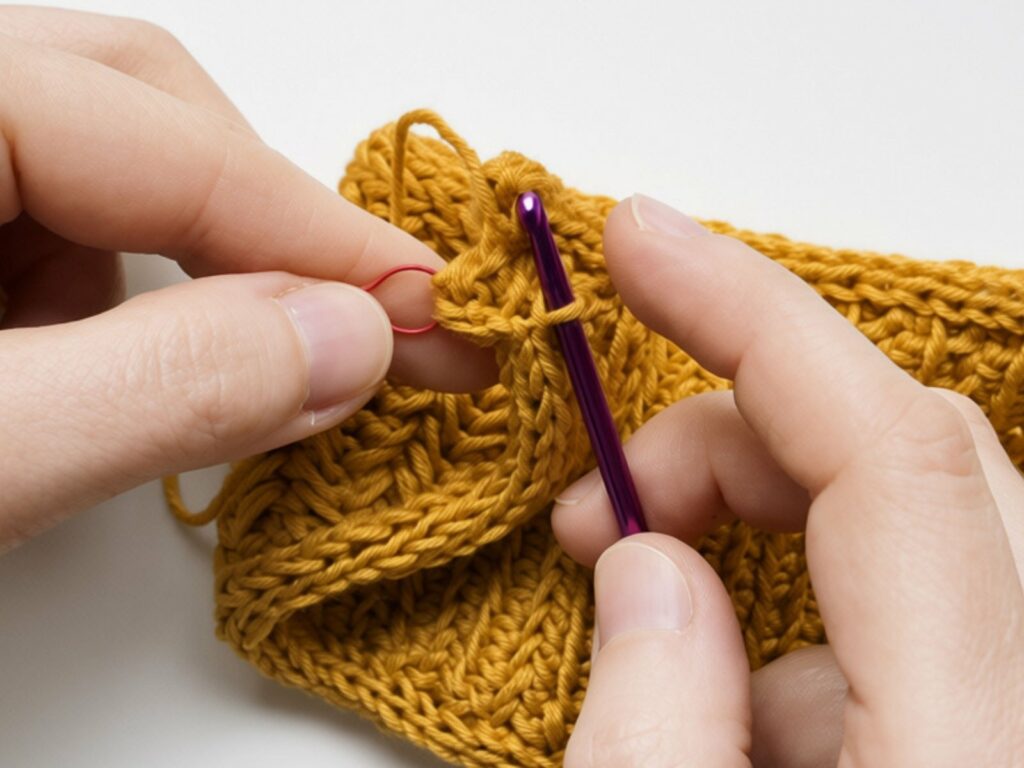
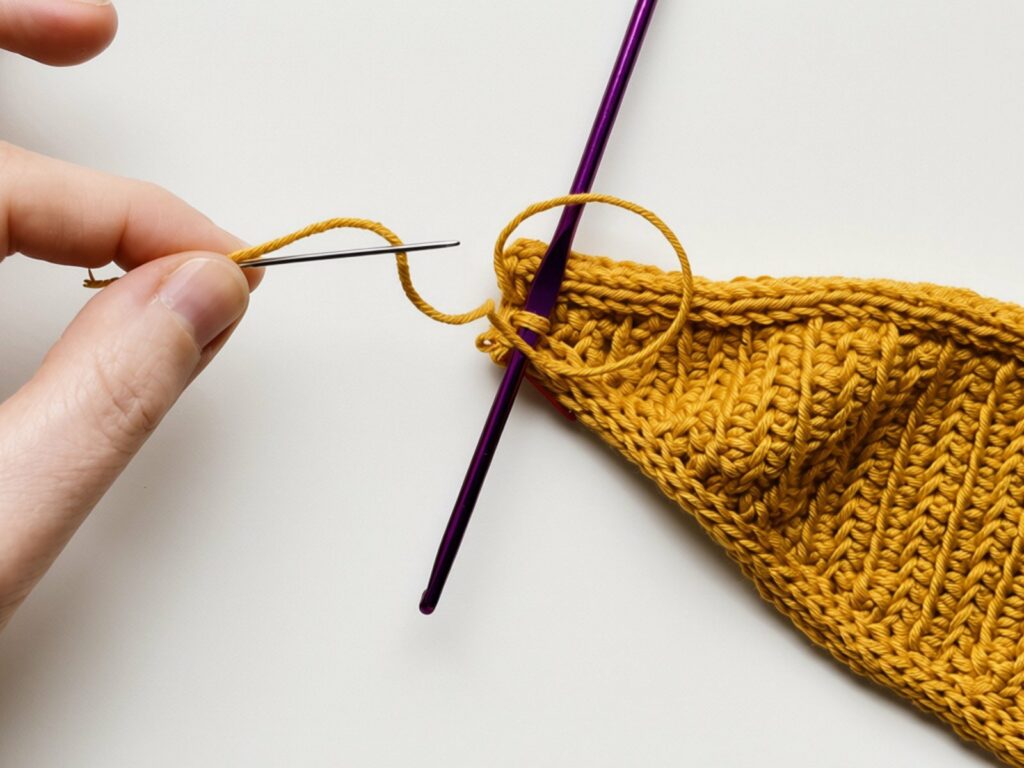
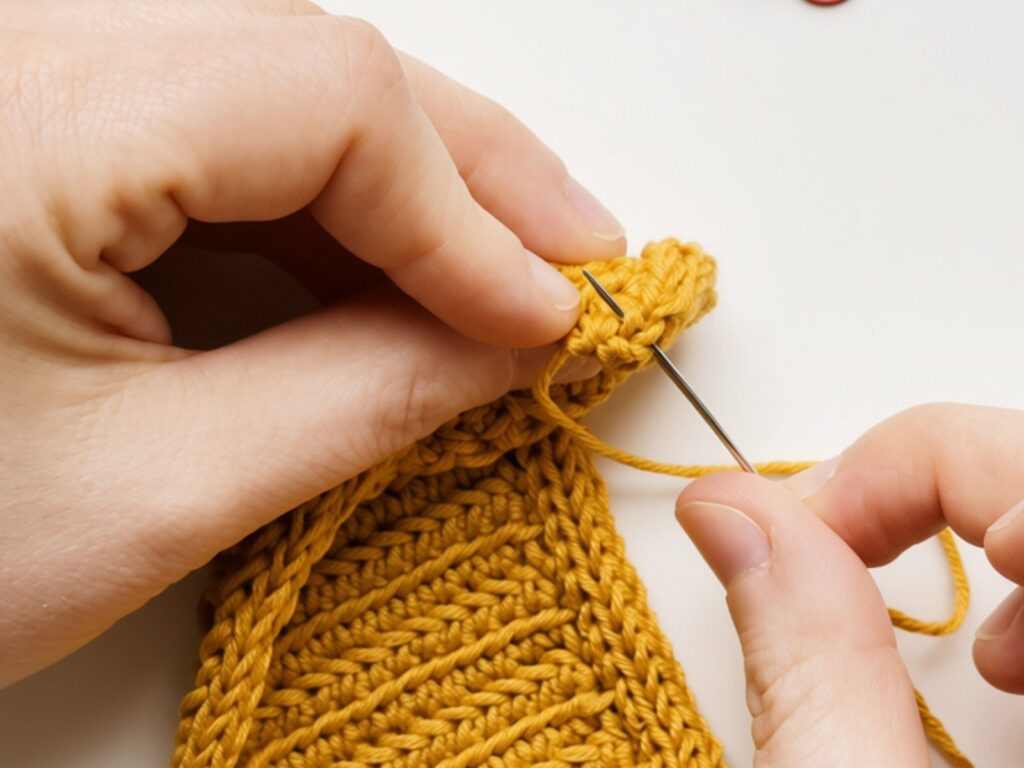
- Cut the yarn and close the loop. Cut the yarn, leaving a long tail, and thread it on a tapestry needle. Take the needle through the loop that came off the hook, pull the yarn through and tighten it.
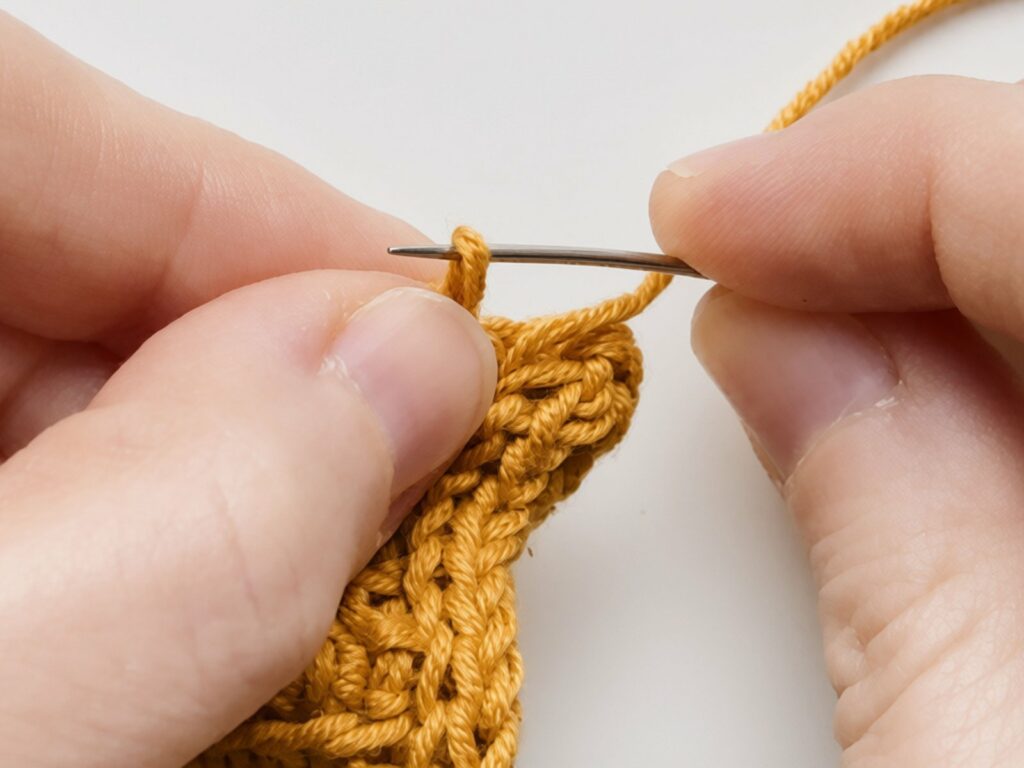
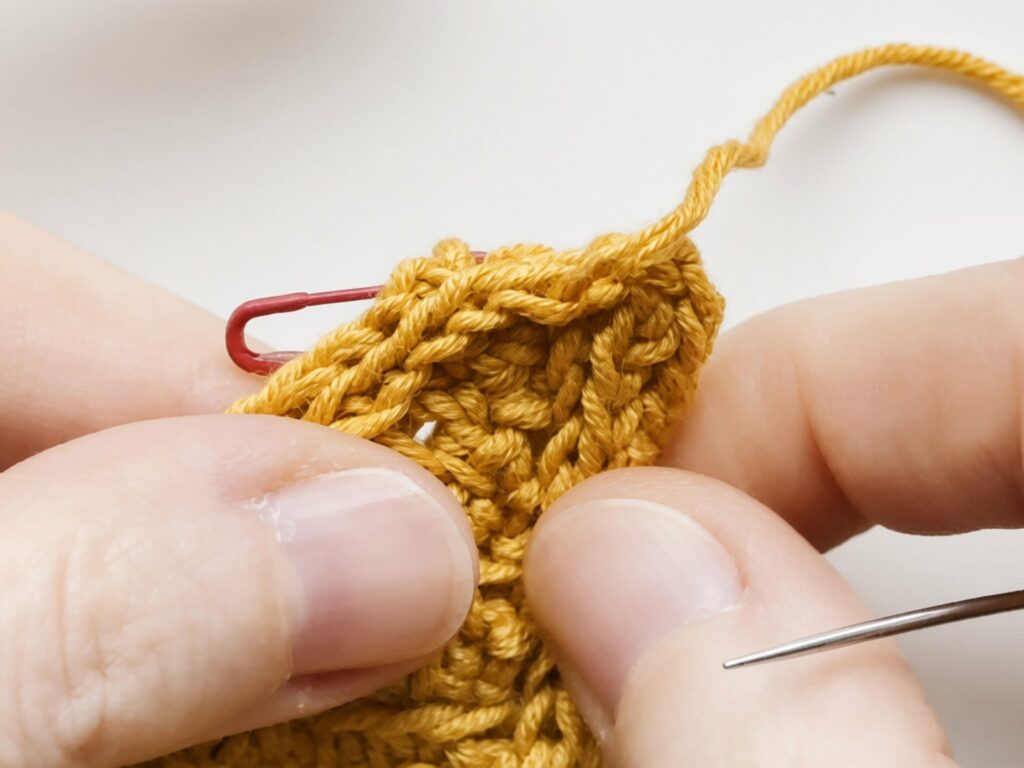
- Sew into the edge. Insert the needle into the edge as shown and pull the yarn through.
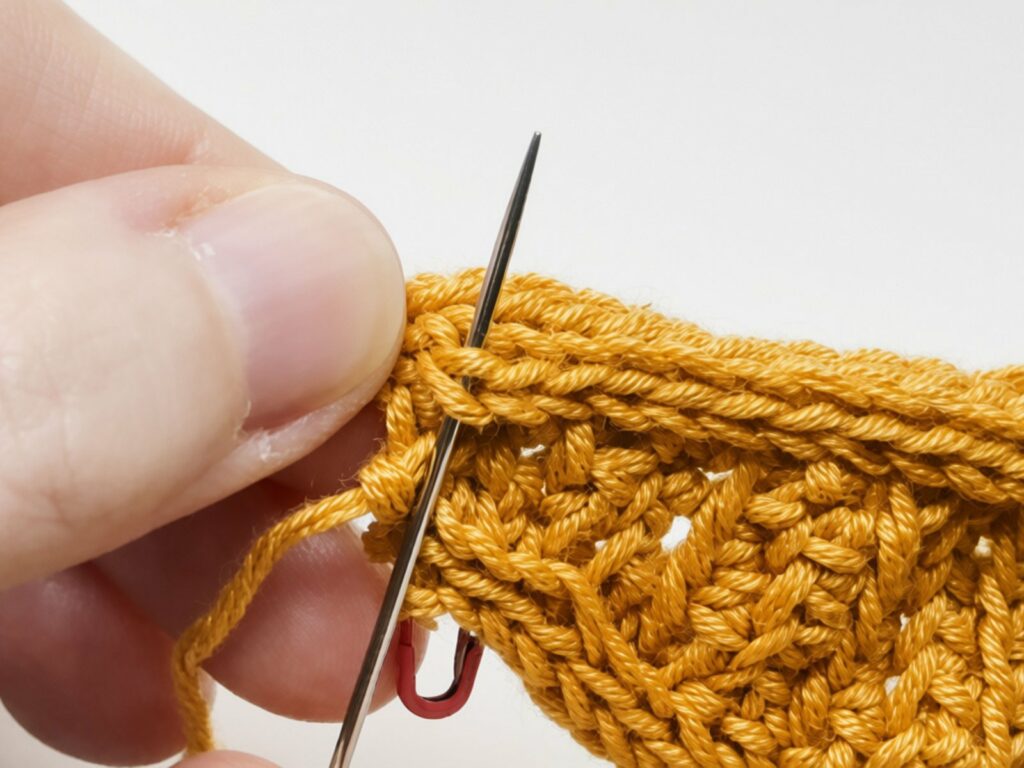
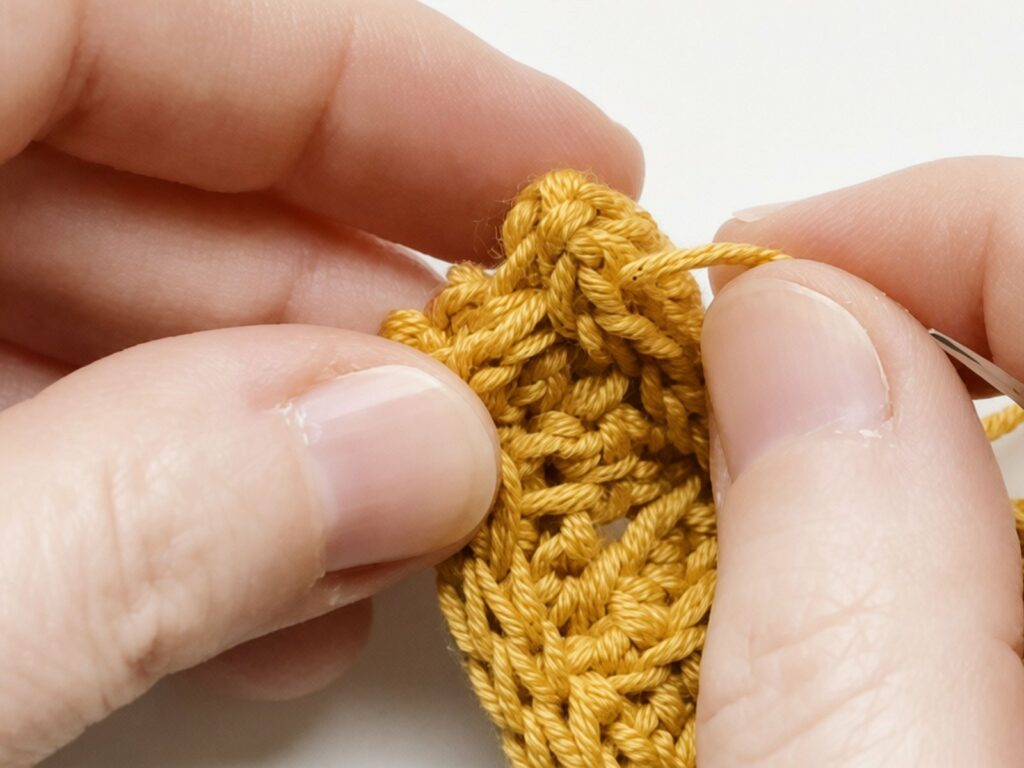
- Back into the stitch your yarn comes out of. Insert the needle into the stitch your yarn comes out of and pull it through. This closes the first column.
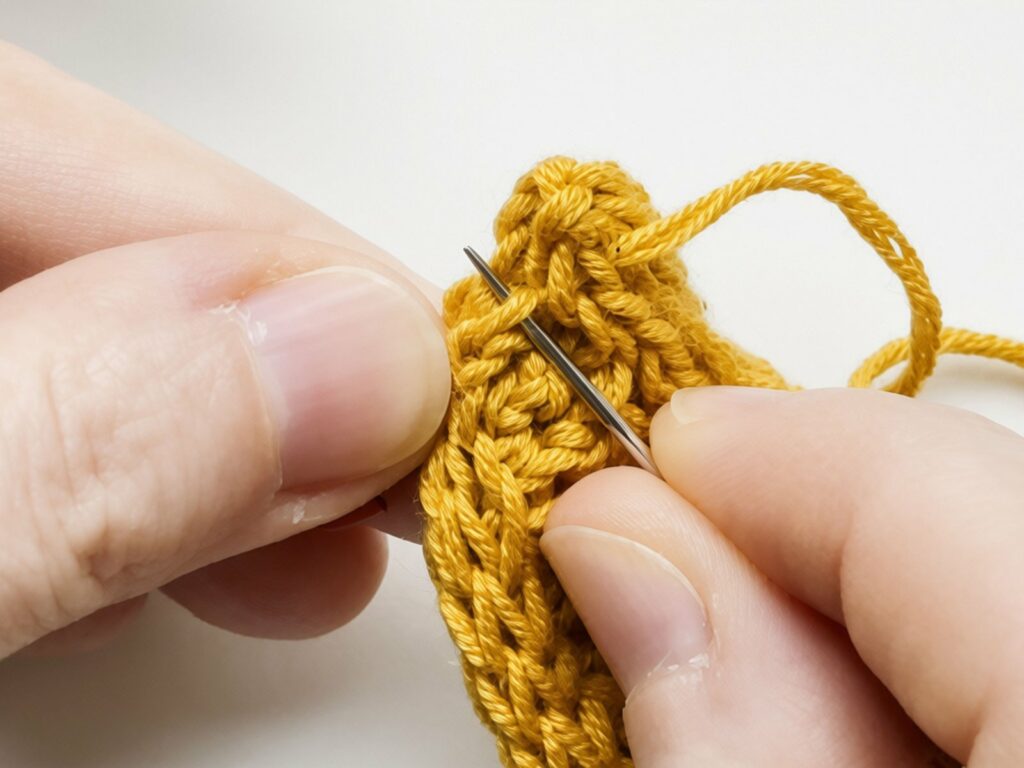
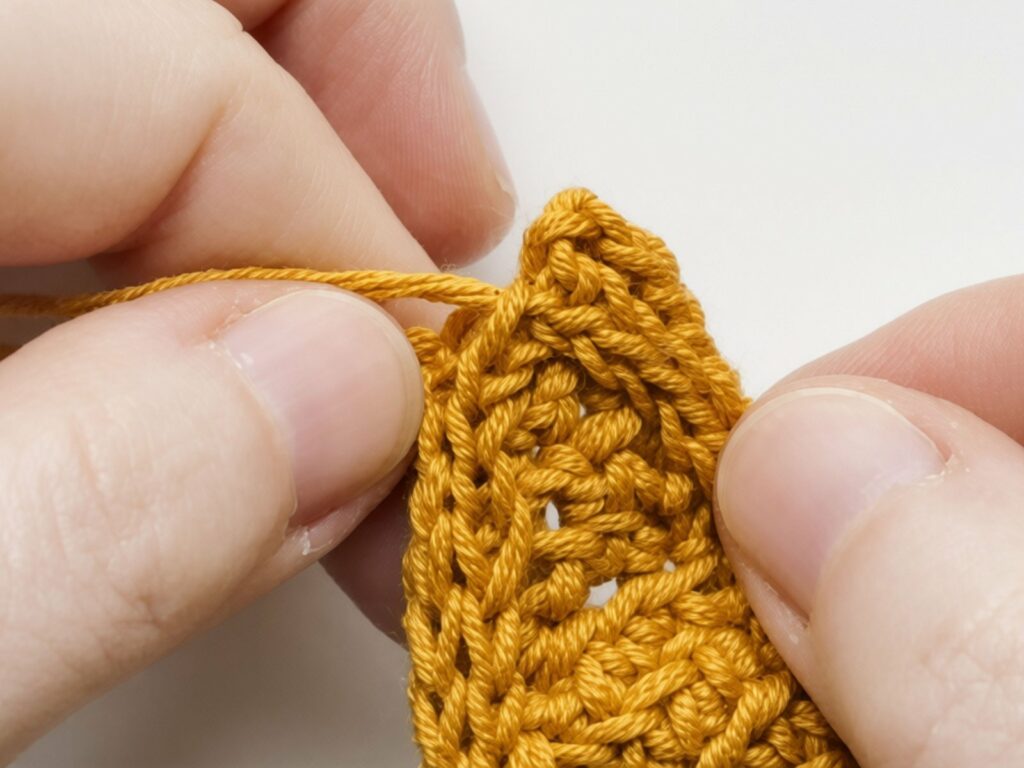
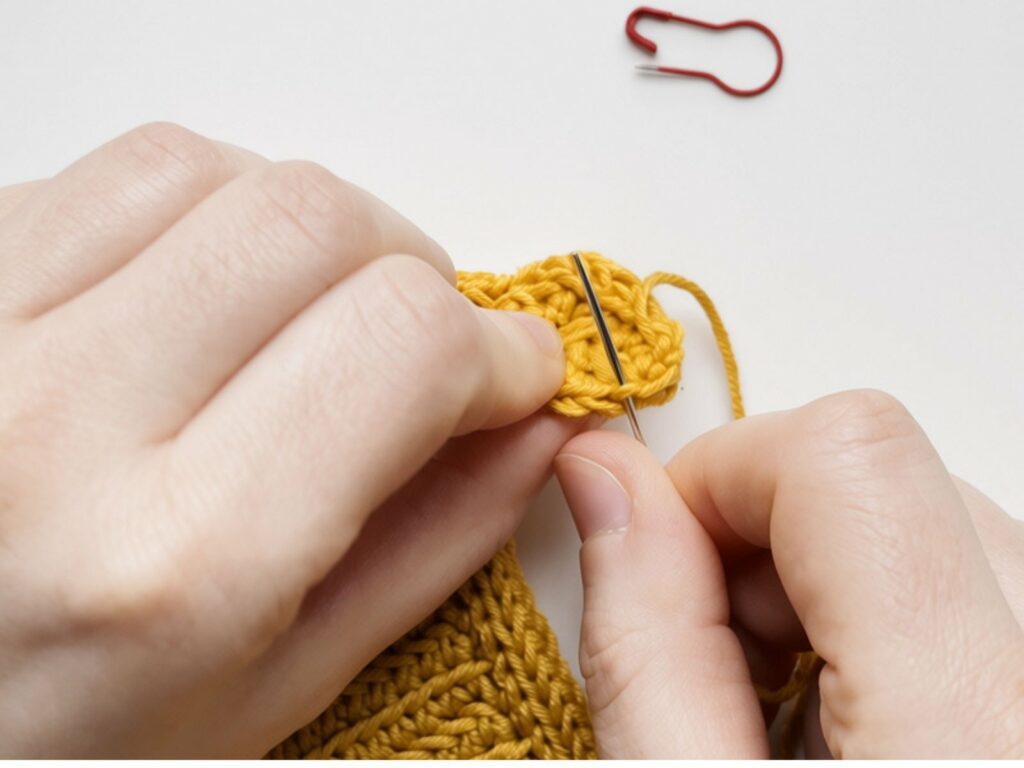
- Join the first held loop. Take the first loop off the marker. The other loops stay on it. Take the needle through this loop.
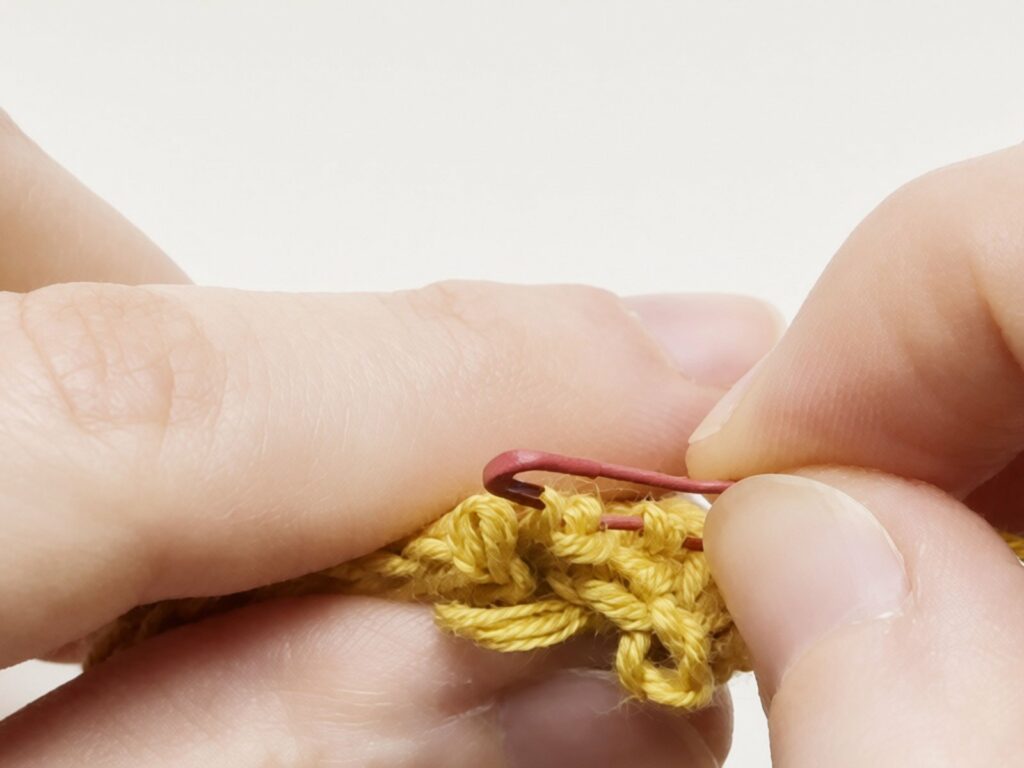
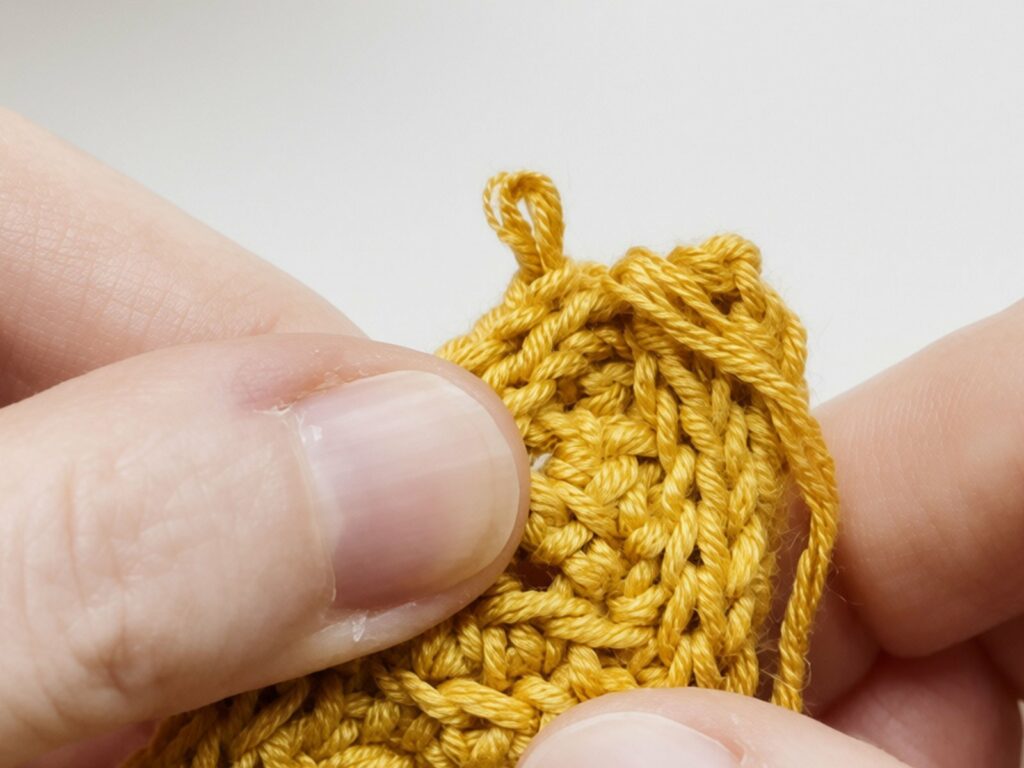
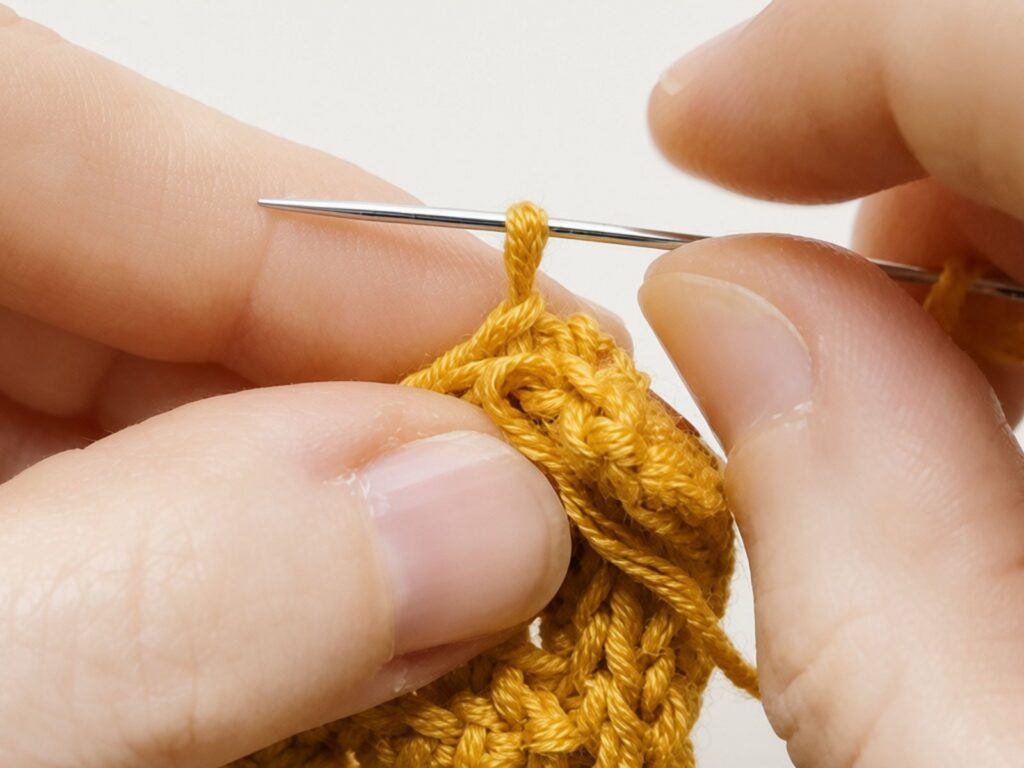
- Close the second column. Sew the same way as before. Now the second column of the I-cord is joined.
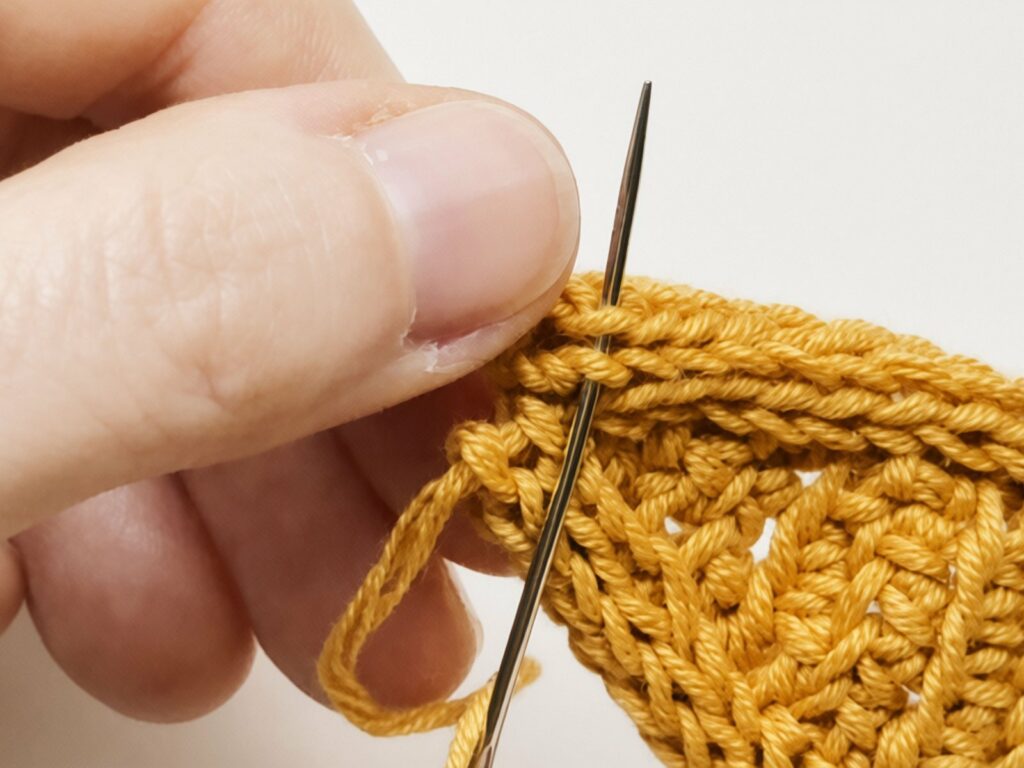
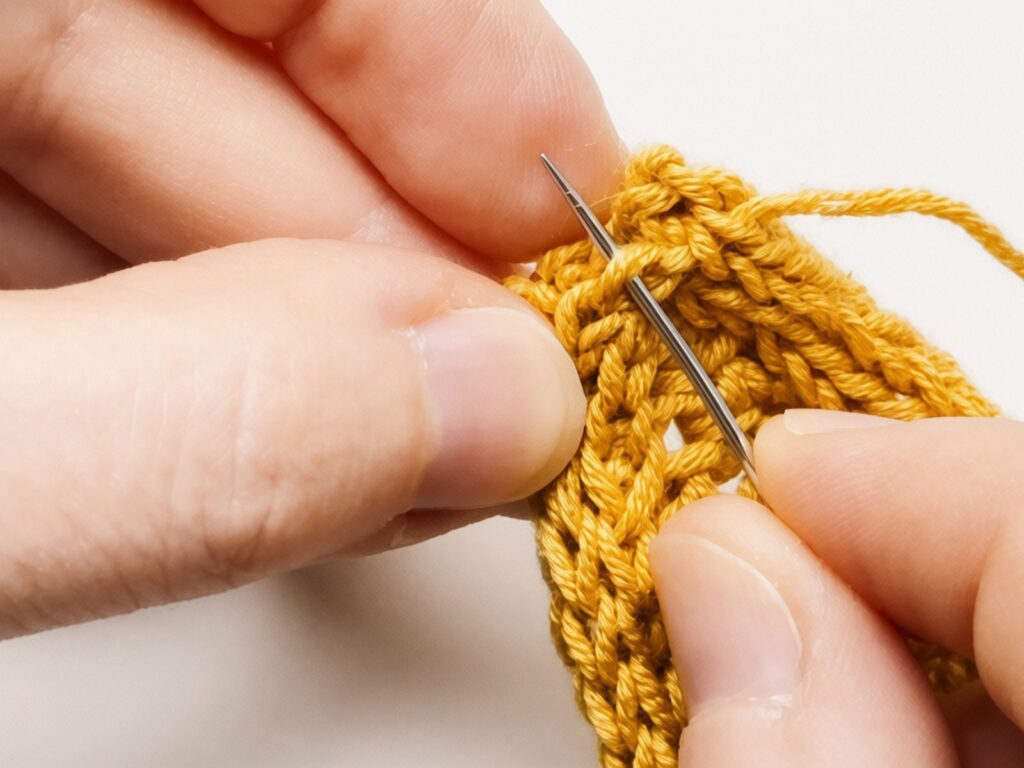
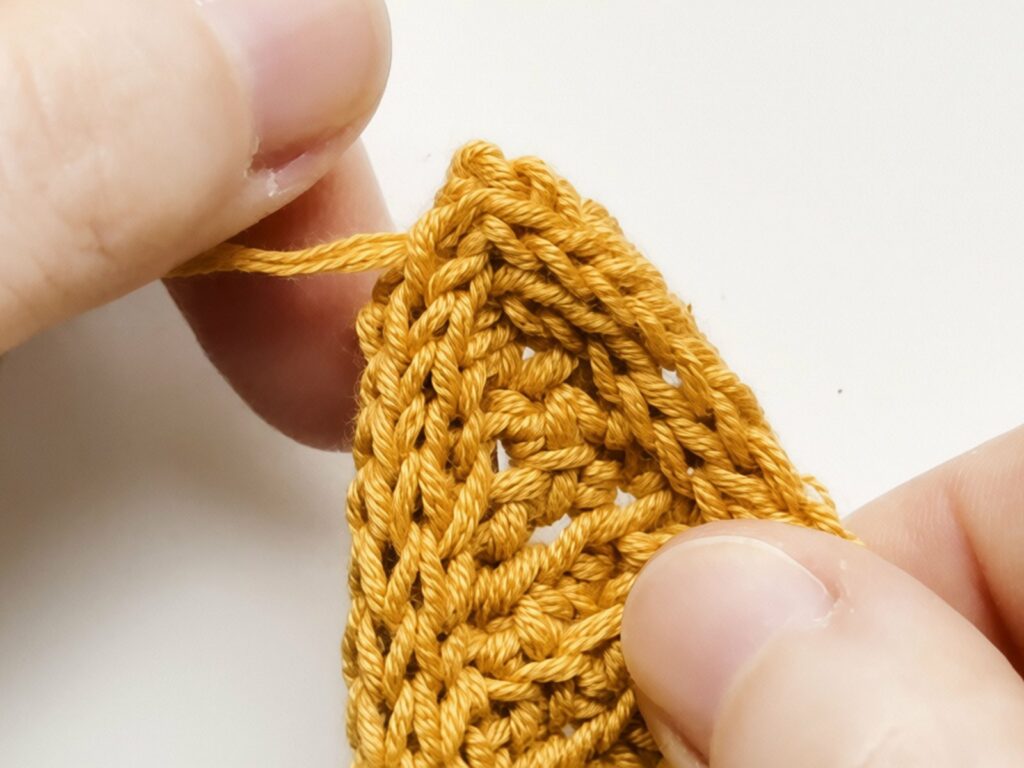
- Join the second held loop. Take the second loop off the marker (2 loops stay on it) and sew it to the third column the same way.
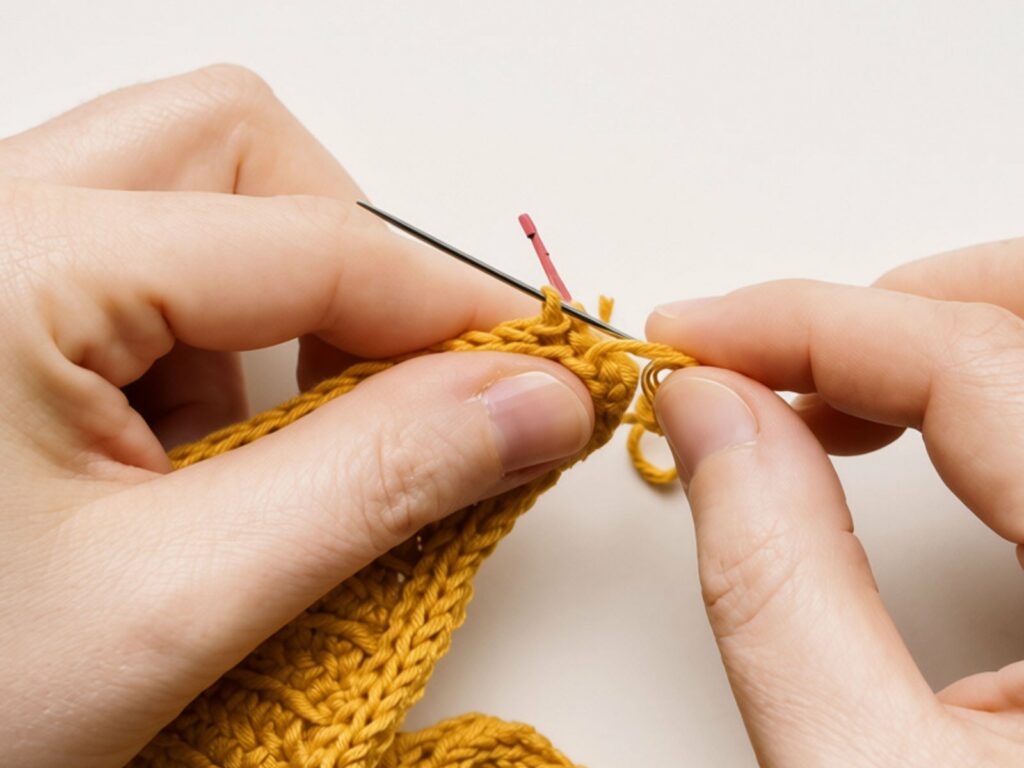
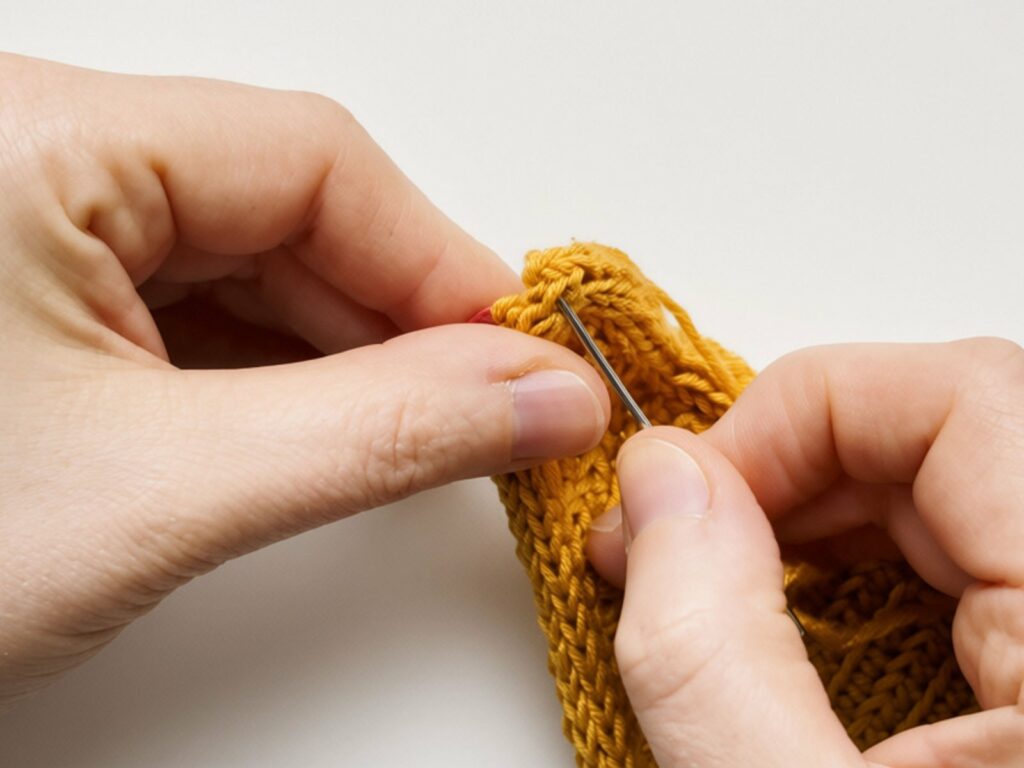
- Join the last 2 loops. Take the needle through the last 2 loops from the marker and sew them to the last column of the I-cord, then into the stitch.
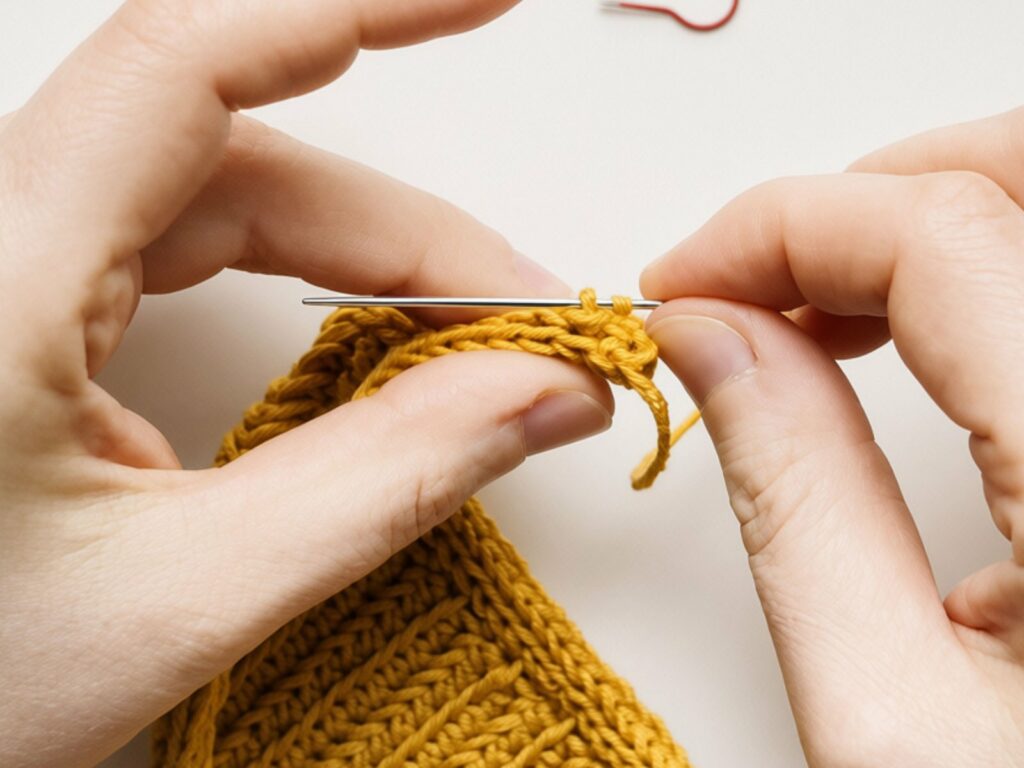
Finish
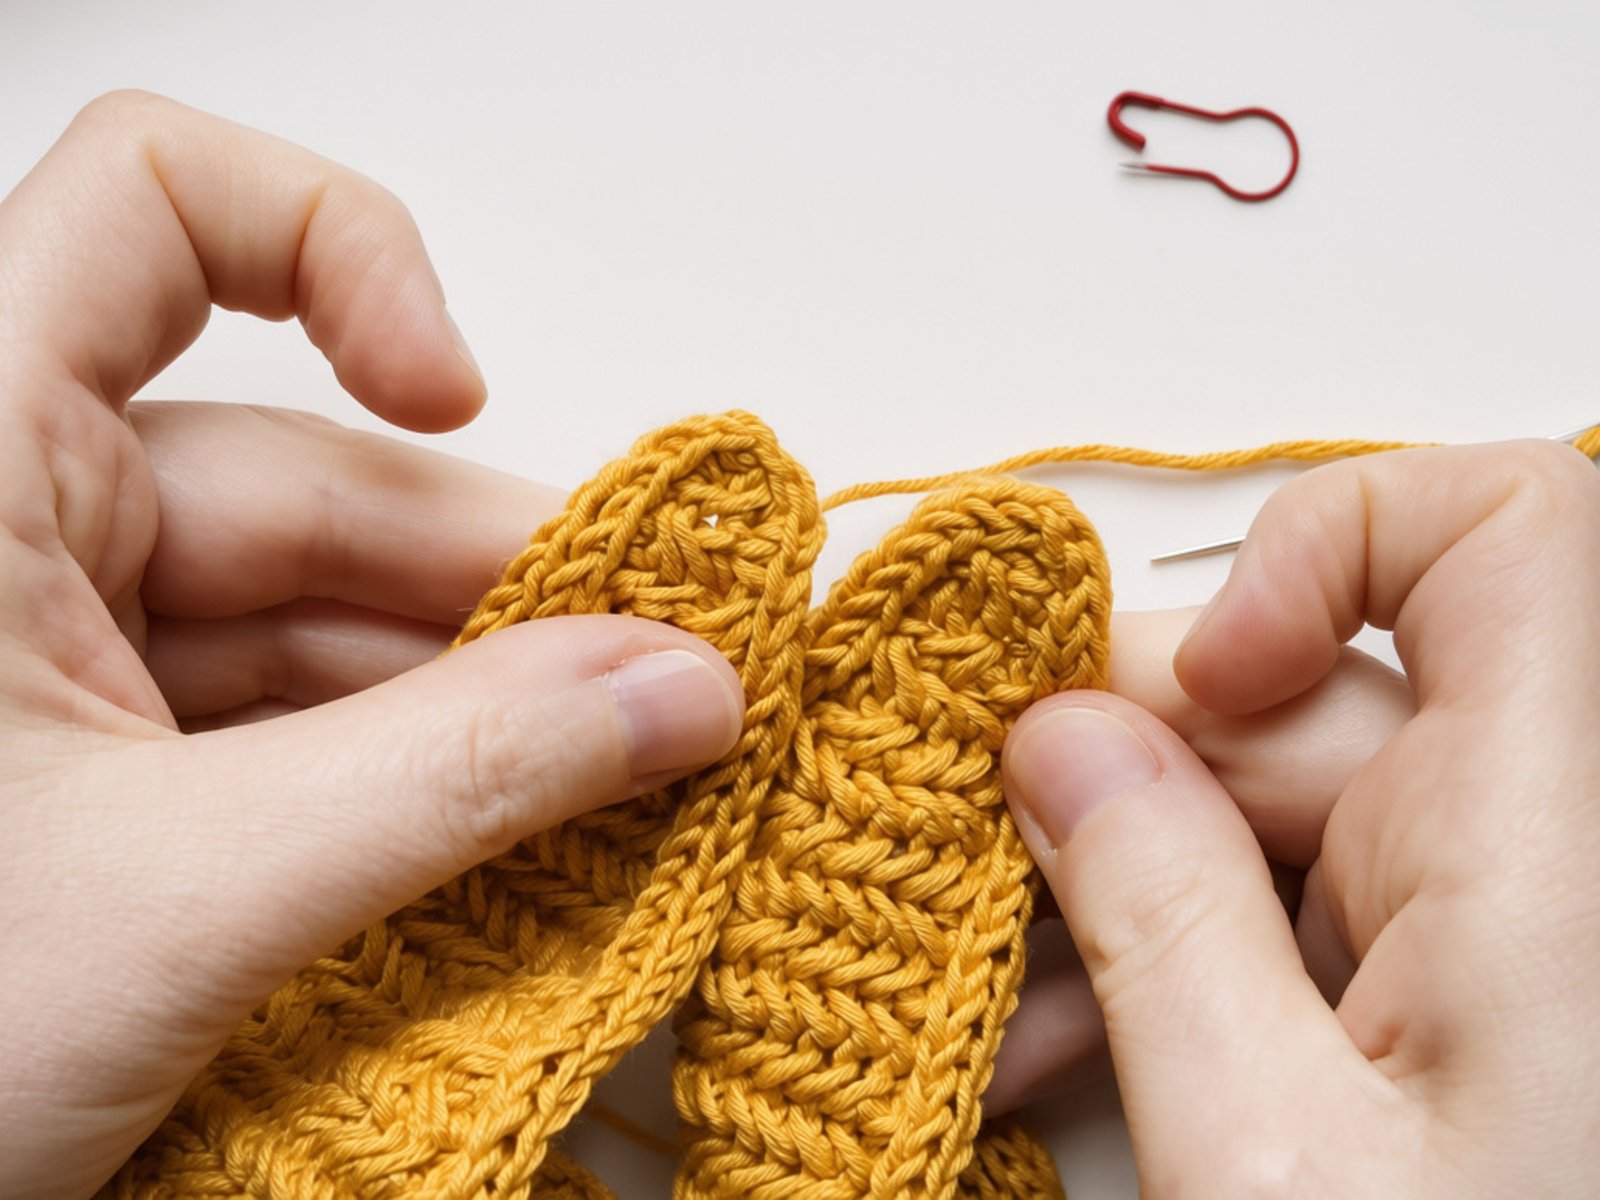
- Weave in the ends. The two ends of the cord join so neatly that they look almost the same.
Finished your hooded scarf? I’d really love to see it, so share it on Instagram with #mycrochetory and tag @mycrochetory.
Stuck at the split or on an I-cord corner? Ask in my Facebook Group or Ravelry Group, or email me at mycrochetory@gmail.com.
More herringbone crochet patterns
Hooked on the zigzag texture now? Herringbone shows up in a whole family of my designs, and all of these are free on the blog.

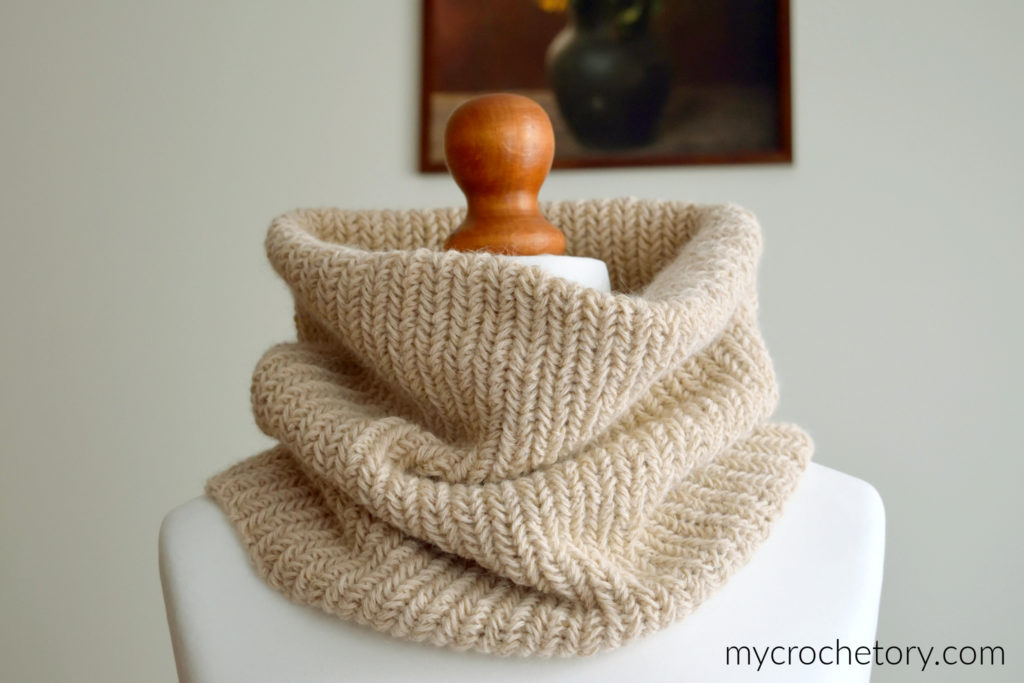
- Diana Herringbone Shawl, a tip-to-tip triangle shawl worked in herringbone single crochet.
- Herringbone Crochet Cowl, a warm alpaca neck warmer in herringbone stitch.
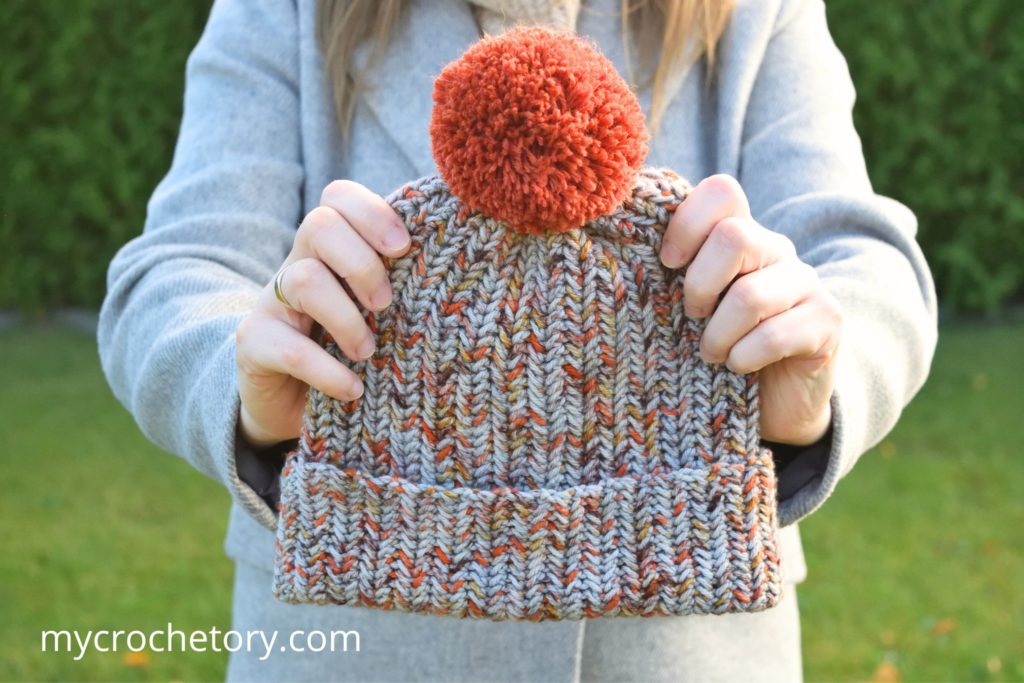
- Siri Herringbone Hat, a beanie worked lengthways as a flat herringbone rectangle.
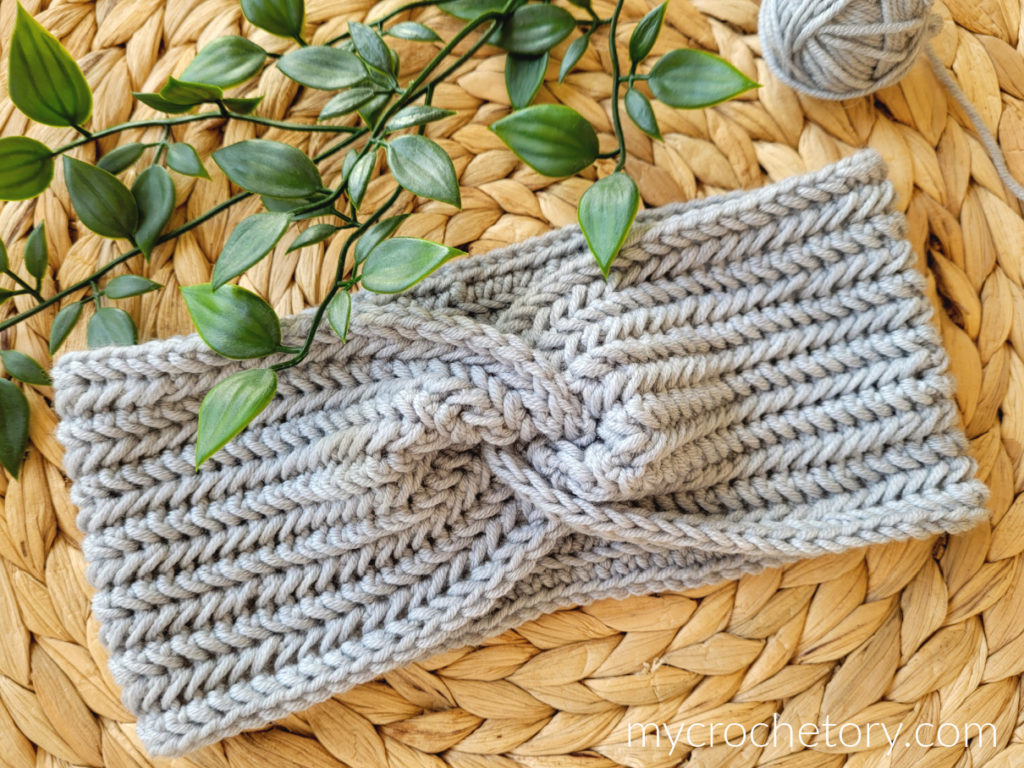
- Twisted Herringbone Headband, a headband worked flat and seamed with a twist at the front.
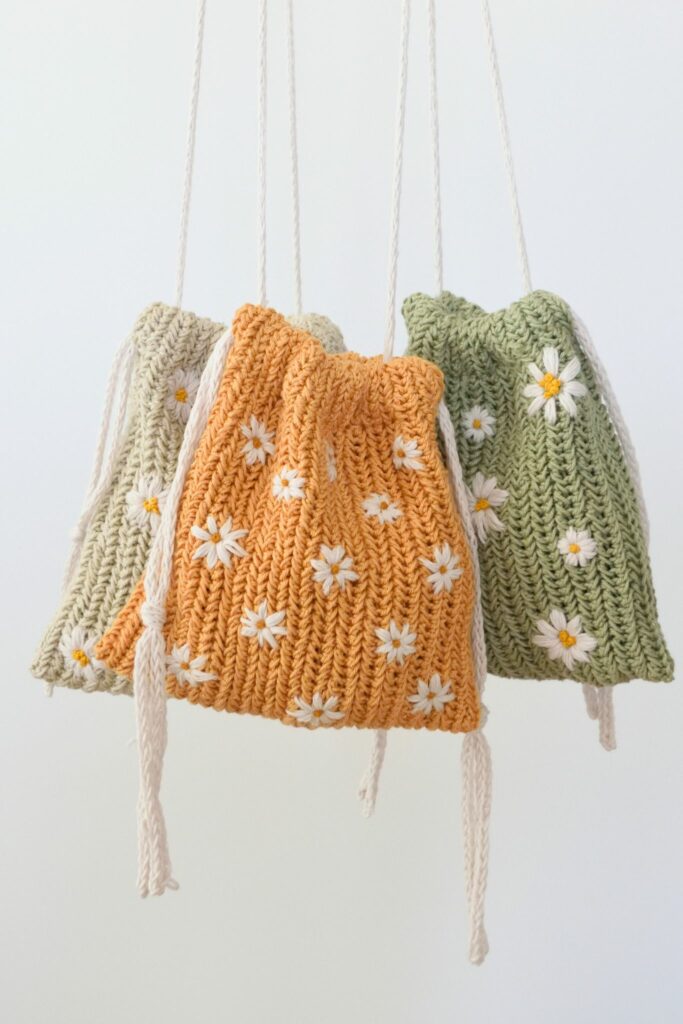
- Herringbone Drawstring Bag, a herringbone rectangle bag with a folded drawstring casing.
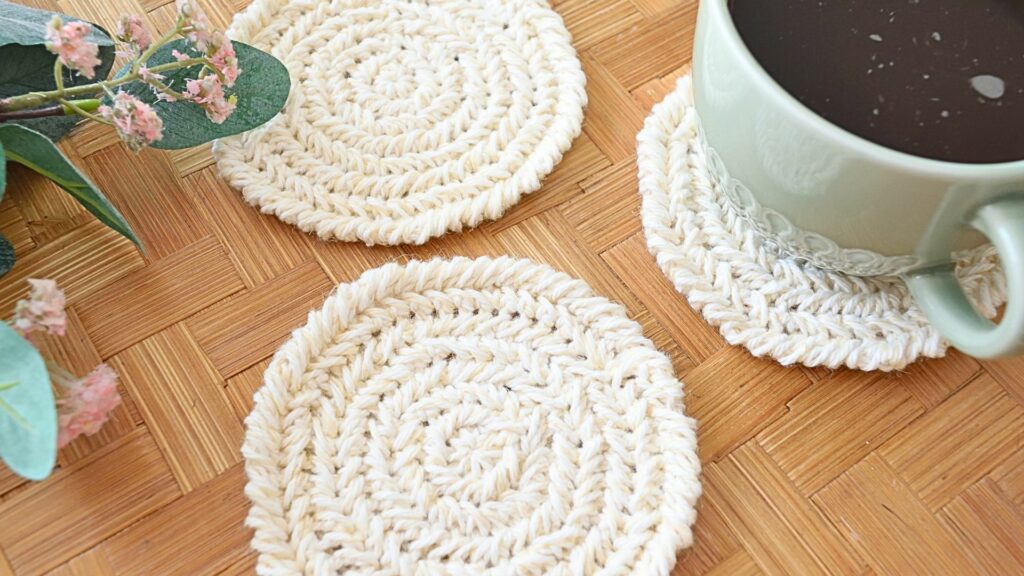
- Round Herringbone Coaster, a quick round coaster that starts with a magic ring.
Want to compare hood styles before you start? My crochet hooded scarf patterns roundup has 34 free designs to browse.
Want the herringbone cheat sheet on paper?
Get the free printable Herringbone Card from my Freebie Vault. Sign up below and the password lands in your inbox.
Crochet hooded scarf FAQ
Do I need to sew the crochet hooded scarf?
No sewing at all. The hood grows from the top rectangle and both ends grow from the hood, and the only needle work is joining the I-cord at the very end.
Can I use one yarn instead of two held together?
Yes, if your yarn gives 24 sts and 15 rows in 4 inches in herringbone single crochet. Gauge sets the slip stitch counts around the top rectangle, so swatch before you chain 29.
Which hooks do I need for the I-cord edging?
Two smooth metal hooks without grips, so the loops slide off the back end. A 0.5 mm difference is fine, and I use a 3.5 mm and a 4 mm myself.
How long is the crochet hooded scarf?
After blocking it measures 59 inches (150 cm) from the top of the hood to the tip of each end. The hood takes up about 11.8 inches of that, so each end hangs about 47 inches.
You can also follow me on Instagram, Facebook and Pinterest.
Leave a Reply