Learn how to crochet ribbing with single crochet in the back loop. Perfect for hat brims, cuffs, and more. Step-by-step guide and free patterns included!
If you can single crochet, then with my step by step picture and VIDEO tutorial below, you can easily learn how to start your project with a crochet ribbing and how to add the perfect crochet ribbing to your project.

Introduction
Crochet ribbing adds texture and stretch to your projects.
There are many ways to make ribbing, but my favorite technique is using single crochet in the back loop. This method creates a stretchy ribbing that is perfect for hat brims, cuffs, and other parts of your projects.
In this post, you will learn how to start with crochet ribbing and how to add ribbing to the end of your project. I will cover the basics, like making the foundation chain and working single crochet stitches in the back loop.
You will also find a photo and VIDEO tutorial to get the perfect ribbing.
This guide will help you create beautiful crochet ribbing, making your crochet projects even better with this easy and fun technique. Happy crocheting!

Understanding Crochet Ribbing
What is Crochet Ribbing?
Crochet ribbing is a technique that adds stretchy, textured edges to your crochet projects. It’s perfect for parts that need a bit of give, like hat brims, cuffs, and waistbands.
In this post, we’re focusing on single crochet in the back loop only method. This technique gives your projects a neat, knit look and lots of stretch, making them look polished and professional.
The Basics of Crochet Ribbing and Its Uses
Let’s dive into how to create ribbing using the single crochet in the back loop only technique. This method is fantastic for making stretchy ribbing that’s ideal for hat brim, cuffs, and waistbands.
Crochet ribbing helps edges keep their shape while adding a tidy finish. It’s practical, makes your projects look more professional, and can even add a decorative touch to blankets, scarves, and more.

Benefits of Using Ribbing for Structure and Aesthetics
Using crochet ribbing has several perks.
First, it adds elasticity, making your projects stretchier and more comfortable to wear.
Second, it provides structure, helping your projects maintain their shape and giving them a firm edge.
Finally, the ribbed texture is visually appealing, adding a nice decorative element. Even simple projects can look more intricate and polished with ribbing.
Types of Crochet Ribbing
While we’re focusing on single crochet in the back loop only ribbing, it’s good to know about other techniques:
Half Double Crochet in the 3rd Loop
This technique involves working half double crochet stitches into the third loop of each stitch. The third loop is located behind the top loops of the stitch. This method creates a textured and stretchy ribbing.
Start with a foundation chain, then work half double crochet stitches into the third loop of each stitch in the following rows. Repeat row after row to get a stretchy ribbing that is perfect for hat brims, cuffs, and waistbands.
Front Post and Back Post Stitches
This method involves working around the post of the stitches from the previous row instead of through the top loops.
Front post stitches are made by inserting the hook from front to back, and back post stitches are made from back to front. This creates more pronounced ribbing, ideal for sweaters and hats.
Alternate front post and back post double crochet stitches to achieve a textured ribbing effect. Repeat row after row to get a nice, bumpy texture.
Slip Stitch Ribbing
This uses slip stitches worked in the back loop only to create tight, stretchy ribbing. It’s great for making firm edges like cuffs and collars.
Start with a foundation chain, then work slip stitches into the back loop of each stitch in the following rows. Repeat row after row to get firm and stretchy ribbing.
Step-by-Step Tutorial and Video Tutorial
For a clear guide, check out the video tutorial included in this post. It shows how to make single crochet ribbing using the back loop only technique.
You’ll see how to start with a foundation chain, work each row, and add ribbing to your finished projects. With step-by-step instructions you’ll quickly learn how to master crochet ribbing.
By focusing on single crochet in the back loop only and understanding these different techniques, you can choose the best type of crochet ribbing for your projects.
Creative Uses of Crochet Ribbing
Crochet ribbing is a great way to add a nice look and stretch to your projects. It makes your work look neat and professional. Let’s see how crochet ribbing makes different patterns special.
Cowls and Scarves
Crochet ribbing is perfect for making cowls and scarves. In the Duende Crochet Cowl, the ribbing adds a stretchy edge that keeps the cowl in shape and fits well around your neck.
The Namari Mosaic Crochet Cowl also uses ribbing to make the cowl cozy and stylish.

Blankets
Adding a ribbed edge to blankets, like in the Cable Crochet Diamond Blanket, makes the blanket look elegant. The ribbing helps the blanket lay flat and gives it a neat finish. This makes crochet ribbing a great addition to any blanket design.
Sweaters and Tees
Crochet ribbing is great for cuffs, hems, and necklines in clothes. The Willow Tee uses ribbing to add a nice touch to the edges, making the tee comfortable and stylish.
The Meadow Lace Crochet Shrug and the Rhea V-Neck Crochet Cardigan also use ribbing to make the edges stretchy and neat.

Hats
Crochet ribbing is ideal for hat brims. It makes the brim stretchy and helps the hat fit well.
The Duende Mosaic Crochet Hat shows how ribbing makes the brim snug and keeps the hat in place while looking stylish.

Home Decor
Use crochet ribbing in home decor items like pillow covers and baskets. Ribbing adds a nice texture and makes the items more durable. It gives your decor a unique and stylish look.
Stitches & Abbreviations (US terms)
st(s) – stitch(es)
yo – yarn over
BLsc – back loop only single crochet
How To Crochet Ribbing: VIDEO Tutorial
To learn how to crochet ribbing, watch the step-by-step free tutorial below or scroll down for the written instructions.
TIP: To view this crochet ribbing video tutorial properly, please disable any ad-blocker you have running.
HOW TO START YOUR CROCHET PROJECT WITH A CROCHET RIBBING
STEP 1:
Figure out how wide you’d like your crochet ribbing to be and then work a starting chain of your desired length.
In my example: chain 8 plus turning chain. Then, you will be working in rows.
Row 1: sc in the second chain from the hook, sc in every sts to end. Turn

Row 2: ch (doesn’t count as a sc here and throughout), sc in first stitch, BLsc until last st remain, sc in last st. Turn.

Now simply repeat Row 2 until desired length of your crochet ribbing has been reached.

STEP 2:
Now fold your crochet ribbing in half and use slip stitches to join last and first row together.

STEP 3:
Turn your crochet ribbing inside out.

If you are going to work the rest of your project with the same color as your ribbing simply continue with the same yarn. For better visualization, I will change the yarn to contrasting color, so you can easily see where I work the stitches.
With the bigger hook, make chain 1 and work single crochet around your crochet ribbing – one single crochet stitch in each ribbing’s row. Then slip stitch to the first single crochet to close the round.
You should have as many single crochet stitches as many rows you’ve made in STEP 1.


HOW TO ADD A CROCHET RIBBING AT THE END
After working the last row of the main body, you will be adding the ribbed edge onto your project. So don’t break the yarn and simply continue working the ribbing, unless you just want to change the color.
Because I want you to see the stitches more easily I will change the yarn for contrasting color.
STEP 1:
Take a hook a half or one size smaller than you used for the main body of your project and make a chain of your desired ribbing length (plus one chain for the turning chain).

Please note that the ribbed edge will be worked in rows.
In my example: chain 6 plus turning chain.
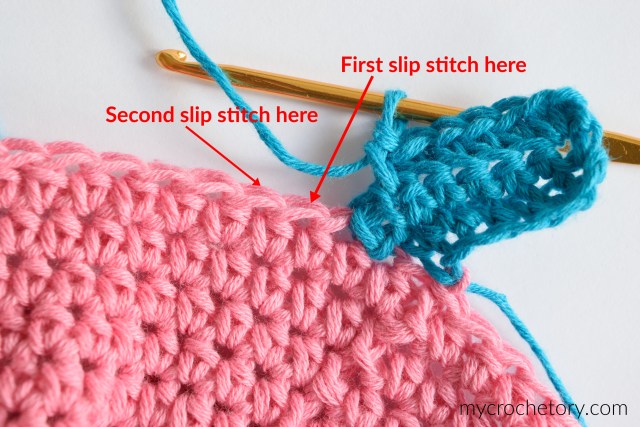
Row 1: starting with 2nd chain from hook, work 1 sc in each ch back to edge of your project. Join to the next st of the edge of your project using sl st and work one more sl st in the next st of your project (2 sl sts in total for joining) plus make ch1. Turn.


Row 2: Starting from 3rd st from hook (skip 3 first stitches), sc in first st, BLsc until last st remain, sc in last st. (2 sc and 4 BLscs in my example). Turn.


Row 3: ch1 (does not count as a sc), sc in first st, BLsc until the last st remain, sc in last st (2 sc and 4 BLsc in my example). Join to the next st of the edge of your project using sl st and work one more sl st in the next st of your project (2 sl sts in total for joining) plus make ch1. Turn.

Repeat Rows 2-3 until you reach beginning Row 1. Then turn your project inside out and join the last row with the first row using the slip stitches. Turn back. Cut the yarn and fasten off.


MORE CROCHET PRO TECHNIQUES
If you found this crochet ribbing tutorial helpful, you might also like posts:
- How to foundation single crochet
- How to double crochet 2 row at once
- How to make a slip knot – 3 Easy Ways
- How to crochet standing stitches
- How to crochet an I-cord
- Mattress stitch join tutorial
Don’t forget to save this Pin for easy reference: 📌

We’d love to hear about your crochet adventures and see your beautiful creations. Drop a comment below sharing your thoughts, questions, or even your favorite crochet tips! Your voice adds a vibrant thread to our forum community.
Sharing is caring! If you found this guide helpful, consider spreading the love. Click the share button and inspire other crocheters.
Stay in the loop with our latest crochet guides, tips, and inspiration. Subscribe to our newsletter for exclusive content straight to your inbox. Never miss a stitch—subscribe today!
Happy crocheting, and may your yarn always be tangle-free!
Join my Facebook Group and Official Ravelry Group where you can find necessary support, you can ask questions or share your finished projects.
You can also follow my Instagram, Facebook page and Pinterest.
I am crocheting a ribbed brim for a hat. Unfortunately, I have frogged many times as The ribbing rows start to slant (instead of standing straight up and down) after about the third or fourth row. What am I doing wrong?
It’s hard to say not seeing your project. Please send me some pics at mycrochetory@gmail.com and I will look at this.
Thank you. I have been trying to figure out how to do this on my own for a baby sweater bottom and sleeve.
Now I get it!! Thanks.
Hi, Silvia. Thanks for the great tutorial on adding ribbed crochet at the end of a project. Very glad I found your site. Please, what does BLsc mean? Thanks in advance.
Hi! BLsc means back loop single crochet.
Thank you very much for this great tutorial. I can’t follow videos so the pictures have been very helpful.I have just crocheted my first rib at the end of a sleeve and I am feeling so proud of myself. I am 86 years of age and have been crocheting most of my life. Thank you again.
This tutorial seems amazing and easy to follow, I can’t wait to add it to my next project! I have a question though, if I wanted my cuffs to be tighter how would I go about that? I’ll be adding them at the end of my project. Thanks!