Updated: 22 June 2026 by Sylwia (MyCrochetory)
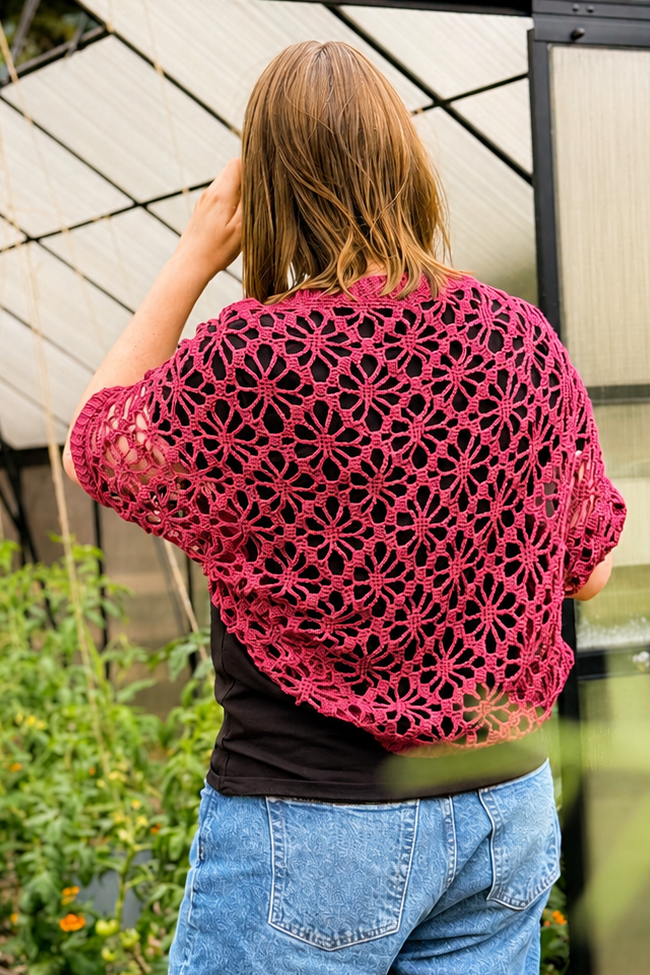
A crochet shrug might look super fancy when you see it hanging up, but honestly, it’s not scary at all to make. With this free crochet shrug pattern, you just make one big rectangle out of lacy stitches and soon you’ll have a light handmade shrug you’ll actually want to wear.
The cool thing about rectangle shrugs is they’re one of the easiest shapes to figure out even if the stitches look a bit tricky. You don’t have to mess with necklines, count sleeve increases, or try to understand a complicated sweater chart. This lacy crochet shrug pattern is a breeze to follow, and you don’t need any special skills. Thank goodness for that!
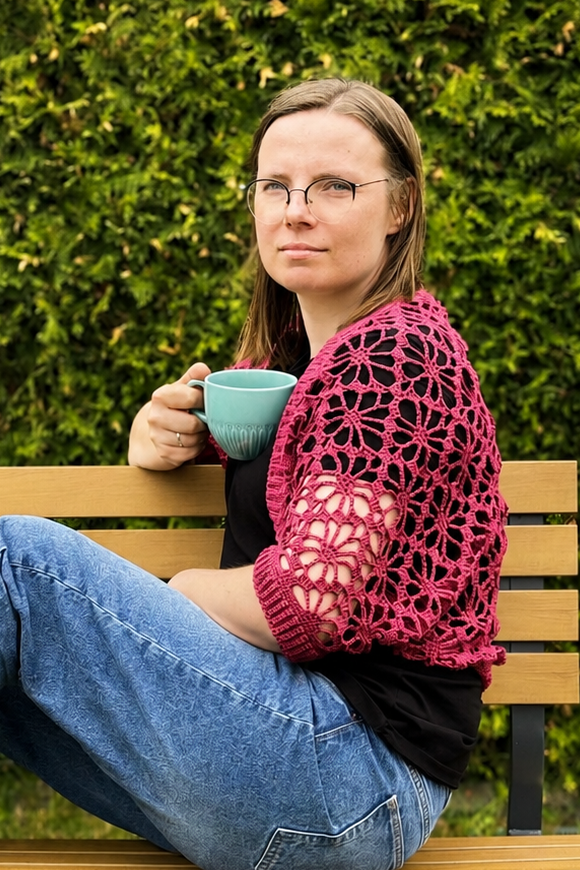
I’ll walk you through making the free Meadow Lace crochet shrug pattern step by step from the lace pattern, custom fit tips, and video, to the final touches that make it look great. If you like lightweight crochet shrugs for layering over jeans, dresses, tank tops, or just for cool summer nights, you’ll love this. It’s a pretty handmade piece, and it won’t make you stressed out!
Scroll down for the free Meadow Lace crochet shrug pattern and video tutorial. If you like working from a printable crochet shrug pattern PDF, you can get the ad-free version with stitch charts HERE on ETSY or HERE on Ravelry. That way, you can follow the crochet shrug pattern with stitch charts without scrolling on your phone while you work.
Why This Free Crochet Shrug Pattern Works So Well
Some crochet clothes look great, but when you see all the tricky shaping and sleeve math, it can feel overwhelming. That’s what I love about this free crochet shrug pattern, it skips all that drama! You get a comfy, relaxed fit that’s easy to finish and fun to wear. If you want a crochet shrug for dresses and tanks, or a summer crochet shrug pattern that is not stressful, this one’s for you.
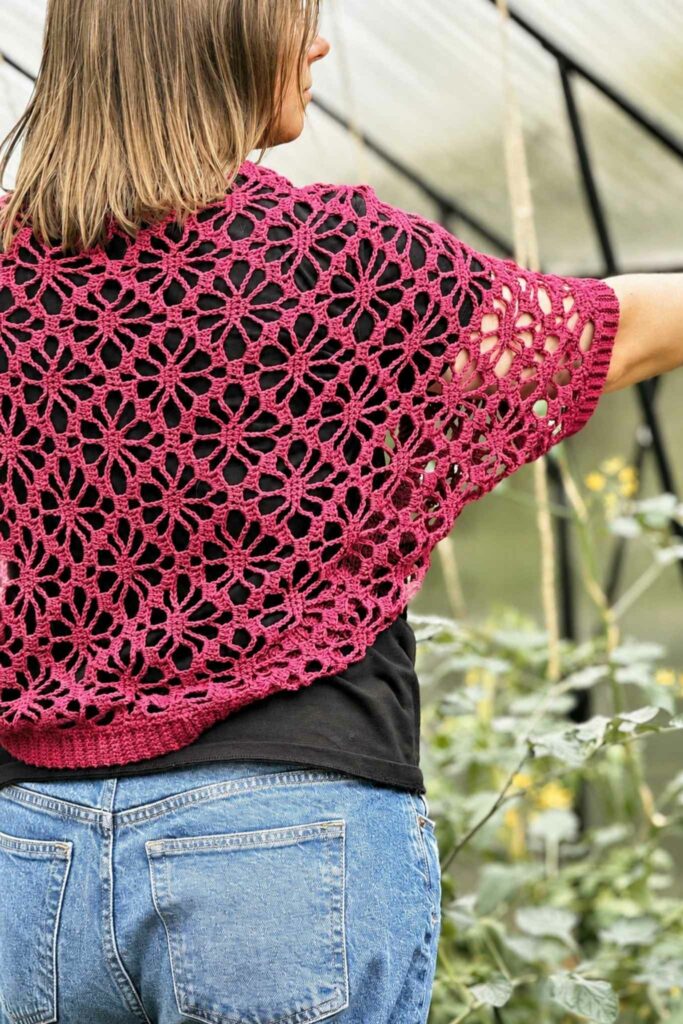
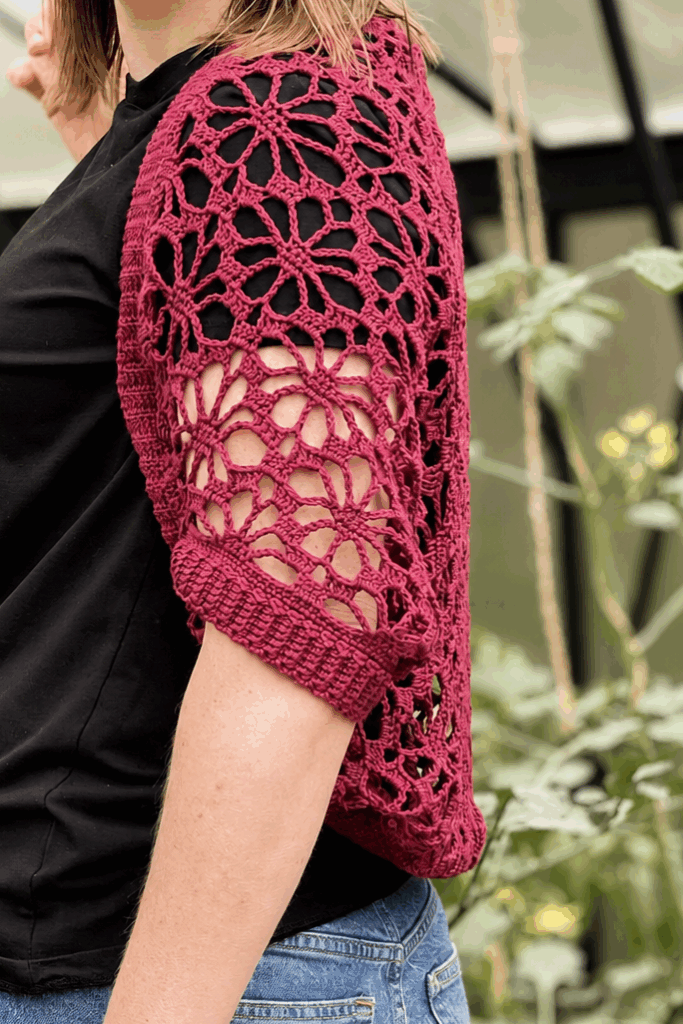
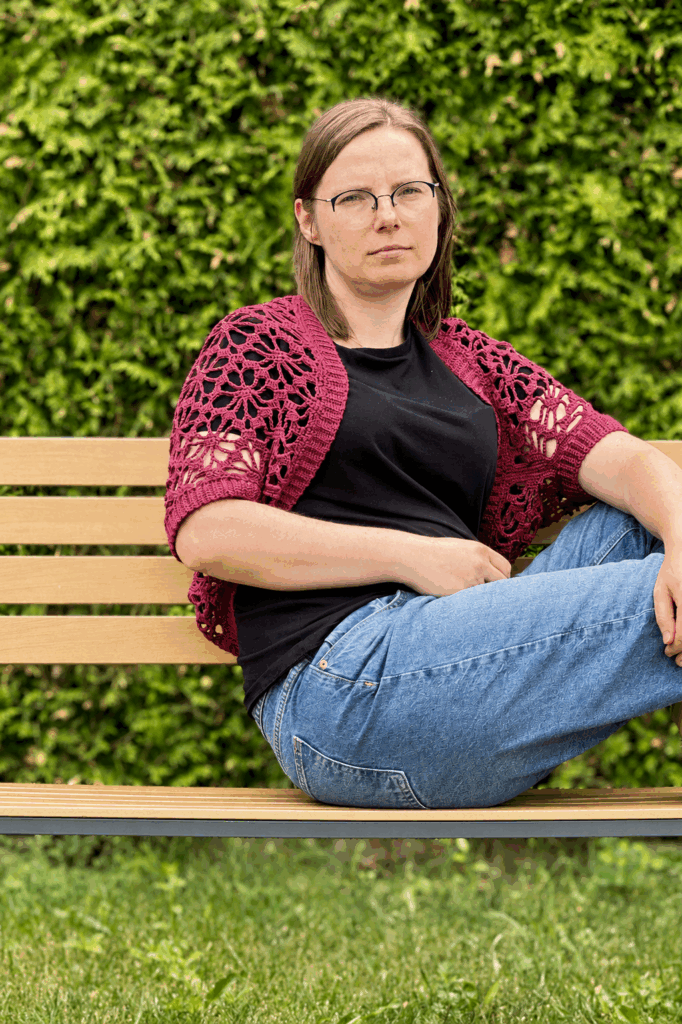
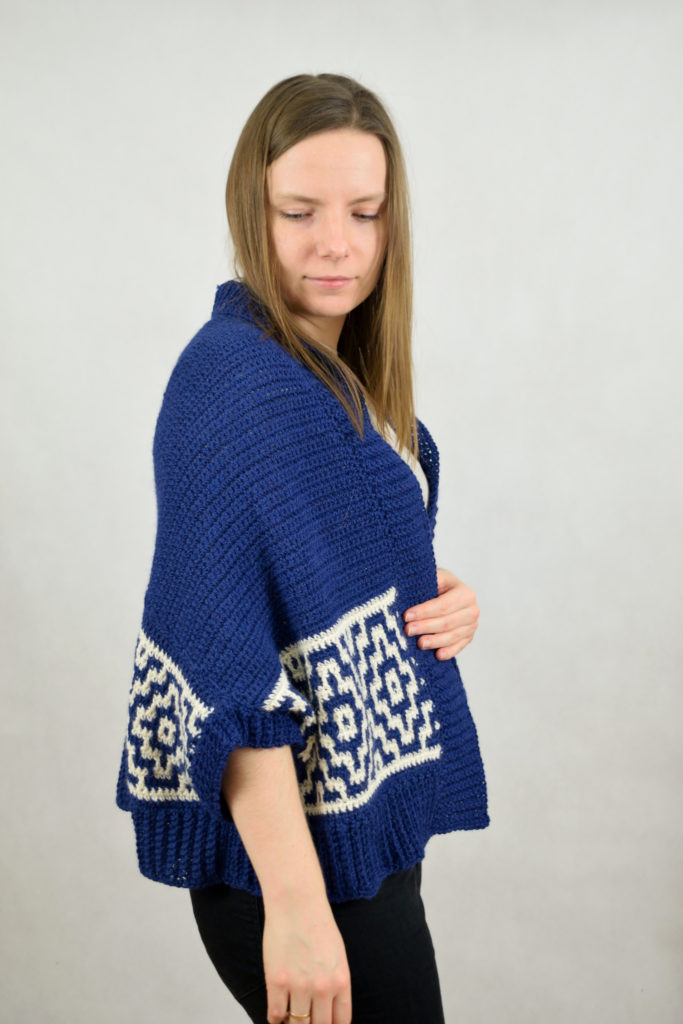
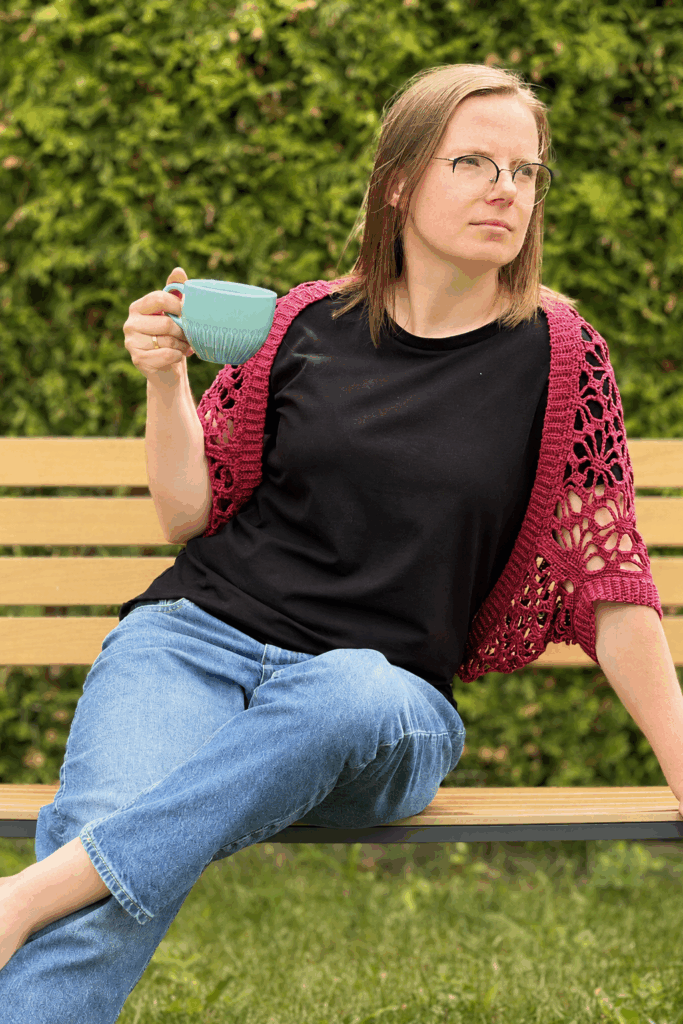
The lace keeps things light and airy, and the ribbed edges make everything look neat. You can dress this lacy crochet shrug pattern up for a special occasion or just wear it with jeans and a tank. It’s a lightweight crochet shrug pattern that really works for all kinds of outfits.
I also love that this adjustable crochet shrug pattern gives you a clear plan to follow, but you can still change it up to fit you just right. You get to focus on the fun parts like the lace and finishing without stressing about tricky sweater stuff.
If you are browsing more warm weather garment ideas, my crochet women’s tops roundup is also worth saving for later.
How This Crochet Shrug Is Made From One Rectangle
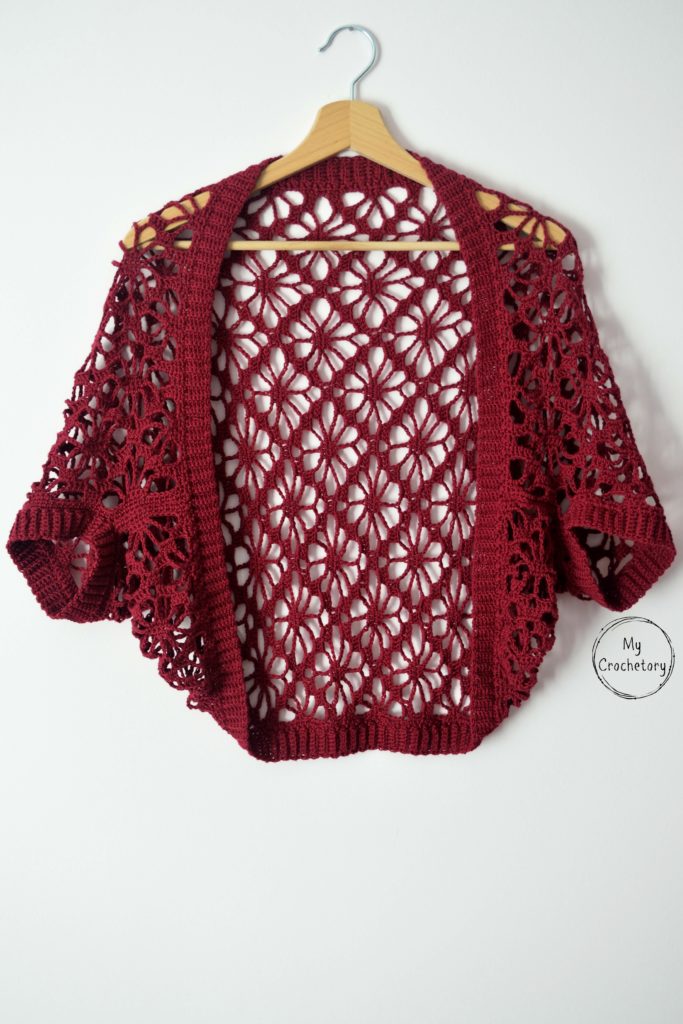
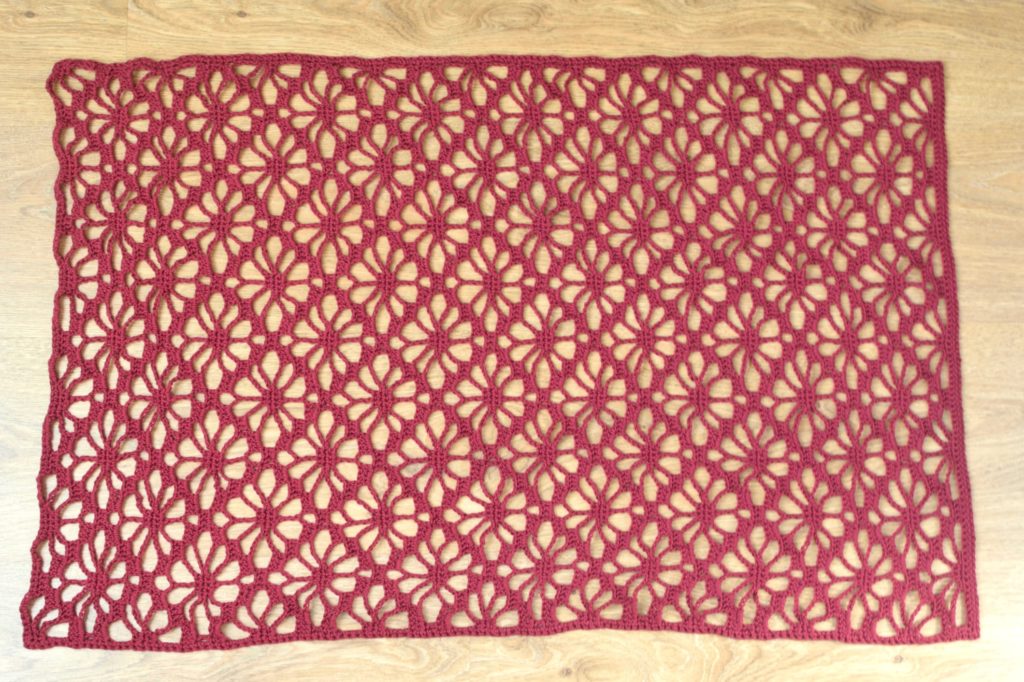
The best thing about making this shrug? You don’t need to be a sweater expert. Just crochet a big rectangle, block it, fold in the corners, and sew up the sides for the armholes. That’s it!
The cuffs and collar are actually worked right onto the shrug, so there’s no need to make them separately or sew them on afterward. One less step, and way less mess.
Pay attention when you fold the rectangle because this is the moment where the flat lace fabric starts looking like an actual shrug. If seaming makes you second guess your tension, this is a good place to use a neat joining method and take your time with both armholes.
When it is time to seam the armholes, you can use your favorite joining method, but my neat crochet seams tutorial is helpful if you want the join to look cleaner.ther.
What To Know Before You Start The Lace Repeat
Lace rows are where many crocheters suddenly get very quiet and start counting like their whole weekend depends on it. Before you jump in, read the notes first, because this crochet shrug pattern uses a stitch multiple of 19 plus 3, and that foundation chain matters if you plan to adjust the size.
Remember, the starting chains do not count as stitches. So, your first real stitch goes right into the last stitch from the row before, not the turning chain. Little details like this can save you a headache later!
Before you begin the lace repeat, take a moment to check your stitch count and make sure you understand where each repeat starts and ends. If you are new to lace crochet, the video tutorial can be especially helpful for seeing how the stitches are placed. The lace pattern creates a beautiful fabric, but it does require careful counting and attention to detail.
If your edges usually start leaning a little before you notice, my tutorial on keeping crochet edges straight is a good one to keep open while working this rectangle.
If you’re a visual learner, the printable crochet shrug pattern PDF (available HERE on ETSY or HERE on Ravelry) includes stitch charts right alongside the written pattern. This makes it easier to follow the lace repeats, check your chain spaces, and keep track of your rows. It’s perfect for anyone who likes a crochet shrug pattern with stitch charts!
How To Customize The Fit Of Your Crochet Shrug
Fit is usually the part where a simple garment starts acting less simple, so let’s keep this practical. For this shrug, the length is adjusted by changing the starting chain, using the pattern multiple of 19 plus 3, and the width is adjusted by working more or fewer rows.
The nice thing is you can decide on the fit before you start seaming. That gives you a better chance to check the fabric against your body and decide if you want more coverage, a longer drape, or a slightly different sleeve opening.
I always check the fit before sewing things up, it’s so much easier to fix a flat rectangle than a finished shrug! Lay it out, hold it up to yourself, and take a minute to see if you like how it fits. Trust me, you’ll be glad you did.
If you enjoy wearable projects with helpful fit notes, you might also like the Willow Tee crochet pattern. And if you’re looking for more crochet garment patterns made from a rectangle, check out my blog for more ideas!
Yarn And Drape Notes For A Lacy Crochet Shrug
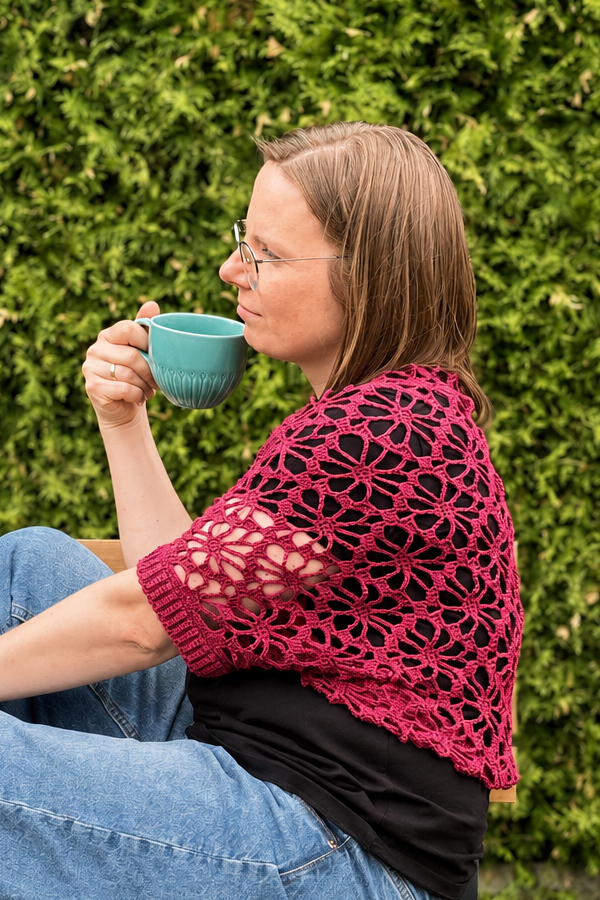
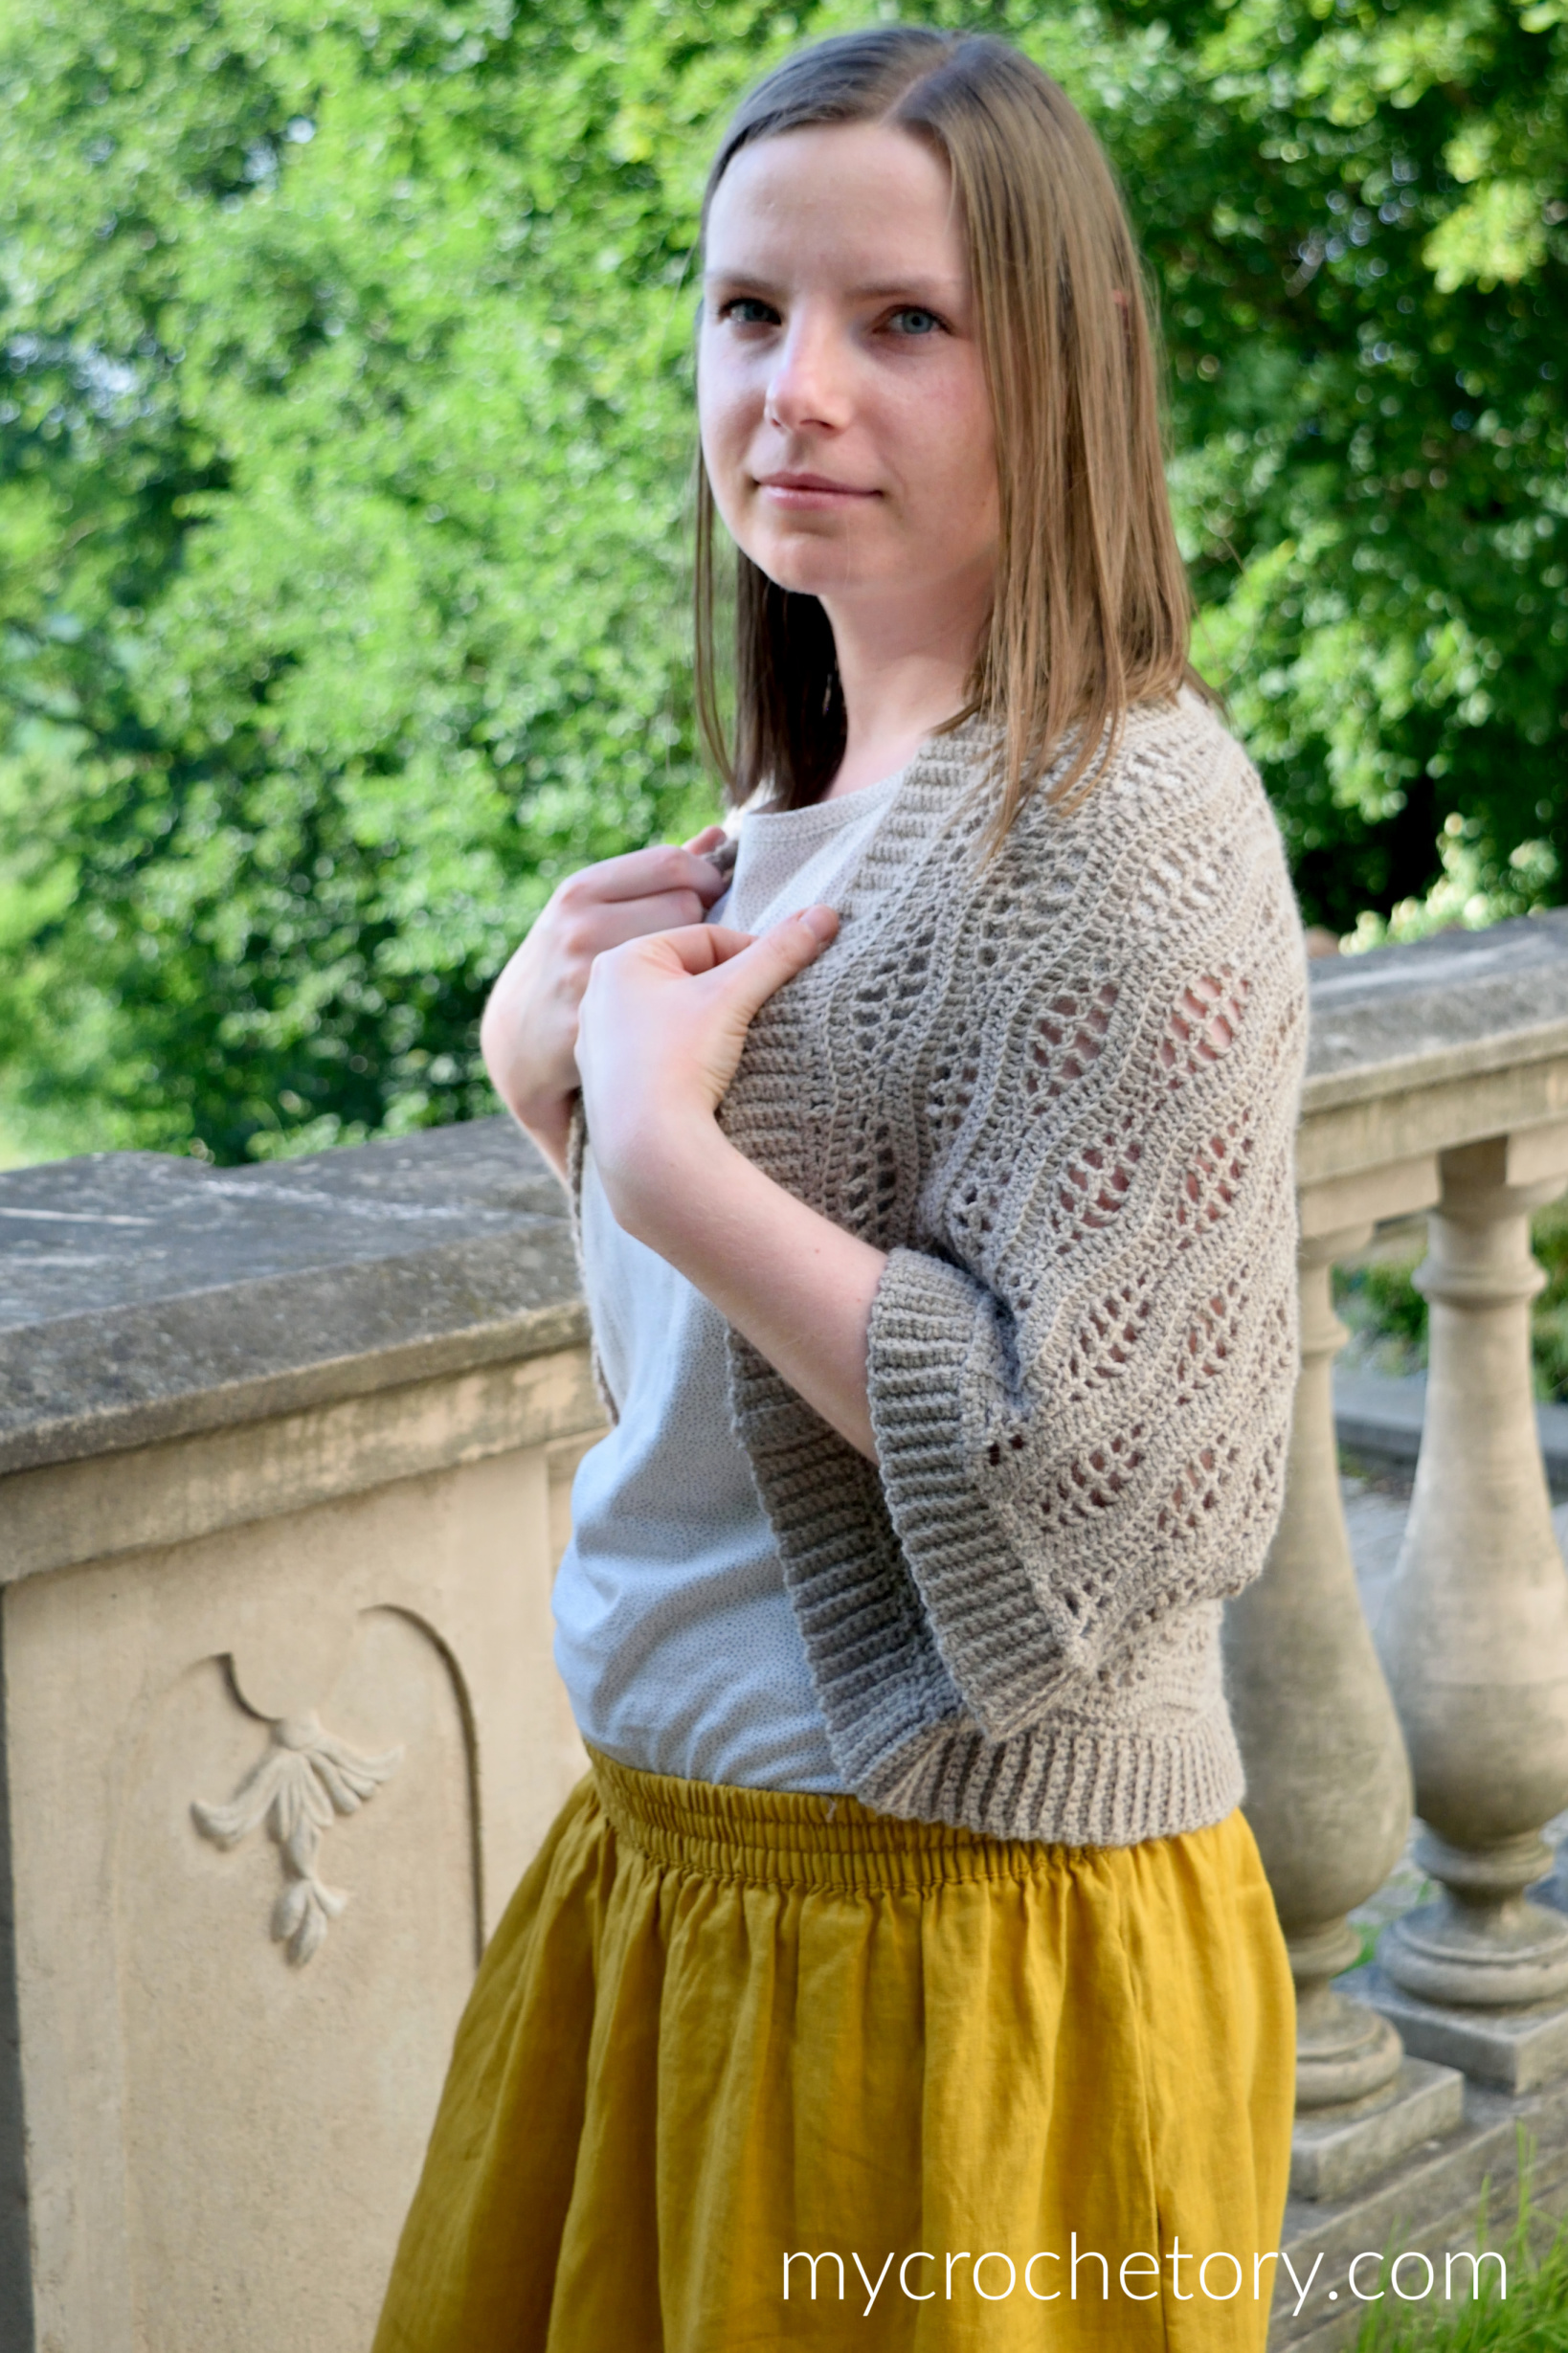
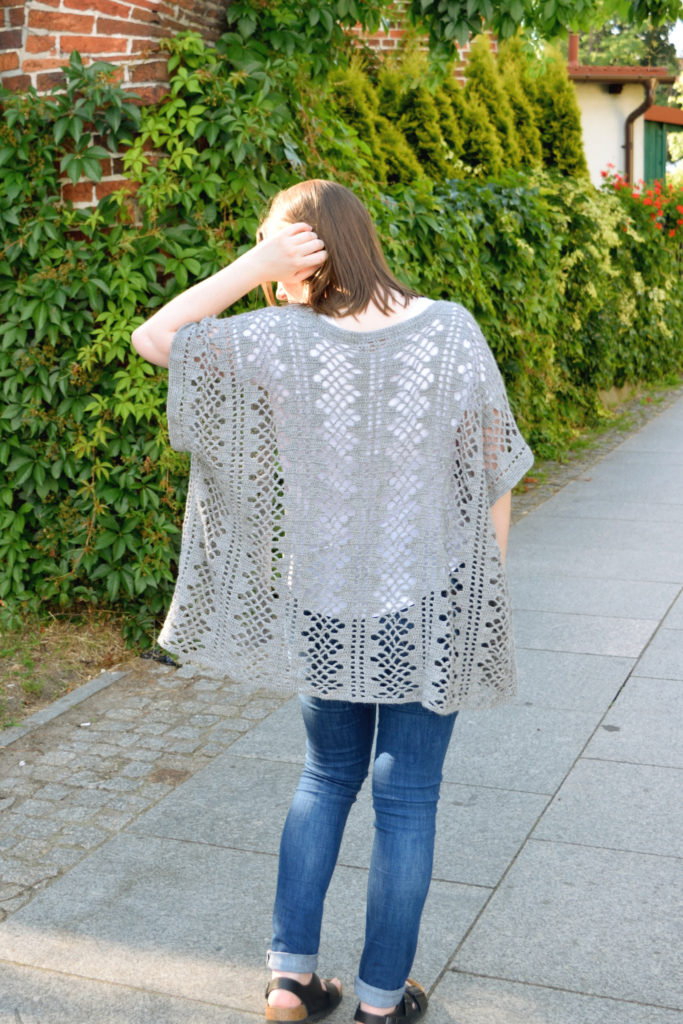
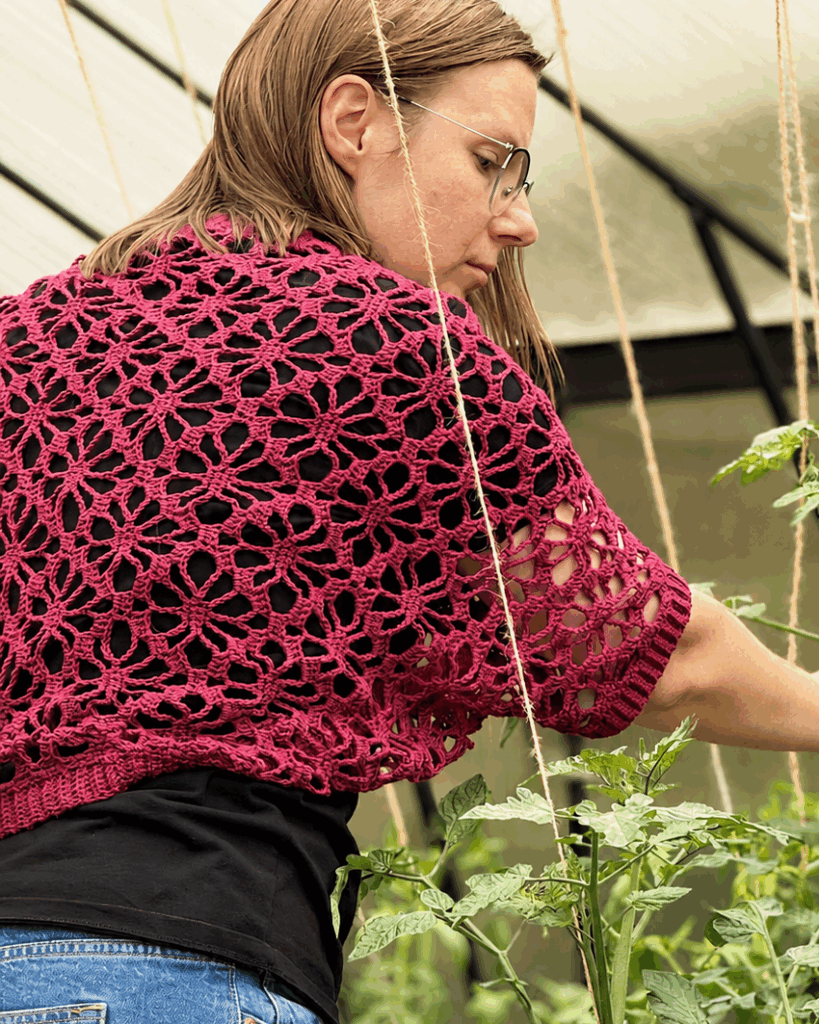
Yarn choice can change a crochet shrug fast, especially for a lacy crochet shrug made from a rectangle because open stitches need to hang nicely on your body. For my sample, I picked GAZZAL Baby Cotton. It makes this lightweight crochet shrug pattern feel soft, and it gives enough structure for the lace and ribbed edging to look clean.
Don’t forget, the gauge for this pattern is measured after blocking, not before. Lace always gets a bit bigger and stretchier after you block it, so don’t worry if it looks small at first, it’ll open up and look just right when you’re done.
Yarn substitutions can absolutely work for this crochet shrug, but it helps to think about drape before anything else. A yarn that is too heavy can pull the lace down and change the way the finished shrug sits on your shoulders, while a lighter yarn may create a softer, airier look.
If you decide to use a different yarn, make a swatch, block it, and compare it to the pattern gauge before committing to the full project. I love a bold yarn experiment, but for this shrug, I would be careful with thicker yarn because it can change both the size and the feel of the final piece.
Since this shrug uses more than one skein, my guide to joining new yarn neatly can help you keep the fabric looking tidy.
Blocking And Finishing Make A Big Difference Here
It’s tempting to skip blocking when your rectangle is finished and you just want to try it on already. But for this Meadow Lace Free Crochet Shrug Pattern, blocking comes first, before you make the armholes, so your fabric can relax and fall into shape before you fold and sew it up.
Blocking helps the lace open up and makes it way easier to measure, fold, and join everything evenly. It also gives you a nice, neat base for adding the ribbed edges.
Finishing isn’t just about making things look nice. It actually changes the shape, the sleeves, and how your shrug looks when you throw it on over your favorite outfit.
The cuffs and collar are made with ribbing, so if you want to see exactly how that works, check out my ribbing tutorial. It is super helpful if you want those edges to look really sharp.
OTHER SHRUG FREE CROCHET PATTERNS YOU MIGHT LOVE
If you love making light layers like this, there are a few more crochet patterns on my blog you might like too. I add them here because sometimes you start one project and then realize you want a different shape or style halfway through, totally normal!
Let us be real, half of making clothes is planning and the other half is pretending you do not already have yarn waiting in your stash. But honestly, if you want to build up your handmade wardrobe, these patterns are totally worth bookmarking.
If you want to share your wips and finished Meadow Lace Shrug on social media, please, use hashtag #mycrochetory. I love to see your finished project!
FREE MEADOW CROCHET SHRUG PATTERN
- Purchase the ad-free, printable PDF here on ETSY or here on Ravelry.
- Add this pattern to your Ravelry Queue HERE.
- Pin it for later.
Copyright 2018 – 2026 MyCrochetory. All right reserved. This pattern is property of Sylwia Kawczyńska @MyCrochetory. Please DO NOT sell the pattern and claim this pattern as your own. The pattern is for personal use only and may not be translated or reproduced in another language. Please respect my rights, DO NOT share or publish this pattern anywhere without my permission.
The crochet shrug you make following this pattern is yours you are free to sell it, as long as you credit MyCrochetory as original designer. For more information, please, read Terms Page.
As a bonus in the ad-free, printable PDF, I’ve provided a stitch charts. If you’re a visual learner or if you just want to support my work you can purchase this crochet pattern HERE on ETSY or HERE on Ravelry. Thank you and I hope you find it useful!

Materials & Tools:
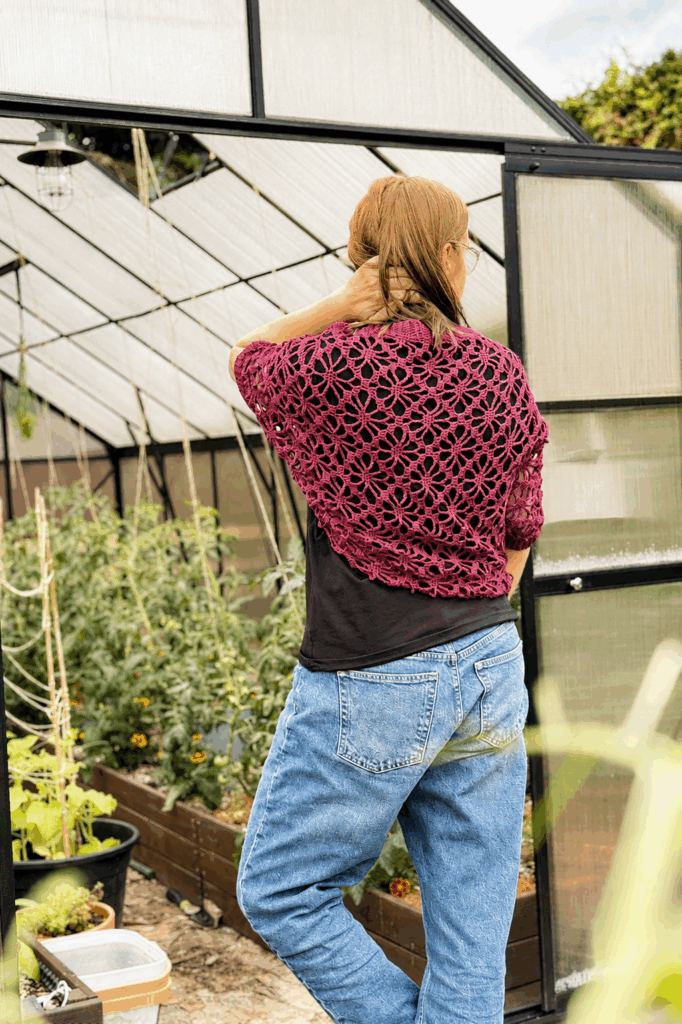
- Yarn GAZZAL Baby Cotton 50g = 165m, 60% cotton, 40% acrylic, 4 skeins. For the shrug sample I used Claret (3442) colorway.
- Hook size 3.5 mm. Adjust hook size if necessary to obtain correct gauge.
- Tapestry needle (to weave and hide yarn ends)
- Scissors.
Level:
Intermediate.
Gauge after blocking:
19 sts and 9 rows = 11 cm x 11cm
Size after blocking:
Length from top of neck, to bottom of shrug is 56cm without ribbed collar. Width is 81cm from end of sleeve to end of sleeve.
This pattern fits S-L. You can easily adjust the pattern to suite your body by creating a longer/shorter chain (multiple of 19 plus 3) and crocheting for more/less rows.
Notes:
- The pattern uses US Terminology.
- This shrug is constructed from one large rectangle worked from the bottom up and seamed to create sleeves.
- Cuffs around the armholes and ribbed collar are worked directly into the main shrug instead of creating a ribbed piece and sewing it on.
- Ch1, ch3 and ch4 in the beginning of each row do not count as a stitches, so first single crochet, double crochet or treble crochet of each row is made in last stitch of previous row.
- Pattern is multiple of 19 plus 3. To increase the length of the shrug, increase the number of chains. To decrease the length of the shrug, decrease the number of chains.
- To make this shrug wider/narrower work more/less pattern repeats.
Stitches & Abbreviations (US terms):
st(s) – stitch(es)
BLsc – back loop only single crochet
rep – repeat
sk – skip
Instructions in square brackets […] are worked as many times as indicated.
Meadow Lace Shrug VIDEO TUTORIAL
Need some extra help? Don’t worry, I’ve got you covered!
There’s a video tutorial to guide you through the entire process.
TIP: To view this video tutorial properly, please disable any ad-blocker you have running.
Meadow Lace Crochet Shrug PATTERN
Read all Notes before you start.
BODY RECTANGLE
Chain 98.
Row 1: dc in 4th ch from hook, dc in next ch, ch7, sk 5ch, sc in next 5ch, ch7, sk 5ch, [dc in next 4ch, ch7, sk 5ch, sc in next 5ch, ch7, sk 5ch] rep until 2ch remain, dc in next 2ch. Turn.
Row 2: ch3 (doesn’t count as a dc here and throughout), dc in first st, dc in next st, 3dc in ch-7sp, ch6, sk first sc, sc in next 3sts, ch6, sk next sc, 3dc in ch-7sp, [dc in first dc, ch2, sk 2dc, dc in last dc, 3dc in ch-7sp, ch6, sk first sc, sc in next 3sc, ch6, sk next sc, 3dc in ch-7sp] rep until 2dc remain, dc in next 2dc. Turn.
Row 3: ch4 (doesn’t count as a tr here and throughout), tr in first st, ch5, sk 3dc, dc in last dc, 3dc in ch-6sp, ch4, sk first sc, tr in next sc, ch4, sk last sc, 3dc in ch-6sp, [dc in first dc, ch5, sk 3dc, tr in ch-2sp, ch5, sk 3dc, dc in last dc, 3dc in ch-6sp, ch4, sk first sc, tr in next sc, ch4, sk last sc, 3dc in ch-6sp] rep until 5dc remain, dc in first dc, ch5, sk 3dc, tr in last dc. Turn.
Row 4: ch1 (doesn’t count as a sc here and throughout), sc in first st, sc in ch-5sp, ch5, sk 3 dc, dc in last dc, 3dc in ch-4sp, ch2, sk tr, 3dc in next ch-4sp, dc in first dc, ch5, sk 3dc, sc in ch-5sp, [sc in tr, sc in next ch-5sp, ch5, sk 3dc, dc in last dc, 3dc in ch-4sp, ch2, sk tr, 3dc in next ch-4sp, dc in first dc, ch5, sk 3dc, sc in ch-5sp] rep until last tr remain, sc in last tr. Turn.
Row 5: ch1, sc in first st, sc in next sc, sc in ch-5sp, ch7, sk 3dc, dc in last dc, 2dc in ch-2sp, dc in next dc, ch7, sk 3dc, sc in ch-5sp, [sc in next 3sc, sc in next ch-5sp, ch7, sk 3dc, dc in last dc, 2dc in ch-2sp, dc in next dc, ch7, sk 3dc, sc in ch-5sp] rep until 2sc remain, sc in next 2sc. Turn.
Row 6: ch1, sc in next 2sc, ch6, sk sc, 3dc in ch-7sp, dc in next dc, ch2, sk 2dc, dc in next dc, 3dc in ch-7sp, [ch6, sk first sc, sc in next 3sc, ch6, sk last sc, 3dc in ch-7sp, dc in next dc, ch2, sk 2dc, dc in next dc, 3dc in next ch-7sp] rep until 3sc remain, ch6, sk first sc, sc in next 2sc. Turn.
Row 7: ch4, tr in first st, ch4, sk sc, 3dc in ch-6sp, dc in next dc, ch5, sk 3dc, tr in ch-2sp, ch5, sk 3dc, dc in next dc, 3dc in ch-6sp, [ch4, sk sc, tr in next sc, ch4, sk sc, 3dc in ch-6sp, dc in next dc, ch5, sk 3dc, tr in ch-2sp, ch5, sk 3dc, dc in next dc, 3dc in ch-6sp] rep until 2sc remain, ch4, sk sc, tr in last sc. Turn.
Row 8: ch3, dc in first st, 3dc in ch-4sp, dc in next dc, ch5, sk 3dc, sc in ch-5sp, sc in tr, sc in next ch-5sp, ch5, sk 3 dc, dc in next dc, 3dc in ch-4sp, [ch2, sk tr, 3dc in next ch-4sp, dc in next dc, ch5, sk 3dc, sc in ch-5sp, sc in tr, sc in next ch-5sp, ch5, sk 3dc, dc in next dc, 3dc in ch-4sp] rep until last st remain, dc in last st. Turn.
Row 9: ch3, dc in first st, dc in next st, ch7, sk 3dc, sc in ch-5sp, sc in next 3sc, sc in next ch-5sp, [ch7, sk 3dc, dc in next dc, 2dc in ch-2sp, dc in next dc, ch7, sk 3dc, sc in ch-5sp, sc in next 3 sc, sc in next ch-5sp] rep until 5dc remain, ch7, sk 3dc, dc in last 2sts. Turn.
Repeat Rows 2-9 until Row 65 or desired length.
ASSEMBLY
Turn your work after the last row of the pattern.
Make one round of single crochet stitches around the rectangle, creating a simple border.
BORDER: ch1, sc in first st, sc in next st, 5sc in next ch-7sp, sc in next 5sts, 5sc in next ch-7sp, [sc in next 4sts, 5sc in next ch-7sp, sc in next 5sts, 5sc in next ch-7sp] rep across until 2sts remain before corner, sc in next st, 3sc in next st, rotate your work, sc across working 2sc around/in each dc, 3sc around/in each tr and 1sc around/in each sc until next corner, 3sc in ch where the first dc was made, rotate your work, sc in each ch across until next corner, 3sc in last ch, rotate your work, sc across working 2sc around/in each dc, 3sc around/in each tr and 1sc around/in each sc until first sc of this round, 2sc in same st where the first sc of this round was made, slst in first sc of this round.
Fasten off yarn, weave in all ends and block the rectangle.
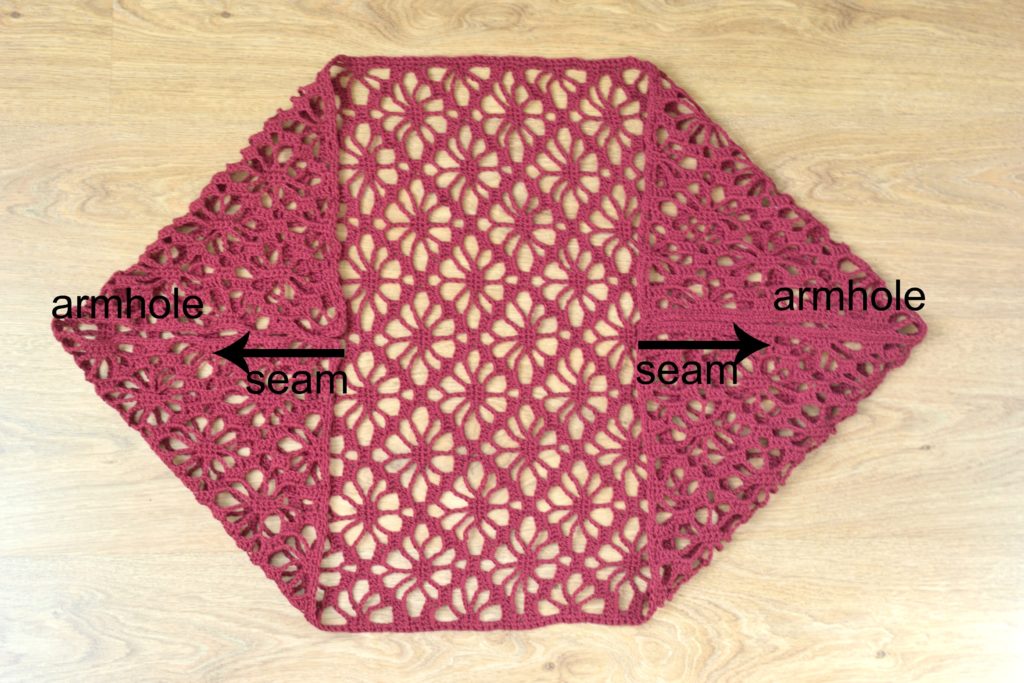
Creating arm holes:
Place piece flat on the floor as pictured. Fold the corners of the body piece into the center. Use whip stitches (or different joinig method you like) to join the arm edges together, approx. 13 cm in on each side. The part that is not sewn will be the opening for the armholes. Tie off and weave in ends.
Sleeves and collar trims
Now we are going to add a ribbed cuffs to both armholes and ribbed collar to the opening of the shrug.
Row 1: Pick any place on the edge of the armhole and attach your yarn with a slst. Ch7, starting with 2nd ch from hook, work 1sc in each ch back to the edge of armhole. Join to the next st of the the edge of armhole using slst and work one more slst in the next st of the edge of armhole (2 slst(s) in total for joining) plus make ch1. Turn.
Row 2: Starting from 4th st from hook, work BLsc in each st across until last st remain, sc in last st (5BLsc and 1sc in total). Turn.

Row 3: ch1 (doesn’t count as a st), sc in first st, BLsc in each st across. Join to the next st of the edge of armhole using slst and work one more slst in the next st of armhole (2 slst(s) in total for joining) plus make ch1. Turn.
Repeat Rows 2-3 until your cuff is joined to the entire edge. Then join your last row with the first row using the slip stitches.
Fasten off yarn.
Repeat for the second sleeve and for the opening of the shrug. You can also make longer trims by adding extra chains.
If you have any suggestions or have detected any mistakes, please feel free to email me at mycrochetory@gmail.com
After You Finish Your Shrug
Right after you finish sewing everything up, it’s so tempting to just throw on your new shrug and be done. But take a quick peek at the cuffs, collar, armholes, and seams, those little finishing touches really make the whole shrug look awesome.
Here is a tip, tight or loose edges can change how your shrug fits. If one cuff feels snugger than the other, fix it now, trust me, it is way better than noticing it after you have taken your first outfit photo!
Once you have woven in all the ends, try your shrug on over a tank, tee, or dress. I like to check how it looks from the front, back, and sides in the mirror, lace sometimes surprises you when you finally put it on!
You can use the free crochet shrug pattern here on the blog anytime. And if you want a cleaner project copy, the ad free printable PDF is available with stitch charts included, so you can save it, print it, or keep it in your crochet folder for later.
[INSERT STYLED FINISHED SHRUG IMAGE]
Free Crochet Shrug Pattern FAQ
How do you crochet a shrug from a rectangle?
You just crochet one big rectangle, then fold it up and sew the sides to make the armholes. That’s really all there is to it! It makes the shape super easy to figure out—even before you start finishing everything up.
Before you sew anything, lay your rectangle flat and take a look at both sides. This is the magic moment when your flat fabric starts looking like a real shrug you can wear.
How do you make this crochet shrug bigger or smaller?
If you want your shrug longer, just make your starting chain longer (remember the stitch pattern is a multiple of 19 plus 3). If you want it wider, crochet more rows before you block and sew it up.
Try to decide on the fit before you sew the armholes. It’s way easier to check and change things while it’s still a flat rectangle!
What yarn works best for a crochet lace shrug?
For my lacy crochet shrug, I used GAZZAL Baby Cotton—a cotton-acrylic blend that’s light but still gives the shrug enough structure for the lace and ribbing to look nice. With lace, you want a yarn that shows off the stitches but doesn’t make the shrug feel heavy.
If you want to use a different yarn, make a little swatch first and block it before you decide. Thicker yarn will work, but it’ll make the shrug bigger, heavier, and it might drape differently.
Do you need to block a crochet shrug before seaming?
Yep, for this shrug, you block the rectangle before making the armholes. So, finish your rectangle, block it, and then fold and sew it into shape.
Blocking helps your lace open up and makes it much easier to measure everything evenly. I know it’s tempting to just try it on right away, but this step really does make a big difference in how it fits.

More Crochet Technique Help For Your Next Project
If you want your next project to go even smoother, I’ve got some crochet tutorials that really help. My straight edges tutorial is great for any project with long rectangles, and the ribbing tutorial is perfect for making cuffs, collars, hems—basically, anywhere you want a bit of texture.
If seaming usually makes you nervous, try my mattress stitch tutorial, it makes everything look neat and tidy. Also, if you’re working with more than one skein, my yarn joining tutorial will show you how to keep your joins clean, so your finished piece looks awesome.
And if you’re into open, airy stitches, check out my crochet V stitch patterns roundup for even more fun projects to try next.
Thanks a lot for sharing ! It seems really comfortable ! I am going to try within few weeks ! I will tell you……. 😉😉😉
From France
Thanks and can’t wait! 🙂
I am making this pattern right now, and for the complexity, I have seriously not read a more clear pattern than this one. I have not had to tear anything out. It just flows! I wanted to thank you so much for making this available. I can’t wait to see the final result! I’m sure it will be gorgeous. I’m using the same yarn and color as you did. I wanted to gently point our a small error on Row 4, should read (doesn’t count as a SC here and throughout). You had put “tr”. I figured it out easily enough, but thought I’d point it out. I followed you on Facebook, and I already see other projects I want to make! Thank you for your beautiful art.
Thank you Heidi! Please, share with me your final shrug!
Hello Sylwia, thank you for sharing this wonderful shrug with us, I’m doing it ! 😊
Can you please confirm ? I think at the end of row 9 there should be a chain 7 before the last 2 dc otherwise i didn’t get a total of 10 ch-7 spaces.
Thanks a lot.
Hi!
Yes you are right. There should be ch7 before the last 2dcs. I will update the pattern. Thank you!
I sute wish this was in a 3x coz I love it
Hi, beautiful pattern. Would you by chance know what the approximate measurement BEFORE blocking is? I want to make sure it will fit with the specified hook, but I don’t have enough extra yarn to swatch and stretch with the blocking.
Thank you!
Hi. Unfortunately I don’t have such measurements.
This is very pretty. I’m adding it to my very long to do list!
💖💖💖 Oh my! This spring/summer shrug is beautiful! What an awesome accessory piece to dress up a tank top. I’m definitely going to be making your lovely creation. Thx so much for the pattern!
You are so kind. Thank you!
Beautiful written pattern. Just have a question re blocking since I never have but want mine to look like yours! Can u tell me how you block? Thank you.
Thank you. I usually use a wet blocking method.
I made the shrug but mine hangs differently. The ribbed border folds up under the body. I used a different yarn, Troobu by Lion brand. It is much longer due to blocking which may be why.
Is there something l can do or is it going to hang that way”
Thank you for your comment. The folding of the ribbed border in the shrug can be influenced by the size of the garment and how it drapes on the body. It varies depending on individual factors and preferences. If your shrug is folding up, you can try adjusting the length and experimenting with different ways of wearing it to minimize the folding. Remember, it’s important to feel comfortable and confident in your shrug. If you have any more questions, feel free to ask.
Such a beautiful shrug and easy to follow pattern! Thankyou for sharing this!
Thank you so much!
I just finished mine last night and I love it! I used Malabrigo Arroyo in Plomo (A slightly purpleish grey sport weight merino wool) with a 4mm hook. I am a larger than average person. so I added one extra repeat to the starting row. The measurements after blocking were 24x 37 inches. It worked up so quickly and I love your method for a ribbed edging. I think it will be perfect over some tank tops and sleeveless dresses I have to cover me up just a bit more without getting too warm! I’ve already ordered more yarn in a different color to make another one.
In this trying time of the Covid-19 and while praying this will pass, there is no time like the present to find creative ways of spending time at home. Saw this pattern loved it and decided to give it a try. Thank you so much for this beautiful pattern.
How do I get the free pattern for the Meadow Lace Shrug? I love the shrug and would love to make it but can`t print out the complete pattern. I can only print the first 6 rows.
Please answer back
Free pattern is included in the blog post, but if you want the printable version please visit my Ravelry or Etsy store for an inexpensive PDF pattern.
I’ve jut started this. Being a beginner (started to crochet 4months ago) I found it useful to write out the pattern vertically, as a list and I place a sticker next to the row I’m on so i know where I am.
I do that so I don’t have to count rows…saves time not having to stop to count
I have made this shrug and it’s beautiful! I am on my second one. I will be making a shawl version for my Mom to wear at my nephews wedding in August. Any suggestions on type of yarn to use for a formal wear? My nephews color motif is navy and gold and my mom’s dress is a long navy with laces.
I wish I had seen this pattern sooner. I would have made a suggestion. I am using Caron Simply Soft Party…it has a velvety texture and a Sparkly filament that is not gaudy….I trust the one you made was beautiful and much appreciated
Made the Meadow Lace Shrug for my niece. Turned out great. Wish I could send a photo.
it’s so beautiful and would love to know if you provide videos, I’m kind of one of those hard learners and then i am left handed and sometimes have a hard time with some of the directions, i crochet afghans, and now have been working on shawls of different colors, have even sold some….but i had to see the directions over and over again on a video, anything will help….thank you …
Is it possible to update your video? When you get to the part at the end of the first cuff and you’re going to join it you go too fast. I can’t really see what you are doing. I have made two of these just figuring out my own way, but I really would like to see better in a slower way what you did there. You turned and did something, but I can’t make it out. If you could email me the explanation, that would be great because I’ll forget to look here for an answer.
Thank you