Updated: 26 January 2024 by Sylwia (MyCrochetory)
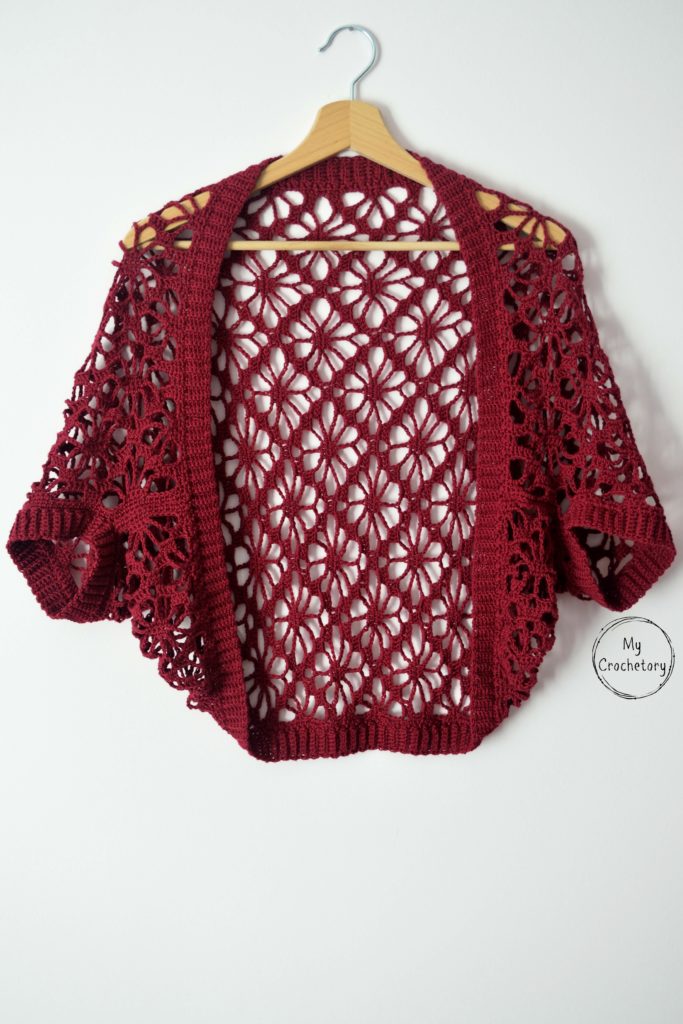
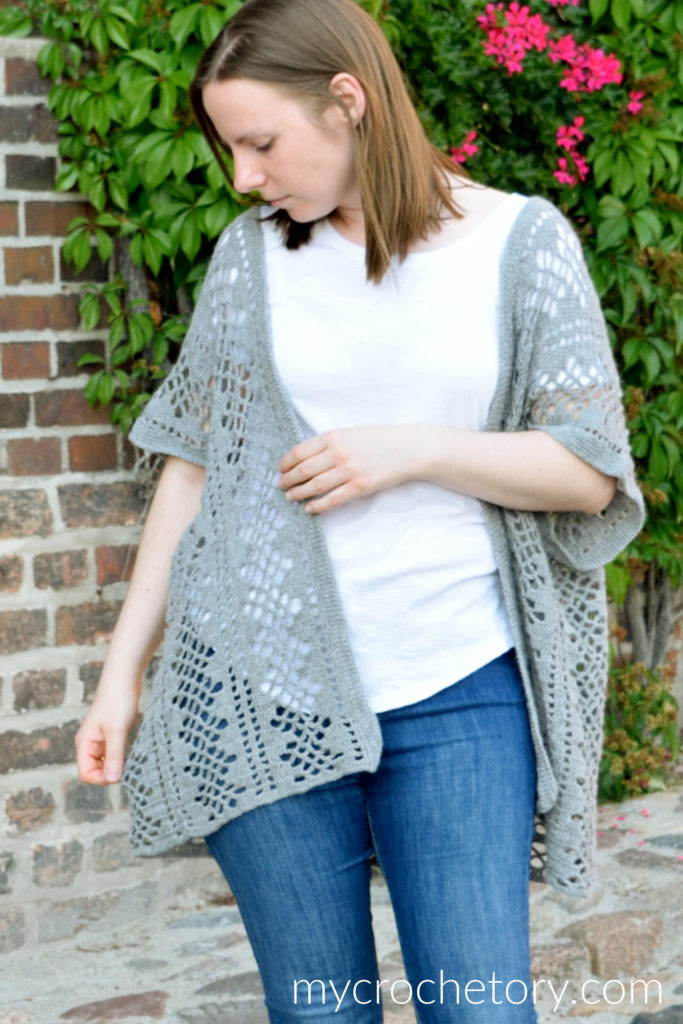
Stay comfortable and stylish on your walks with the Nalu Shrug, a lightweight free crochet cardigan pattern featuring a beautiful lace pattern. Enjoy the beauty of nature while feeling effortlessly fashionable.
Scroll down to see the Nalu Crochet Shrug free crochet cardigan pattern with progress pictures or you may choose to purchase the ad-free, printable PDF crochet pattern with stitch charts HERE on ETSY or HERE on Ravelry.

Join my Facebook Group and Official Ravelry Group where you can find necessary support, you can ask questions or share your finished projects.
You can also follow my Instagram, Facebook page and Pinterest.


Effortless Style with the Nalu Shrug
Picture yourself going for a relaxing walk in the park on a beautiful summer evening.
As you walk down the path surrounded by trees, a soft breeze gently brushes against your skin.
You put on the Nalu Shrug, a light and breezy crochet cardigan pattern that adds a cozy layer of comfort.
The pretty lace pattern on the shrug dances in the wind, making you feel stylish and graceful.
With every step you take, you feel at ease and enjoy the wonders of nature, all while looking effortlessly fashionable in your crochet creation.

Crochet Your Own Nalu Shrug – A Simple Rectangle
The beauty of the Nalu Shrug lies in its simplicity.
This crochet cardigan pattern is constructed from a single rectangle, making it an ideal project for both beginners and experienced crocheters.
With a beautiful lacy stitch pattern that works up quickly, you’ll enjoy the rhythm of pattern repeats as you create your own Nalu Shrug.
Follow the step-by-step instructions and progress pictures to bring this stylish garment to life.


Customizing the Crochet Cardigan Pattern
The Nalu Shrug is a versatile crochet cardigan pattern that allows you to make adjustments according to your preferences. The best part is, you can easily customize the measurements to create a cardigan that fits you perfectly.
To make the shrug wider, simply add more rows in the Ribbing 1 section. Make sure to follow a multiple of 16 plus 15 rows for the desired width.
If you want a shorter or longer shrug, you can work fewer or more pattern repeats between the Ribbing sections.
Adapting the pattern is really easy, and you have the freedom to make it just the way you like it.
Let your creativity flow and have fun with customizing your Nalu Shrug.

Frequently Asked Questions
Q: Is the Nalu Shrug suitable for beginners?
A: Yes, the Nalu Shrug is a great project for beginners who want to try their hand at lace crocheting. The pattern is straightforward, and the detailed instructions will guide you through the process.
Q: Can I use different yarn for the Nalu Shrug?
A: Absolutely! Feel free to choose your favorite yarn as long as it matches the recommended gauge. Experiment with different colors and textures to create a personalized Nalu Shrug.
Q: How do I seam the armhole openings?
A: The Nalu Shrug is seamed to create the armhole openings. You can use a mattress stitch or any other seaming technique you’re comfortable with. The instructions in the pattern will guide you through the seaming process.
OTHER FREE CROCHET CARDIGAN PATTERNS YOU MIGHT LOVE

If you want to share your wips and finished shrug on social media, please, use hashtag #mycrochetory. I love to see your finished project!
NALU CROCHET SHRUG FREE PATTERN
- Purchase the ad-free, printable PDF with stitch charts here on ETSY or here on Ravelry.
- Add this pattern to your Ravelry Queue HERE.
- Pin it for later.
Copyright 2020 – 2024 MyCrochetory. All right reserved. This pattern is property of Sylwia Kawczyńska @MyCrochetory. Please DO NOT sell the pattern and claim this pattern as your own. The pattern is for personal use only and may not be translated or reproduced in another language. Please respect my rights, DO NOT share or publish this pattern anywhere without my permission.
The crochet cardigan pattern you make following this pattern is yours you are free to sell it, as long as you credit MyCrochetory as original designer. For more information, please, read Terms Page.

As a bonus in the ad-free, printable PDF, I’ve provided stitch charts. If you’re a visual learner or if you just want to support my work you can purchase this crochet pattern HERE on ETSY or HERE on Ravelry. Thank you and I hope you find it useful!

Materials & Tools:
- Yarn DROPS Nord 50g = 170 m, 45% Alpaca, 30% Polyamide, 25% Wool, 5 skeins.
- Hook size 3.5mm. Adjust hook size if necessary to obtain correct gauge.
- Tapestry needle (to weave and hide yarn ends).
- Scissors.
Level:
Adventurous beginner/ Intermediate
Size after blocking (adjustable):
Length from top of neck, to bottom of shrug is 59cm with ribbed collar (it stretches slightly downward when worn).
Width is 85cm from end of sleeve to end of sleeve.
This pattern fits S-L. You can easily adjust the pattern to suite your body by creating a longer/shorter Ribbing 1 (multiple of 16 plus 15 rows) and crocheting for more/less pattern repeats in Main Body section.
Gauge after blocking:
For a rectangle with 31 rows of Ribbing 1, 10 rows in Main Body and 31 rows of Ribbing 2 the length is 17.5cm/6.9” and the width is 15cm/5.9”.
If necessary, adjust hook size to obtain the correct gauge.
Before you measure, please take the time to wash and block your swatch in the same manner that you will wash and block your shrug.
Notes:
- The pattern uses US crochet terminology.
- This shrug is constructed from one large rectangle worked from the bottom up and seamed to create armholes.
- Cuffs around the armholes are worked directly into the main shrug instead of creating a ribbed piece and sewing it on.
- Pattern is a multiple of 16 plus 15 stitches. To increase the width of the shrug, increase the number of rows in the Ribbing 1 section. To decrease the width of the shrug, decrease the number of rows in the Ribbing 1 section.
- You can make this shrug as long as you like by adding or substracting pattern repeats between ribbings.
- You can also use yarn in different weights, but just know that the width will be different depending on your gauge.
- Instructions in square brackets […] are worked as many times as indicated.
- The pattern includes the stitch charts.
Stitches & Abbreviations (US terms):
st(s) – stitch(es)
BLsc – back loop single crochet
BLhdc – back loop half double crochet
BLdc – back loop double crochet
BLtr – back loop treble crochet
yo – yarn over
sp – space
sk – skip
prev – previous
beg – beginning
PATTERN
Ribbing 1
With 3.5 mm hook work ch9.
Row 1: sc in second ch from hook, sc in each ch to end. Turn.
Row 2: ch1 (doesn’t count as a sc), BLsc across to end. Turn.
You should have 8 stitches in each row.
Repeat Row 2 173 more times for a total of 175 rows or until desired length.
Remember that the pattern is a multiple of 16 plus 15 stitches, so in your Ribbing 1 section you should have multiple of 16 plus 15 rows.
Don’t break the yarn and rotate your work.
Main body
In the following Setup row every stitch will be working in each ribbing’s row.
Setup row (WS): ch1 (doesn’t count as a st), sc in first ribbing’s row, hdc in next 2 ribbing’s rows, dc in next 3 ribbing’s rows, tr in next 3 ribbing’s rows, dc in next 3 ribbing’s rows, hdc in next 2 ribbing’s rows, sc in next ribbing’s row, [sc in next 2 ribbing’s rows, hdc in next 2 ribbing’s rows, dc in next 3 ribbing’s rows, tr in next 3 ribbing’s rows, dc in next 3 ribbing’s rows, hdc in next 2 ribbing’s rows, sc in next ribbing’s row] rep across to end. Turn.
Row 1 (RS): ch3 (counts as a dc), BLdc in each st across until last st remain, dc in last st. Turn.
Row 2 (WS): ch5 (counts as tr and ch1), sk second st, dc in next st, ch1, sk next st, hdc in next st, ch1, sk next st, sc in next st, ch1, sk next st, sc in next st, ch1, sk next st, hdc in next st, ch1, sk next st, dc in next st, ch1, sk next st, tr in next st, [ch1, sk next st, tr in next st, ch1, sk next st, dc in next st, ch1, sk next st, hdc in next st, ch1, sk next st, sc in next st, ch1, sk next st, sc in next st, ch1, sk next st, hdc in next st, ch1, sk next st, dc in next st, ch1, sk next st, tr in next st] rep across to end. Turn.
Row 3 (RS): ch5 (counts as tr and ch1), sk first ch-1sp, dc in next st, ch1, sk next ch-1sp, hdc in next st, ch1, sk next ch-1sp, sc in next st, ch1, sk next ch-1sp, sc in next st, ch1, sk next ch-1sp, hdc in next st, ch1, sk next ch-1sp, dc in next st, ch1, sk next ch-1sp, tr in next st, [ch1, sk next ch-1sp, tr in next st, ch1, sk next ch-1sp, dc in next st, ch1, sk next ch-1sp, hdc in next st, ch1, sk next ch-1sp, sc in next st, ch1, sk next ch-1sp, sc in next st, ch1, sk next ch-1sp, hdc in next st, ch1, sk next ch-1sp, dc in next st, ch1, sk next ch-1sp, tr in next st] rep across to end. Turn.
Row 4 (WS): ch3 (counts as a dc), dc in each ch-1sp and st across to end. Turn.
Row 5 (RS): Repeat Row 1

Row 6 (WS): ch1 (doesn’t count as a sc), sc in first st, ch1, sk next st, hdc in next st, ch1, sk next st, dc in next st, ch1, sk next st, tr in next st, ch1, sk next st, tr in next st, ch1, sk next st, dc in next st, ch1, sk next st, hdc in next st, ch1, sk next st, sc in next st, [ch1, sk next st, sc in next st, ch1, sk next st, hdc in next st, ch1, sk next st, dc in next st, ch1, sk next st, tr in next st, ch1, sk next st, tr in next st, ch1, sk next st, dc in next st, ch1, sk next st, hdc in next st, ch1, sk next st, sc in next st] rep across to end. Turn.
Row 7 (RS): ch1 (doesn’t count as a sc), sc in first st, ch1, sk next ch-1sp, hdc in next st, ch1, sk next ch-1sp, dc in next st, ch1, sk next ch-1sp, tr in next st, ch1, sk next ch-1sp, tr in next st, ch1, sk next ch-1sp, dc in next st, ch1, sk next ch-1sp, hdc in next st, ch1, sk next ch-1sp, sc in next st, [ch1, sk next ch-1sp, sc in next st, ch1, sk next ch-1sp, hdc in next st, ch1, sk next ch-1sp, dc in next st, ch1, sk next ch-1sp, tr in next st, ch1, sk next ch-1sp, tr in next st, ch1, sk next ch-1sp, dc in next st, ch1, sk next ch-1sp, hdc in next st, ch1, sk next ch-1sp, sc in next st] rep across to end. Turn.
Row 8 (WS): Repeat Row 4
Repeat Rows 1 – 8 five more times or until desired length
Next, Repeat Rows 1 – 4.
Last Row (RS): ch1 (doesn’t count as a st), tr in first st, BLdc in next 3sts, BLhdc in next 2sts, BLsc in next 3sts, BLhdc in next 2sts, BLdc in next 3sts, [BLtr in next 3sts, BLdc in next 3sts, BLhdc in next 2sts, BLsc in next 3sts, BLhdc in next 2sts, BLdc in next 3sts] rep across until last st remain, tr in last st. Turn.
Ribbing 2
This ribbing 2 is worked in rows and attached to the body as you go. Continue with 3.5mm hook.
With RS facing you.
Row 1: ch9, starting with 2nd ch from hook, work 1 sc in each ch back to edge of main body. Join to the next st of the edge of main body using slst and work one more slst in the next st of main body (2 slst(s) in total for joining) plus make ch1. Turn.
Row 2: Starting from 4 st from hook, work BLsc in each st across to end. Turn.
Row 3: ch1 (does not count as a st), BLsc in each st across [8sts]. Join to the next st of the edge of main body using slst and work one more slst in the next st of main body (2 slst(s) in total for joining) plus make ch1. Turn.
Repeat Rows 2-3 until your ribbing is joined to the entire edge.
Don’t break the yarn.
Make one row of single crochet across the both shorter edges.
Fasten off yarn, weave in all ends and block the rectangle to the measurements .
Creating arm holes
Place piece flat on the floor as pictured in Progress Pictures section below. Fold the corners of the body piece into the center. Use Mattress Stitch (or different joinig method you like) to join the arm edges together, approx. 12 cm in on each side. The part that is not sewn will be the opening for the armholes. Tie off and weave in ends.
Sleeves
Now, we will add a ribbed cuffs to both armholes of the shrug.
Row 1: Pick any place on the edge of the armhole opening and attach your yarn with a slip stitch. Work 9 chains, starting with 2nd ch from hook, work 1 sc in each ch back to edge of armhole opening. Join to the next st of the armhole opening using slst and work one more slst in the next st of armhole opening (2 slst(s) in total for joining) plus make ch1. Turn.
Row 2: Starting from 4 st from hook, work BLsc in each st across to end. Turn.
Row 3: ch1 (does not count as a st), BLsc in each st across [8sts]. Join to the next st of the edge of armhole opening using slst and work one more slst in the next st of armhole opening (2 slst in total for joining) plus make ch1. Turn.
Repeat Row 2-3 until you reach Row 1. Then join your last row with the first row using the slip stitches.
Repeat for the second sleeve
You can also make longer cuffs by adding extra chains.
If you have any suggestions or have detected any mistakes, please feel free to email me at mycrochetory@gmail.com
Click HERE to find my picture tutorial on how to attach a ribbed cuffs to your piece.
PROGRESS PICTURES


Leave a Reply