
Updated: 1 September 2026 by Sylwia (MyCrochetory)
Joining crochet squares always seems like the slow, stubborn part after all the fun. I make these cheerful little squares, lay them out, and admire my work. Then I remember it’s time to sew them together, and honestly, I’d rather just keep crocheting more squares than deal with seams.
But mattress stitch has saved me more times than I can count. It makes seams flat, neat, and almost invisible. No lumpy ridges or seams that stand out. I use it for everything from granny square blankets to pillows, bags, and even sweaters. If it’s made of squares, this is the join I rely on.
I’ll show you how I use mattress stitch to join crochet squares, line up the corners, and avoid little problems like seams that bunch or twist when you want them to disappear.
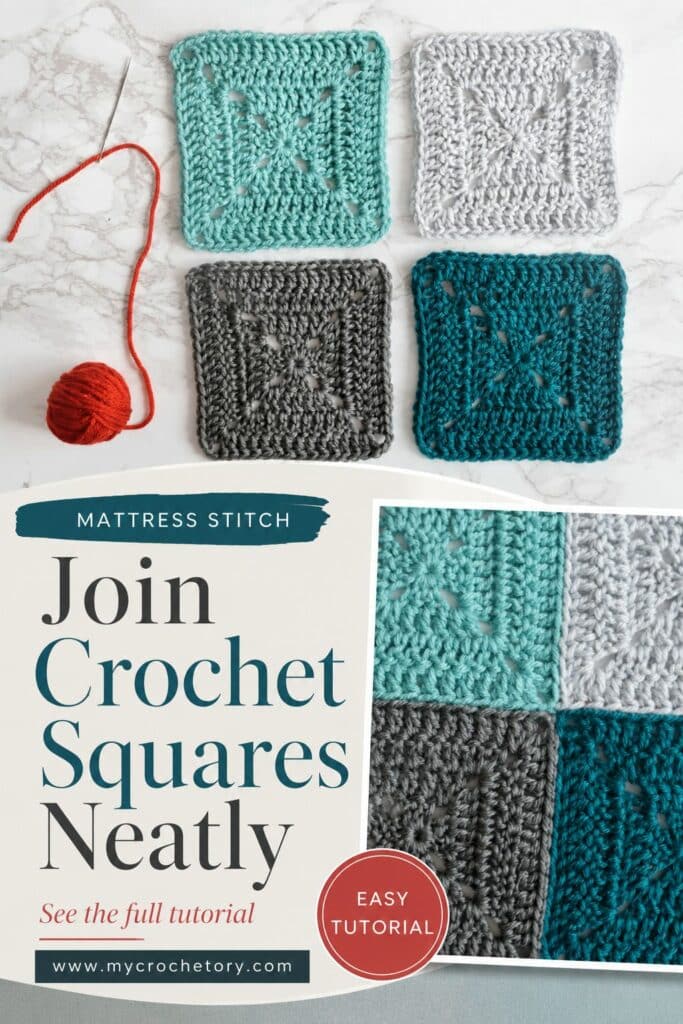
Start by trying this on just two squares, then move on to rows or bigger sections. Once you see where the needle goes, it all feels much less intimidating.
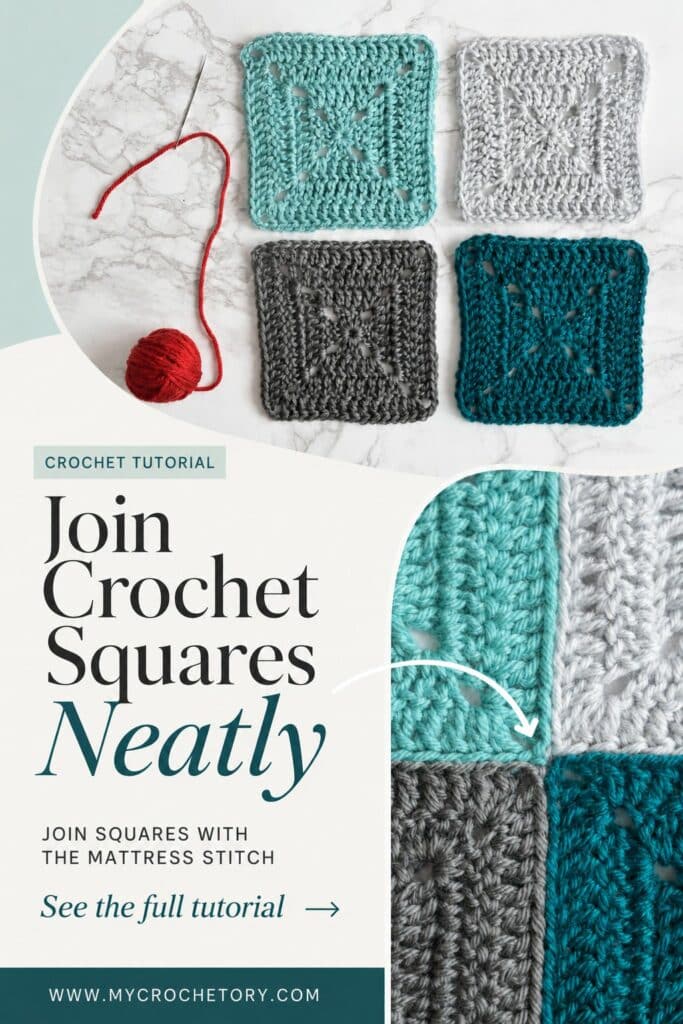
Save this tutorial before you start joining your squares. It’s much easier to follow along when you can check the photos as you go.
Quick Answer: What Is the Best Way to Join Crochet Squares Invisibly?
Mattress stitch lets you sew your crochet squares together so the front seam almost disappears. All you need is a yarn needle, matching yarn, and a few simple stitches back and forth through the edges.
The best part of this join is how you control the tension. Give the yarn a gentle tug after a few stitches, and the gap closes up with no bumpy ridge showing on your blanket.
I always use this method when I want the squares to stand out, not the seam. I reach for it constantly with modern granny blankets, smooth pillow covers, and clothes where you don’t want a chunky ridge.
Before You Start Joining Crochet Squares
This step saves you from future frustration. Before you start joining, block your squares if needed, check their size, and lay out your whole design for a quick preview.
Blocking really helps here, especially with granny squares that tend to wiggle or stretch as you work. Don’t worry about making every square look perfect; just get them close in size and shape so joining is much easier.
Here’s what you’ll need:
- Crochet squares or motifs
- Yarn needle
- Matching yarn for an invisible seam
- Stitch markers
- Scissors
- Crochet hook, only if you need help pulling yarn ends through

Why I Like Mattress Stitch for Crochet Squares
Some joining methods are quick, but they leave a ridge. That can look nice if you want texture, but not every blanket needs extra seams standing out in front.
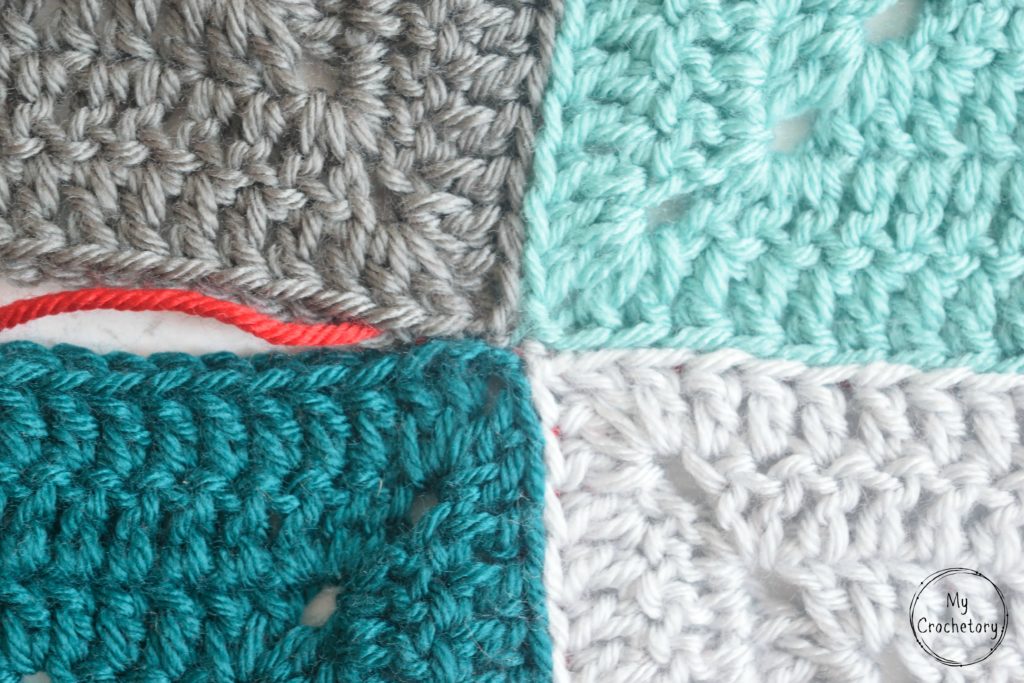
Mattress stitch keeps the front looking smooth because the yarn hides between the square edges. It’s not the fastest way to join, but after spending so much time making the squares, I want the join to look just as good.
This join also works well with color changes. If you use matching yarn and keep your stitches tucked into the edge, the seam blends in instead of cutting through the design.
When Mattress Stitch Works Best
I use this method whenever I want a join that’s flat and smooth. It’s my favorite for blankets, cushion covers, bags, or any project made of squares, especially when you want things to look neat.
It works best when your squares have clear edge stitches—like granny squares, solid blocks, or textured motifs. As long as you can line up the side stitches, mattress stitch has your back.
Take your time with this step. Mattress stitch is about lining things up, not rushing. I’m happy to spend a few extra minutes for a seam that looks smooth and tidy.
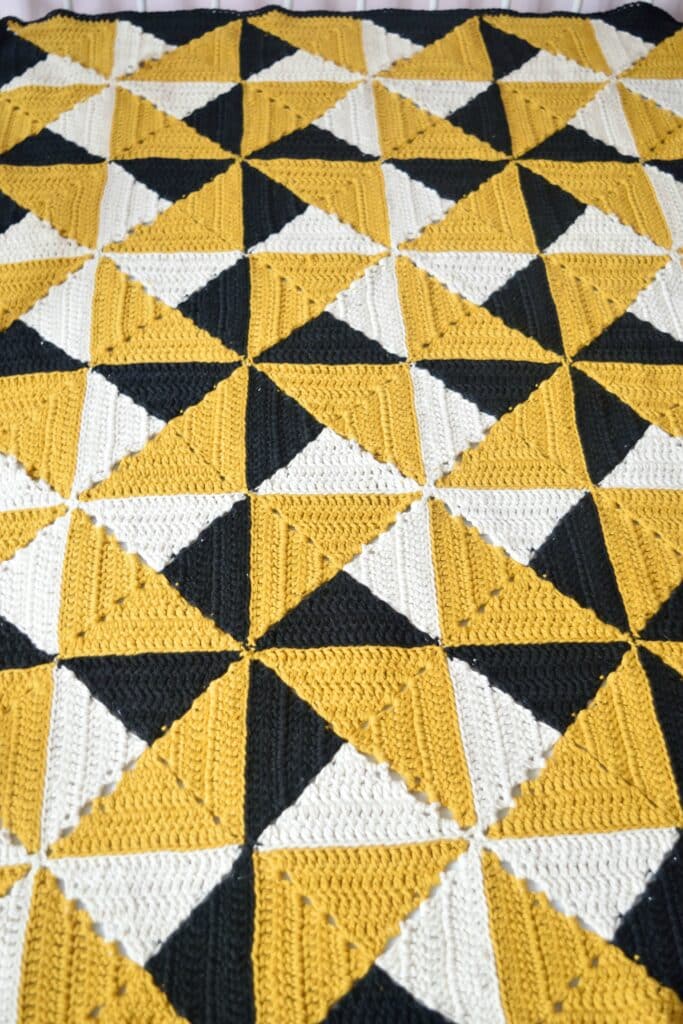
If you want to put these joining tips to use, take a look at my Granny Pinwheel Blanket pattern. It’s a fun way to practice and end up with something beautiful!
How to Join Crochet Squares: Video Tutorial
TIP: To view this mattress stitch join video tutorial properly, please disable any ad-blocker you have running.
How to Join Two Crochet Squares With Mattress Stitch
This first join is where it all starts to make sense. Once you get the rhythm, you can stitch across a whole blanket without worrying about every single step.
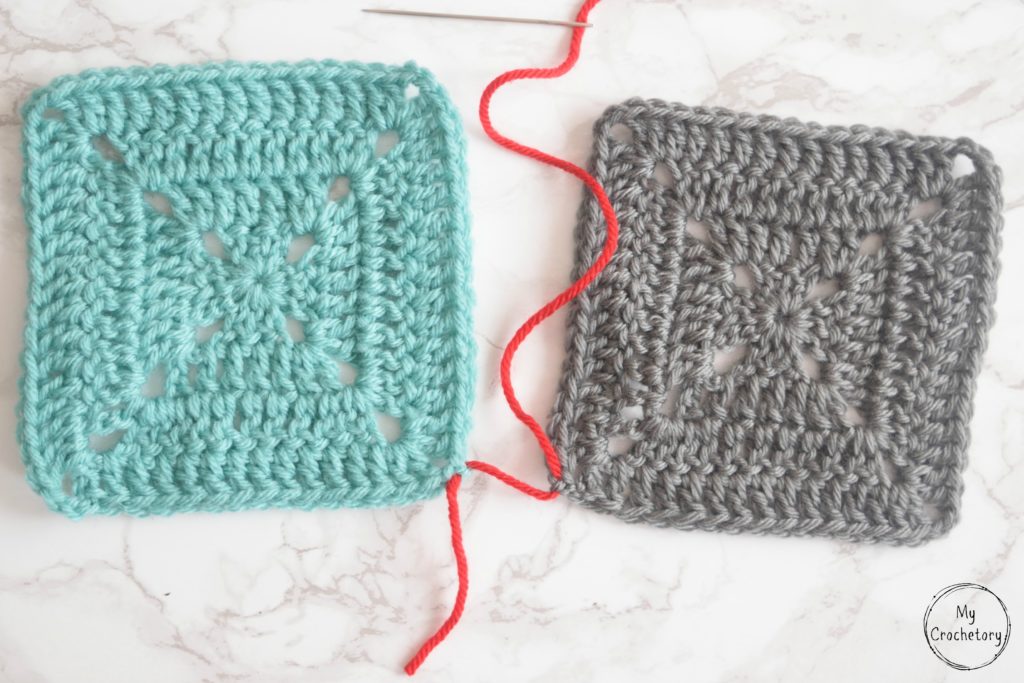
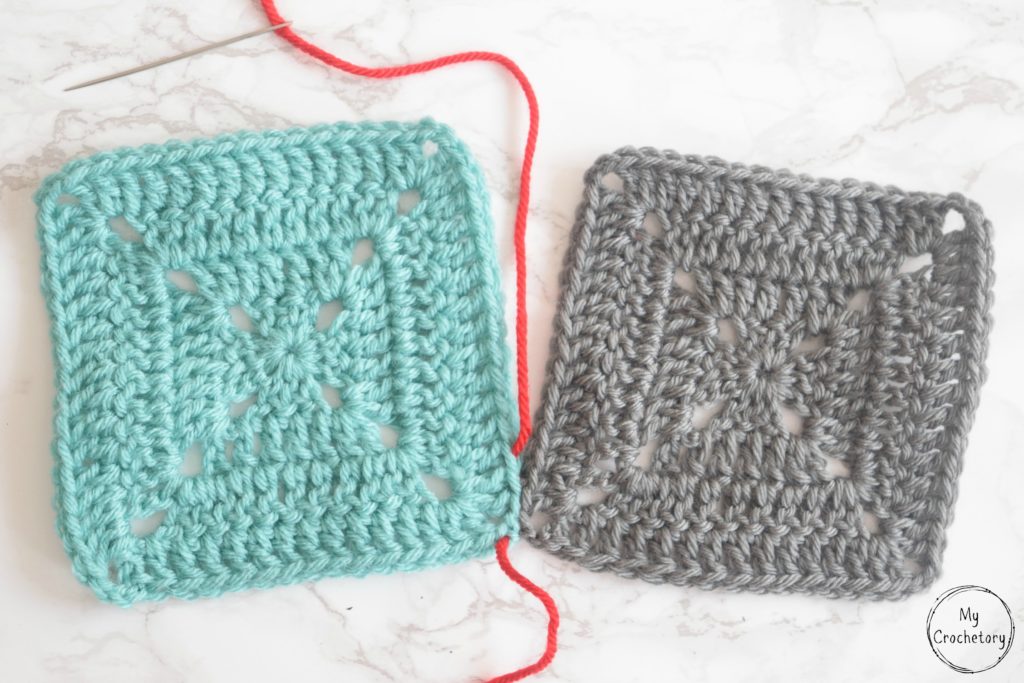
Place two crochet squares on a flat surface with the right side facing up. The edges you want to join should sit close together, with the corners lined up.
Thread your yarn needle with the same yarn you used for your squares, or pick a color that blends right in. Leave yourself a tail long enough to weave in when you’re done.
Step 1: Start at the Corner
Corners can be trickier than they look. If that first corner is off, your seam will start drifting before you even notice.
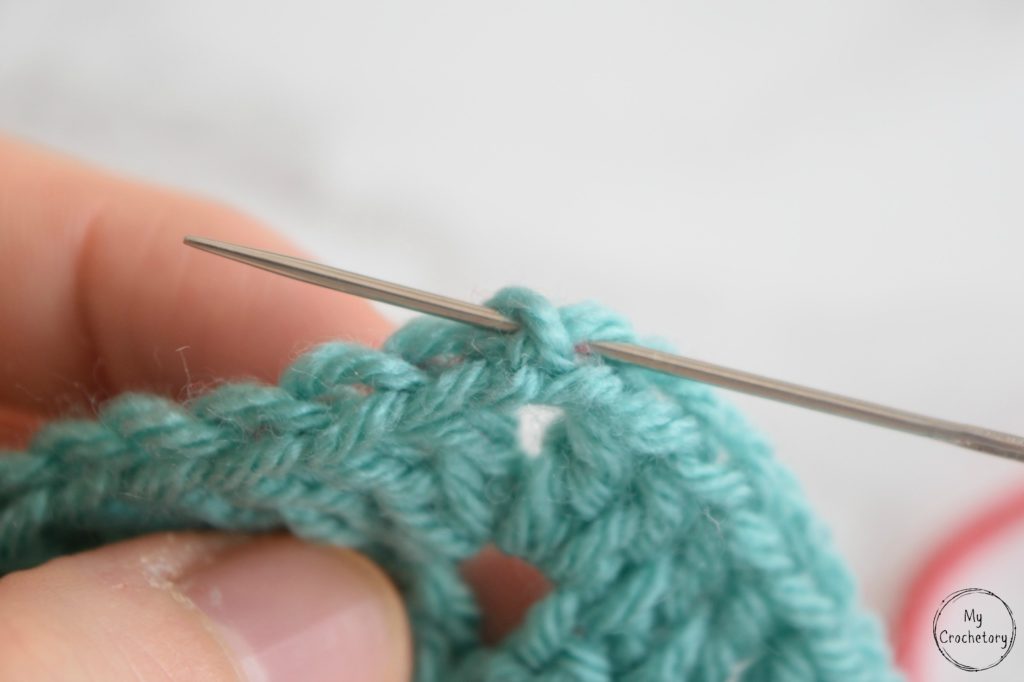
Insert the needle into the first corner stitch of the first square, then bring it out through the next corner stitch. Pull the yarn through gently.
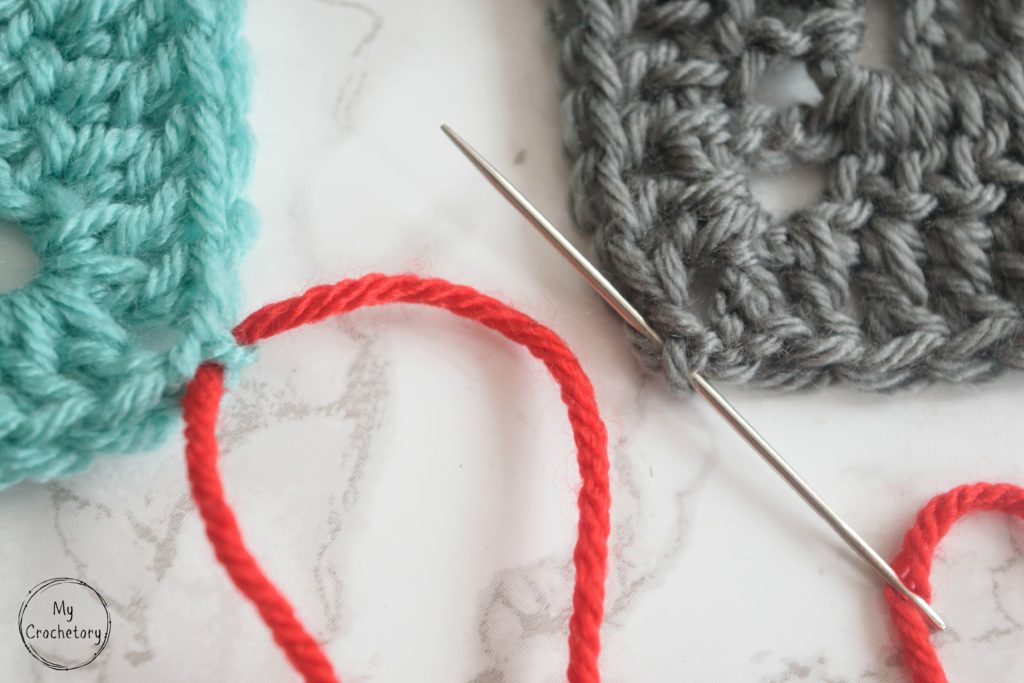
Now repeat the same step on the second square, starting at the matching corner space. Don’t pull tightly yet, since you want the fabric to stay relaxed while you make the first few stitches.
Step 2: Work Into the Next Edge Stitch
This part can get a little tricky, and your usual crochet habits might trip you up. The key is to keep moving through matching spots on both squares.
Go back to the first square. Insert the needle into the same place where the yarn came out, then bring it out through the next stitch along the edge.
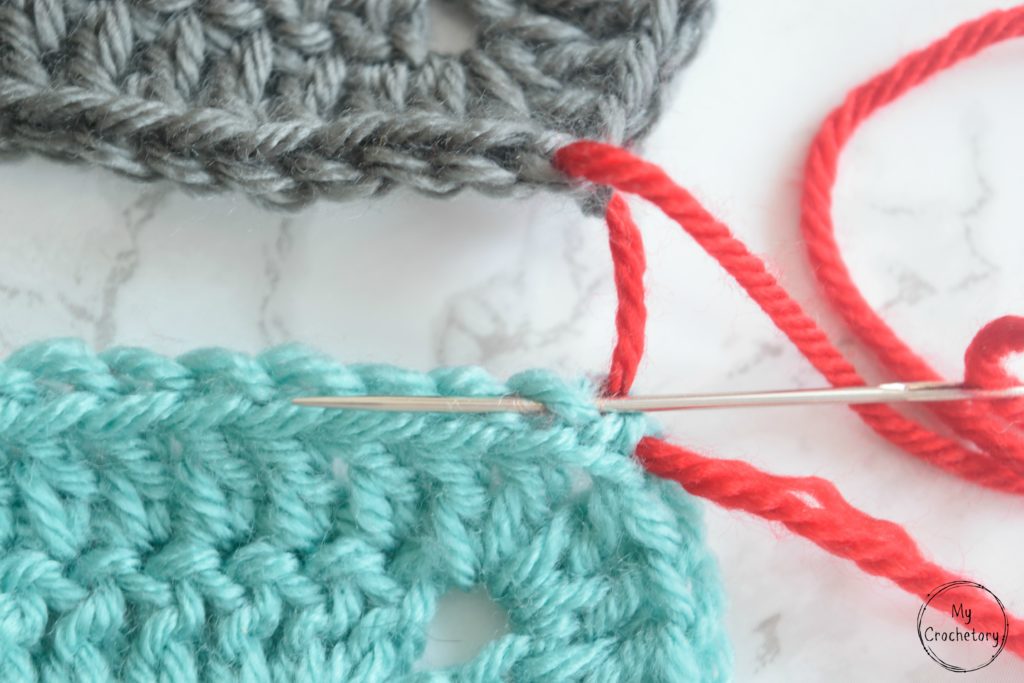
Do the same thing on the second square. Find the matching stitch on the other side and keep the squares flat and side by side.
You’ll see a little ladder forming between the two edges. It might look a bit loose at first, and that’s totally normal. Don’t worry about the seam yet—it needs a few stitches before it starts to come together.
Step 3: Keep the Stitches Matched
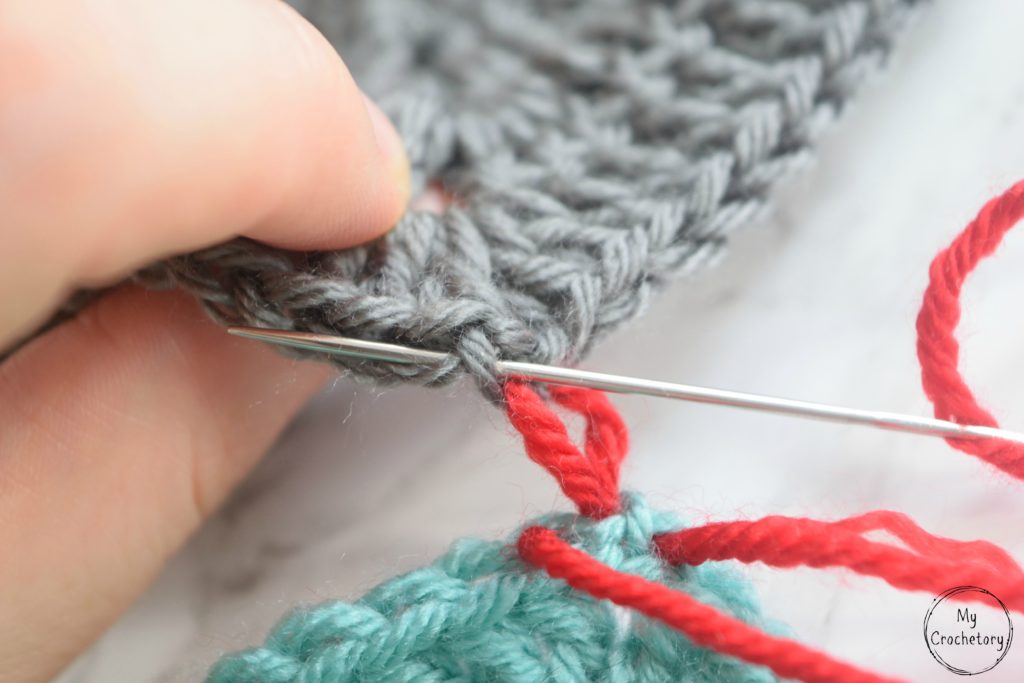
Watch your tension here. If you pull every stitch tight, you’ll end up with puckers or a shorter edge than you wanted.
Go back and forth between the squares, always picking the next matching stitch. Every so often, give the yarn a gentle pull to snug things up and bring the edges together.
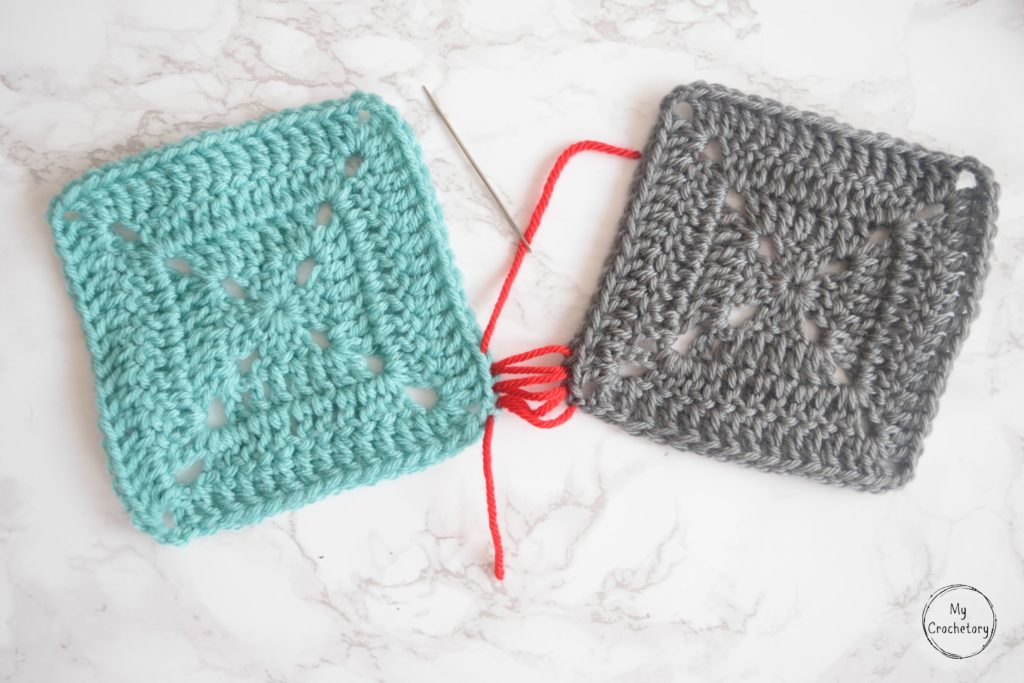
Don’t yank your squares into place—just pull enough so the seam closes and everything stays flat. You want the fabric to relax, not bunch up.
Step 4: Finish the Corner
It’s easy to miss the last corner because your mind is already on the finish line. Don’t skip it, or you’ll spot a tiny gap later and wish you hadn’t!
When you reach the end, insert the needle through the top corner chain or corner stitch on both squares. Pull gently so the corners meet neatly.
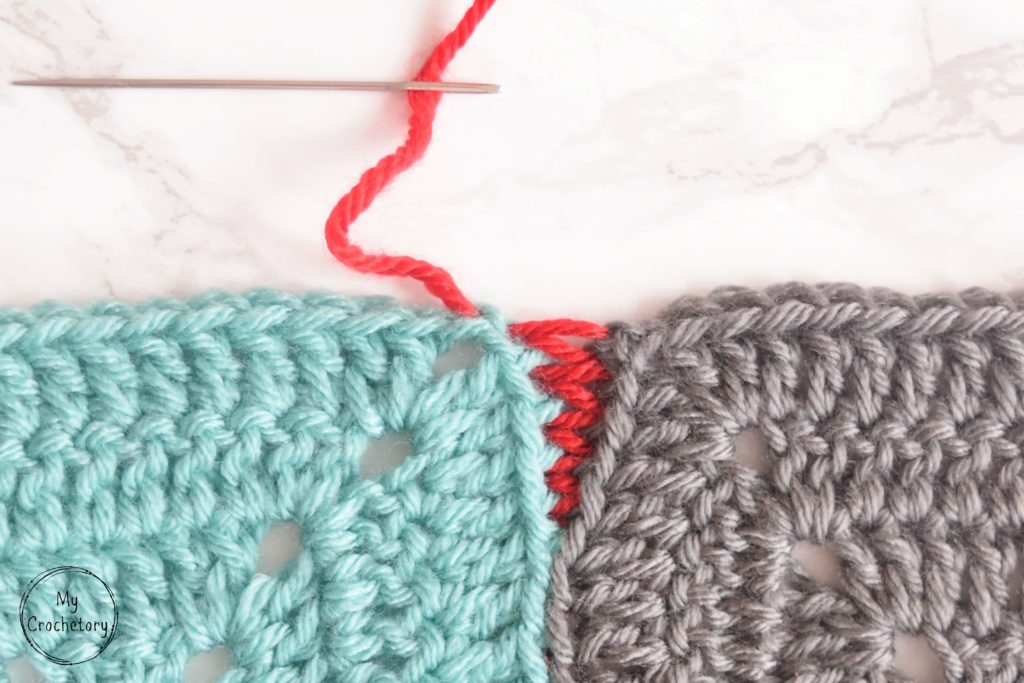
Tie off and weave in your ends on the back side. Check how it looks from the front first, then the back, and make any last tension tweaks before hiding the tail for good.
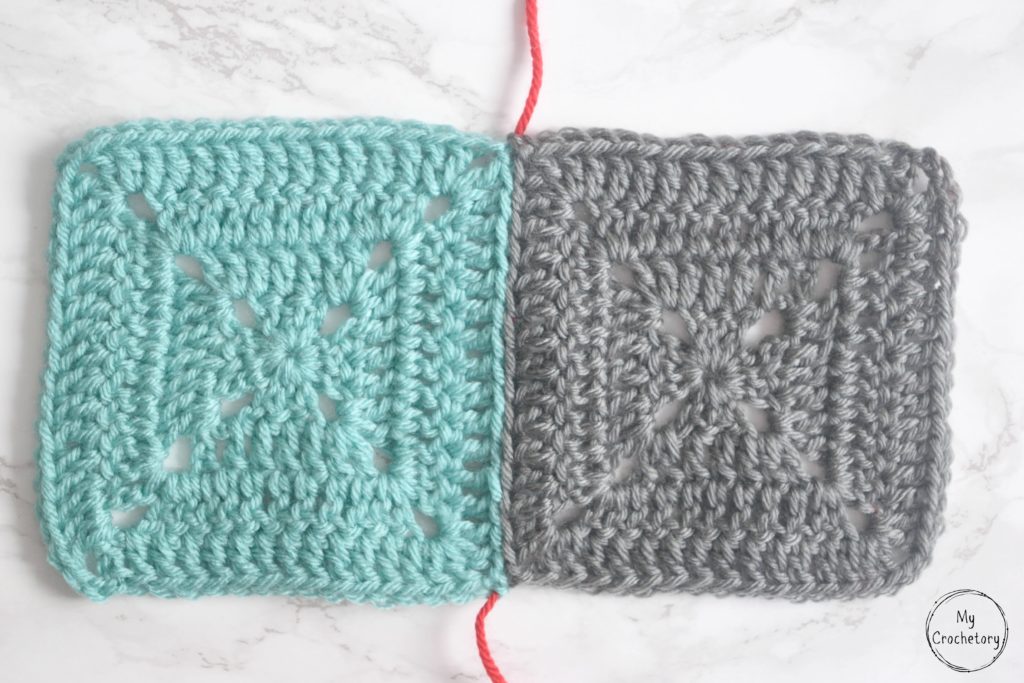
Here, you can also see the back of the seamed motifs and the stitch is almost invisible even there.
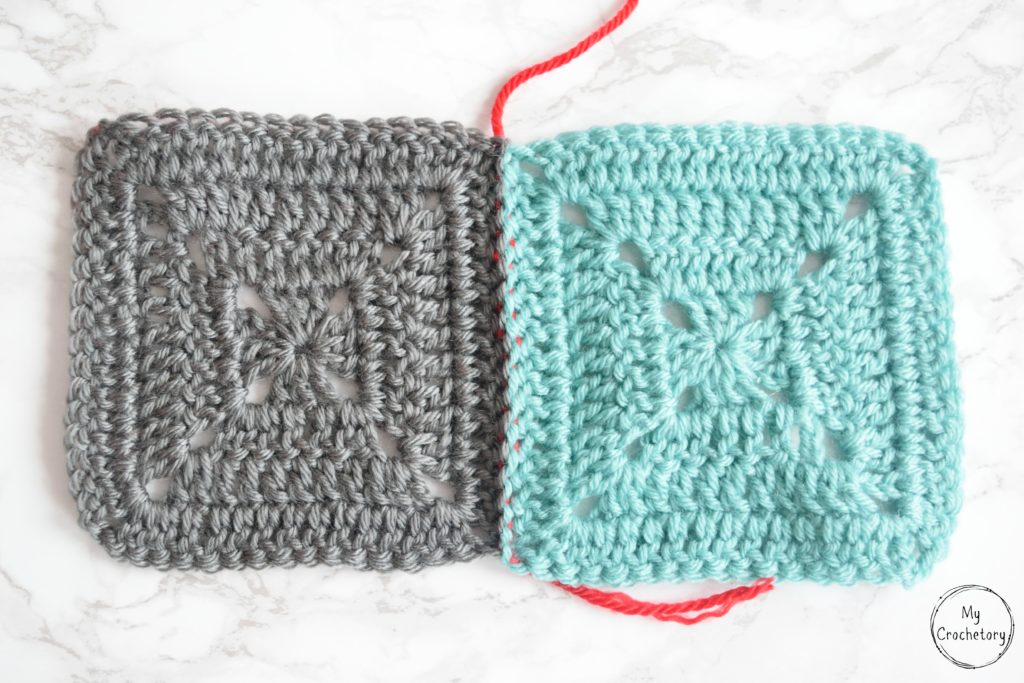
How Tight Should the Mattress Stitch Be?
If you pull your seam too tight, those pretty squares start to look a bit sad. The edges curl in, the fabric pulls, and suddenly your join looks off in the corner.
You want mattress stitch snug enough to close the gap, but loose enough so everything stays the same size. I usually pull the yarn after a few stitches, then smooth the fabric with my hands before moving on.
If the seam feels stiff, just loosen your next few stitches. If you spot gaps between the squares, pull a bit more, or double-check that you’re working into matching stitches.
How to Join Sets of Crochet Squares
Joining four squares at a corner can make a lot of us nervous. It’s not actually hard; you just need to slow down and pay attention to the corner chains.
Start by joining your squares into pairs or strips, just like before. Once you’ve got those, lay them next to each other and line up the corners before you sew the next seam.
Step 1: Bring the First Corner Into Place
Start at the corner where the new seam begins. Insert the needle into the top of the last stitch of the first square and bring it out through the first corner chain.
Repeat the same step on the second square. Keep the yarn relaxed until all corner points are connected.
Step 2: Connect the Center Where Four Squares Meet
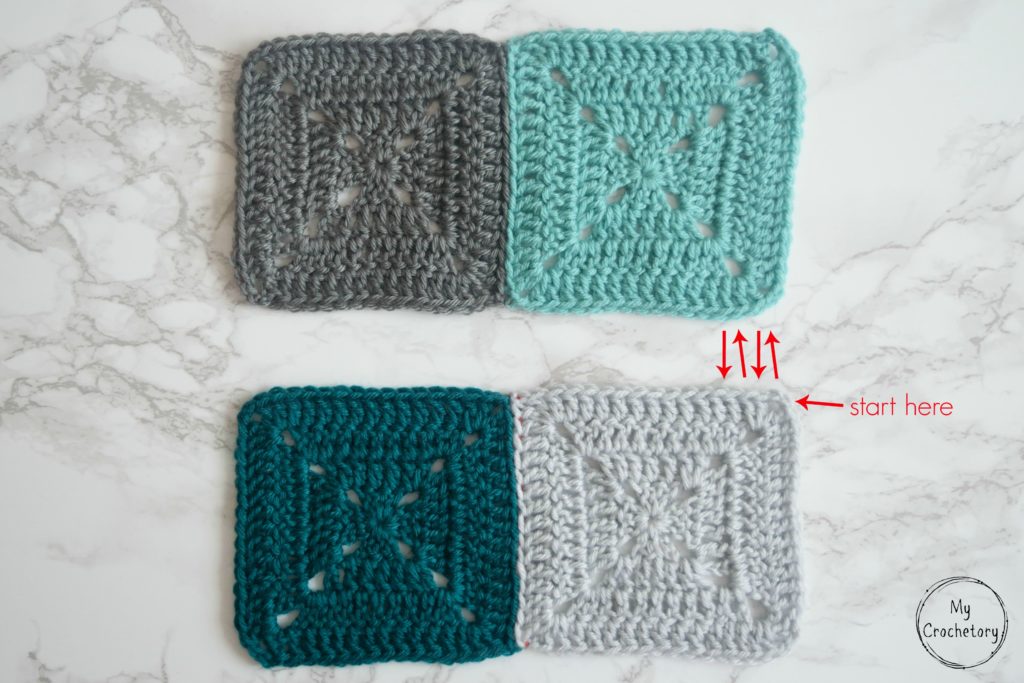
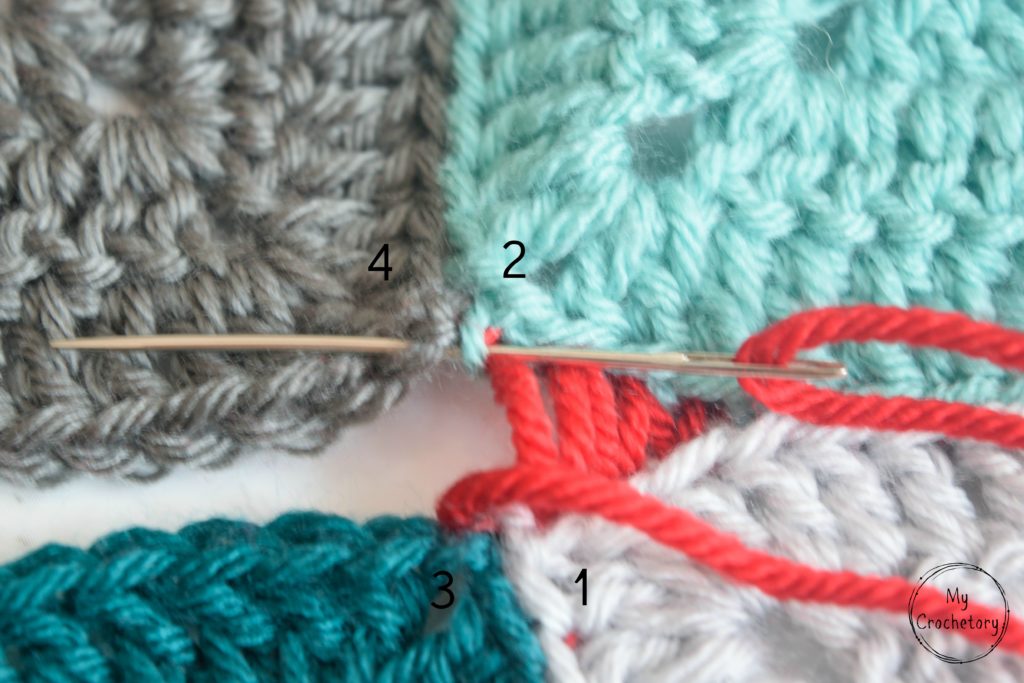
It’s so easy to lose track of which corner belongs to which square, especially when you’re joining four squares at the center. Before sewing, place the four squares in their final position and keep the numbering consistent:
- Square 1: bottom right
- Square 2: top right
- Square 3: bottom left
- Square 4: top left
The seam runs from the outer right edge toward the center, passes through the point where all four squares meet, and then continues along the edges of Squares 3 and 4. Keep the squares flat while you work so the corner chains stay easy to see.
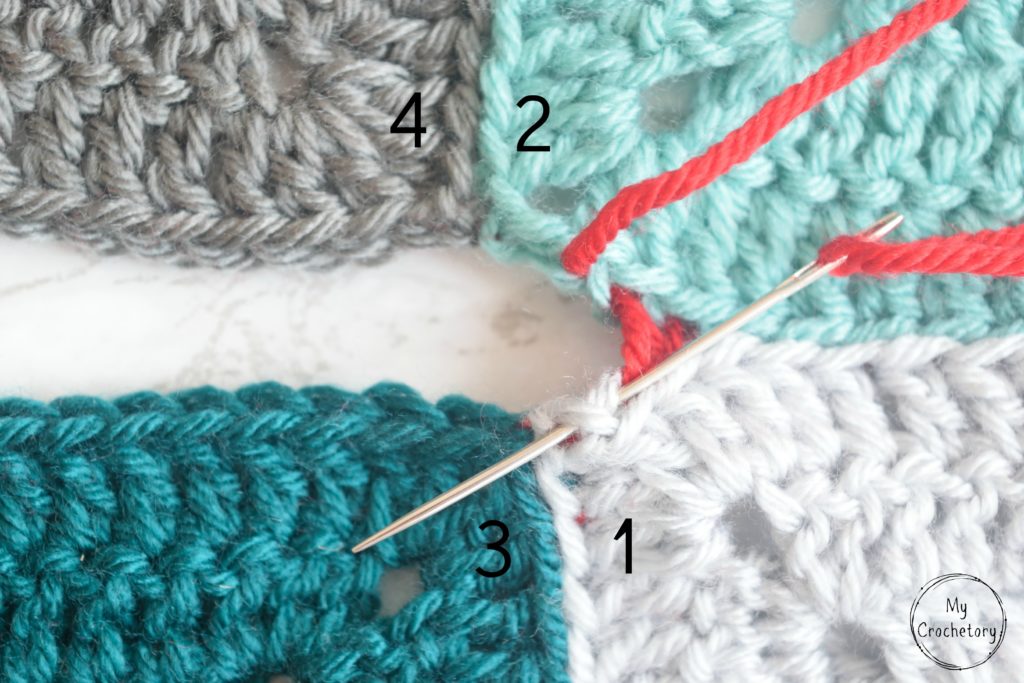
Finish the Edge of Square 1
Continue the mattress stitch along the edge of Square 1 until you reach its final stitch before the corner.
Insert the needle into the top of that last edge stitch. Bring the needle out through the first corner chain of Square 1.
Don’t pull the yarn tight yet. Leaving a little slack makes it easier to move through all four corners without twisting them.
Repeat on Square 2
Move the needle to Square 2, directly above Square 1.
Insert it into the top of the last edge stitch before the corner. Bring it out through the first corner chain of Square 2, following the same path used on Square 1.
The two right-hand corners should now be connected by loose mattress stitches. Check that you have used matching stitches on both squares before moving past the center.
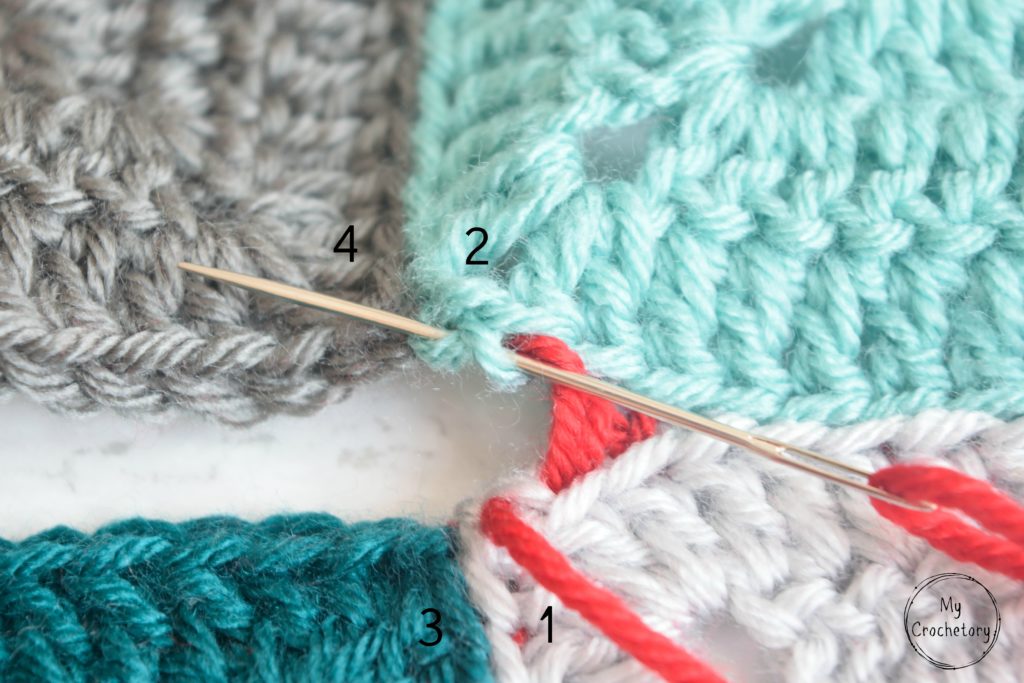
Move From Square 1 to Square 3
Return to the corner chain of Square 1. Insert the needle into the same point where it came out previously.
Guide the needle across the center and bring it up through the corner chain of Square 3, right beside the first edge stitch that you will join next.
This movement connects the bottom two squares across the center. Keep the yarn loose so the corner of Square 3 is not pulled under Square 1.
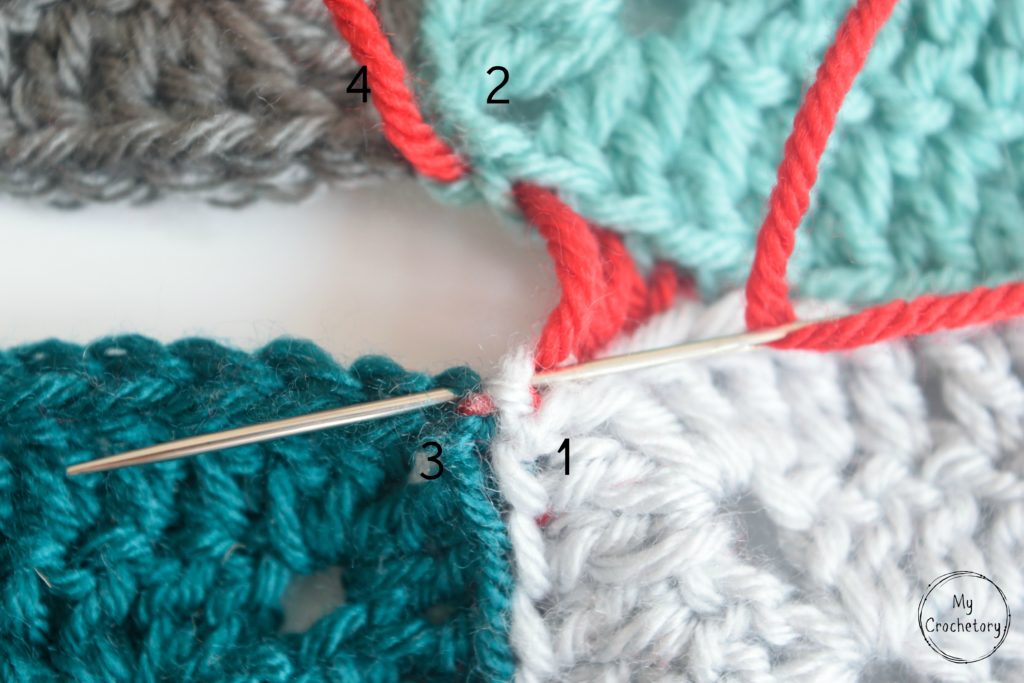
Move From Square 2 to Square 4
Repeat the same movement across the top two squares.
Insert the needle into the corner chain of Square 2, using the same point where the yarn previously exited. Bring it up through the corresponding corner chain of Square 4, close to its first edge stitch.
You should now have small yarn bridges connecting Squares 1 and 3, and Squares 2 and 4. All four corners should still lie flat around the center opening.
Begin the Next Section of the Seam
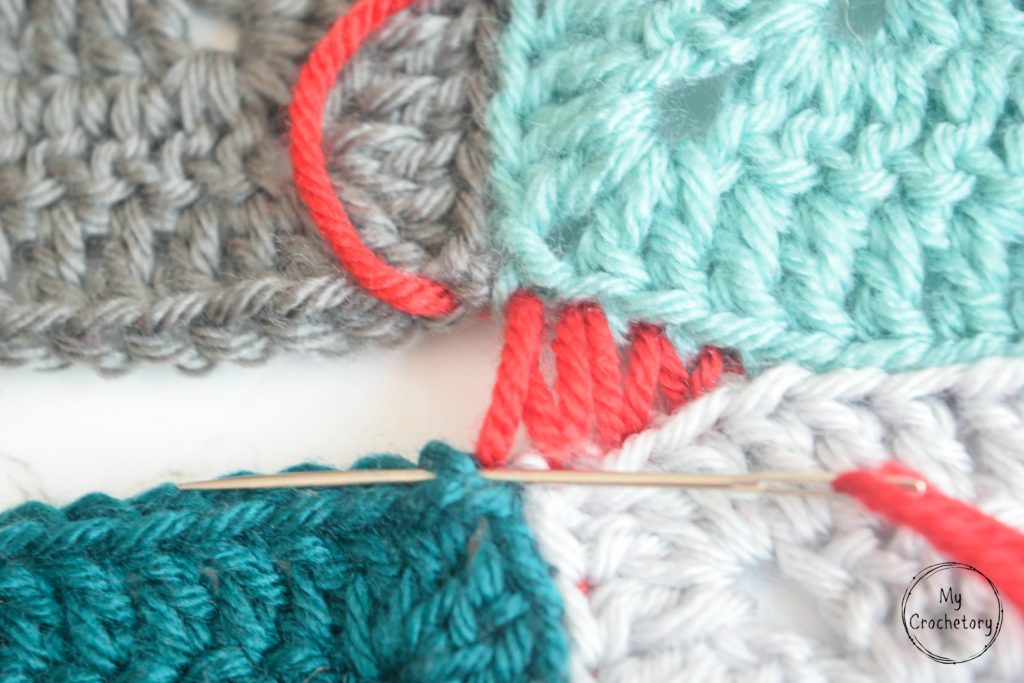
Now continue from the center along the edges of Squares 3 and 4.
On Square 3, insert the needle into the corner chain where it last came out. Bring it up through the top of the next edge stitch.
Repeat this on Square 4. Insert the needle into its corner chain, then bring it out through the next matching edge stitch.
You have now passed through the four-square intersection and returned to the regular mattress stitch rhythm.
Tighten the Center Carefully
Once all four corner connections are in place, pull the seaming yarn slowly. Do not tighten one section with a sharp tug.
Instead, hold the squares flat and gently draw the yarn through each connection. Watch the center as the four corners move closer together.
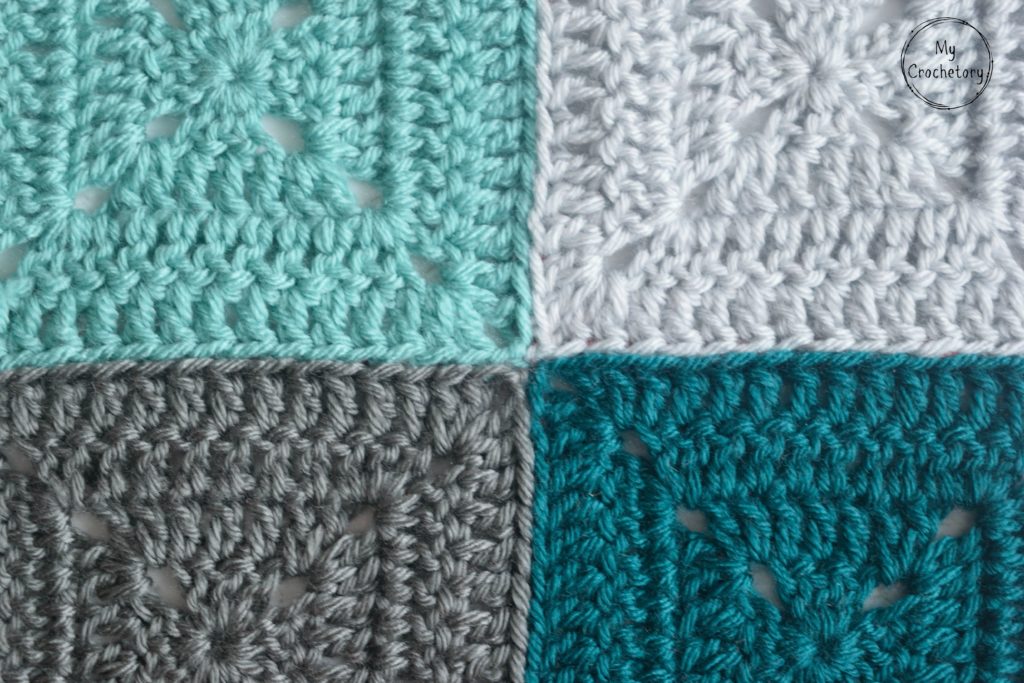
The corners should meet neatly without overlapping, bunching, or forming a hard knot. A tiny opening in the center is fine if that matches the corner construction of your squares.
If one corner starts to fold inward, loosen the yarn slightly and adjust the squares before continuing. It is much easier to fix the center now than after the remaining seam is finished.
Continue Across the Next Edge
Once the center corner looks neat, continue the mattress stitch along the next pair of square edges. Match stitch to stitch and pause every few stitches to check the front.
The center should lie flat, not twist or puff up. If it’s bulky, just undo that little bit and use a lighter touch next time you pull through the corners.
Common Mistakes When Joining Crochet Squares
Most messy seams aren’t because you’re doing it wrong. It’s usually just small habits sneaking in. The best part? Once you know what to watch for, fixing them is easy.
Pulling the Yarn Too Tight
Pulling the seam too tight can shrink the edge. That’s how you get puckers, curled edges, or a seam that feels stiff and grumpy.
Pull gently after every few stitches instead of yanking after each one. If the fabric starts to gather, loosen the last few stitches before moving forward.
Skipping a Stitch Along One Edge
This sneaky mistake hides until you finish. You’ll reach the corner and suddenly notice one square has more stitches left than the other.
Break up long edges with stitch markers so you’re only matching a small section at a time. It’s much easier than trying to keep an entire blanket strip straight by willpower alone.
Working Into the Wrong Part of the Stitch
If the seam shows more than expected, your needle may be too far from the edge or catching different parts of the stitch on each square.
Stick with the same part of each stitch as you go. Being consistent here makes your join look much neater in the end.
Forgetting to Block First
You can still join unblocked squares, but wobbly edges make things harder. You’ll spend more time fixing corners than actually sewing.
Block first for flatter edges and corners that line up. It makes joining much less of a struggle.
Mattress Stitch vs Slip Stitch Join
A slip stitch join is faster and uses a crochet hook, but it usually creates a visible ridge or line. That can be beautiful when the seam is part of the design.
Mattress stitch uses a yarn needle and leaves things nice and flat. I use it whenever I want the squares to fit closely together, without a big seam standing out.
For blankets that need a decorative grid, slip stitch can be a fun option. For a softer, cleaner look, mattress stitch is usually the one I would pick.
If you’d like to learn another handy joining method, check out my How to Slip Stitch in Crochet tutorial for step-by-step instructions
Best Projects for This Joining Method
This way of joining works best when you want the front to look smooth and clean. Think granny square blankets, patchwork bags, soft pillow covers, cardigans, or baby blankets made from squares.
It also works well when you use more than one square color. Since the seam hides between the edges, the join does not compete with the color layout.
If I need a quick gift, this isn’t my first choice. But when I want a project to look like I put in extra care, that smooth, clean seam is worth every extra minute.
Helpful Tips Before You Join a Whole Blanket
Looking at a whole blanket of squares can feel overwhelming, but I like to join smaller sections first and then put those together. It’s much easier to handle, and you won’t get frustrated trying to manage a huge pile of crochet.
Lay out your design and take a quick photo on your phone before you start. Stack your squares in order or add small tags if you care about the color order. This really helps prevent mixing things up halfway through.
Use a yarn length that feels comfortable, not one long piece for the whole blanket. Long yarn gets fuzzy, tangled, and hard to manage after too much pulling through stitches.
Working on a granny square blanket? Pin this tutorial or bookmark it before you start joining rows. It’s much easier to check the corner steps with the post open next to you.
More Crochet Tutorials to Try Next
Once you feel good about joining squares, there are a few other tricks that can really tidy up your crochet projects.
Here are some to try next:
- How to crochet a shawl
- How to foundation single crochet
- How to single crochet 2 rows at once
- How to crochet a magic ring – 3 easy ways
- How to crochet ribbing
- How to Intarsia Crochet
If you love making squares, I’d definitely save the magic ring and blocking tutorials. Clean centers, straight edges, and tidy joins are the kind of details that make me happy.
FAQ About Joining Crochet Squares
What is the cleanest way to join crochet squares?
Mattress stitch is my go-to for joining crochet squares when I want a flat, barely-there seam. It works best if you block your squares first and line up the edge stitches before you start—that little bit of prep goes a long way.
Should I block crochet squares before joining?
Yes, I always block my squares before joining, especially if they’re granny squares or tend to lose their shape. It makes lining up the edges easier, and the whole joining process goes much smoother.
Can I use a different color yarn for mattress stitch?
You can, but if you want the seam to disappear, matching yarn works best. A contrasting color is good for learning or teaching, but in a finished piece, it will stand out more.
Why does my seam pucker?
If your seam is puckering, you’ve probably pulled too tight or missed a stitch match somewhere. Loosen the last few stitches, smooth things out, and double-check that every stitch on one square lines up with the one on the other.
Can I use mattress stitch for granny square blankets?
Yes, mattress stitch works great for granny square blankets. You get a flatter, cleaner join, and your squares remain the main focus.
Is mattress stitch better than whip stitch for crochet squares?
Mattress stitch usually makes a smoother, flatter seam. Whip stitch is a bit faster, but it often shows more—especially if your yarn color is different from the squares.
How do I join four crochet squares at the center?
Join your squares in pairs first, then match up the pairs and sew through the corner chains at the center. Go easy on the tension so all four corners meet up nice and flat—no lumps or bumps.
Final Thoughts
You don’t have to let joining squares become the step that keeps your project unfinished for months. Once you get the feel for mattress stitch, finishing up becomes almost relaxing, and it’s a peaceful way to close out all your hard work.
Just start with two squares, go easy on the tension, and watch those corners. That’s usually all it takes to turn a pile of squares into something you’ll actually want to use or give as a gift.
Save this mattress stitch tutorial for your next project with squares. It’s a handy guide to keep for blankets, pillows, bags, or any crochet made from small motifs.
This technique worked absolutely perfectly for my project!! Thank you!!
Thank you so much for the clear, easy to understand instructions!
Thank you! Your technique has given the perfect finish to my project. It’s called Midnight Diamond Blanket on Ravelry.
Thank you for your help. Amazing…..!!!!!
I’ve been crocheting for years, and these are the best instructions I’ve see! I’m going to pass this email along to my granddaughter who loves to crochet granny squares!
Thanks so much!