Updated: 18 June 2026 by Sylwia (MyCrochetory)
The first time I needed a sturdy drawstring for a crochet project, a regular chain just didn’t look right. It worked, but it felt a little flimsy and didn’t have the clean, finished look I wanted.
That’s when I learned how to crochet an I-cord.
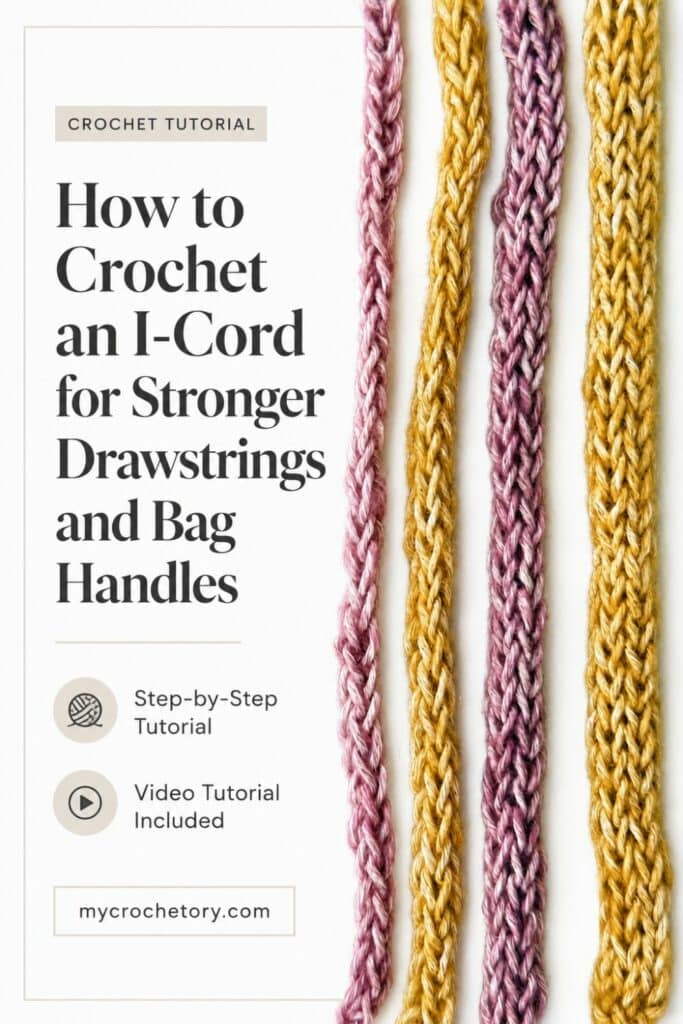
An I-cord is a simple crochet cord with a rounded shape that looks more substantial than a basic chain. It’s often used for drawstrings, bag handles, ties, and decorative details where you need something durable and neat. Even though it looks a bit unusual at first, the technique itself is surprisingly straightforward once you understand the movement.
What I like most about a crochet I-cord is how much it can improve the finished look of a project. Sometimes it’s the smallest details that make the biggest difference. Swapping a chain for an I-cord can instantly make a bag strap feel sturdier or a drawstring look more polished.
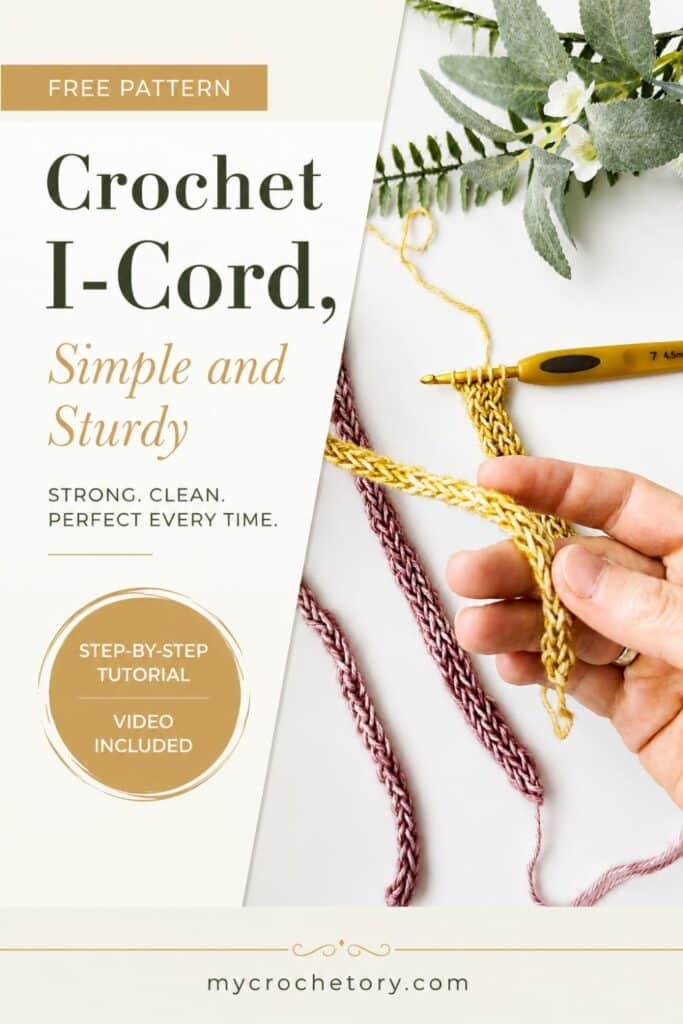
In this crochet I-cord tutorial, I’ll show you exactly how to make one step by step. You’ll find detailed photos, a video tutorial, and practical tips to help you feel confident as you work through the process. I’ll also share a few ideas for using crochet cords in your projects, from bag handles and drawstrings to decorative ties and other finishing touches.
If you’ve been wondering how to make a crochet cord that’s sturdy, professional looking, and easy to customize, you’re in the right place. Grab your yarn and hook, and let’s get started.
Crochet I-Cord Quick Summary
- Chain 3.
- Insert your hook into the second chain from the hook and pull up a loop.
- Insert your hook into the next chain and pull up another loop.
- You should now have 3 loops on your hook.
- Drop 2 loops from the hook.
- Work a slip stitch in the remaining loop.
- Pick up the dropped loops one at a time.
- Repeat these steps until your I-cord reaches the desired length.
- Pull through all loops to finish and weave in the ends.
That is how to crochet an I-cord.
Scroll down for the full step by step photo tutorial and video tutorial, where you can see exactly how to hold the dropped loops, where to insert your hook, and what each stage of the crochet I-cord should look like as you work.
If you’re not making an I-cord right now, save this tutorial to Pinterest so it’s easy to find the next time you need a drawstring, bag handle, or decorative tie.
What Is an I-Cord in Crochet?
Some crochet techniques sound much more complicated than they actually are. The I-cord is a perfect example.
When I first came across the term, I expected a technique that would take ages to learn. Instead, it’s a simple crochet cord made by repeating the same movement over and over until it reaches the length you need.
Unlike most crochet projects, you’re not building rows or rounds. The cord grows little by little as you work with a small number of active loops on your hook. That unusual construction is what gives an I-cord its distinctive shape.
Another thing that surprises many crocheters is how little you need to get started. Most I-cords begin with just a few chains, and from there it’s all about repeating the same sequence.
If the process feels slightly awkward at first, that’s completely normal. A lot of crocheters need a few repeats before the movement starts feeling familiar. Once it does, the technique becomes much easier to follow.
Why Use a Crochet I-Cord Instead of a Chain?
A regular chain works perfectly well in a lot of situations.
But every now and then, you reach the end of a project and feel like it needs something a little different. That’s usually when an I-cord starts making sense.
I notice it most on projects where the cord remains visible. A closure, tie, strap, or decorative detail can completely change the overall look of a project, even though it only takes a few extra minutes to make.
Another reason many crocheters enjoy using I-cords is the flexibility. You can make them exactly as long as you need, and changing the size is often as simple as adjusting the number of starting chains.
The best way I can describe it is this: a chain is often the quickest solution, while an I-cord feels more intentional. You won’t need one for every project, but it’s a useful option to have when a regular chain doesn’t quite give you the result you’re looking for.
Gather Your Crochet Supplies
One reason I like teaching how to crochet an I-cord is that you don’t need anything special to get started.
There’s a good chance you already have everything you need somewhere in your yarn stash. No extra tools, no special equipment, and no trip to the craft store before you can give it a try.
Yarn
For your first I-cord, I’d suggest using a smooth yarn that’s easy to work with. Being able to clearly see the loops makes the process much less frustrating while you’re learning the sequence.
That said, don’t spend too much time searching for the “perfect” yarn. This is a great technique for practicing with yarn you already have on hand.
Crochet Hook
Use the hook size you’d normally pair with your yarn.
Later on, if you’re feeling curious, try making a few small samples with different hook sizes. Even a small change can noticeably affect the finished cord.
Yarn Needle
You’ll also need a yarn needle to weave in the ends once your I-cord is finished.
That’s it. Simple projects are sometimes the most satisfying ones.
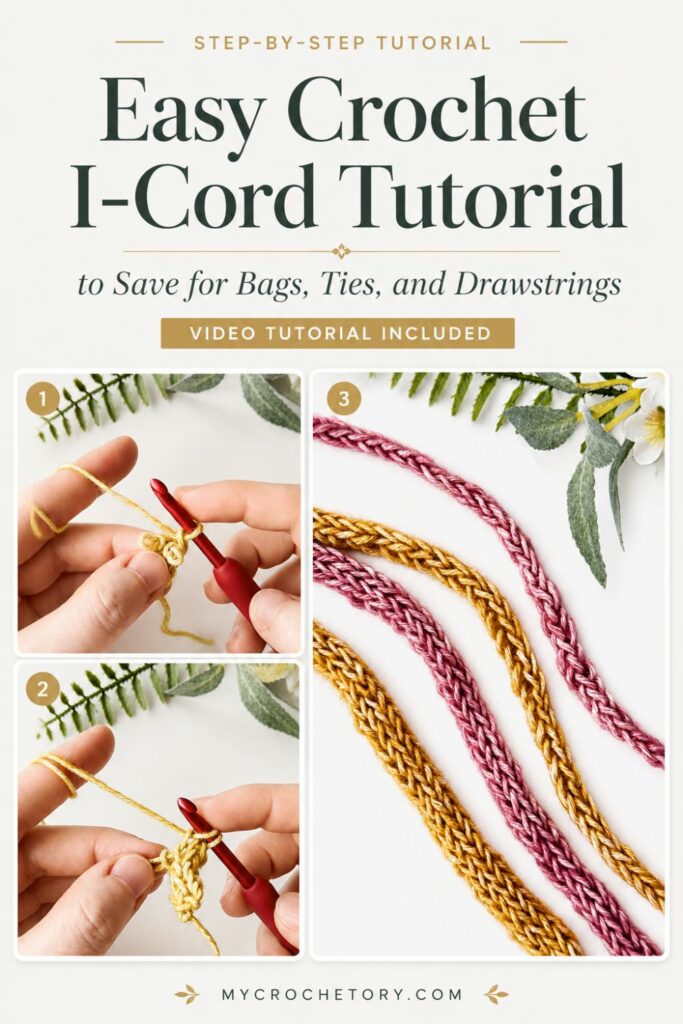
How To Crochet An I-Cord: VIDEO Tutorial
How To Crochet An I-Cord Video Tutorial
Some techniques are easier to understand when you can watch the movement happen in real time.
With an I-cord, the part that tends to catch people off guard isn’t the stitch itself. It’s keeping track of the loops during the first few repeats. Seeing the sequence a few times can make everything feel much clearer before you pick up your hook.
I still find it helpful to switch between photos and video when learning something new. Sometimes a photo helps me check a specific step, while a quick look at a video answers a question instantly.
Watch the free video tutorial below, or keep scrolling for the full step by step photo tutorial.
Enjoy crochet tutorials like this one?
Join my newsletter and I’ll send new patterns, tutorials, and crochet tips straight to your inbox. No spam, just plenty of crochet inspiration and helpful resources.
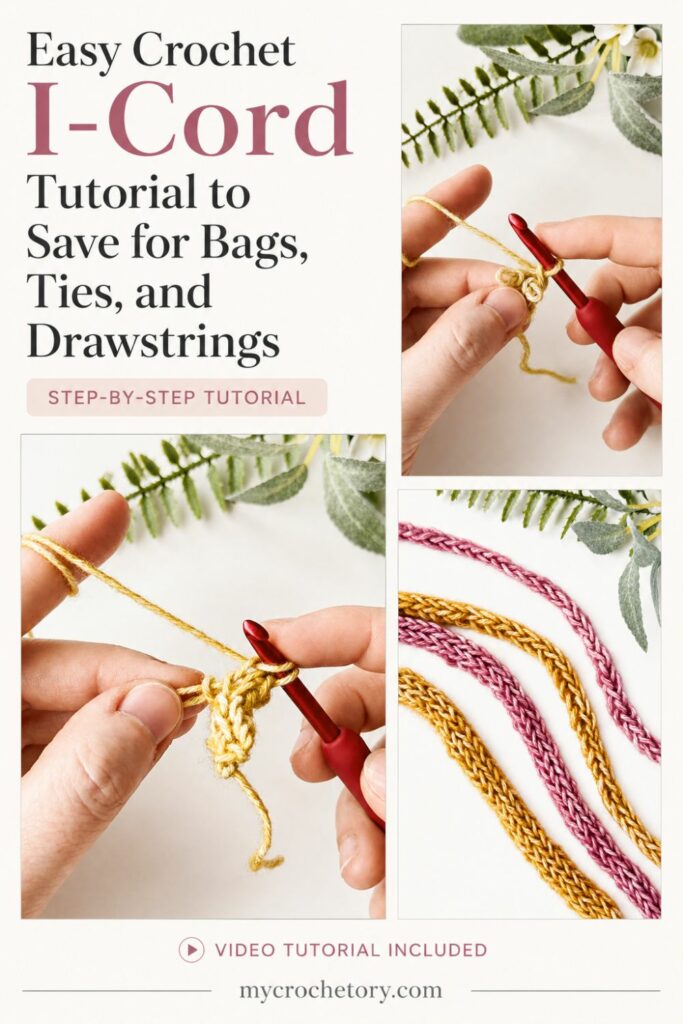
How To Crochet An I-Cord: Photo Tutorial
Welcome to our easy guide on making an I-cord! Here, we’ll show you each step with clear instructions and helpful pictures. Let’s start!
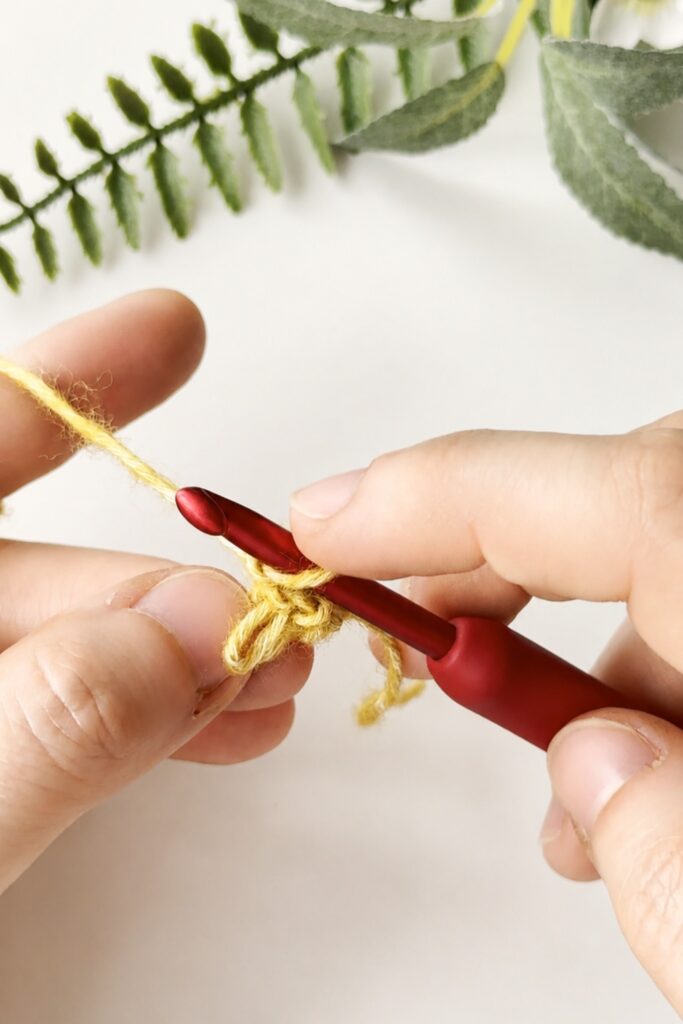
Step 1
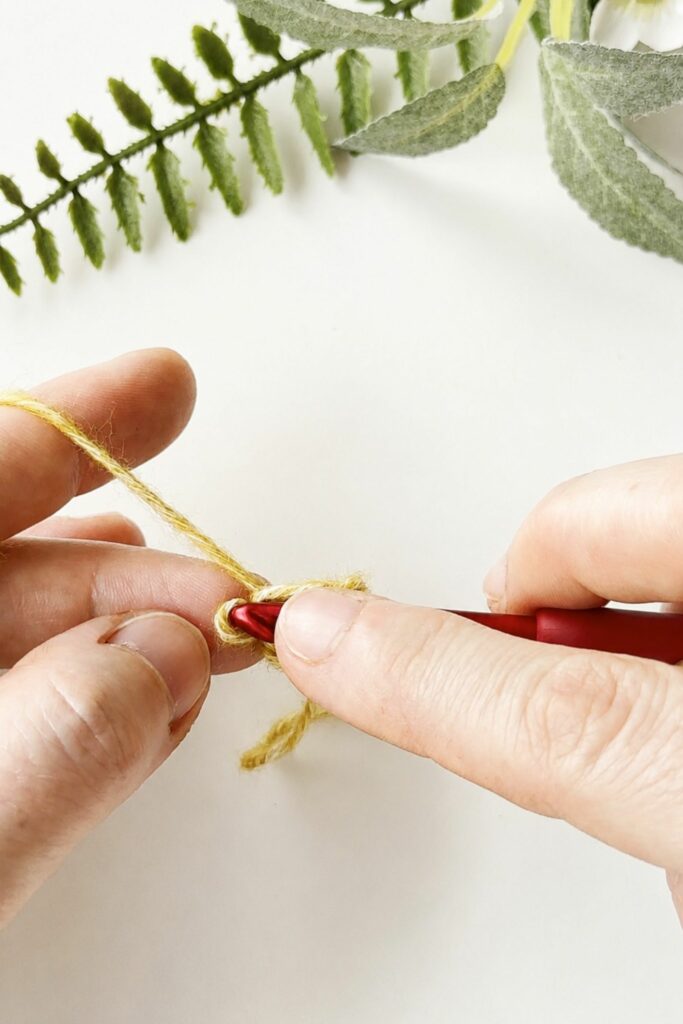
To begin, make a slip knot and chain 3. This is where your I-cord journey starts.
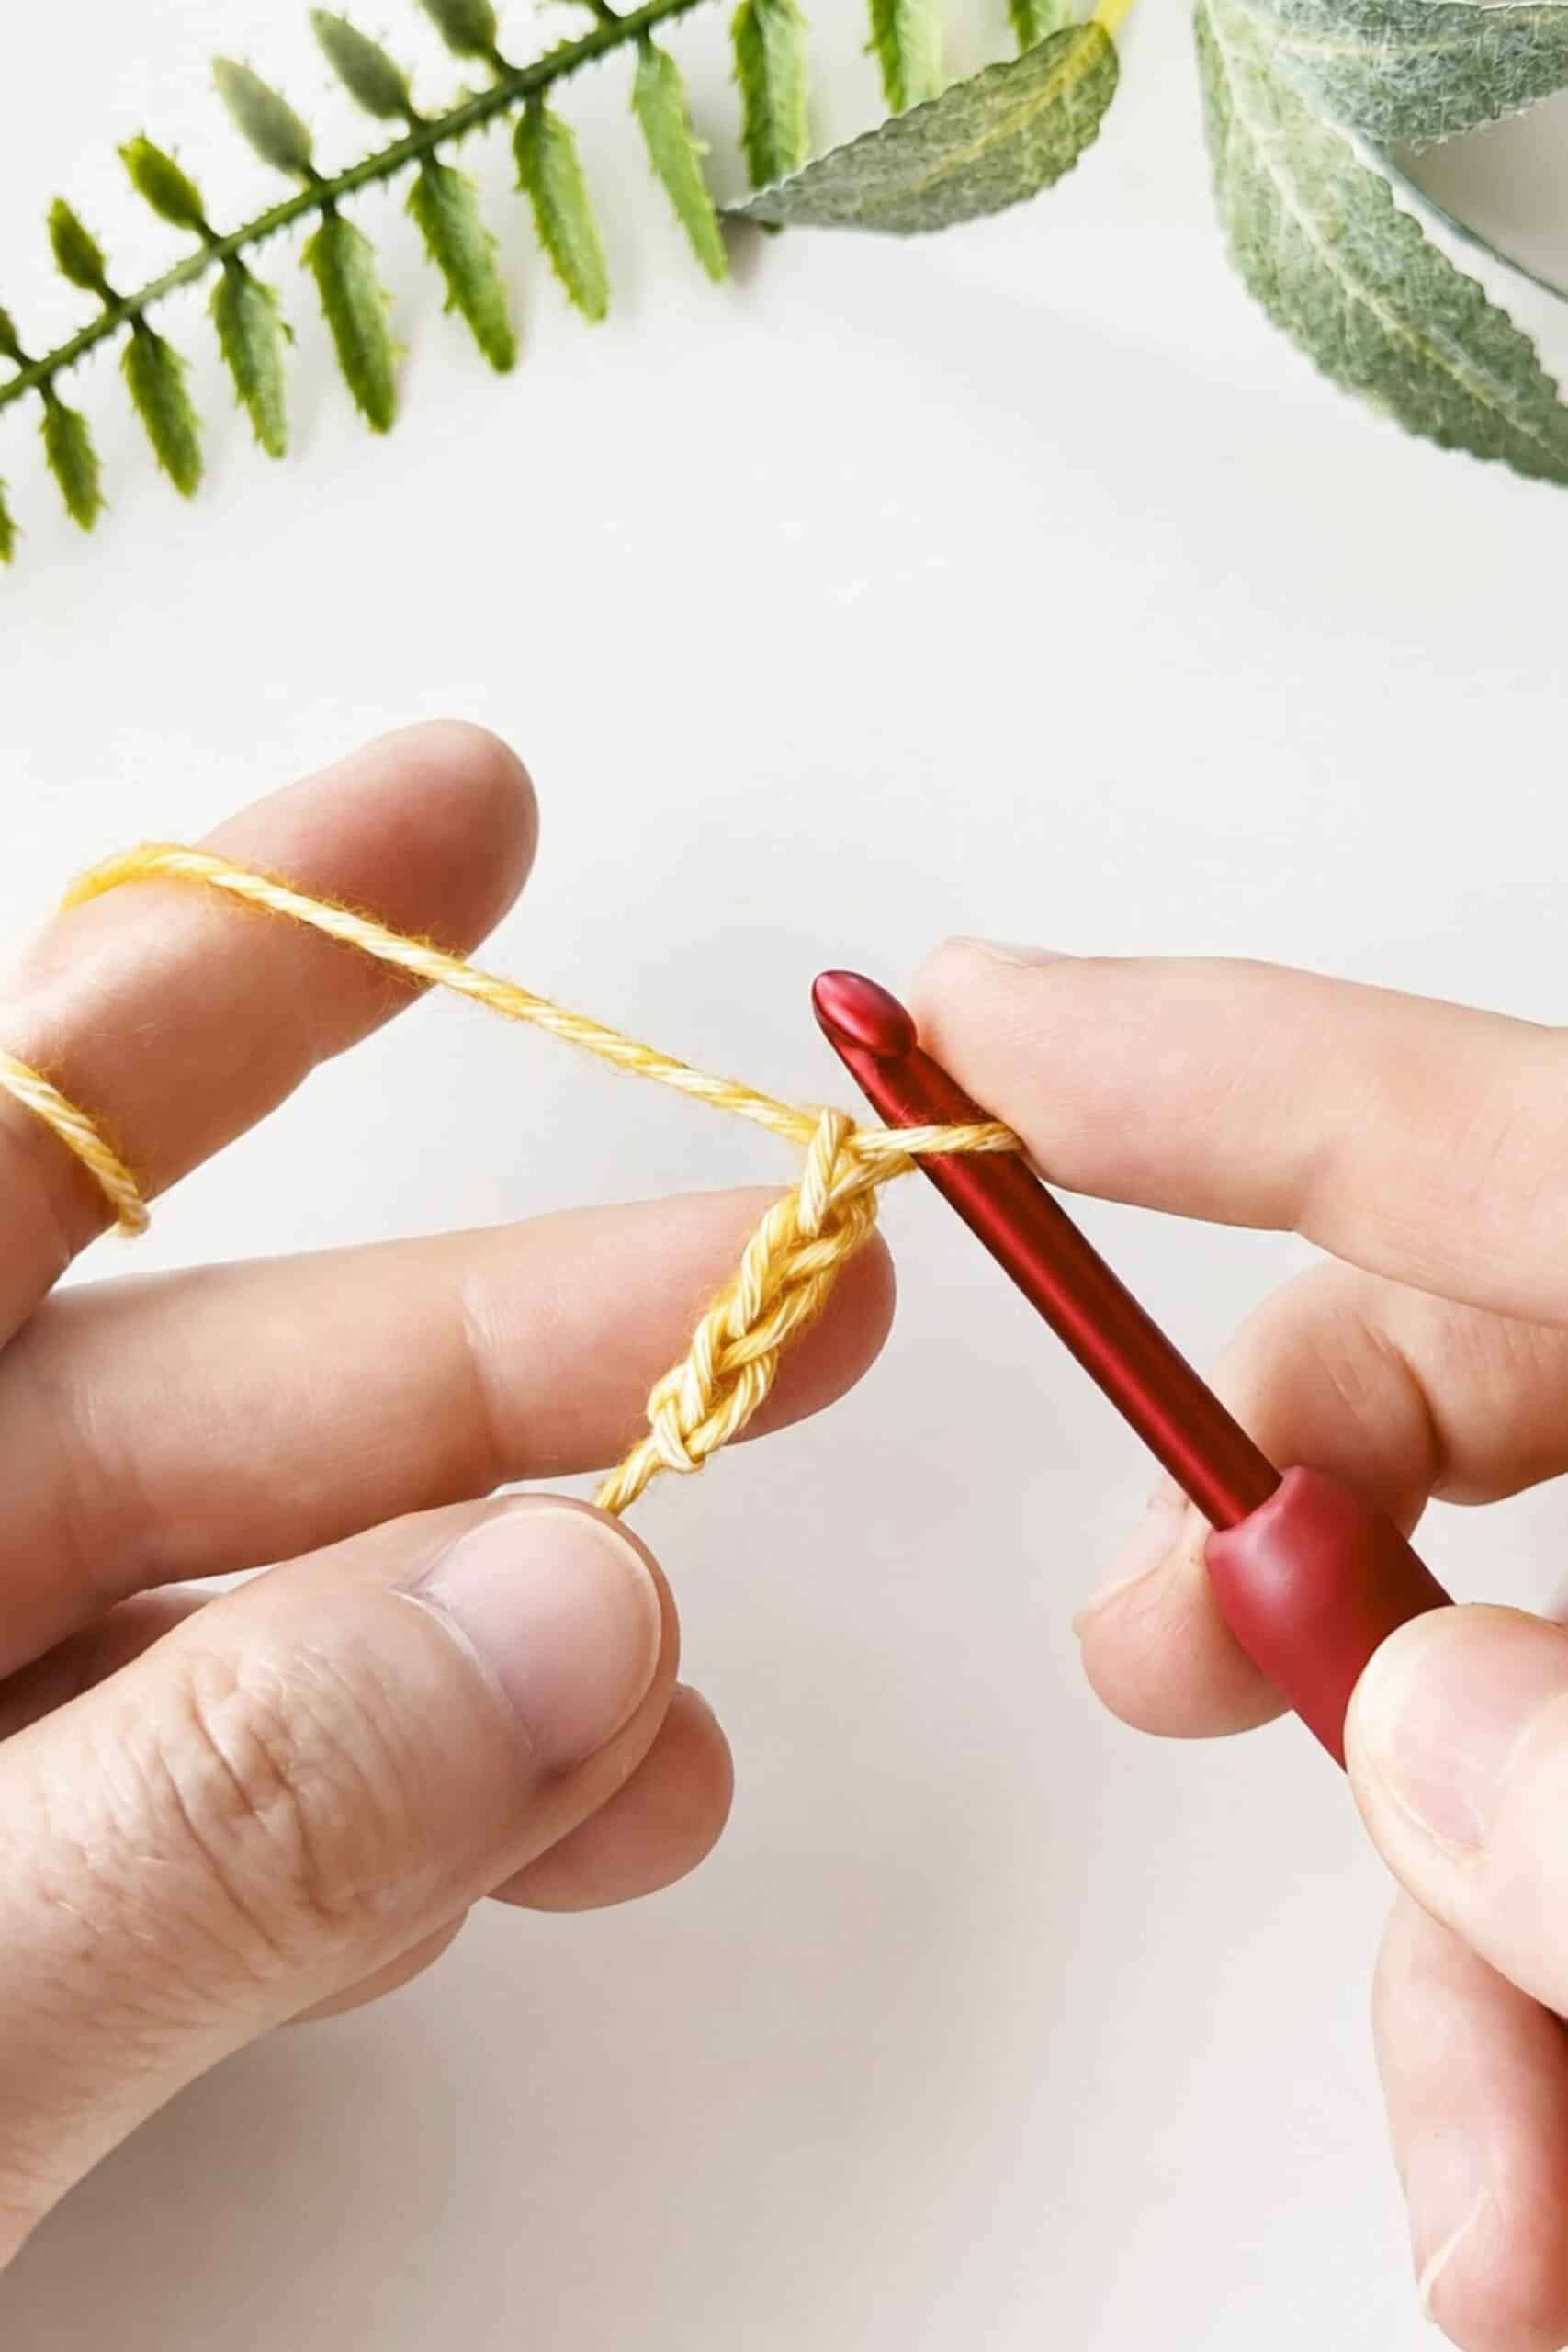
Note: You can adjust the size of your I-cord tube by chaining 2, 3, or 4 at the beginning. The rest stays the same; only the loops on your hook change.
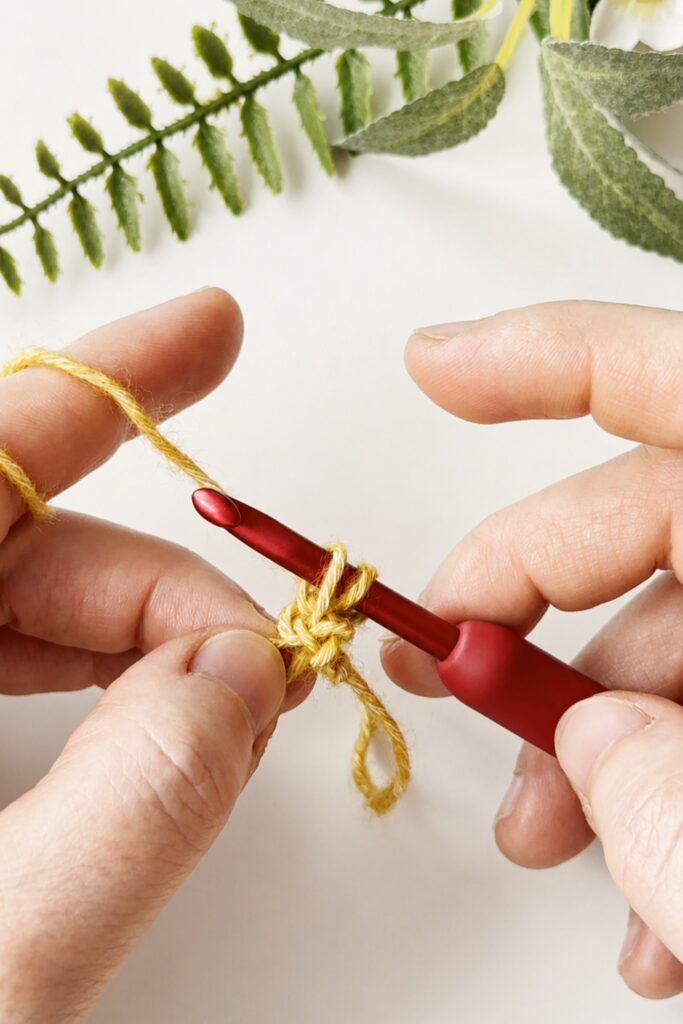
Step 2
Now, insert hook into the second chain from the hook.
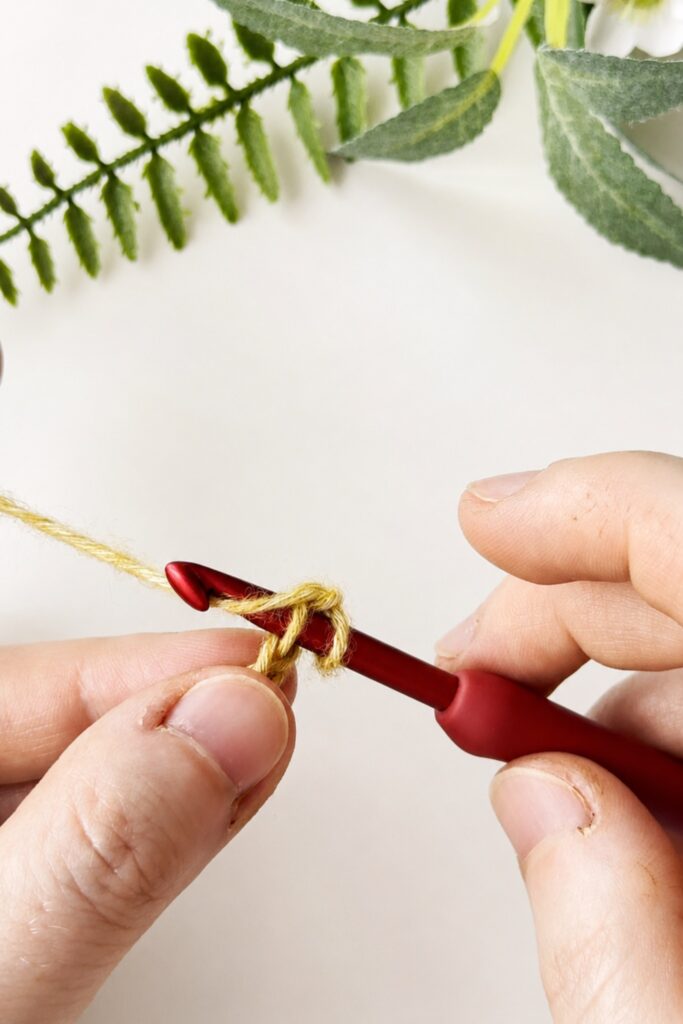
Yarn over and pull the working yarn through to make a loop. You’ll have 2 loops on your hook now.

Step 3
Next, insert hook into the third chain.
Yarn over and pull the working yarn through to make another loop. Now, you have 3 loops on your hook.
Time to start the first row of your I-cord. Follow these easy steps carefully:
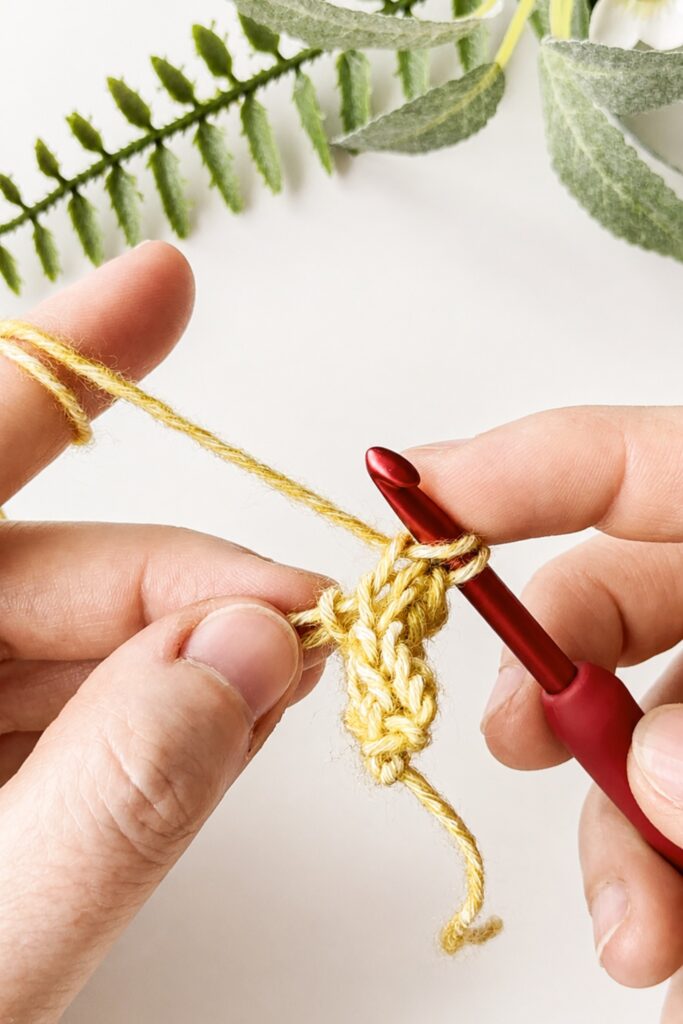
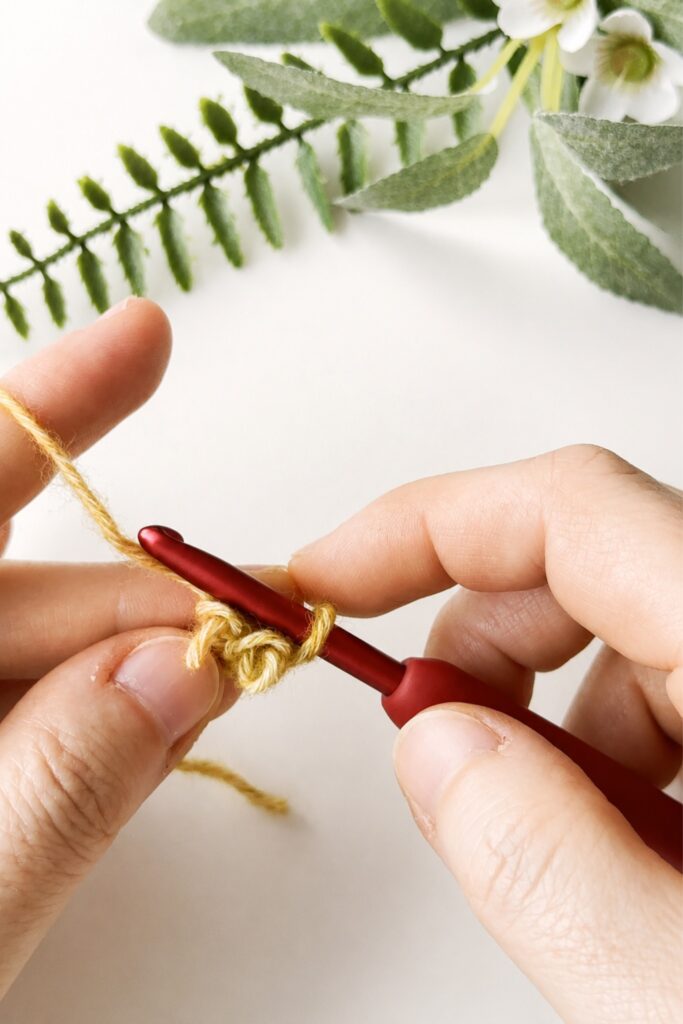
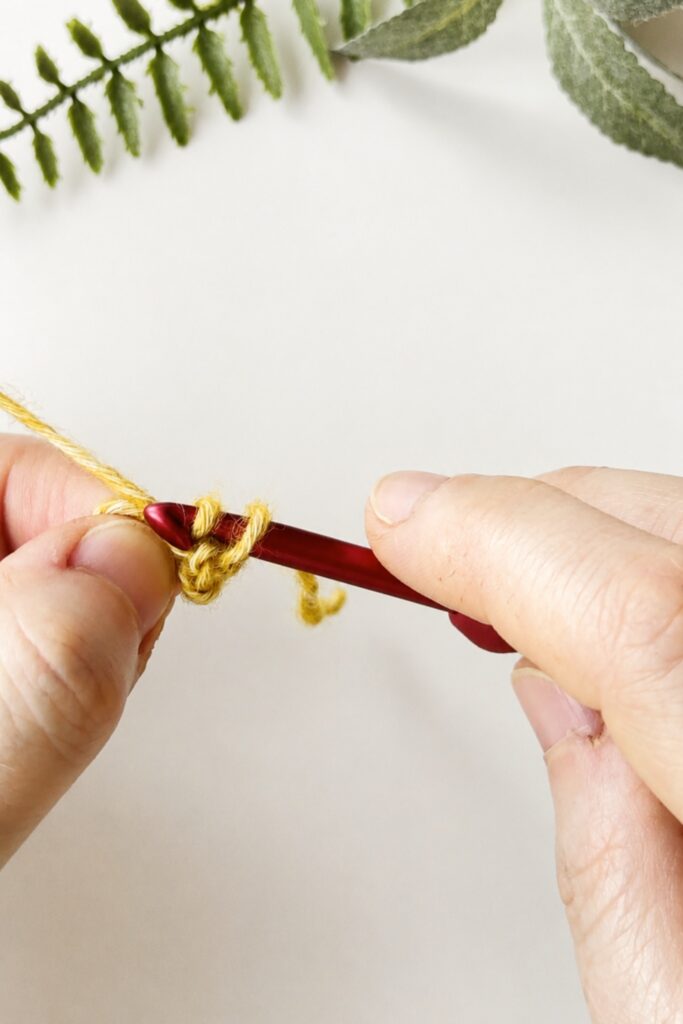
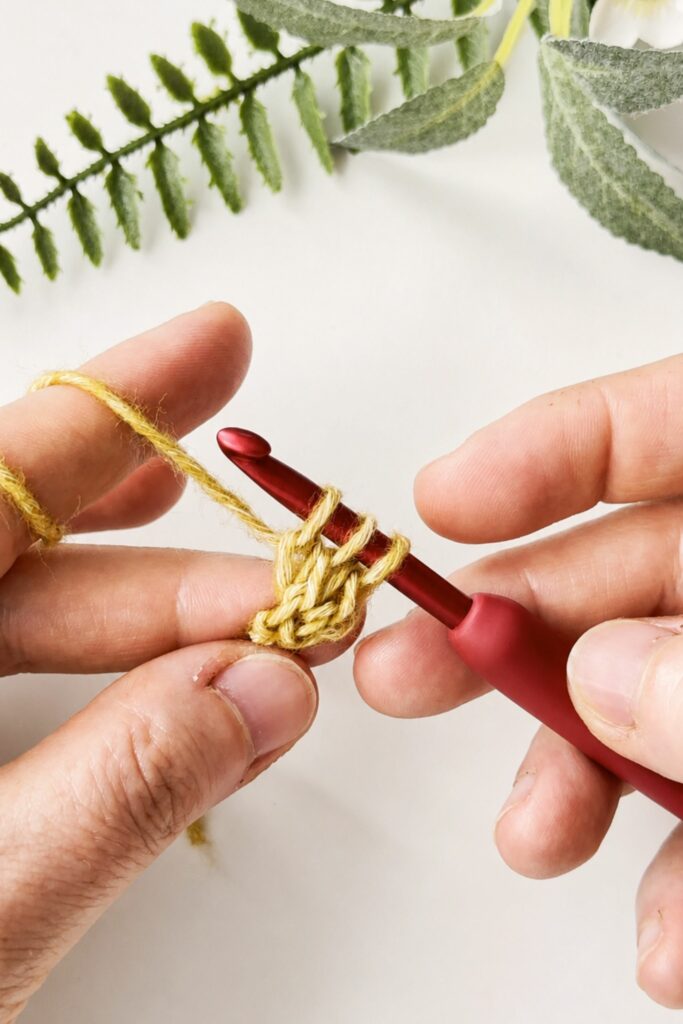
Step 4
Gently let 2 loops slip away from your hook. Hold the dropped loops with your other hand so they don’t go missing.
Step 5
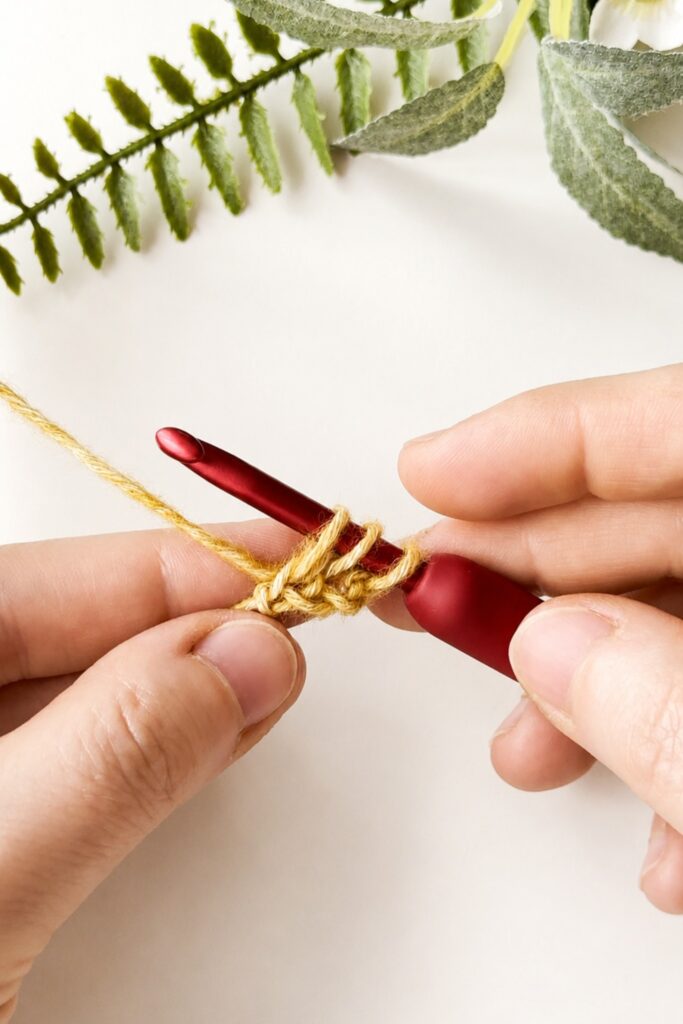
Make a slip stitch by pulling the working yarn through the loop on your hook. Now, you have one loop left on your hook.

Step 6
Put your hook into the closest dropped loop.
Yarn over pull the working yarn through the first loop. You now have 2 loops on your hook.
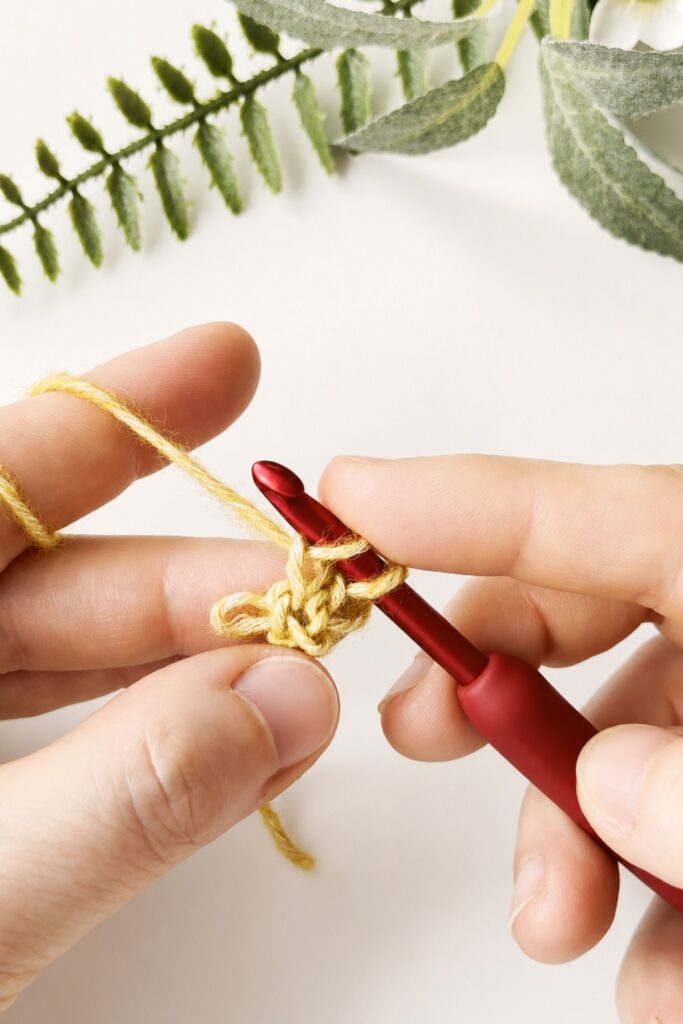
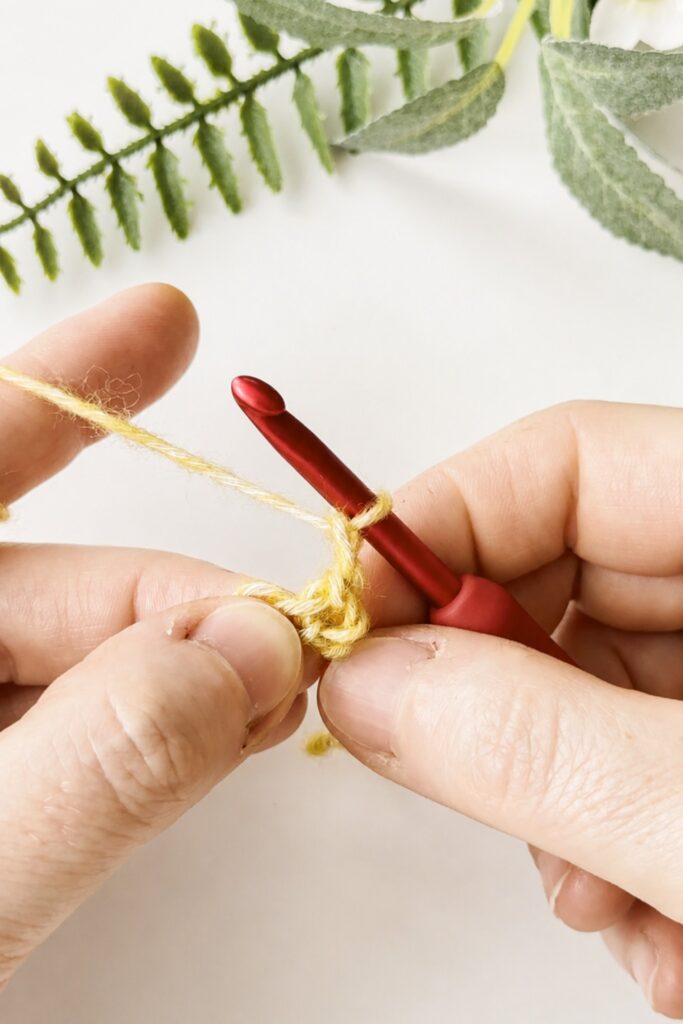
Step 7
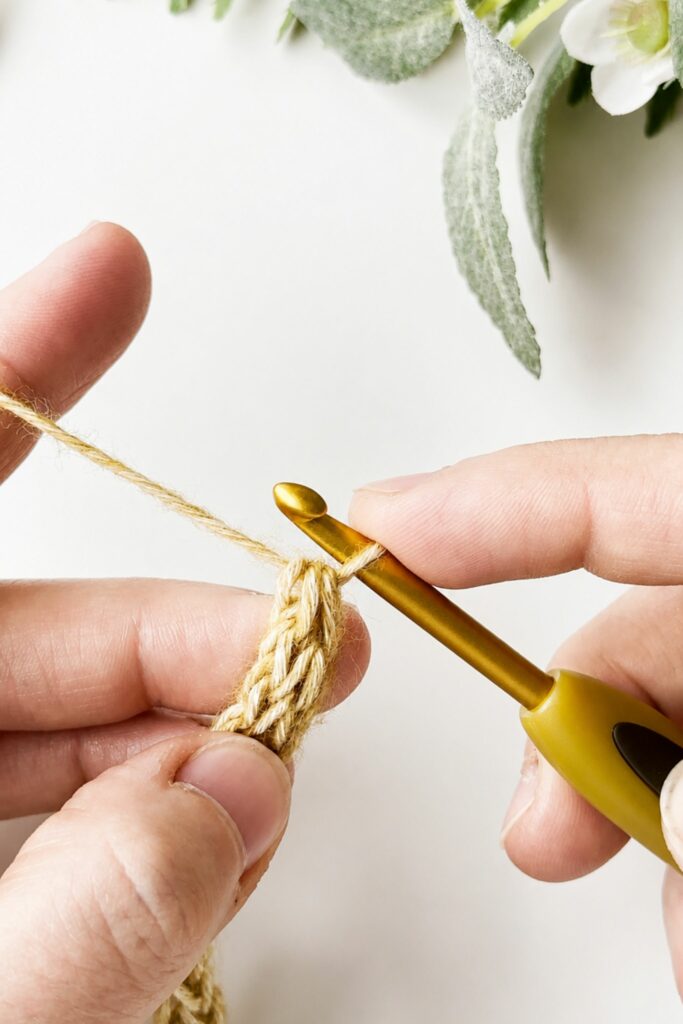
Finish the row by inserting your hook into the last loop you dropped.
Yarn over and pull through the first loop again. Now, you’ll have 3 loops on your hook again.
Step 8
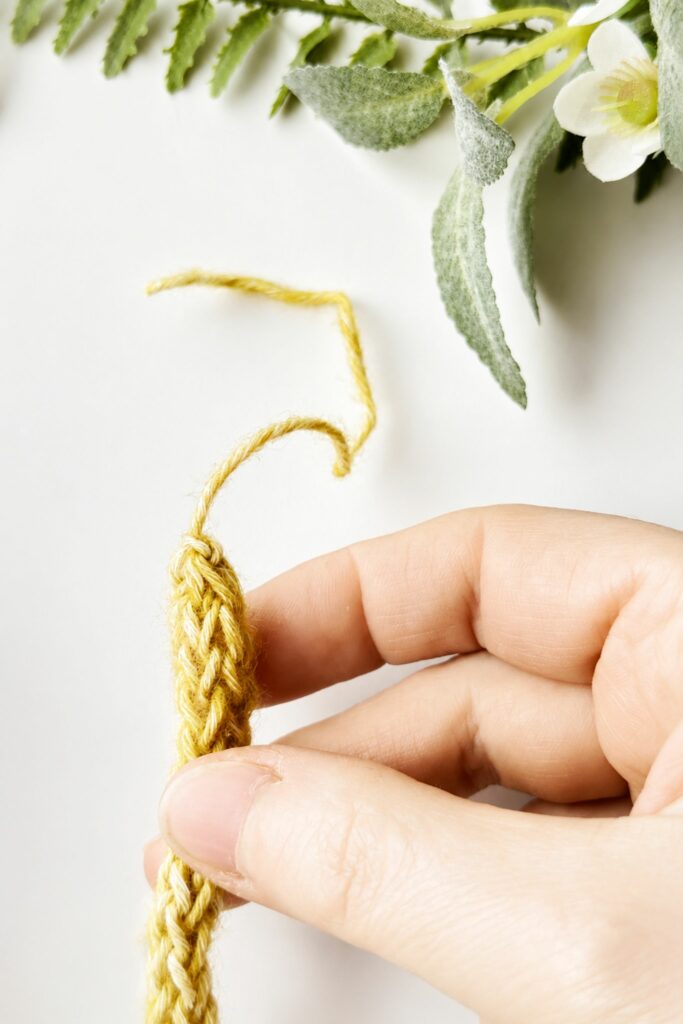
Well done! You’ve finished the first row of your crochet I-cord. Repeat steps 4 – 7 until your I-Cord is the desired length.
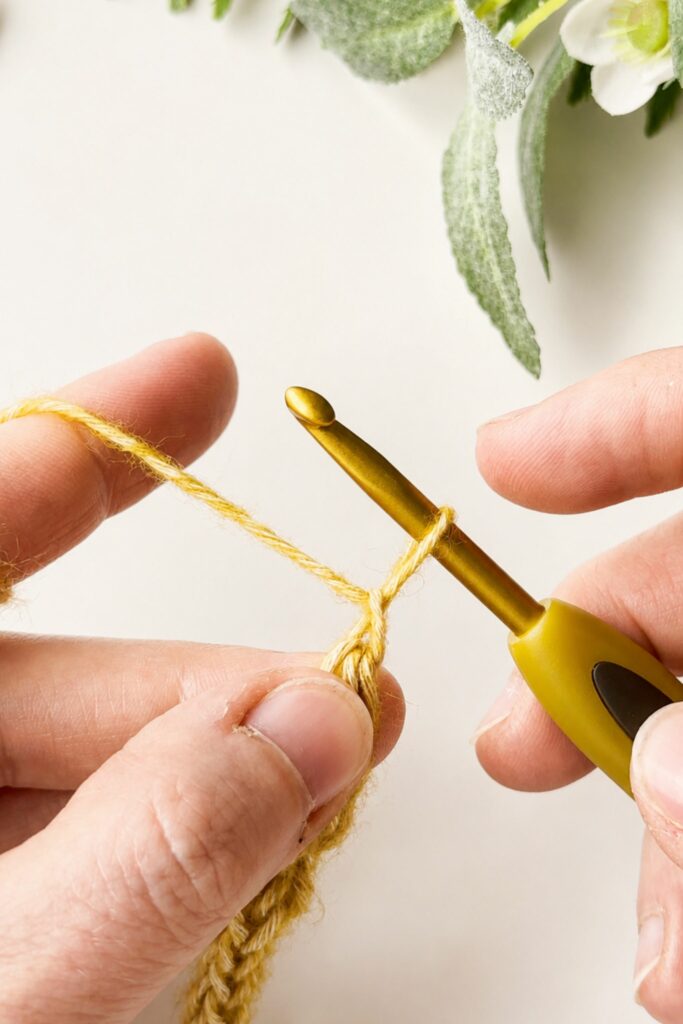
Last Step
Once you’ve achieve the desired length, yarn over and draw through all 3 loops and chain 1. Weave in the ends with a yarn needle to finish.
Common Crochet I-Cord Mistakes
Most I-cord problems show up near the beginning.
Not because the technique is particularly difficult, but because it asks your hands to do something they don’t normally do. For a little while, it can feel like you’re thinking about every single movement instead of simply crocheting.
I Keep Losing Track of the Loops
If you’ve ever stopped halfway through a repeat and wondered which loop you’re supposed to pick up next, you’re not alone.
This usually happens while you’re still getting familiar with the sequence. Try slowing down and focusing on one step at a time. Speed can come later. Right now, it’s more important to build confidence with the movement.
My I-Cord Looks Different Along the Length
This is something I often notice when learning a new technique.
The first few repeats are worked slowly and carefully. Then, as the movement starts feeling more familiar, your hands naturally speed up. That change in pace can affect the appearance of the cord.
Before deciding something went wrong, make a little more progress and see how the cord develops. A short section doesn’t always tell the whole story.
Every Repeat Feels Awkward
That’s completely normal at the beginning.
An I-cord has a rhythm to it, and it usually takes a little time for your hands to find it. At first, each step feels separate. Then suddenly you’re no longer thinking about every loop, and the process starts flowing much more naturally.
I’m Tempted to Start Over
Many crocheters restart their first I-cord at least once.
Sometimes the easiest way to learn the technique is simply to keep going for a bit longer. A few extra repeats often teach more than starting from the beginning again.
What Can You Use a Crochet I-Cord For?
Most people don’t search for an I-cord tutorial because they’re excited about making cords.
Usually, they’re finishing a project and need a practical solution for a specific detail. Then they learn the technique and start noticing all kinds of other ways to use it.
Drawstrings
This is often where crocheters first come across I-cords.
They’re commonly used in pouches, project bags, garment ties, and similar projects where you need a cord that’s made to a specific length.
Bag Projects
I-cords show up in all kinds of crochet bags.
Sometimes they’re used as drawstrings. Sometimes they’re part of a strap or handle. Sometimes they’re simply a small finishing detail that ties the whole design together.
If bags are your favorite thing to crochet, you’ll find plenty of inspiration in these crochet bag patterns. One project where this technique works especially well is the Herringbone Drawstring Crochet Bag.
Garments and Accessories
An I-cord can be useful anywhere a project needs a tie, closure, or decorative detail.
Because you’re making the cord yourself, it’s easy to adjust the length to suit the project instead of trying to make a pre-made cord fit.
Home Decor
Crochet projects around the home often include small details that need a cord or hanging loop.
Plant hangers are a popular example, but they’re certainly not the only one.
Small Leftover Yarn Projects
If you’ve ever finished a project and been left with a small amount of yarn, an I-cord can be a surprisingly useful way to use it.
Short cords can become zipper pulls, hanging loops, gift ties, keychains, and other small accessories that don’t require much yarn at all.
You Start Seeing Them Everywhere
The funny thing about I-cords is that you don’t always notice them until you’ve learned how they’re made.
After that, you’ll start spotting them in bags, garments, accessories, and all sorts of crochet projects. Once you know how to make one, it becomes another useful option whenever a project calls for a cord.
Can You Make a Crochet I-Cord Thicker?
One of the things I like about I-cords is that you can change the look quite a bit without learning a different technique.
If you’ve ever seen two I-cords that looked completely different, there’s a good chance they started with a different number of chains.
For this tutorial, I’m using a 3-chain I-cord because it’s a nice balance between size and simplicity. It’s easy to handle, easy to see, and works well for many projects.
If you’d like a slimmer cord, try starting with 2 chains instead. If you’re after something with a little more presence, start with 4 chains. The overall process stays very similar, but the finished cord can look surprisingly different.
If you’re unsure which size will work best, make a few short samples before committing to a longer cord. It only takes a couple of minutes and can save a lot of second-guessing later.
Frequently Asked Questions
What is an I-cord in crochet?
An I-cord is a narrow crochet cord worked with just a few loops on your hook. Instead of building rows like you normally would, you repeat the same sequence until the cord reaches the length you need.
The finished result can be used in all kinds of projects, from garment ties and bag details to decorative accents and home decor.
Is a crochet I-cord hard for beginners?
The movement feels a little unusual at first, mostly because you’ll be dropping and picking up loops instead of working straight across a row.
That’s usually the part that makes people stop and double-check the instructions. After a little practice, the sequence starts feeling much more familiar.
Why does my I-cord look different from the photos?
Small differences are completely normal.
The yarn, hook size, tension, and even the way you hold your yarn can affect the finished appearance. Two crocheters can follow the same instructions and end up with slightly different results.
How do I make a thicker crochet I-cord?
The easiest way is to start with more chains.
A cord made from two starting chains will look very different from one made from four. If you’re curious about the difference, try making a few small samples and compare them side by side.
What is the best yarn for a crochet I-cord?
If you’re learning the technique, smooth yarn is usually the easiest option.
The loops are easier to see, which makes it simpler to follow the sequence and spot where your hook needs to go next.
How long should a crochet I-cord be?
That depends entirely on the project you’re making.
Some projects need only a short cord, while others require a much longer one. The nice thing about making your own is that you can stop whenever the cord reaches the length you need.
Can I use a crochet I-cord for bag handles?
Many crocheters do.
You’ll often find I-cords used in bags as drawstrings, straps, handles, and decorative details. The exact size and construction will depend on the project, but it’s a technique that comes up often in bag making.
Can I crochet an I-cord without knitting needles?
Absolutely.
Despite the name, a crochet I-cord is made entirely with a crochet hook. No knitting skills or knitting needles are required.
More Crochet Tutorials You May Like
If you enjoyed learning this technique, you might also like:
- How to foundation single crochet
- How to double crochet 2 row at once
- How to make a slip knot – 3 Easy Ways
- How to crochet standing stitches
- How to crochet ribbing
- Mattress stitch join tutorial
- Why Is My Crochet Circle Curling?
- How to Crochet a Shawl (3 Easy Ways)
Looking for more? Visit the Tutorials Hub for additional crochet tutorials, stitch guides, and helpful crochet tips.
Final Thoughts
Some crochet techniques become part of your routine almost immediately.
Others quietly wait in the background until the right project comes along. Then one day you’re finishing a bag, adding a tie to a garment, or looking for a simple cord, and you’re glad you took the time to learn something new.
That’s how I think about I-cords.
The movement can feel a little unfamiliar at first, especially during the first few repeats. Give yourself a bit of time to get comfortable with it. Before long, you’ll stop thinking about each individual step and simply enjoy the rhythm of the process.
If you try this crochet I-cord tutorial, I’d love to hear how it went. Let me know what you’re making and where you plan to use your I-cord. Seeing how different crocheters use the same technique is always one of my favorite parts of sharing tutorials.
Save This Tutorial for Later
Planning to try this technique another day?
Save this crochet I-cord tutorial to your Pinterest board so it’s easy to find the next time you need a crochet cord for a bag, tie, closure, or another project.ious about the look of an I-cord but prefer crochet.
We’d love to hear about your crochet adventures and see your beautiful creations. Drop a comment below sharing your thoughts, questions, or even your favorite crochet tips! Your voice adds a vibrant thread to our forum community.
Sharing is caring! If you found this guide helpful, consider spreading the love. Click the share button and inspire other crocheters.
Stay in the loop with our latest crochet guides, tips, and inspiration. Subscribe to our newsletter for exclusive content straight to your inbox. Never miss a stitch—subscribe today!
Happy crocheting, and may your yarn always be tangle-free!
Join my Facebook Group and Official Ravelry Group where you can find necessary support, you can ask questions or share your finished projects.
You can also follow my Instagram, Facebook page and Pinterest.
Leave a Reply