Updated: 26 January 2024 by Sylwia (MyCrochetory)
Discover the art of cable crochet and learn how to crochet baby blanket with cables. This free pattern and picture tutorial will guide you step-by-step in creating a timeless and cozy Cable Diamond Blanket for your little one.
Scroll down to see the Cable Crochet Diamond Blanket free pattern or you may choose to purchase the complete ad-free, printable PDF crochet pattern with the stitch chart HERE on ETSY or HERE on Ravelry.

Join my Facebook Group and Official Ravelry Group where you can find necessary support, you can ask questions or share your finished projects.
You can also follow my Instagram, Facebook page and Pinterest.

Introducing the Crochet Baby Blanket with Cables
Are you searching for the perfect baby blanket that combines style, warmth, and charm? Look no further!
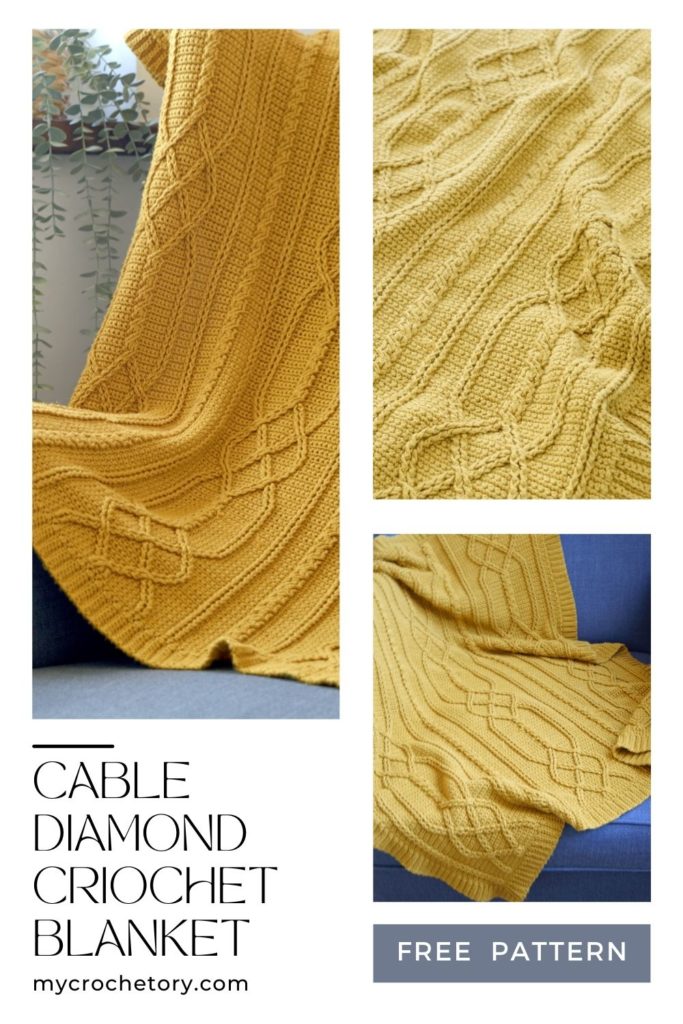
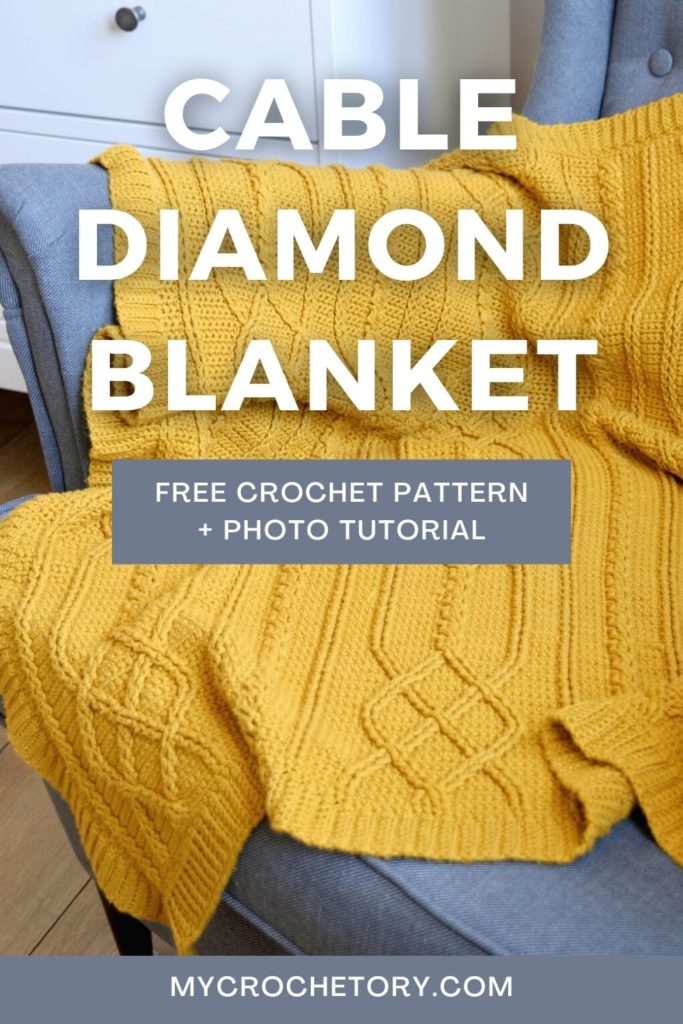
The Cable Diamond Blanket is a stunning crochet creation that will captivate your heart.
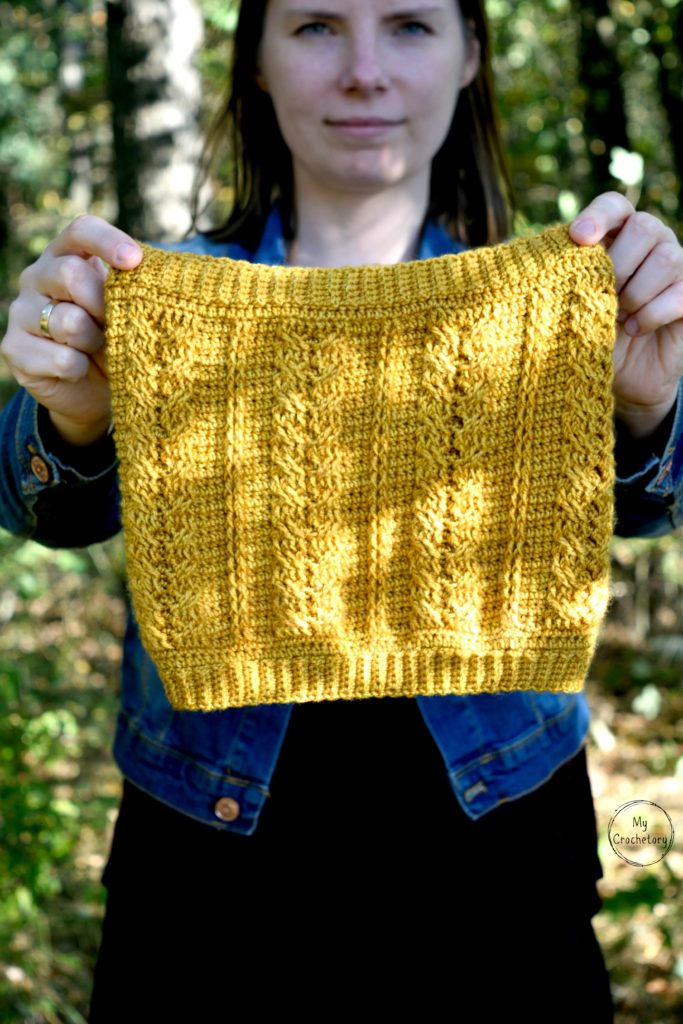
Inspired by the beloved Cable Diamond Pillow, this blanket is designed to bring comfort and joy to your little bundle of joy.
With its intricate cable stitches and rich texture, it’s truly a work of art that will become a cherished keepsake.

Experience the Magic of Cable Crochet
Cable crochet is a technique that adds a touch of magict to your projects.
With its interwoven twists and turns, cables create a fascinating effect that elevates any design.
In this section, we’ll explore the world of cable crochet and explain the process.
You’ll learn how to crochet cables with ease, allowing you to bring intricate patterns to life.
Let your crochet hooks dance as you create beautiful cables that will adorn your baby blanket.
Crochet Baby Blanket with Cables: A Delightful Journey
Get ready to start a delightful journey of crafting as we guide you through the creation of the Cable Diamond Blanket.
With our easy-to-follow baby blanket pattern, you’ll learn how to crochet cables and create a blanket that is both visually stunning and incredibly cozy.
Each stitch will be a step closer to wrapping your little one in warmth and love.
Follow along as we provide detailed instructions and helpful tips to make your crochet experience enjoyable and rewarding.

Frequently Asked Questions about Crochet Baby Blanket with Cables
Q: Is cable crochet difficult to learn?
A: Cable crochet may seem intricate, but with practice and patience, it becomes much easier. Our step-by-step instructions and detailed photos will guide you through the process, making cable crochet accessible for crocheters of all skill levels.
Q: Can I use a different yarn for the Cable Diamond Blanket?
A: Absolutely! While we recommend using a soft and cozy yarn suitable for babies, you can choose any yarn that meets your preferences. Just make sure to check the gauge and adjust the hook size accordingly.
Q: How long does it take to complete the Cable Diamond Blanket?
A: The time required to finish the blanket depends on your crochet speed and the amount of time you can dedicate to the project. On average, it takes a few weeks to complete, but the result is well worth the effort.
Wrap Your Little One in Timeless Elegance
The Cable Diamond Blanket is more than just a baby blanket; it’s a symbol of love, warmth, and craftsmanship.
Crocheting this blanket is a rewarding experience that allows you to create a cherished heirloom for your little bundle of joy.
With its intricate cables and cozy texture, it’s the perfect companion for snuggles and precious moments.
Let your creativity flourish as you crochet this masterpiece, and watch as your baby is embraced by its timeless elegance.
Remember, you can access the complete pattern with a stitch chart on Etsy or Ravelry for a hassle-free crocheting experience. Start your crochet journey today and create a Cable Diamond Blanket that will be treasured for generations to come.
OTHER CABLE CROCHET PATTERNS YOU MIGHT LOVE

CABLE CROCHET DIAMOND BLANKET FREE PATTERN
- Purchase the ad-free, printable PDF with the stitch chart here on ETSY or here on Ravelry.
- Add this pattern to your Ravelry Queue HERE.
- Pin it for later.
Copyright 2021 – 2024 MyCrochetory. All right reserved. This pattern is property of Sylwia Kawczyńska @MyCrochetory. Please DO NOT sell the pattern and claim this pattern as your own. The pattern is for personal use only and may not be translated or reproduced in another language. Please respect my rights, DO NOT share or publish this pattern anywhere without my permission.
The crochet baby blanket with cables you make following this pattern is yours you are free to sell it, as long as you credit MyCrochetory as original designer. For more information, please, read Terms Page.

As a bonus in the ad-free, printable PDF, I’ve provided a stitch chart. If you’re a visual learner or if you just want to support my work you can purchase this crochet pattern HERE on ETSY or HERE on Ravelry. Thank you and I hope you find it useful!

Materials & Tools:
- Yarn Scheepjes Bamboo Soft 50g = 150m, 50% Bamboo, 50% Cotton, in 1 color:
Golden Nugget (260) – 12 skeins.
- Hook size 3.5mm. Adjust hook size if necessary to obtain correct gauge,
- Tapestry needle (to weave and hide yarn ends),
- Scissors.
Level:
Intermediate – front post stitches.
Sizes:
one size, adjustable: 95cm x 70cm (37.4”x27.6”).

Gauge after blocking:
21 sts and 24 rows = 10 cm x 10 cm using sc.
If necessary, adjust hook size to obtain the correct gauge.
Before you measure, please take the time to block your swatch in the same manner that you will block your blanket.
General Notes:
- The pattern uses US crochet terminology.
- The crochet baby blanket with cables is worked in rows back and forth.
- Pattern is multiple of 44 plus 38 stitches. To increase the width of the blanket, increase the number of chains. To decrease the width of the blanket, decrease the number of chains.
- You can make this blanket as long as you like by adding or substracting pattern repeats.
- You can also use yarn in different weights, but just know that the width will be different depending on your gauge.
- Ch1 at the beginning of each row doesn’t count as a stitch.
- All even rows are single crochet rows and worked in indicated stitches 1 row below.
- All FPdc(s) and FPtr(s) are worked in indicated stitches 2 rows below.
- The number of post stitches is always the same as the number of skipped sts so finally the stitch count is the same (126) in each row.
- STITCHES: When in the instructions you have a stitch followed by a number, eg sc14, this means you have to work 1sc stitch into each of the next 14 sts. When in the instructions you have a number followed by a stitch, eg 2sc, this this means you have to work 2 sc stitches into the next (same) stitch.
- Instructions in square brackets […] are worked as many times as indicated.
- The stitch chart is included in the ad-free printable PDF here on ETSY or here on Ravelry.
- You can find the Progress Pictures/Photo Tutorial below.
Stitches & Abbreviations (US terms):
st(s) – stitch(es)
yo – yarn over
rep – repeat
sp – space
sk – skip
BLsc – back loop single crochet
FPdc – front post double crochet – yo, insert hook from front to back to front around post of indicated stitch; yo and draw up loop; [yo and draw through 2 loop on hook] twice. Skip stitch behind FPdc.
FPtr – front post treble crochet – yo twice, insert hook from front to back to front around post of indicated stitch; yo and draw up loop; [yo and draw through 2 loop on hook] 3 times. Skip stitch behind FPtr.

PATTERN
Read all Notes before you start.
Ribbing 1
With 3.5 mm hook work ch9.
Row 1: sc in second ch from hook, sc in each ch to end. Turn.
Row 2: ch1 (doesn’t count as a sc), BLsc across to end. Turn.
You should have 8 stitches in each row.
Repeat Row 2 124 more times for a total of 126 rows or until desired length.
Remember, this pattern is a multiple of 44 plus 39 stitches, so in your Ribbing 1 section you should have multiple of 44 plus 39 rows.
Don’t break the yarn and rotate your work.
Main Body
In the following Row 1 every stitch will be working in each ribbing’s row.
Row 1: ch1 (doesn’t count as a st), sc in each ribbing row across. Turn. (126sc)
Row 2 and ALL EVEN ROWS: ch 1 (does not count as sc here and throughout), sc in each sts across. Turn. (126 sc)
Row 3: ch1 (does not count as sc here and throughout), sc3, FPdc2 two rows below, sk 2sts behind FPdc(s) just made, sc4, FPdc2 two rows below, sk 2sts behind FPdc(s) just made, sc6, FPdc4 two rows below, sk 4sts behind FPdc(s) just made, sc6, FPdc2 two rows below, sk 2sts behind FPdc(s) just made, sc4, FPdc2 two rows below, sk 2sts behind FPdc(s) just made, [sc4, FPdc4 two rows below, sk 4sts behind FPdc(s) just made, sc4, FPdc2 two rows below, sk 2sts behind FPdc(s) just made, sc4, FPdc2 two rows below, sk 2sts behind FPdc(s) just made, sc6, FPdc4 two rows below, sk 4 sts behind FPdc(s) just made, sc6, FPdc2 two rows below, sk 2sts behind FPdc(s) just made, sc4, FPdc2 two rows below, sk 2sts behind FPdc(s) just made] rep until 3sts remain, sc3. Turn.
Row 5: ch1, sc3, FPdc in next 2 post sts, sk 2sts behind FPdc(s) just made, sc4, FPdc in next 2 post sts, sk 2sts behind FPdc(s) just made, sc6, sk 2 post sts, FPtr in next 2 post sts, working IN FRONT of post sts just made FPtr in 2 skipped post sts, sk 4 sts behind FPdc(s) just made, sc6, FPdc in next 2 post sts, sk 2sts behind FPdc(s) just made, sc4, FPdc in next 2 post sts, sk 2sts behind FPdc(s) just made, [sc4, sk 2 post sts, FPtr in next 2 post sts, working IN FRONT of post sts just made FPtr in 2 skipped post sts, sk 4sts behind FPdc(s) just made, sc4, FPdc in next 2 post sts, sk 2sts behind FPdc(s) just made, sc4, FPdc in next 2 post sts, sk 2sts behind FPdc(s) just made, sc6, skip 2 post sts, FPtr in next 2 post sts, working IN FRONT of post sts just made FPtr in 2 skipped post sts, sk 4sts behind FPdc(s) just made, sc6, FPdc in next 2 post sts, sk 2sts behind FPdc(s) just made, sc4, FPdc in next 2 post sts, sk 2sts behind FPdc(s) just made] rep until 3sts remain, sc3. Turn.
NOTE! From now on, it will be just „sk sts” instead of „sk sts behind FPdc(s) just made”.
Row 7: ch1, sc3, FPdc in next 2 post sts, sk 2sts, sc5, FPdc in next 2 post sts, sk 2sts, sc4, FPdc in next 2 post sts, sk 2sts, sc 2, FPdc in next 2 post sts, sk 2sts, sc4, FPdc in next 2 post sts, sk 2sts, sc5, FPdc in next 2 post sts, sk 2sts, [sc4, FPdc in next 4 post sts, sk 4sts, sc4, FPdc in next 2 post sts, sk 2sts, sc5, FPdc in next 2 post sts, sk 2sts, sc4, FPdc in next 2 post sts, sk 2sts, sc 2, FPdc in next 2 post sts, sk 2sts, sc4, FPdc in next 2 post sts, sk 2sts, sc5, FPdc in next 2 post sts, sk 2sts] rep until 3sts remain, sc3. Turn.
Row 9: ch1, sc3, FPdc in next 2 post sts, sk 2sts, sc6, FPdc in next 2 post sts, sk 2sts, sc 2, FPdc in next 2 post sts, sk 2sts, sc4, FPdc in next 2 post sts, sk 2sts, sc 2, FPdc in next 2 post sts, sk 2sts, sc6, FPdc in next 2 post sts, sk 2sts, [sc4, skip 2 post sts, FPtr in next 2 post sts, working IN FRONT of post sts just made FPtr in 2 skipped post sts, sk 4sts, sc4, FPdc in next 2 post sts, sk 2sts, sc6, FPdc in next 2 post sts, sk 2sts, sc 2, FPdc in next 2 post sts, sk 2sts, sc4, FPdc in next 2 post sts, sk 2sts, sc 2, FPdc in next 2 post sts, sk 2sts, sc6, FPdc in next 2 post sts, sk 2sts] rep until 3sts remain, sc3. Turn.
Row 11: ch1, sc3, FPdc in next 2 post sts, sk 2sts, sc7, FPdc in next 4 post sts, sk 4sts, sc6, FPdc in next 4 post sts, sk 4sts, sc7, FPdc in next 2 post sts, sk 2sts, [sc4, FPdc in next 4 post sts, sk 4sts, sc4, FPdc in next 2 post sts, sk 2sts, sc7, FPdc in next 4 post sts, sk 4sts, sc6, FPdc in next 4 post sts, sk 4sts, sc7, FPdc in next 2 post sts, sk 2sts] rep until 3sts remain, sc3. Turn.
Row 13: ch1, sc3, FPdc in next 2 post sts, sk 2sts, sc7, skip 2 post sts, FPtr in next 2 post sts, working BEHIND post sts just made FPtr in 2 skipped post sts, sk 4sts, sc6, skip 2 post sts, FPtr in next 2 post sts, working IN FRONT of post sts just made FPtr in 2 skipped post sts, sk 4sts, sc7, FPdc in next 2 post sts, sk 2sts, [sc4, skip 2 post sts, FPtr in next 2 post sts, working IN FRONT of post sts just made FPtr in 2 skipped post sts, sk 4sts, sc4, FPdc in next 2 post sts, sk 2sts, sc7, skip 2 post sts, FPtr in next 2 post sts, working BEHIND post sts just made FPtr in 2 skipped post sts, sk 4sts, sc6, skip 2 post sts, FPtr in next 2 post sts, working IN FRONT of post sts just made FPtr in 2 skipped post sts, sk 4sts, sc7, FPdc in next 2 post sts, sk 2sts] rep until 3sts remain, sc3. Turn.
Row 15: ch1, sc3, FPdc in next 2 post sts, sk 2sts, sc6, FPdc in next 2 post sts, sk 2sts, sc 2, FPdc in next 2 post sts, sk 2sts, sc4, FPdc in next 2 post sts, sk 2sts, sc 2, FPdc in next 2 post sts, sk 2sts, sc6, FPdc in next 2 post sts, sk 2sts, [sc4, FPdc in next 4 post sts, sk 4sts, sc4, FPdc in next 2 post sts, sk 2sts, sc6, FPdc in next 2 post sts, sk 2sts, sc 2, FPdc in next 2 post sts, sk 2sts, sc4, FPdc in next 2 post sts, sk 2sts, sc 2, FPdc in next 2 post sts, sk 2sts, sc6, FPdc in next 2 post sts, sk 2sts] rep until 3sts remain, sc3. Turn.
Row 17: ch1, sc3, FPdc in next 2 post sts, sk 2sts, sc5, FPdc in next 2 post sts, sk 2sts, sc4, FPdc in next 2 post sts, sk 2sts, sc 2, FPdc in next 2 post sts, sk 2sts, sc4, FPdc in next 2 post sts, sk 2sts, sc5, FPdc in next 2 post sts, sk 2sts, [sc4, skip 2 post sts, FPtr in next 2 post sts, working IN FRONT of post sts just made, FPtr in 2 skipped post sts, sk 4sts, sc4, FPdc in next 2 post sts, sk 2sts, sc5, FPdc in next 2 post sts, sk 2sts, sc4, FPdc in next 2 post sts, sk 2sts, sc 2, FPdc in next 2 post sts, sk 2sts, sc4, FPdc in next 2 post sts, sk 2sts, sc5, FPdc in next 2 post sts, sk 2sts] rep until 3sts remain, sc3. Turn.
Row 19: ch1, sc3, FPdc in next 2 post sts, sk 2sts, sc4, FPdc in next 2 post sts, sk 2sts, sc6, FPdc in next 4 post sts, sk 4sts, sc6, FPdc in next 2 post sts, sk 2sts, sc4, FPdc in next 2 post sts, sk 2sts, [sc4, FPdc in next 4 post sts, sk 4sts, sc4, FPdc in next 2 post sts, sk 2sts, sc4, FPdc in next 2 post sts, sk 2sts, sc6, FPdc in next 4 post sts, sk 4sts, sc6, FPdc in next 2 post sts, sk 2sts, sc4, FPdc in next 2 post sts, sk 2sts] rep until 3sts remain, sc3. Turn.
Row 21: Repeat Row 5
Row 23: Repeat Row 7
Row 25: Repeat Row 9
Row 27: Repeat Row 11
Row 29: ch1, sc3, FPdc in next 2 post sts, sk 2sts, sc7, skip 2 post sts, FPtr in next 2 post sts, working IN FRONT of post sts just made FPtr in 2 skipped post sts, sk 4sts, sc6, skip 2 post sts, FPtr in next 2 post sts, working BEHIND post sts just made FPtr in 2 skipped post sts, sk 4sts, sc7, FPdc in next 2 post sts, sk 2sts, [sc4, skip 2 post sts, FPtr in next 2 post sts, working IN FRONT OF post sts just made, FPtr in 2 skipped post sts, sk 4sts, sc4, FPdc in next 2 post sts, sk 2sts, sc7, skip 2 post sts, FPtr in next 2 post sts, working IN FRONT of post sts just made FPtr in 2 skipped post sts, sk 4sts, sc6, skip 2 post sts, FPtr in next 2 post sts, working BEHIND of post sts just made FPtr in 2 skipped post sts, sk 4sts, sc7, FPdc in next 2 post sts, sk 2sts] rep until 3sts remain, sc3. Turn.
Row 31: Repeat Row 15
Row 33: Repeat Row 17
Row 35: Repeat Row 19
Row 37: Repeat Row 5
Row 39: Repeat Row 19
Row 41: Repeat Row 5
Row 43: Repeat Row 19
Row 45: Repeat Row 5
Row 47: Repeat Row 19
Row 49: Repeat Row 5
Row 51: Repeat Row 19
Row 53: Repeat Row 5
Row 55: Repeat Row 19
Row 57: Repeat Row 5
Row 59: Repeat Row 19
Next, Repeat Rows 4 – 59 two more times (or until desired lenght).
Then, Repeat Rows 4 – 39.
Last Row: ch1, sc in each st across.
Don’t break the yarn.
Ribbing 2
This ribbing 2 is worked in rows and attached to the top edge of main body as you go. Continue with 3.5mm hook.
Row 1: ch9, starting with 2nd ch from hook, work 1 sc in each ch back to top edge of main body. Join to the next st of the top edge of main body using slst and work one more slst in the next st of main body (2 slst(s) in total for joining) plus make ch1. Turn.
Row 2: Starting from 4 st from hook, work BLsc in each st across to end. Turn.
Row 3: ch1 (does not count as a st), BLsc in each st across [8sts]. Join to the next st of the top edge of main body using slst and work one more slst in the next st of main body (2 slst(s) in total for joining) plus make ch1. Turn.
Repeat Rows 2-3 until your ribbing is joined to the entire top edge.
Don’t break the yarn.
Detailed photo tutorial on how to add a crochet ribbing to your project you can find HERE.

Ribbing 3
This Ribbing 3 is worked in rows and attached to the longer side of the main body as you go. Continue with 3.5mm hook.
Row 1: ch9, starting with 2nd ch from hook, work 1 sc in each ch back to side edge of main body. Join to the next st of the side edge of main body using slst and work one more slst in the next st of main body (2 slst(s) in total for joining) plus make ch1. Turn.
Row 2: Starting from 4 st from hook, work BLsc in each st across to end. Turn.
Row 3: ch1 (does not count as a st), BLsc in each st across [8sts]. Join to the next st of the side edge of main body using slst and work one more slst in the next st of main body (2 slst(s) in total for joining) plus make ch1. Turn.
Repeat Rows 2-3 until your ribbing is joined to the entire side edge.
Fasten off yarn.
Ribbing 4
This Ribbing 4 is worked in rows and attached to the second longer side of the main body as you go. Continue with 3.5mm hook.
With Right Side facing you, attach yarn in bottom right corner.
Row 1: ch9, starting with 2nd ch from hook, work 1 sc in each ch back to side edge of main body. Join to the next st of the side edge of main body using slst and work one more slst in the next st of main body (2 slst(s) in total for joining) plus make ch1. Turn.
Row 2: Starting from 4 st from hook, work BLsc in each st across to end. Turn.
Row 3: ch1 (does not count as a st), BLsc in each st across [8sts]. Join to the next st of the side edge of main body using slst and work one more slst in the next st of main body (2 slst(s) in total for joining) plus make ch1. Turn.
Repeat Rows 2-3 until your ribbing is joined to the entire side edge.
Fasten off yarn, weave in all ends and block your blanket.
If you have any suggestions or have detected any mistakes, please feel free to email me at mycrochetory@gmail.com .
Oh my , love this blanket. Thank you. Can’t wait to start one.
How much yarn is needed?
Approx. 1800m