Updated: 9 March 2026 by Sylwia (MyCrochetory)
At first glance, this crochet wave blanket pattern might look a little complicated.
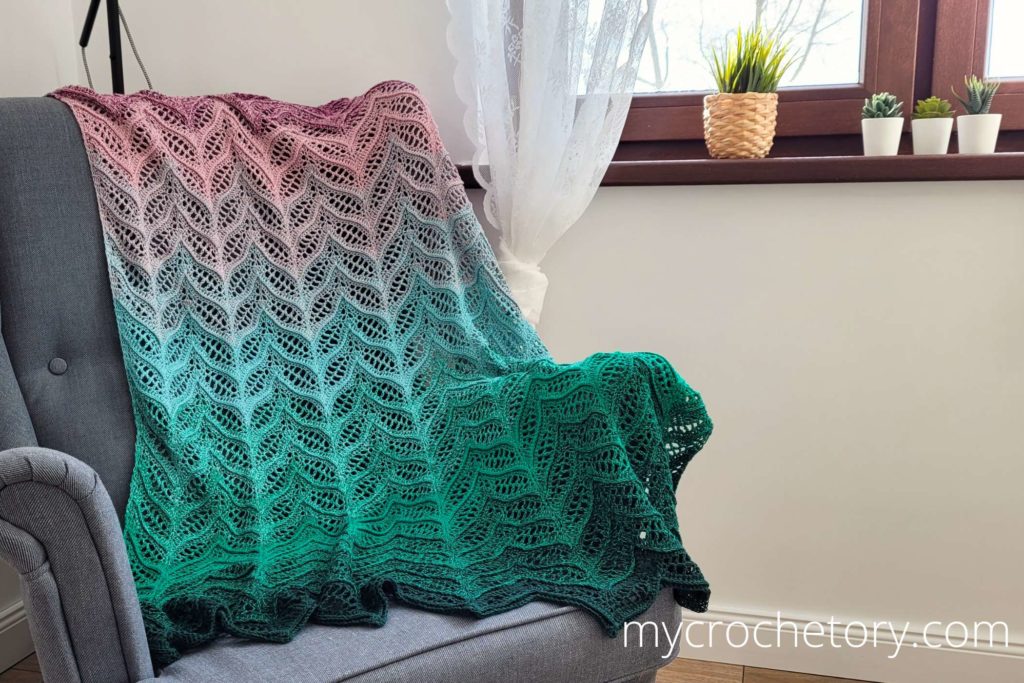
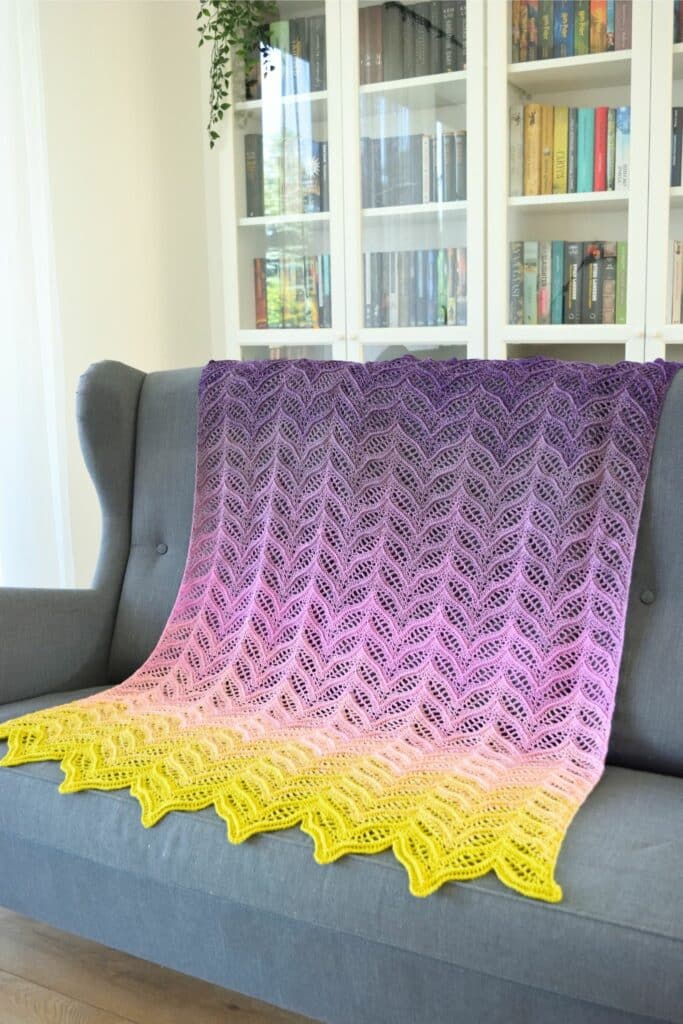
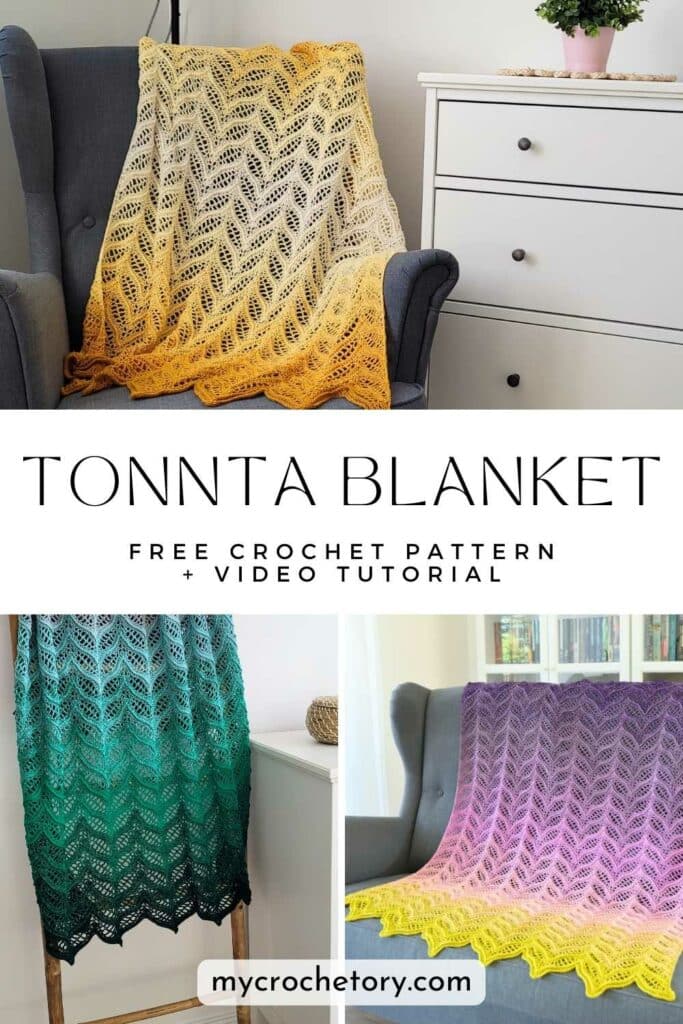
When you first see the Tonnta Blanket, your eyes immediately notice the zigzag waves. The peaks, the valleys, and those little lace spaces between stitches give it a lot of texture. It’s the kind of blanket that makes you think every row must be doing something completely different.
But that’s not actually the case.
In reality, the whole design is built around just four rows.
Once you work through those four rows the first time, you simply go back to the beginning and work through them again. And then again after that. As you keep repeating the same small sequence, the pattern slowly starts to make sense. The peaks begin lining up, the valleys appear where you expect them, and the waves stretch across the blanket almost without you noticing.
The idea for the Tonnta Blanket actually goes back to my Kalinda Shawl. That design has been around for about eight years now, and thousands of crocheters have made their own versions of those flowing waves. I still get photos of finished shawls from time to time, and honestly, it never gets old seeing them.
At some point I started thinking about that stitch pattern again.
What if those same waves turned into a ripple blanket?
That simple idea eventually led to the Tonnta Blanket. It has the same relaxing wave pattern, just spread out across a cozy blanket that’s perfect for the couch.
And at the heart of it all is still the same simple idea: a small sequence of four rows that repeat again and again, slowly building those soft waves across the entire blanket.
Before we get into the pattern itself, it helps to understand what actually creates those waves.
Scroll down to see the Tonnta Colorful Crochet Blanket free pattern with VIDEO TUTORIAL or you may choose to purchase the ad-free, printable PDF crochet pattern with stitch chart HERE on ETSY or HERE on Ravelry.

How This Crochet Wave Blanket Pattern Works
When you first look at a wave blanket, the ripple shape is usually the first thing that catches your eye. The stitches rise into little peaks and then dip down again, creating that soft zigzag line running across the row.
It might look fancy at first, but the structure behind it is actually pretty straightforward.
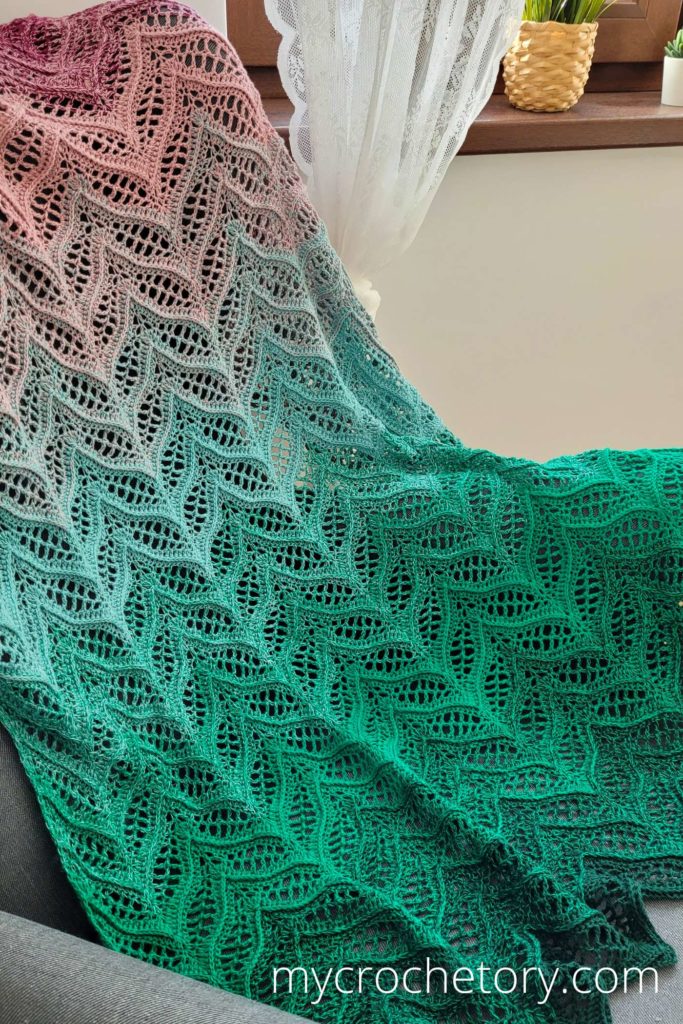
In this crochet wave blanket pattern, the waves come from a simple mix of increases and decreases. In some spots you’ll work several stitches into the same space, which gives the fabric extra room and forms the higher peaks. In other spots, stitches are worked together, gently pulling the fabric inward and creating the valleys.
As those sections repeat across the row, the ripple shape starts forming naturally.
One thing I really like about this pattern is that it uses stitches most crocheters already know. You’ll work single crochet, half double crochet, double crochet, treble crochet, and chain stitches. Because each stitch has a slightly different height, they create that smooth rise and fall that gives the blanket its wave texture.
As the rows build up, the structure becomes easier to see. The peaks begin lining up, the valleys appear right where you expect them, and the ripple slowly spreads across the blanket.
Why a 4 Row Repeat Blanket Is So Hard to Put Down
There’s a reason so many crocheters love a crochet blanket with a 4 row repeat.
Projects like this quickly fall into a rhythm.
You work through the rows, turn your blanket, start again, and before long the movement of the stitches becomes familiar. The pattern stops feeling like instructions and starts feeling more like a steady flow.
That’s what makes a crochet wave blanket pattern like this one so enjoyable to work on.
Instead of constantly studying the pattern, you begin recognizing what comes next. Your hands move through the stitches while the blanket slowly grows across your lap.
It’s also the kind of project that shows progress in a really satisfying way. Each repeat adds another section of ripple, and the blanket gradually stretches wider with every set of rows.
That steady rhythm is exactly what makes this style of crochet ripple blanket pattern so appealing for longer projects like blankets.
Yarn Choices for This Crochet Wave Blanket Pattern
Yarn can completely change how a blanket like this turns out.
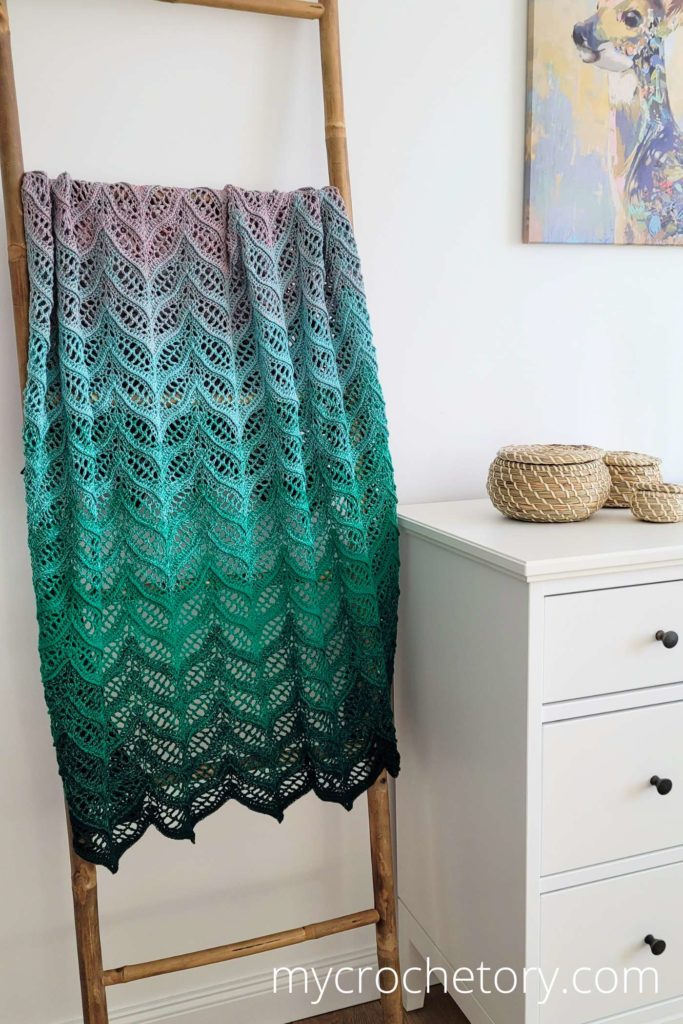
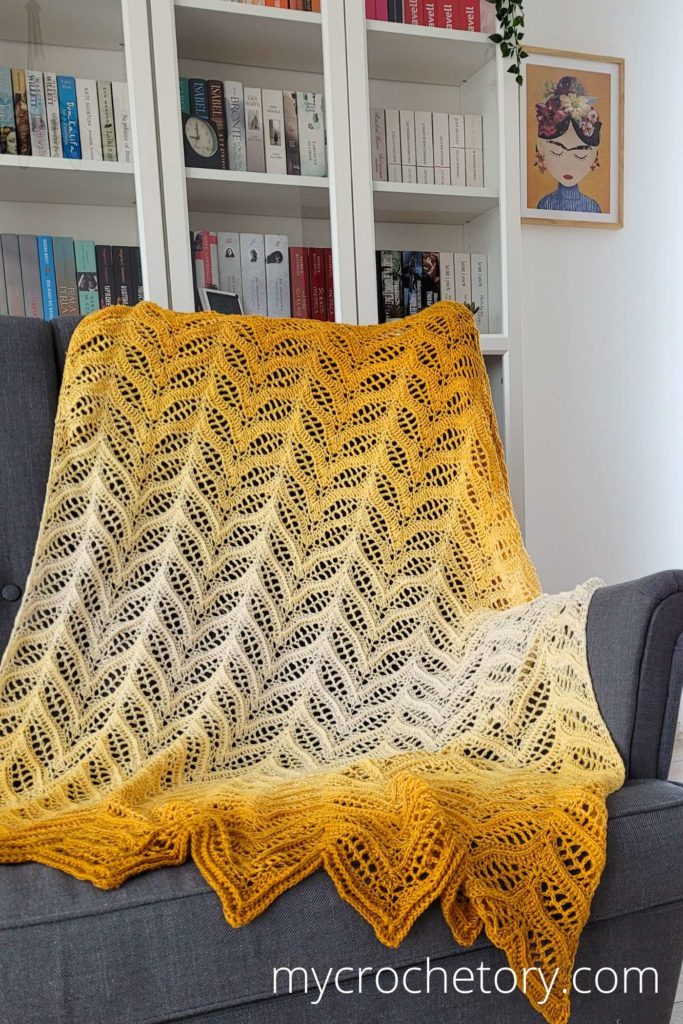
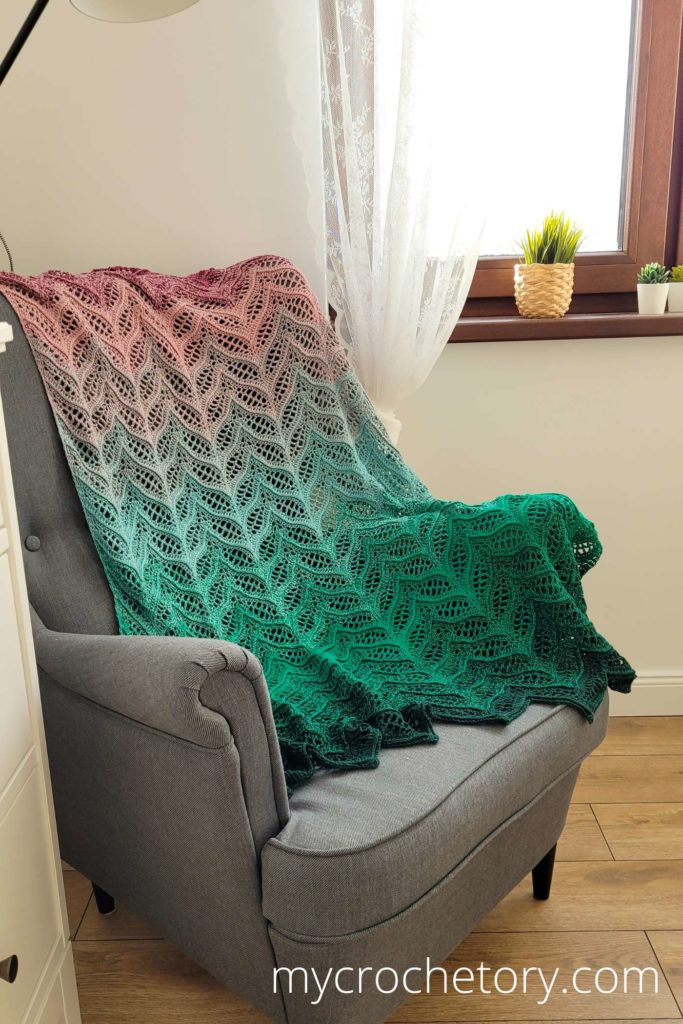
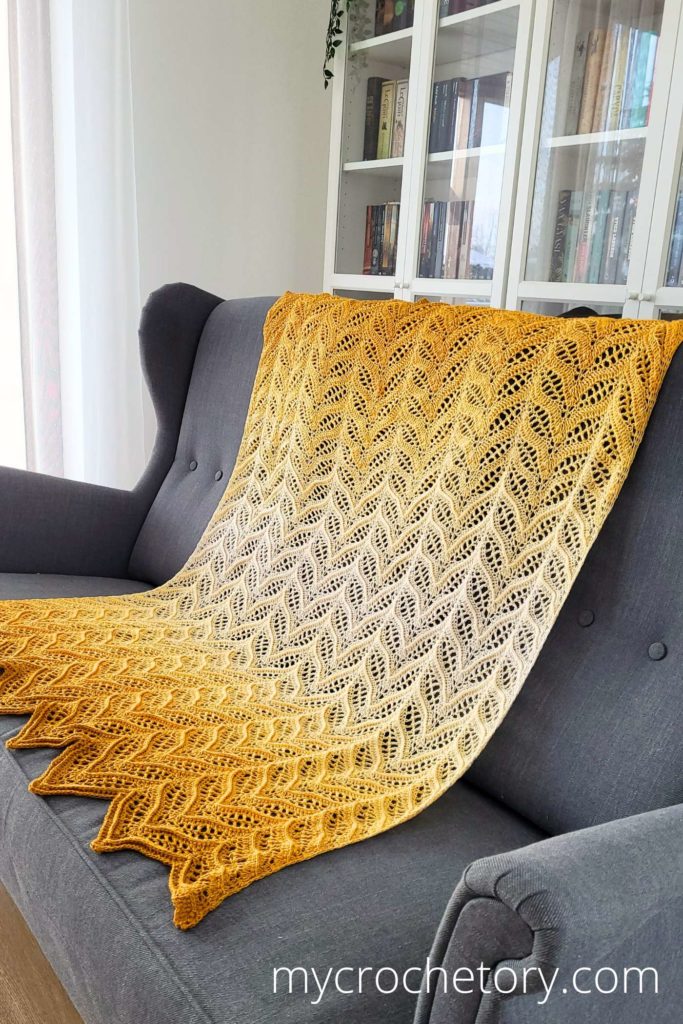
For my Tonnta Blanket, I chose a gradient yarn cake, and I really love how the colors slowly shift across the waves. When the shades move from one color to the next, the ripple pattern becomes even more noticeable because each wave shows a slightly different tone.
It’s one of those small details that makes a big visual difference.
That said, this crochet wave blanket pattern works beautifully with several yarn styles. Gradient yarn highlights the movement of the waves, but solid colors can create a very elegant look as well. If you prefer a more classic blanket, a single color lets the texture of the stitches stand out without any color changes.
Another option many crocheters enjoy is using soft color transitions or gentle stripes. Those can make the ripple effect even more playful, especially in a lightweight crochet blanket pattern like this one.
The yarn weight also affects how the blanket feels. Fingering weight yarn creates a lighter blanket with a lot of drape, which works especially well for a ripple design. The waves stay soft and flexible instead of feeling heavy or stiff.
No matter which yarn you choose, the repeating waves will still be the star of the project.
How to Adjust the Size of This Crochet Wave Blanket
One thing I always appreciate in a blanket project is a little flexibility with the size. Sometimes you start crocheting and realize you’d love the blanket to be a bit wider, or maybe a little longer for extra drape.
With this crochet wave blanket pattern, adjusting the size is quite simple because the waves follow a repeating stitch sequence.
The pattern is worked in a multiple of 40 plus 5 stitches. That means you can easily change the width of the blanket before you begin. If you would like a wider blanket, simply start with more chains while keeping that stitch multiple. If you prefer a narrower version, start with fewer chains.
The ripple pattern will still form correctly as long as that multiple is maintained.
The length is even easier to adjust. Since the design grows through repeating rows, you can make the blanket as long as you like by adding or subtracting pattern repeats. Some crocheters prefer a smaller throw that fits nicely on the couch, while others enjoy letting the blanket grow a bit longer so it drapes comfortably over the bed.
That flexibility is one of the reasons many crocheters enjoy working with crochet ripple blanket patterns. Once the waves are established, the blanket can grow naturally while still keeping the same structure across the rows.
Helpful Crochet Tutorials Before You Start
Even though this blanket uses familiar stitches, it can still help to review a few basic techniques before you begin.
This crochet wave blanket pattern combines several common stitches, each with a slightly different height. When those stitches work together across the row, they create the smooth rise and fall that forms the ripple shape of the blanket.
If you would like a quick refresher, these tutorials may be helpful before starting the project:
• how to work foundation single crochet (FSC)
• how to join yarn ends neatly (4 WAYS!)
• a guide to beginning crochet stitches
• a collection of free crochet tutorials for beginners
These tutorials walk through the stitches step by step, so you can feel comfortable with the techniques used in the blanket.
Once those stitches feel familiar, the repeating structure of the pattern becomes much easier to follow and the waves start forming naturally across the rows.
Other Crochet Blanket Patterns You Might Like
Finishing a blanket often leads to a funny moment.
You fold it, admire those waves for a minute… and then your brain immediately goes, “Okay, what should I crochet next?”
If you enjoy projects like this crochet wave blanket pattern, chances are you’ll have fun exploring a few other blanket designs too. I always like switching between different textures and stitch styles. It keeps things interesting while still giving you that relaxing rhythm that blanket projects are known for.
Here are a few blanket patterns from my blog that readers often enjoy working on:
• Kalinda Crochet Blanket – if you like the flowing wave look, this design continues that idea in a beautiful blanket version.
• Thassos Mosaic Crochet Blanket – a bold mosaic pattern with strong texture and a striking geometric feel.
• Carina Rectangle Crochet Blanket – a clean and modern blanket that focuses on stitch texture rather than color changes.
• Cable Crochet Diamond Blanket – a cozy design that highlights raised cable stitches across the fabric.
• Granny Pinwheel Blanket – a playful blanket built from spinning granny-style motifs.
• Clamshell Stitch Square Crochet Blanket – a soft shell pattern that creates a lovely layered texture.
Each one has its own personality, but they all share the same thing many crocheters love about blanket projects: steady progress, satisfying texture, and something cozy to enjoy when it’s finished.
If you’re ready to start crocheting, you can scroll down to the Tonnta Colorful Crochet Blanket free pattern below.
If you want to share your wips and finished Tonnta Colorful Crochet Blanket on social media, please, use hashtag #mycrochetory. I love to see your finished project!
TONNTA CROCHET BLANKET FREE PATTERN
- Purchase the ad-free, printable PDF with STITCH CHART here on ETSY or here on Ravelry.
- Add this pattern to your Ravelry Queue HERE.
- Pin it for later.
Copyright 2023–2026 MyCrochetory. All rights reserved. This pattern is the property of Sylwia Kawczyńska @MyCrochetory. Please DO NOT sell this pattern or claim it as your own.
This pattern is for personal use only and may not be translated or reproduced in another language. Please respect my rights and DO NOT share or publish this pattern anywhere without my permission.
The blanket you make using this pattern is yours and you are welcome to sell it, as long as you credit MyCrochetory as the original designer.
For more information, please read the Terms Page.
Pattern Summary
This crochet wave blanket pattern creates soft zigzag waves across the fabric using a repeating four-row sequence.
The blanket is worked flat in rows and combines several basic crochet stitches to build the ripple texture. Because the pattern repeat is consistent, the waves begin lining up naturally as the blanket grows.
The finished blanket measures approximately 100 cm x 130 cm (39.5” x 51”) after blocking, but the size can easily be adjusted by adding or subtracting pattern repeats.
This pattern is best suited for intermediate crocheters who are comfortable working with different stitch heights and repeating stitch sequences.
The design uses fingering weight yarn, which gives the blanket a lightweight feel and beautiful drape.
Materials & Tools:
- Yarn Requirements: Fingering weight yarn, approx. 2000 m.
Suggested Yarn: KOKONEK Classic, 50% cotton, 50% acrylic.
First sample made using THIS colorway, and the second one made using THIS colorway.
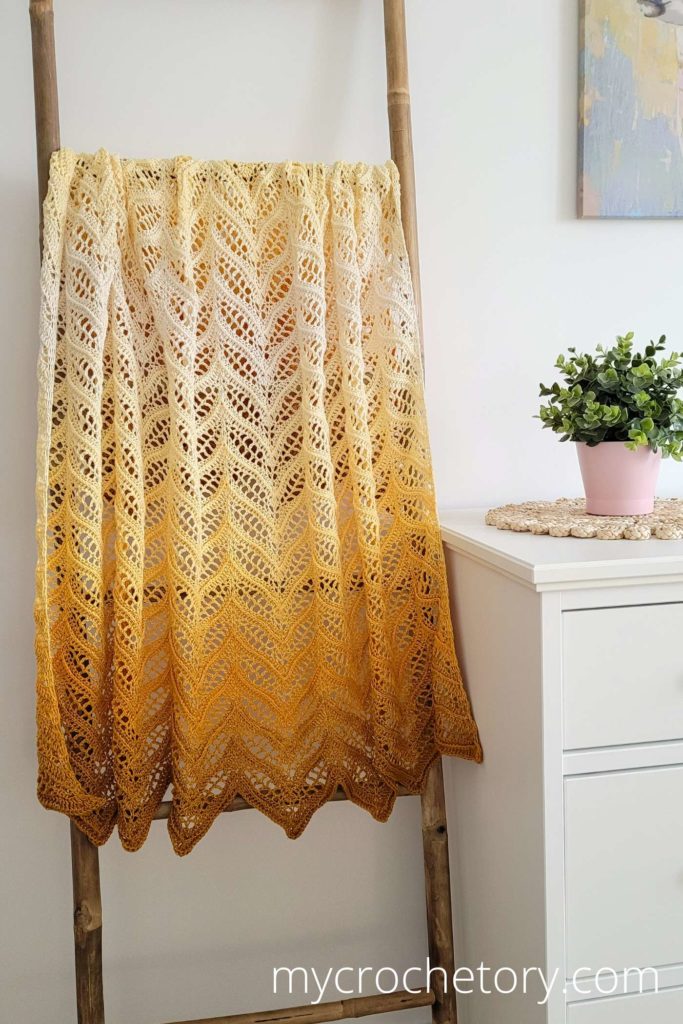
For my first version (the green one) of this blanket I used one 2000 meters yarn cake, and for the second one (the yellow one) I decided to use two 1000meters yarn cakes.
- Hook size 4 mm. Adjust hook size if necessary to obtain correct gauge.
- Tapestry needle (to weave and hide yarn ends).
- Scissors.
Level:
Intermediate.
Gauge after blocking:
For a swatch of 85 chains and 24 rows the length is 30 cm/12” and the width is 30 cm/12”.
Gauge is not crucial for this project. However, changes might result in a different yardage requirements and the finished size.
Size after blocking:
One size, adjustable: 100 cm x 130 cm (39.5” x 51”)
Notes:
- The pattern uses US terminology.
- The blanket is worked back and forth, in rows.
- Pattern multiple of 40 plus 5 stitches. To increase the width of the blanket, increase the number of chains. To decrease the width of the blanket, decrease the number of chains.
- You can make this blanket as long as you like by adding or subtracting pattern repeats.
- You can use yarn in different weights, but be aware that the measurements will be different depending on your gauge.
- Stitch count remains the same at the end of each row.
- Turning chains count as stitches where noted in the pattern.
- Rows 3–6 form the main pattern repeat.
- Blocking helps open the lace pattern and smooth the ripple shape.ok
Stitches & Abbreviations (US terms):
st – stitch
FPdc – front post double crochet
yo – yarn over
sk – skip
beg – beginning
prev – previous
rep – repeat
sp – space
Fsc – foundation single crochet
dc3tog (double crochet 3 together) – [yo, insert hook in indicated st, yo, draw up a loop, yo, pull through 2 loops] three times, yo, pull through all 4 loops on hook.
dc5tog (double crochet 5 together) – [yo, insert hook in indicated st, yo, draw up a loop, yo, pull through 2 loops] five times, yo, pull through all 6 loops on hook.
FPdc3tog (front post double crochet 3 together) – [yo, insert hook from the front to the back and back to the front, around indicated st, yo, draw up a loop, yo, pull through 2 loops] three times, yo, pull through all 4 loops on hook.
FPdc5tog (front post double crochet 5 together) – [yo, insert hook from the front to the back and back to the front, around indicated st, yo, draw up a loop, yo, pull through 2 loops] five times, yo, pull through all 6 loops on hook.
Instructions in square brackets […] are worked as many times as indicated.
TONNTA CROCHET BLANKET VIDEO TUTORIAL
Would you like a little help along the way? Use this video tutorial and make your Tonnta Colorful Crochet Blanket successfully.
TIP: To view these video tutorials properly, please disable any ad-blocker you have running.
Before we get into the full instructions, a quick note.
If you prefer crocheting from a printable pattern with a stitch chart, the ad-free PDF version of the Tonnta Blanket is available in my Etsy and Ravelry shops.
Many crocheters like having the PDF open on a tablet or printed next to them while they work.
Alright, let’s get into the stitches.
PATTERN
Read all Notes before you start.
Chain 286 or any other multiple of 40 plus 6 chains.
You can also start with Fsc 285 (or any other multiple of 40 plus 5) and skip to Row 2.
Row 1: sc in 2nd ch from hook, sc in each ch across to end. Turn.
Row 2: ch3 (counts as dc), dc in next st, dc3tog, dc in next 17sts, (2dc, ch1, 2dc) in next st, dc in next 17sts, [dc5tog, dc in next 17sts, (2dc, ch1, 2dc) in next st, dc in next 17sts] rep […] across until 5sts remain, dc3tog, dc in next 2sts. Turn.
Row 3: ch3 (counts as dc), FPdc in next st, FPdc3tog, FPdc in next 17sts, (2dc, ch1, 2dc) in next ch-1sp, FPdc in next 17sts, [FPdc5tog, FPdc in next 17sts, (2dc, ch1, 2dc) in next ch-1sp, FPdc in next 17sts] rep […] across until 5sts remain, FPdc3tog, FPdc in next st, dc in 3rd ch of ch3 at beg of prev row. Turn.
Row 4: ch1 (doesn’t count as st), sc in first st, sc in next 2sts, ch1, sk next 3sts, sc in next st, ch1, sk next st, sc in next st, ch1, sk next st, hdc in next st, ch1, sk next st, dc in next st, ch1, sk next st, tr in next st, ch1, sk next st, tr in next st, ch1, sk next st, dc in next st, ch1, sk next st, hdc in next st, ch1, sk next st, (sc, ch1, sc, ch1, sc) in next ch-1sp, ch1, sk next st, hdc in next st, ch1, sk next st, dc in next st, ch1, sk next st, tr in next st, ch1, sk next st, tr in next st, ch1, sk next st, dc in next st, ch1, sk next st, hdc in next st, ch1, sk next st, sc in next st, ch1, sk next st, sc in next st, ch1, sk next 3sts, [sc in next st, ch1, sk next 3sts, sc in next st, ch1, sk next st, sc in next st, ch1, sk next st, hdc in next st, ch1, sk next st, dc in next st, ch1, sk next st, tr in next st, ch1, sk next st, tr in next st, ch1, sk next st, dc in next st, ch1, sk next st, hdc in next st, ch1, sk next st, (sc, ch1, sc, ch1, sc) in next ch-1sp, ch1, sk next st, hdc in next st, ch1, sk next st, dc in next st, ch1, sk next st, tr in next st, ch1, sk next st, tr in next st, ch1, sk next st, dc in next st, ch1, sk next st, hdc in next st, ch1, sk next st, sc in next st, ch1, sk next st, sc in next st, ch1, sk 3sts] rep […] across until 3sts remain, sc in next 3sts. Turn.
Row 5: ch1 (doesn’t count as st), sc in first st, sc in next 2sts, ch1, sk next ch-1sp, sk next sc, sk next ch-1sp, sc in next sc, ch1, sk next ch-1sp, hdc in next hdc, ch1, sk next ch-1sp, dc in next dc, ch1, sk next ch-1sp, tr in next tr, ch1, sk next ch-1sp, tr in next tr, ch1, sk next ch-1sp, dc in next dc, ch1, sk next ch-1sp, hdc in next hdc, ch1, sk next ch-1sp, sc in next sc, ch1, sk next ch-1sp, (sc, ch1, sc, ch1, sc) in next sc, ch1, sk next ch-1sp, sc in next sc, ch1, sk next ch-1sp, hdc in next hdc, ch1, sk next ch-1sp, dc in next dc, ch1, sk next ch-1sp, tr in next tr, ch1, sk next ch-1sp, tr in next tr, ch1, sk next ch-1sp, dc in next dc, ch1, sk next ch-1sp, hdc in next hdc, ch1, sk next ch-1sp, sc in next sc, ch1, sk next ch-1sp, sk next sc, sk next ch-1sp, [sc in next sc, ch1, sk next ch-1sp, sk next sc, sk next ch-1sp, sc in next sc, ch1, sk next ch-1sp, hdc in next hdc, ch1, sk next ch-1sp, dc in next dc, ch1, sk next ch-1sp, tr in next tr, ch1, sk next ch-1sp, tr in next tr, ch1, sk next ch-1sp, dc in next dc, ch1, sk next ch-1sp, hdc in next hdc, ch1, sk next ch-1sp, sc in next sc, ch1, sk next ch-1sp, (sc, ch1, sc, ch1, sc) in next sc, ch1, sk next ch-1sp, sc in next sc, ch1, sk next ch-1sp, hdc in next hdc, ch1, sk next ch-1sp, dc in next dc, ch1, sk next ch-1sp, tr in next tr, ch1, sk next ch-1sp, tr in next tr, ch1, sk next ch-1sp, dc in next dc, ch1, sk next ch-1sp, hdc in next hdc, ch1, sk next ch-1sp, sc in next sc, ch1, sk next ch-1sp, sk next sc, sk next ch-1sp] rep […] across until 3sts remain, sc in next 3sts. Turn.
Row 6: ch3 (counts as dc), dc in next st, dc3tog (working 1st leg in next sc, 2nd leg in next ch-1sp and 3rd leg in next sc), dc in next 17sts*, (2dc, ch1, 2dc) in next sc, dc in next 17sts*, [dc5tog (1st leg in next sc, 2nd leg in next ch-1sp, 3rd leg in next sc, 4th leg in next ch-1sp and 5th leg in next sc), dc in next 17sts*, (2dc, ch1, 2dc) in next sc, dc in next 17sts*] rep […] across until 5sts remain, dc3tog (1st leg in next sc, 2nd leg in next ch-1sp, 3rd leg in next sc), dc in next 2sts. Turn.
*ch-1sp counts as a stitch
Next, repeat Rows 3 – 6 until row 102 or until desired length.
Next row: Rep Row 3.
Last row: ch1 (doesn’t count as st), sc in first st, sc in each st and ch-1sp across until last stitch remain, sc in 3rd ch of ch3 at beg of prev row.
Fasten off yarn, weave in all ends and block to shape.
If you have any suggestions or have detected any mistakes, please feel free to email me at mycrochetory@gmail.com
I hope you enjoyed making the Tonnta Crochet Wave Blanket.
If you’d like to keep the pattern for later or work from a clean layout, you can also get the printable PDF with the stitch chart in my Etsy and Ravelry shops.
And if you make your own Tonnta Blanket, I’d love to see it.
Feel free to share your project and tag #mycrochetory so I can take a look.
FAQ
What is a crochet wave blanket pattern?
A crochet wave blanket pattern creates that soft ripple shape you see running across the blanket. The waves appear because some stitches are worked together while other spots add extra stitches. Those little changes create the peaks and valleys that form the zigzag line.
Once that sequence repeats across the row, the ripple shape starts showing up naturally. It’s one of those stitch patterns that looks fancy but is really built from a simple rhythm that repeats again and again.
How many chains do you need to start a crochet wave blanket?
That depends on the stitch repeat used in the pattern.
For the Tonnta Blanket, the pattern is worked in multiples of 40 stitches plus 5. That means you can easily make the blanket wider or narrower by adding or removing full repeats when you make the starting chain.
Some crocheters also prefer starting with foundation single crochet instead of a long chain. If you like that method, you can see the step by step tutorial here:
https://mycrochetory.com/how-to-foundation-single-crochet-fsc/
What yarn works best for a crochet ripple blanket?
Ripple blankets really shine when the yarn has nice drape and clear stitch definition. Fingering weight yarn works beautifully for this pattern because it lets the lace details show clearly and keeps the blanket lightweight.
Gradient yarn cakes are also a fun option. As the color slowly changes, the waves start spreading across the blanket and the color shifts follow the ripple pattern in a really satisfying way.
Is a crochet wave blanket hard to make?
At first glance, ripple blankets can look a little intimidating. The stitches move up and down across the row, and the lace sections make the pattern look more complex than it actually is.
But once you work through the first repeat, the structure starts making sense. The peaks begin appearing in the same spots, the valleys line up row after row, and the pattern settles into a steady rhythm.
After a while, your hands start recognizing the sequence and the waves grow across the blanket almost without thinking about it.
This blanket Is so beautiful, I can not stop looking at it.
Wow!
These would be gorgeous curtain panels. It is a beautiful pattern!
I am obsessed with this pattern and can’t wait to try it! Does anyone know if you can find this yarn in North America? I’m in Canada and the link for the yarn is in Poland. ☹️ Thanks for your help!
Your patterns are beautiful, this one in the colors shown is exquisite!
The directions look involved but are very simple to follow, thank you for making this beautiful pattern available.
Do you think a 2 weight or would 3 weight yarn be ok to use and keep in pattern.
Thank you, you are very talented.