Updated: 5 June 2026 by Sylwia (MyCrochetory)
Many picot stitch tutorials make the technique seem easy, but when you try it, you might see a tiny loop, not know where to put your hook, and wonder why your crochet picot stitch doesn’t look like the neat bump in the picture. This is a common problem for people learning crochet picot for beginners.
Changing where you place your hook when making a picot stitch can really change how it looks. The usual method can leave small gaps, but another way, like the perfect picot stitch crochet method, gives you a cleaner, neater finish. This is especially useful for decorative crochet stitches and when you want a beautiful crochet edging stitch.
In this picot stitch tutorial, I’ll walk you through my favorite way to crochet the picot stitch step by step for beginners. You’ll learn how to make neat picot stitch crochet, avoid common issues, and see why this method works well for crochet picot edging, lace, and borders. If you want the best way to crochet picot stitch without gaps, this guide will show you how.
If your picots sometimes look uneven, too loose, or not as sharp as you want, this guide will help. By the end, you’ll know how to fix uneven picot stitches, how to crochet picots on borders and edges, and feel more confident adding this classic crochet edging stitch to your projects.
Want to keep this tutorial handy for later? Save it to Pinterest now so you can easily find it again when you’re ready to add picots to a project.
Why Your Picot Stitch Might Not Look Quite Right
A picot stitch looks simple enough. A few chains, one small join, and you’re done. Yet it’s surprisingly common to end up with picots that look uneven, oversized, or slightly disconnected from the edge.
In many cases, the issue isn’t tension or experience. It’s the method. Most crocheters learn the traditional version first because that’s what appears in many patterns and tutorials. It works perfectly well, but it can sometimes leave a visible gap at the base of the picot.
This is why I like to use a different approach.
In this tutorial, I’ll show you how to crochet picot stitch the way I do it in my own projects. You’ll see where to insert your hook, how to keep your picots looking more consistent, and why this simple trick makes them look so much better, especially if you want a crochet picot stitch tutorial with pictures.
If neat finishing details are something you’re working on, you may also find my tutorial on how to crochet straight edges every time helpful. A well-shaped edge provides the perfect foundation for decorative stitches like picots.
What Is a Picot Stitch in Crochet?
A picot stitch is a small decorative element worked along the edge of crochet fabric. It’s created by making a short chain and joining it back into a stitch to form a tiny loop or point.
You’ll often see crochet picot edging used on shawls, blankets, garments, lace projects, and crochet squares. Depending on the pattern, picots can be spaced apart for a subtle effect or worked all along the edge to create a decorative border. If you’re looking for a crochet picot edging tutorial or want to learn how to crochet picots on borders and edges, these techniques will add a professional finish to your work.
One reason this stitch remains so popular is its versatility. It adds texture and visual interest without adding much height or bulk. Even a simple row of picots can give an edge a more finished look while keeping the focus on the main stitch pattern.
Where You’ll See Picots Most Often
After learning this stitch, it’s hard not to notice it on crochet projects everywhere.
Picots are especially common on shawls and lace designs, where they add a decorative finish without making the edge feel heavy. They’re also popular on blankets, garments, crochet squares, and accessories.
What I like most about picots is that they can look completely different depending on the project. On a lace shawl, they add a delicate touch. On a blanket border, they create texture and definition. On a garment, they can turn a simple edge into a small design feature.
If you’d like to see how decorative edging can change the look of a finished project, take a look at the Aprilace Shawl, Eira Shawl, and Norra Shawl patterns. Picots also work beautifully alongside many of the techniques featured in my collection of easy crochet borders and 60 free crochet square patterns.
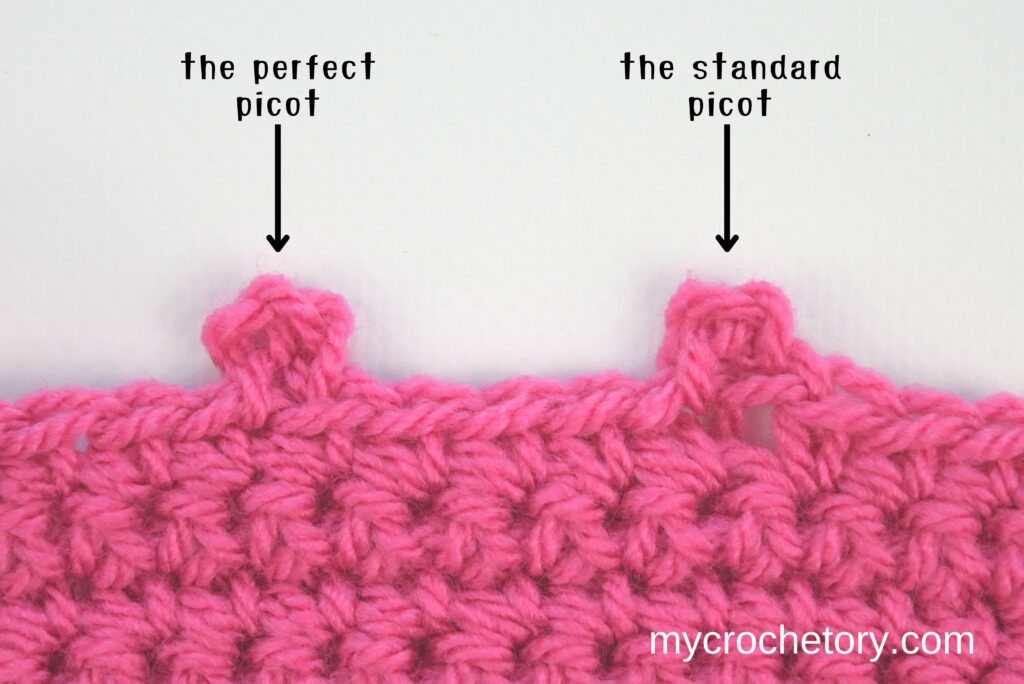
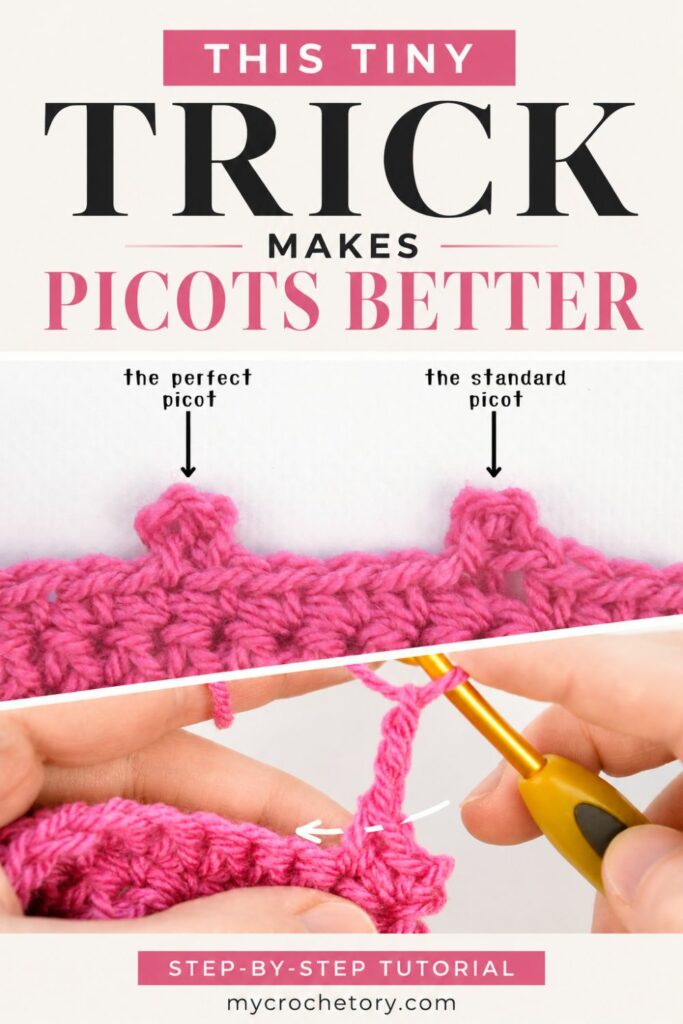
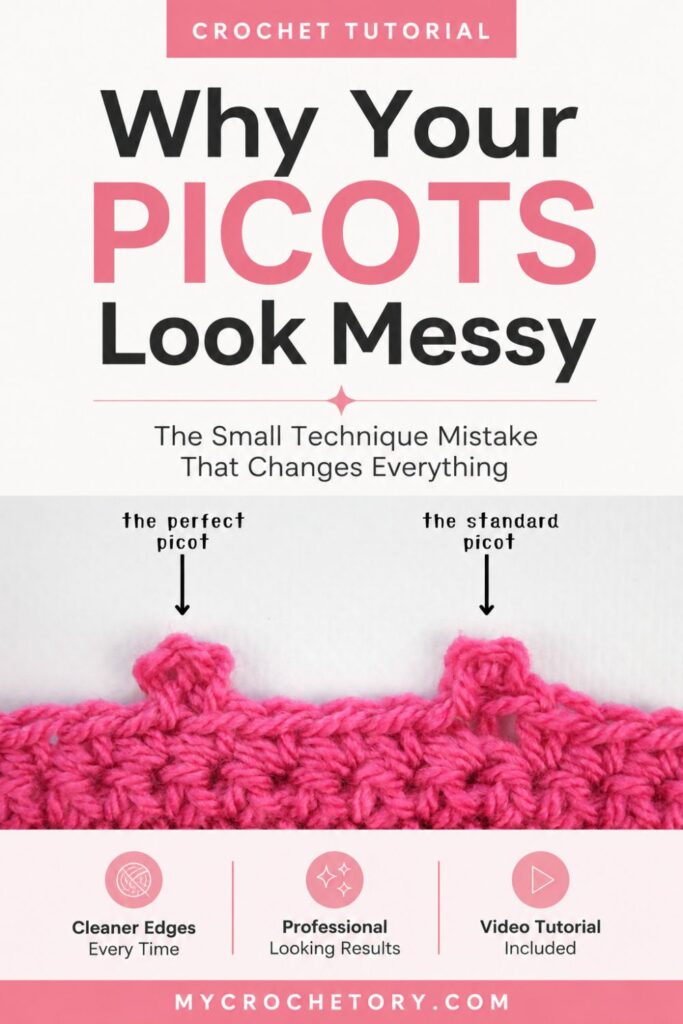
Traditional Picot vs Perfect Picot
Before we get to the tutorial, it’s worth talking about the two most common ways to make a picot.
The traditional method is the version you’ll find in many crochet patterns. After making the chain stitches, you join them back into the first chain to create the picot. It’s quick, familiar, and widely used.
The method I share in this tutorial is a bit different. Instead of joining into the chain, you’ll work into certain loops of the stitch. It takes just a moment longer, but the finished picot usually sits more naturally on the edge.
I’ve tried both methods over the years, but now I rarely use the traditional version. I often had to adjust picots that looked uneven or left a gap at the base. After switching to this technique, my results became much more consistent, especially for lace projects and decorative edges.
This doesn’t mean one method is right and the other is wrong. Crochet is all about personal preference. This is just the approach that gives me the look I like best.
If visible gaps have ever bothered you, you’ll probably enjoy this version too.
Materials Needed
One of the nice things about the picot stitch is that you don’t need anything special to practice it.
Grab a crochet hook, some yarn, scissors, and a tapestry needle. Any yarn weight will work, but if this is your first time trying the stitch, go for a smooth, light-colored yarn since it’ll be easier to see the loops, making it way less frustrating to learn.
If you’re working on a practice swatch, don’t worry about matching your hook size to a pattern. The whole point is just to get comfortable spotting the right loops and making picots that look the same every time.

Video Tutorial
If you’re like me, some techniques are much easier to understand when you see them in action.
The written instructions and photos below will guide you through each step, but the video shows you exactly where the hook goes and how the stitch is made. That’s often the part that feels confusing the first time you try this method.
I suggest watching the demonstration once before you begin, then returning to the step-by-step tutorial. Seeing how the stitch moves can make the photos easier to follow.
TIP: If the video isn’t displaying properly, try temporarily disabling your ad blocker.
How to Crochet A Picot: Written Instructions
Step 1: Start by chaining 3.
These chains will form the picot, so it’s worth paying some attention to their size. If the chains are very tight, the next step can feel tricky because the loops are harder to see. If they’re much looser than the rest of your work, the picot may look bigger than expected.
Don’t worry about making them perfect. Try to keep them fairly even, and after a few picots, you’ll get a sense for what size works best for you.
Once your chain 3 is complete, you’re ready for the step that makes this method different.
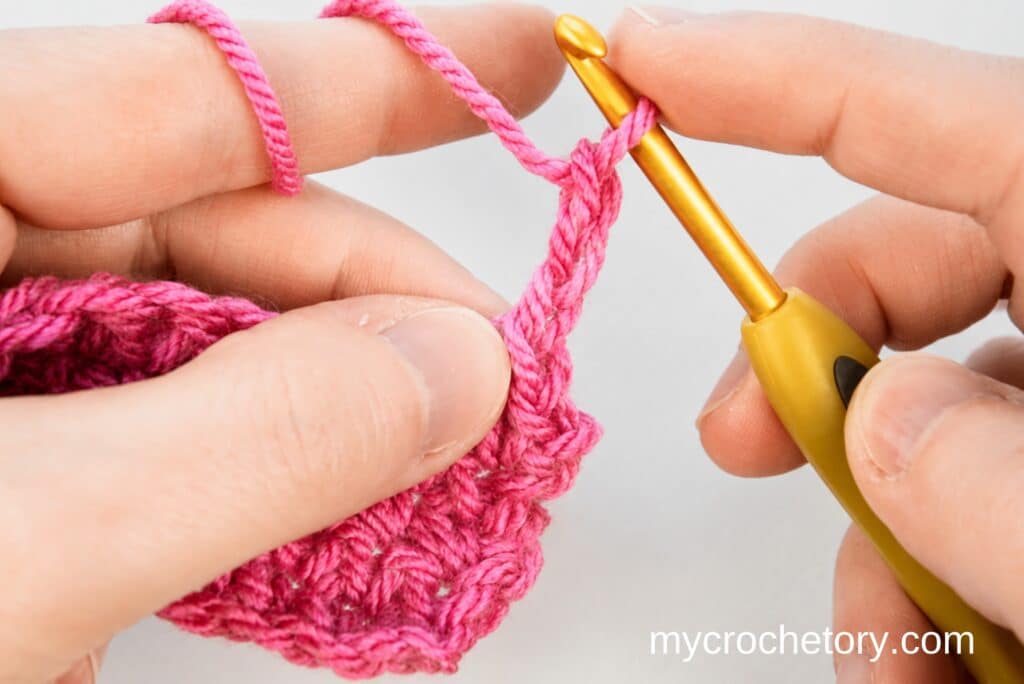
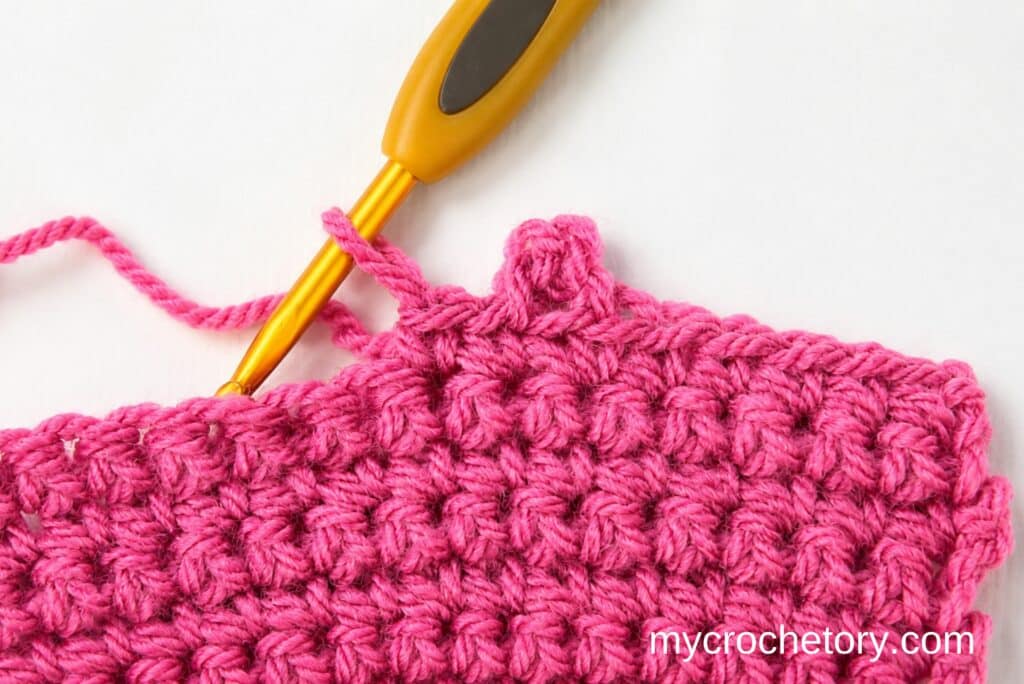
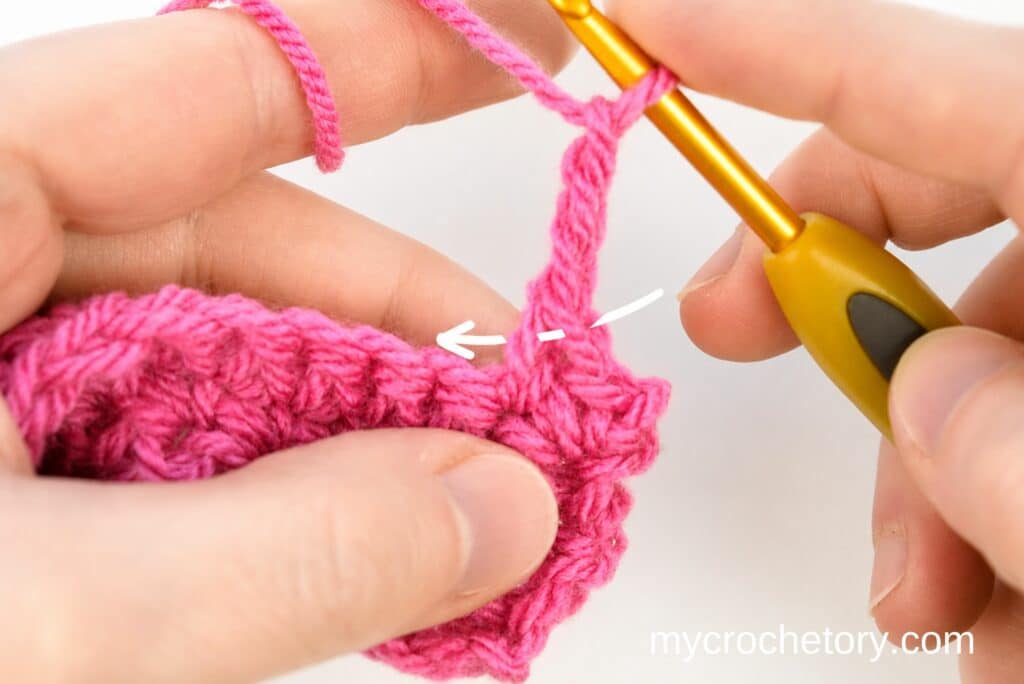
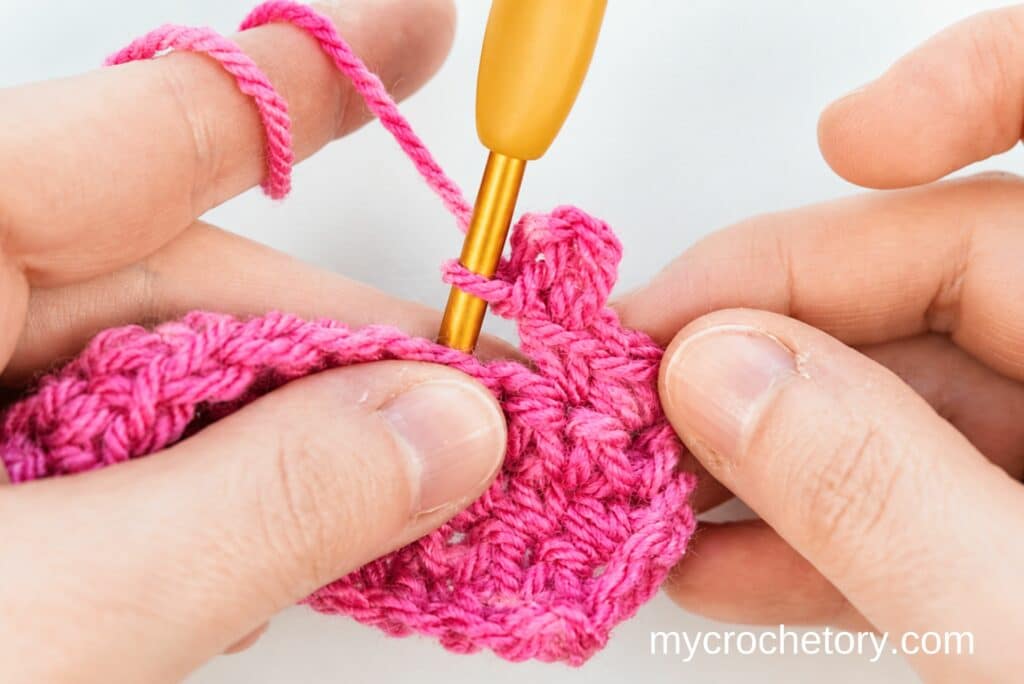
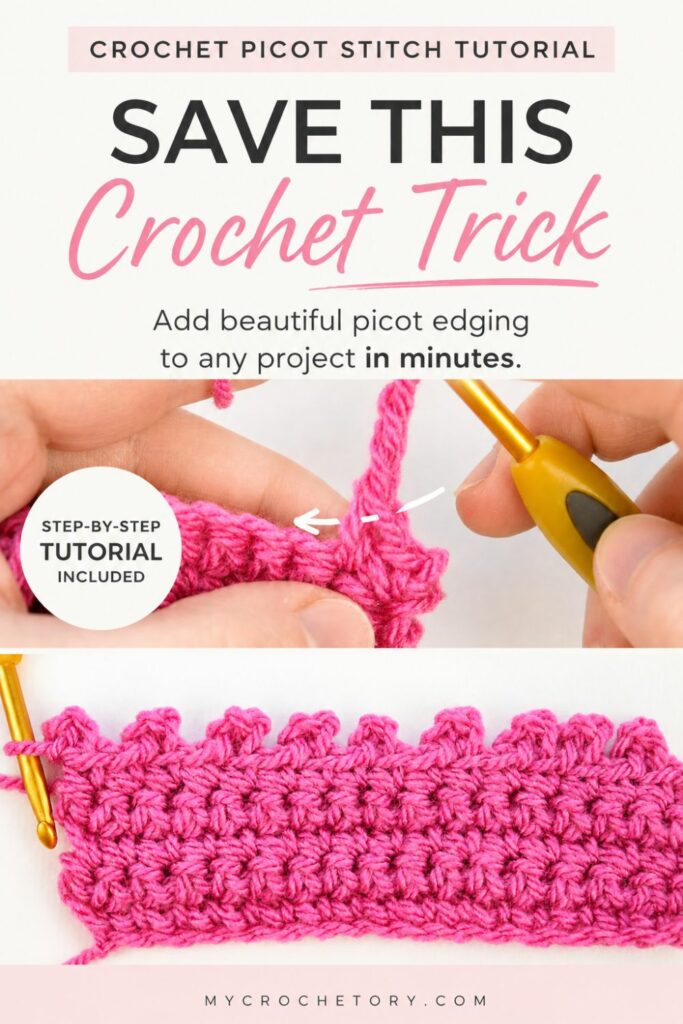
Step 2: Now take a look at the stitch you just made.
Instead of inserting your hook back into the chain, insert it into the front loop and the small slanted loop of the stitch. This is what makes the picot look sharper like I mentioned earlier.
If you’re trying this technique for the first time, don’t worry if it takes a bit to spot both loops. The front loop is usually easy to see, but the slanted one might take a little getting used to.
I find it helpful to tilt the work a little toward me before inserting the hook. That makes the loops easier to see and helps avoid guessing.
Once your hook is under both loops, you’re ready to complete the picot.
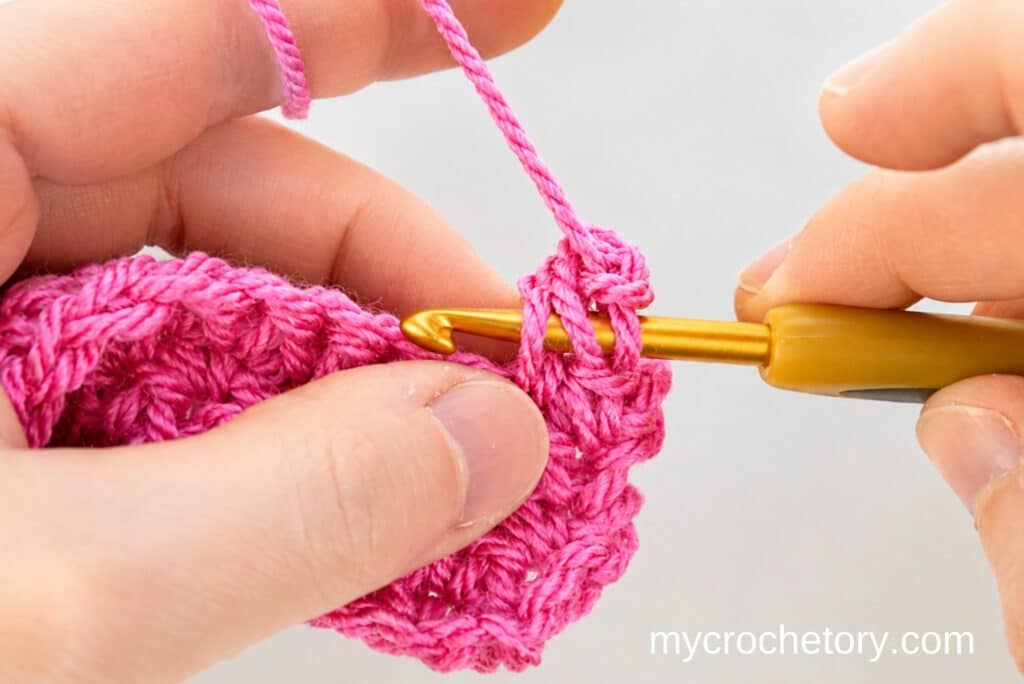
Step 3: With your hook inserted under both loops, yarn over and pull through all three loops on your hook.
Your picot is now complete.
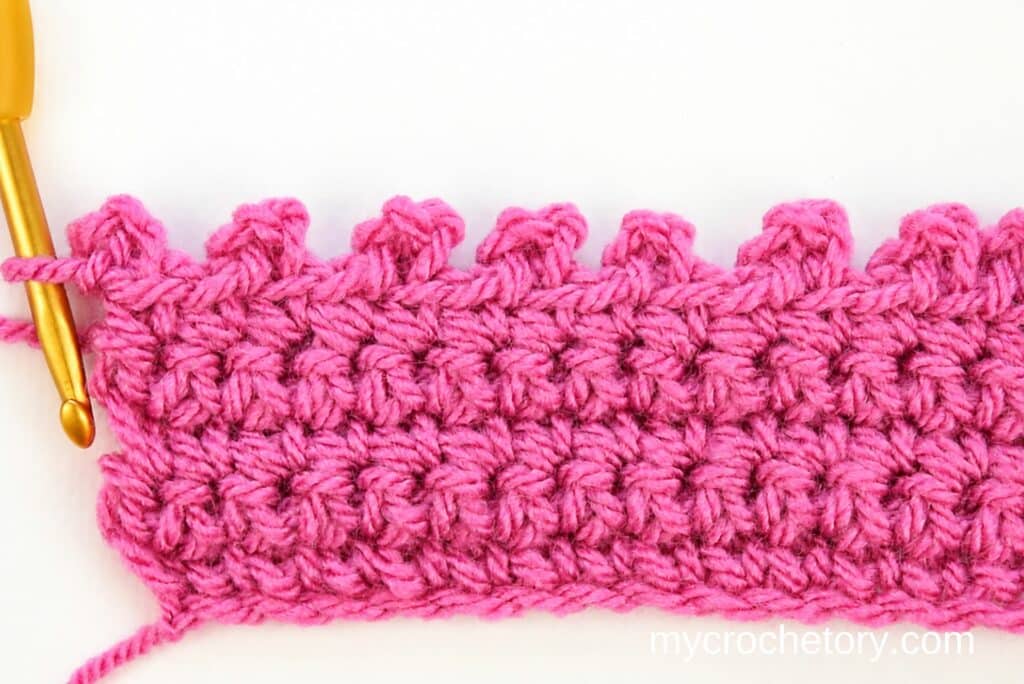
Before you move on, take a quick look at your finished stitch. The picot should sit right on the edge and make a little point. Compare your stitch to the photo. If it looks pretty close, you’re good to go.
What I like about this method is how easily the picot blends into the edge. Since it’s worked right into the stitch, it feels like it really belongs there, not just sitting on top.
Common Picot Stitch Mistakes and How to Fix Them
If you’ve been trying to get your picots to look just right, or you want to know how to make neat picot stitch crochet or how to fix uneven picot stitches, you’re definitely not the only one. Lots of crocheters want the perfect picot stitch crochet, and the tips below will make it much easier.
The picot stitch is small, but small changes in tightness and where you place the stitch can change how it looks a lot.
If your picots aren’t turning out how you hoped, it doesn’t mean you’re doing anything wrong. Most issues have simple fixes and happen to everyone at first.
My Picot Looks Too Loose
A loose picot is often the result of loose chain stitches.
Try making your chain 3 with the same tightness you use for the rest of your crochet. If the chains are clearly bigger than the nearby stitches, the picot can look too big and lose its shape.
It’s also worth checking that you’re working under both loops shown in the tutorial. Missing one of them can affect how the picot sits on the edge.
My Picot Looks Too Tight
If the picot looks compressed or almost disappears into the fabric, the chains may be too tight.
This often happens when you’re focusing so much on finding the right loops that your tightness changes without you noticing. Try relaxing your hold a bit and making the chains a little more comfortably.
A picot doesn’t need to be large, but it should remain visible as a decorative detail.
I Can’t Find the Correct Loops
This is the point where most crocheters pause the first few times they try this technique.
Take a quick look at the photo. Find the front loop first, then the little slanted one next to it. Once you spot them a couple of times, they get a lot easier to find.
If the stitches are difficult to see, practicing with a smooth, light-colored yarn can make a big difference.
My Picots Are Different Sizes
When some picots look larger than others, tension is usually the reason.
Pay attention to the size of your chain stitches and try to make them the same from one picot to the next. Even small differences can stand out when many picots are worked along the same edge.
The good news is that you’ll get the hang of it pretty quickly with some practice. Making a short swatch is usually all it takes to feel comfortable with this technique.
What Can You Make With Picot Stitch?
Once you know how to crochet picot stitch, you’ll start noticing places where a simple edge could benefit from a little extra detail. This is one of the most versatile decorative crochet stitches for any project.
One of the most common uses is crochet picot edging. A row of picots can add texture and definition to a shawl, blanket, garment, or crochet square without adding much width to the edge.
I especially like picots on lace projects. They add a nice touch without taking away from the stitch pattern itself. For some examples, check out the Aprilace Shawl, Eira Shawl, and Norra Shawl. A simple decorative edging can totally change the look of a project.
Picots also work beautifully alongside other finishing techniques. If you enjoy experimenting with edges, you might like learning the crab stitch or exploring other decorative crochet stitches that add texture and interest to a project.
And if you’re looking for more ways to build your skills, don’t miss my collection of free crochet tutorials for beginners. Learning a few finishing techniques gives you more options when it’s time to put the final touches on a project.
More Crochet Tutorials to Try Next
Learning a new technique often inspires you to try another.
If you’re building your crochet skills, here are a few tutorials I’d recommend exploring next:
- How to foundation single crochet
- How to double crochet 2 rows at the same time
- How to make a slip knot – 3 Easy Ways
- How to crochet a magic ring – 3 easy ways
- How to crochet ribbing
- Mattress stitch join tutorial
Many of these techniques go well with picots. For example, you could start a project with a foundation row, add a decorative picot edging at the end and finish with a neat join.
If you’re looking for even more ideas, browse my collection of free crochet tutorials for beg
inners. It’s a great place to discover new stitches, finishing techniques, and project-building skills.
Frequently Asked Questions
Why does my picot stitch look uneven?
Picots usually look uneven when the chain stitches vary in size or when the hook is inserted into different loops from one picot to the next. Consistent tension and consistent placement are the two biggest factors in creating neat, matching picots.
If you’re still struggling with consistency, try practicing on a small swatch before adding picots to a project. Working several picots in a row makes it easier to spot what’s causing the difference.
How many chains should a picot stitch have?
Most picots are made with three chain stitches, but there isn’t a single correct number.
A three-chain picot creates a small decorative point that works well on most projects. Some patterns use four or five chains for a larger picot, while others use only two chains for a more subtle effect.
Always check your pattern first, since the size of the picot is often part of the overall design.
Can I use the picot stitch on blankets and shawls?
Absolutely.
Crochet picot edging is commonly used on shawls, blankets, garments, crochet squares, and lace projects. Because picots add decoration without adding much weight or width, they’re a popular choice for finishing edges.
If you’re looking for examples, take a look at the Aprilace Shawl, Eira Shawl, or Norra Shawl to see how decorative edging can enhance a finished project.
What is the best way to crochet a picot stitch without gaps?
Many crocheters find that working into the stitch itself creates a cleaner result than joining back into the chain.
The method shown in this tutorial uses the front loop and the small slanted loop of the stitch. This helps the picot sit neatly on the edge and can reduce the visible gap that sometimes appears with the traditional method. If you prefer learning visually, a crochet picot stitch tutorial with pictures can make each step clearer for beginners.
That’s one reason this has become my preferred way to crochet a picot stitch.
Final Thoughts
When you learn how to crochet picot stitch step by step for beginners, you’ll find lots of ways to add something special to your projects. If you want an easy way to add a decorative finish or are looking for the perfect picot stitch crochet method, these tips will help you get the hang of this edging.
The picot stitch may be small, but it can completely change the look of an edge.
The best thing about this technique is you don’t need extra rows, fancy stitches, or special supplies. Just a few simple stitches can add some nice detail and texture to your project.
If this method feels new at first, give yourself some time to practice. Most crocheters need a few tries before they can spot the loops easily and work the stitch without thinking about each step.
I hope this tutorial made it clearer how to crochet picot stitch and showed you why I like this method better than the traditional one. If you want to try a simple, step-by-step approach, these tips will help you get a neat result every time.
If you give this a try, I’d love to hear your thoughts. Please leave a comment below and let me know if this technique becomes part of your crochet toolbox too.
Don’t forget to save this Pin for easy reference: 📌
I’d love to hear about your crochet adventures and see your beautiful creations.
Drop a comment below sharing your thoughts, questions, or even your favorite crochet tips! Your voice adds a vibrant thread to our crafting community.
Sharing is caring! If you found this guide helpful, consider spreading the love. Click the share button and inspire other crocheters.
Stay in the loop with our latest crochet guides, tips, and inspiration. Subscribe to our newsletter for exclusive content straight to your inbox. Never miss a stitch—subscribe today!
Happy crocheting, and may your yarn always be tangle-free!
Join my Facebook Group and Official Ravelry Group where you can find necessary support, you can ask questions or share your finished projects.
You can also follow my Instagram, Facebook page and Pinterest.
Leave a Reply