Updated: 30 April 2025 by Sylwia (MyCrochetory)
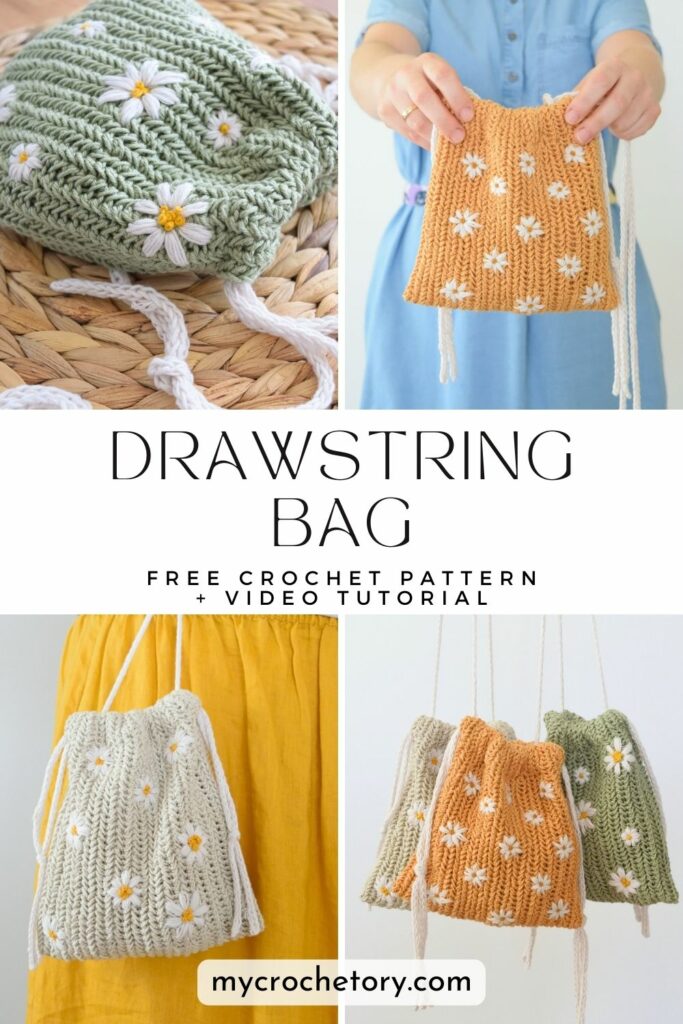
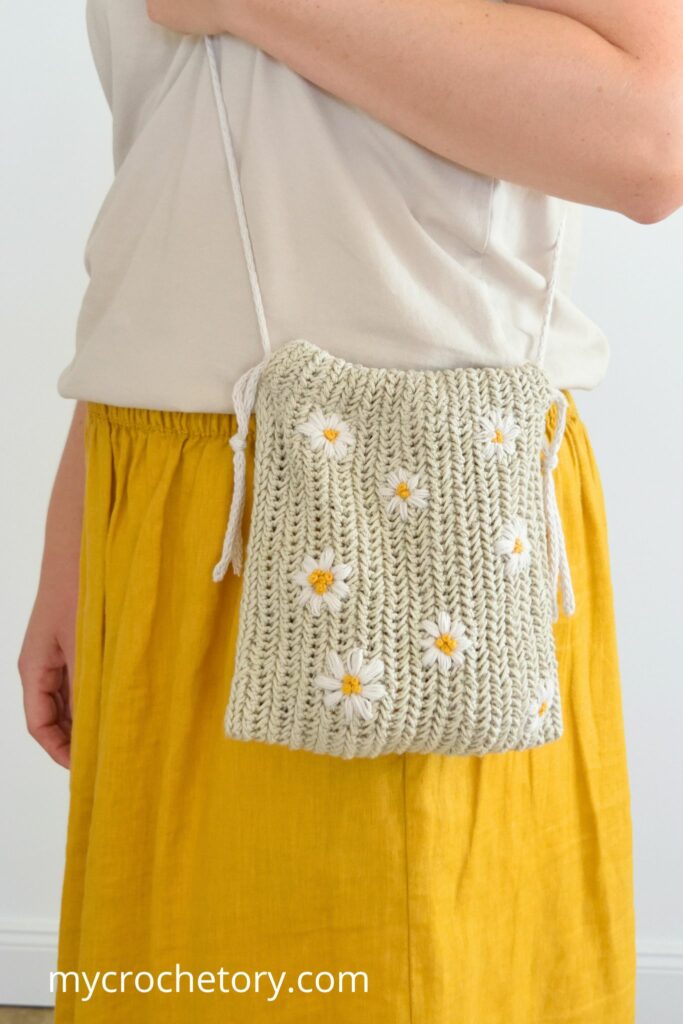
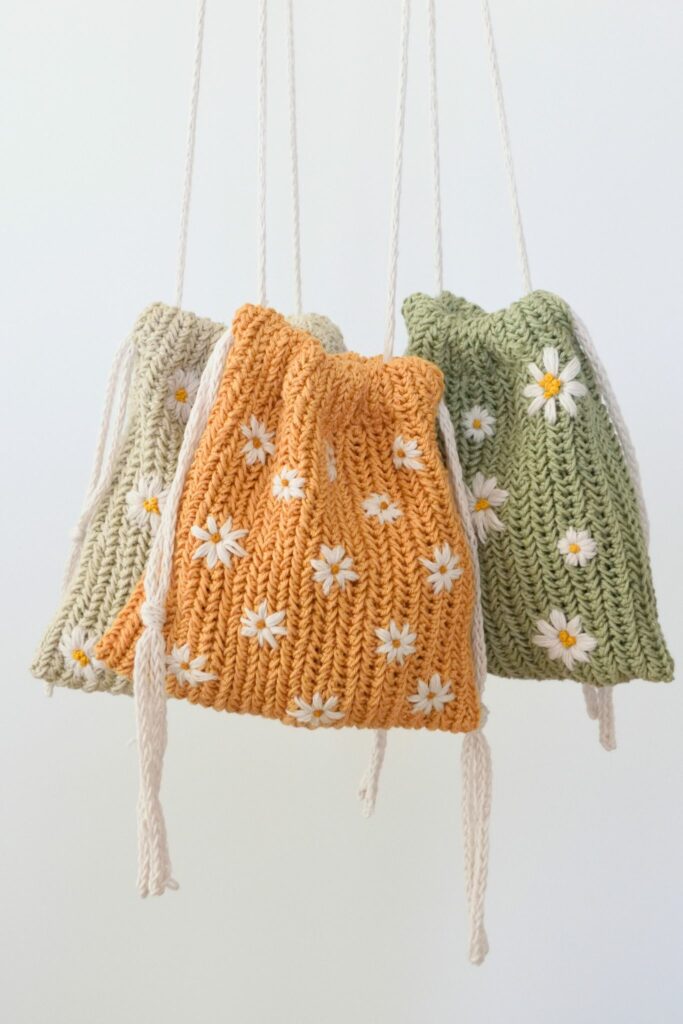
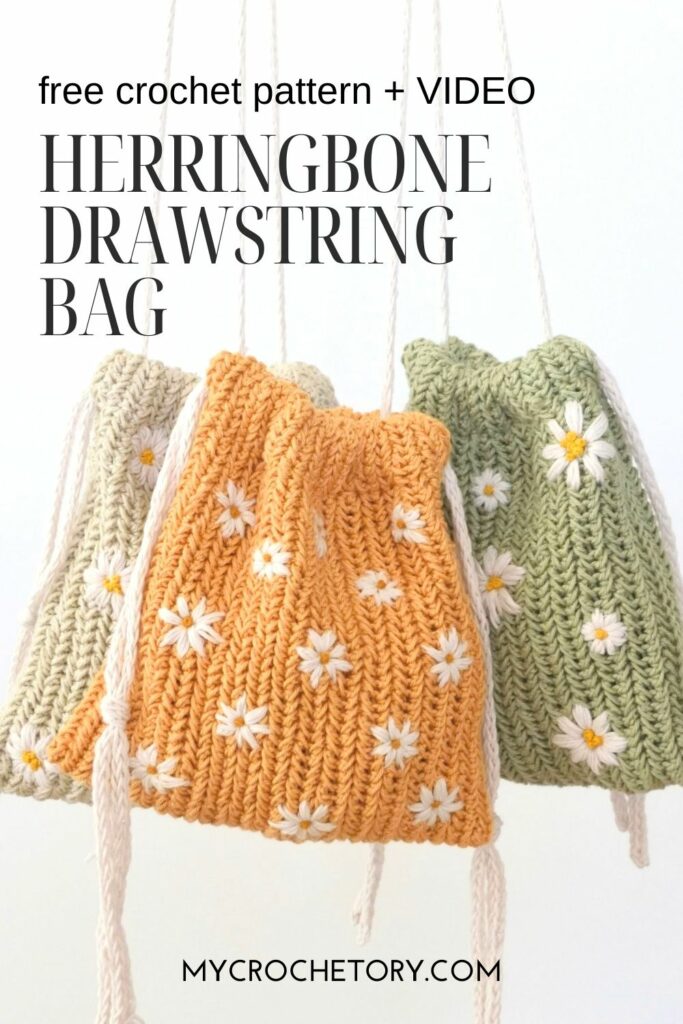
Make a cute and handy bag with my free Herringbone Crochet Drawstring Bag Pattern. It’s easy to customize and super durable. Follow simple steps and tips to create your own unique accessory.
Scroll down to see the Herringbone Crochet Drawstring Bag Pattern with VIDEO TUTORIAL or you may choose to purchase the complete ad-free, printable PDF crochet pattern HERE on ETSY or HERE on Ravelry.
Introduction
Hey there! I just had to share this fantastic crochet project with you: the Herringbone Crochet Drawstring Bag Pattern.
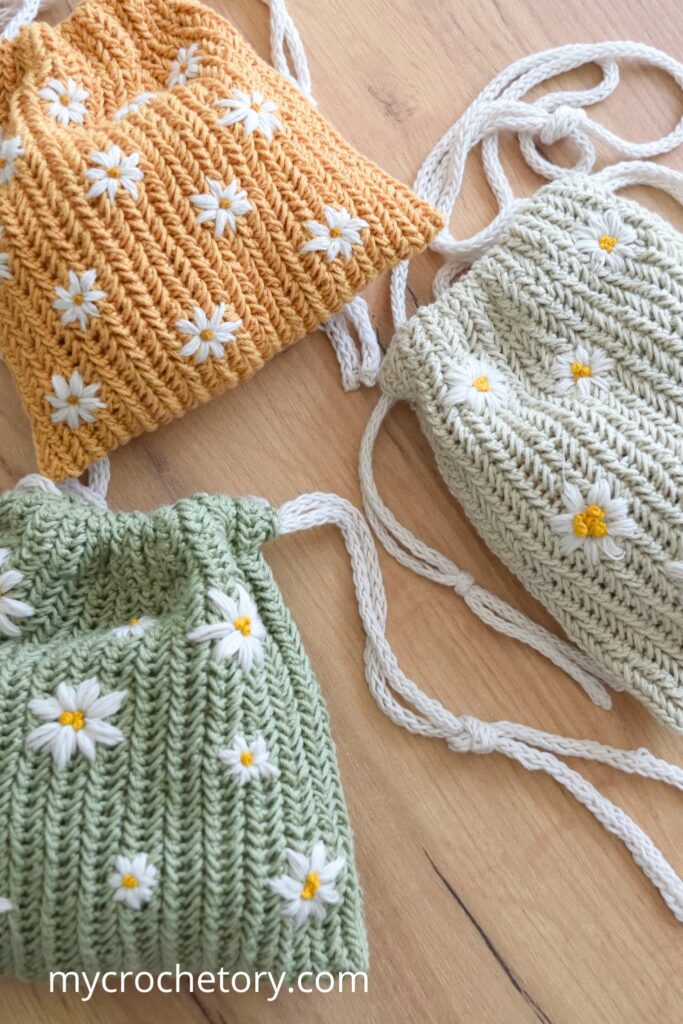
This bag is super stylish and incredibly versatile – you can easily adjust the size and width to your needs.
I made an I-cord for the drawstring closure, which is super easy to make. You could also replace it with leather or some other kind of drawstring and strap if you would like.
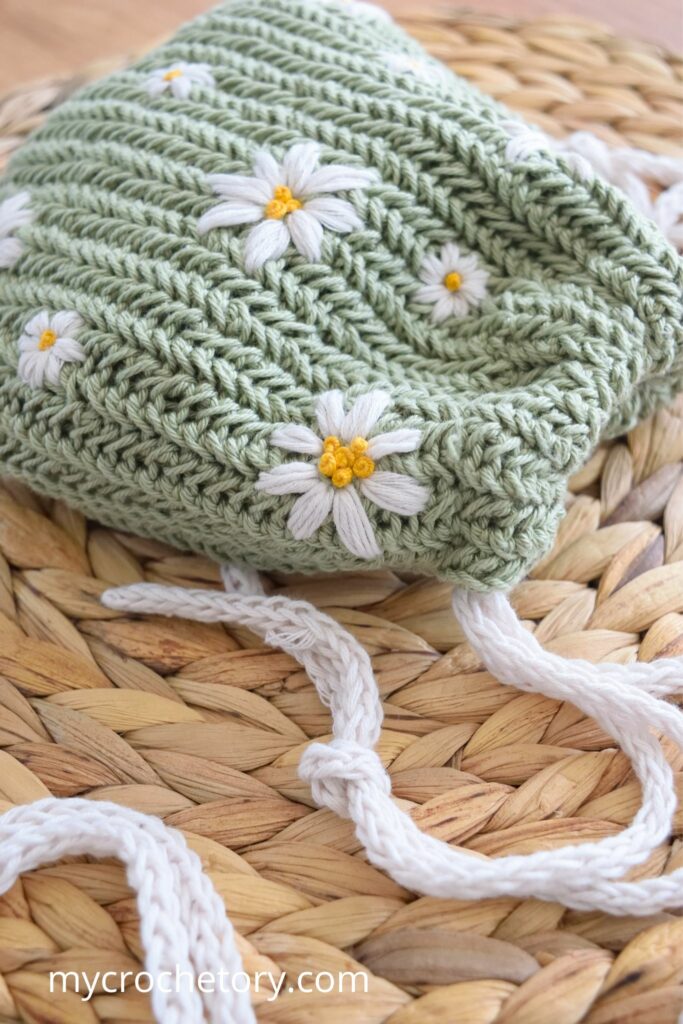
The herringbone stitch used for the body gives it such a unique and elegant look. Trust me, you will love working on this free crochet pattern.
This is perfect for all those crocheters looking for a little bit of challenging fun.
Happy crocheting, and hopefully, I’ll be seeing your crochet bags soon enough! Don’t miss the free pattern with step-by-step pictures and video tutorial down the page.
Construction of the Bag
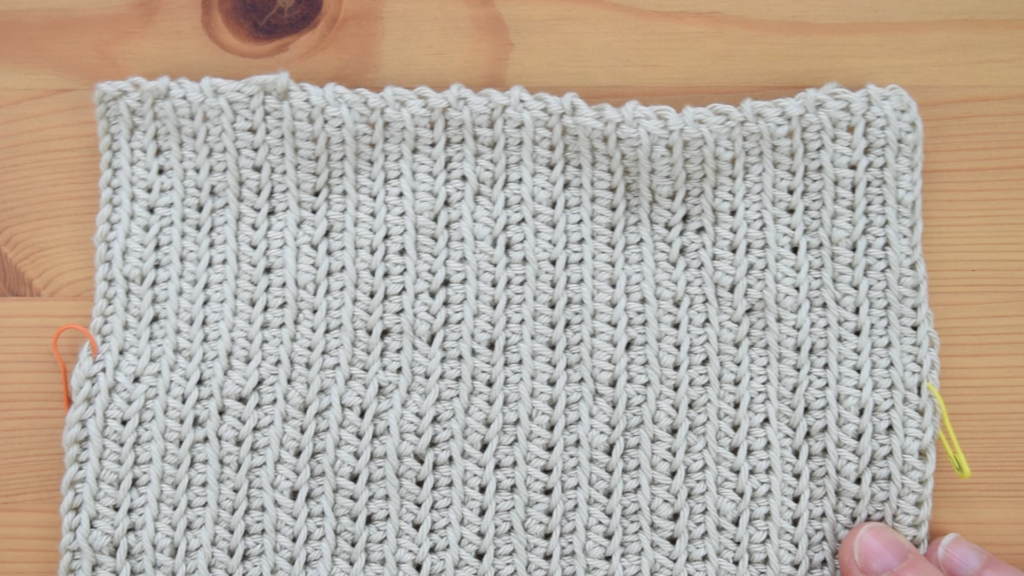
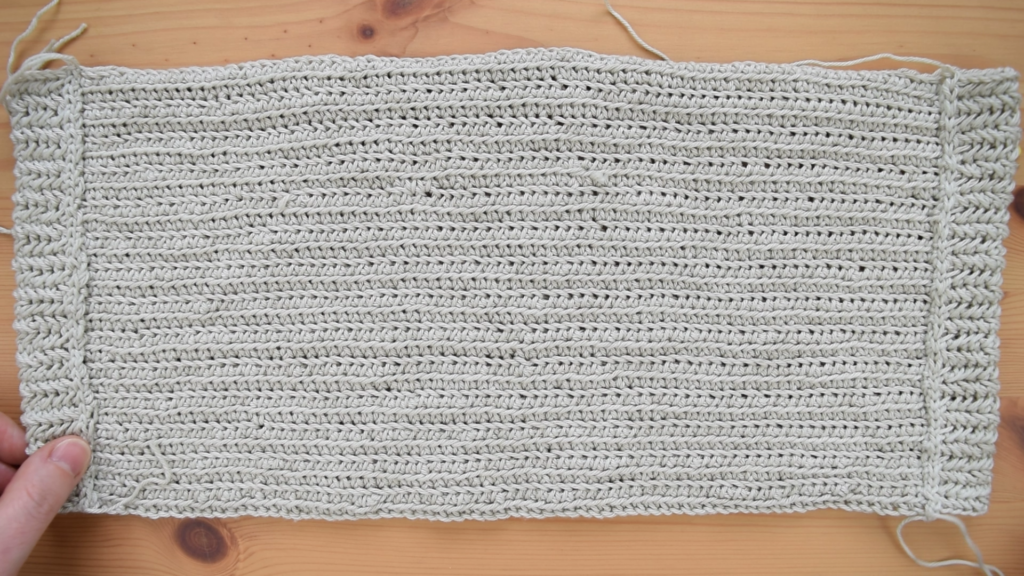
So, this bag is really simple to make. You start with a basic rectangle using the herringbone crochet stitch.
The height of the bag depends on the number of starting chains, so you can add or subtract chains to get the size you want. The width is just a matter of working more or fewer rows.
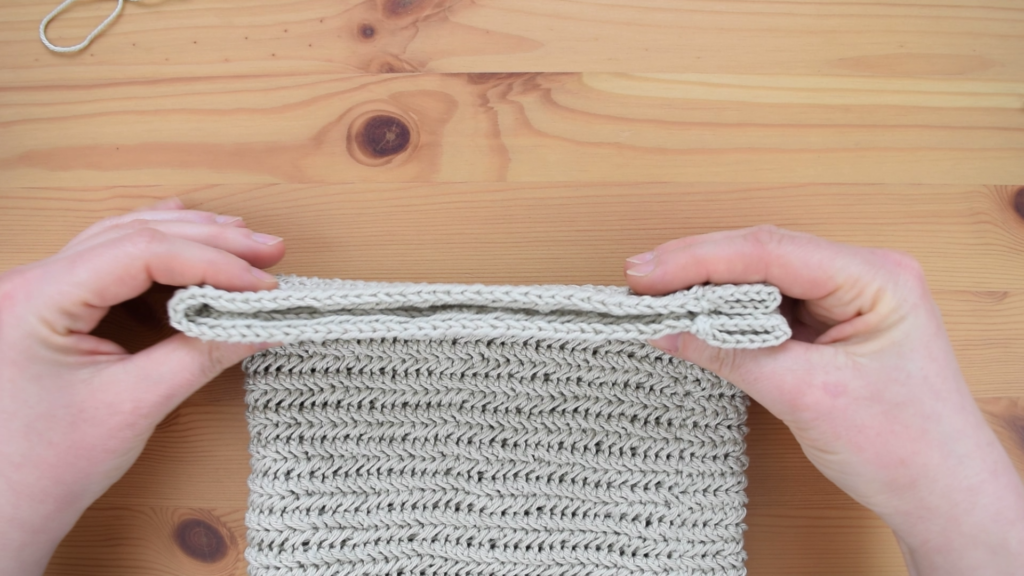
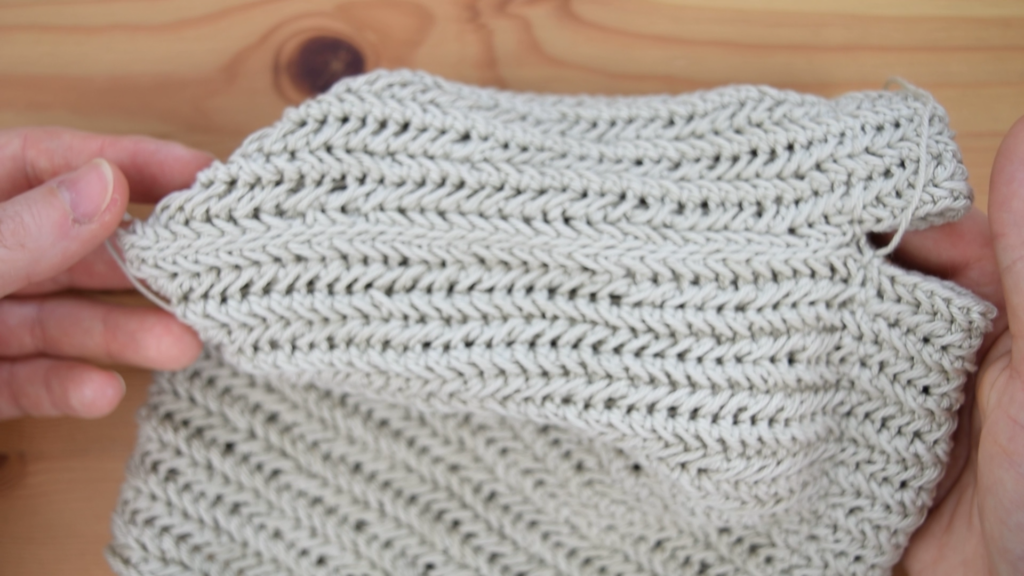
To create the casing for the drawstring, you slip stitch along the short edges of the rectangle. Once you have your rectangle, fold it in half and stitch the edges together with a mattress stitch.
I made the drawstring and strap using a crochet I-cord, which was super fun and easy to do.
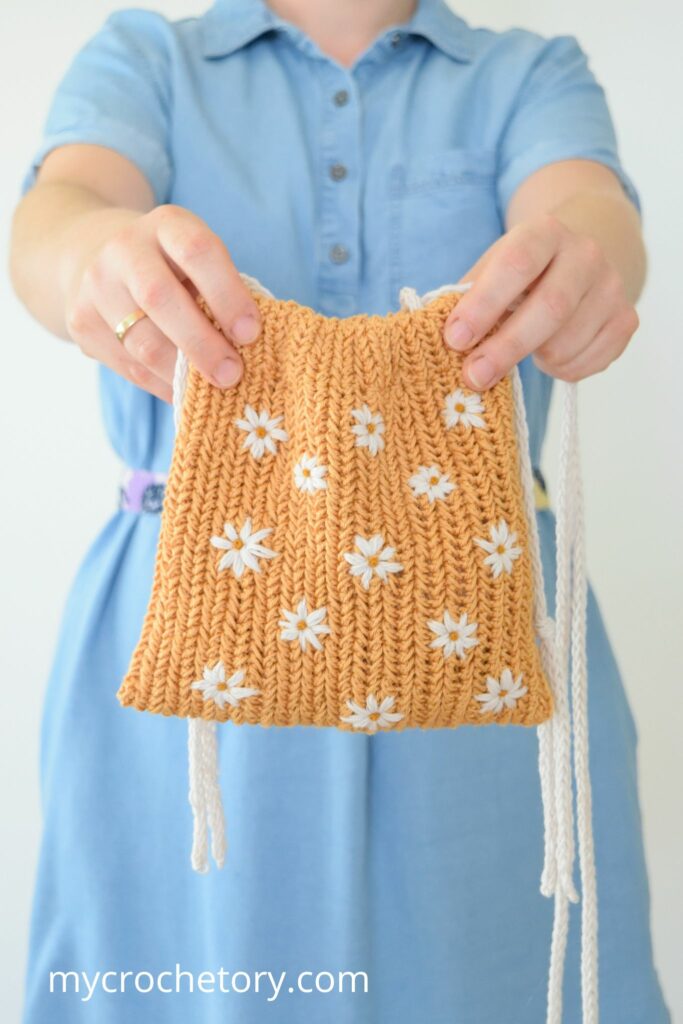
For decoration, I decided to add some embroidered daisy flowers. I’m not an expert, so I won’t go into the details, but you can easily find some great tutorials online.
Of course, you can decorate your bag any way you like or leave it plain if that’s more your style. Some other ideas for decorating include stitching one big flower onto the bag, adding beads and sequins for a bit of sparkle, using cool patches, colorful buttons, small pom-poms, fabric flowers in various colors and sizes, metal charms or keychains, tassels for a boho look, removable brooches, or adding fringe along the bag bottom or sides for a bit of drama.
Using the Bag
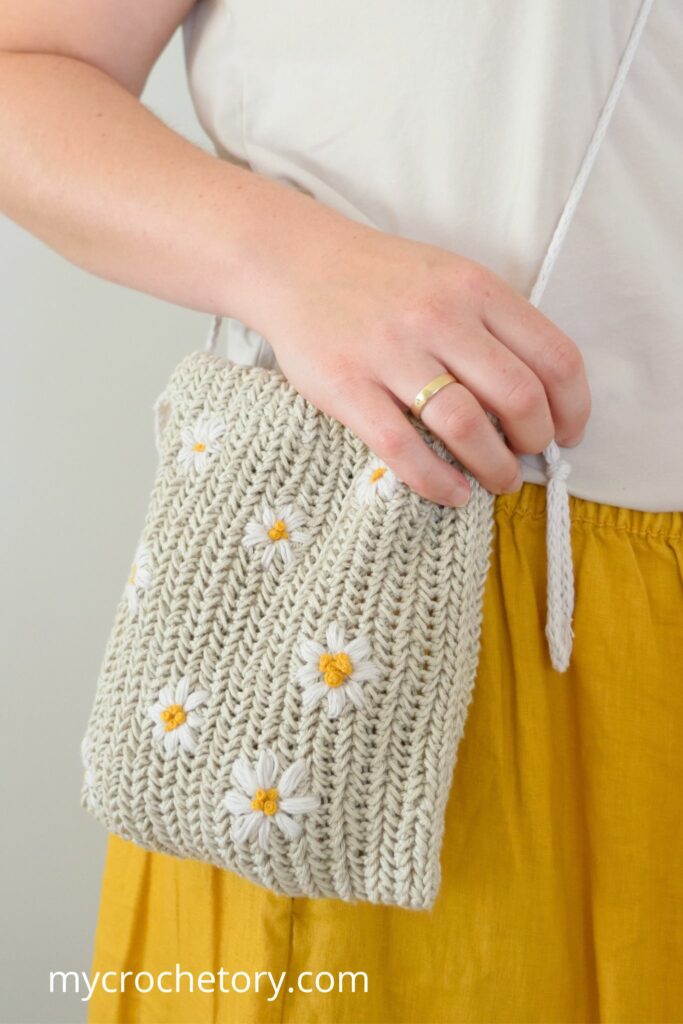
This bag is absolutely adorable and works great as a small purse.
The drawstring closure keeps your belongings secure, making it perfect for everyday use. You can also use it as a project bag if you love crocheting or knitting.
Without the strap, it can function as a dice bag or something similar. The versatility of this crochet drawstring bag pattern means you can use it for all sorts of purposes.
Whether you’re heading out for a casual day or need a stylish way to store your crafting supplies, this bag has you covered.
It’s cute and practical—you’ll find yourself reaching for it all the time. Imagine using it for quick errands, as a charming accessory for brunch with friends, or even to keep your yarn organized.
It’s one of those handy items that’s both functional and fashionable, making it a great addition to your collection. Whether you need a secure bag for your daily essentials or a chic way to carry your crochet projects, this bag fits the bill perfectly.
The Crochet Skills You’ll Practice With This Project
So, with this project, you’ll get to practice a bunch of fun crochet skills.
First, you’ll be working on the herringbone crochet stitch in rows, which creates such a lovely texture. You’ll also be changing crochet hooks within the row to achieve that professional look.
For securing the folded hem, you’ll use slip stitches, which are really handy.
To join the sides and create the bag, you’ll master the mattress stitch.
On top of that, you’ll be making crochet I-cords, which are great for the drawstring and strap.
And if you’re up for it, you can try your hand at embroidering flowers on the crochet fabric, adding a beautiful personal touch.
This crochet bag pattern is perfect for fine-tuning your crochet skills while creating a gorgeous accessory you’ll be proud to show off.
The Best Yarn for This Bag
For this crochet drawstring bag pattern, the best yarn to use is mercerized cotton. This type of yarn is excellent because it gives the bag a beautiful, polished finish and enhances its durability. Mercerized cotton has a slight sheen that adds a touch of elegance to your project, and it’s strong enough to hold up to daily use.
I used Scheepjes Catona, a 100% mercerized cotton yarn, which worked wonderfully.
However, you can experiment with different yarn weights to achieve your preferred look. Using a thinner or thicker yarn will change the texture and size of the bag, making each one unique.

So, feel free to play around with various types to find what you like best.
By following the detailed pattern and using the suggested materials and techniques, you’ll end up with a chic drawstring crochet bag.
The free pattern and video tutorial are available, so follow along and enjoy the process. Happy crocheting! And don’t forget to share your finished bags on social media to inspire others!
OTHER FREE HERRINGBONE CROCHET PATTERNS YOU MIGHT LOVE

If you want to share your wips and finished Herringbone Crochet Drawstring Bag on social media, please, use hashtag #mycrochetory. I love to see your finished project!
Herringbone Crochet Drawstring Bag PATTERN
- Purchase the ad-free, printable PDF here on ETSY or here on Ravelry.
- Add this pattern to your Ravelry Queue HERE.
- Pin it for later.
Copyright 2024 MyCrochetory. All right reserved. This pattern is property of Sylwia Kawczyńska @MyCrochetory. Please DO NOT sell the pattern and claim this pattern as your own. The pattern is for personal use only and may not be translated or reproduced in another language. Please respect my rights, DO NOT share or publish this pattern anywhere without my permission.
The herringbone crochet drawstring bag you make following this pattern is yours you are free to sell it, as long as you credit MyCrochetory as original designer. For more information, please, read Terms Page.
Materials & Tools:
- Yarn Requirements:
Fingering weight yarn, approx. 188m for main body.
Plus some yarn for 3 I-cords and embroider flowers.
Suggested Yarn: Scheepjes Catona 100% mercerised cotton.
- Hook size 3mm and 4mm. Adjust hook size if necessary to obtain correct gauge.
- Yarn needle (to weave and hide yarn ends).
- Scissors.
- Stitch markers.
Level:
Intermediate skill level – herringbone crochet stitch, seaming, crochet I-cord,
Gauge after blocking:
22sts x 16rows in 4”/10cm in Herringbone Crochet Stitch using 4mm crochet hook.
Size after blocking:
One size, adjustable:
Width: approx. 20 cm/ 7.87”
Height: approx. 19 cm/ 7.48”
Notes:
- The pattern uses US Terminology.
- The ch1 at the beginning of each row doesn’t count as a stitch.
- The bag is made from a rectangle using the herringbone crochet stitch.
- The bag is worked lengthways which means that the foundation chain equals the height of the bag.
- The height of the bag can be adjusted by simply making more or fewer starting chains, and the width can be adjusted by working more or fewer rows.
- The short edges of the rectangle should be folded approximately 3 cm (covering about 15 stitches), and the casing for the drawstring is created by sewing along each fold with slip stitches.
- The rectangle is folded in half, and the edges are stitched together using the mattress stitch joining technique, stopping at the previously sewn folds.
- Three cords (I-cords) are made: two shorter ones about 76 cm long and one longer one for the shoulder strap. The two shorter cords are threaded through the folded hems to create the drawstring closure for the bag, and the longer cord is sewn on as the shoulder strap.
- Different cords or ribbons can be used for the drawstring if preferred. They should be the same length and fit through the folded hem easily.
- Finally, the bag is decorated. For example, daisy flowers can be embroidered on it.
- The pattern incorporates two different crochet hook sizes in each row. This variation in hook sizes is essential for achieving a neat and professional finish for the bag’s opening. Make sure to switch between these hooks as indicated in the pattern for the desired results.
- Stitch marker placement: When instructed to place your marker, place on the last stitch worked unless instructed. It should lie on a stitch, not between stitches.
- You can use yarn in different weights, but be aware that the measurements will be different depending on your gauge.
Stitches & Abbreviations (US terms):
st – stitch
yo – yarn over
sk – skip
beg – beginning
prev – previous
rep – repeat
sp – space
M – marker
PM – place marker
RPM – reposition marker
Instructions in square brackets […] are worked as many times as indicated.
Hsc (herringbone single crochet worked on RS) – insert hook in left leg of previous stitch, insert hook in next stitch from front to back and pull up a loop, yarn over and pull through all three loops on the hook.
RHsc (herringbone single crochet worked on WS) – flip your work so the RS is facing you, insert hook in left leg of previous stitch, insert hook in next st from back to front and pull up a loop, yarn over and pull through all three loops on the hook.
RHsc2tog (herringbone single crochet 2 together worked on WS) – flip your work so the RS is facing you, insert hook in left leg of previous stitch, [insert hook in indicated st from back to front and pull up a loop, yo] twice, pull through all 4 loops on hook.
Video Tutorial
I’ve got you covered with a detailed video tutorial! If you prefer seeing the steps in action, this video will guide you through the entire process of making the Herringbone Drawstring Bag.
From setting up your foundation chain to attaching the strap, I’ll show you everything you need to know.
I created this video to make it easier for you to follow along and understand each step. So, grab your crochet hooks, and let’s create this stylish and functional accessory together!
TIP: To view this video tutorial properly, please disable any ad-blocker you have running.
PATTERN
Read all Notes before you start.
Body of Bag
Using 3mm crochet hook make ch15, PM in last chain. Then, change to 4mm crochet hook and make ch70. Next, change to 3mm, ch1 and PM. Then make ch15.
Row 1 (RS): using 3mm crochet hook work sc in second ch from hook working in the back bump of the ch, [insert your hook into left leg of previous st, insert the hook into the back bump of the next ch and pull up a loop, yarn over and pull through all three loops on the hook] rep until M, RPM, change to 4mm hook and [insert your hook into left leg of previous st, insert the hook into the back bump of the next ch and pull up a loop, yarn over and pull through all three loops on the hook] rep until next M, change to 3mm hook and insert your hook into left leg of previous st, insert the hook into the back bump of the next ch and pull up a loop, yarn over and pull through all three loops on the hook, RPM, [insert your hook into left leg of previous st, insert the hook into the back bump of the next ch and pull up a loop, yarn over and pull through all three loops on the hook] rep to end. Turn.
Row 2 (WS) ch1 (doesn’t count as a st here and throughout), sc in first st by inserting hook from back to front, RHsc to M, RPM, change to 4mm hook and work RHsc until next M, change to 3mm hook, RHsc in next next st, RPM, RHsc to end. Turn.
Row 3 (RS): ch1 (doesn’t count as a st here and throughout), sc in first st by inserting hook from front to back, Hsc to M, RPM, change to 4mm hook and work Hsc until next M, change to 3mm hook, Hsc in next next st, RPM, Hsc to end. Turn.
Repeat Rows 2-3 until Row 29 or until desired width.
TIP: Don’t remove markers after your last row.
Your rectangle should now measures about 20 x 45cm (7.9 x 17.7″).
Fasten off yarn and weave in all ends.
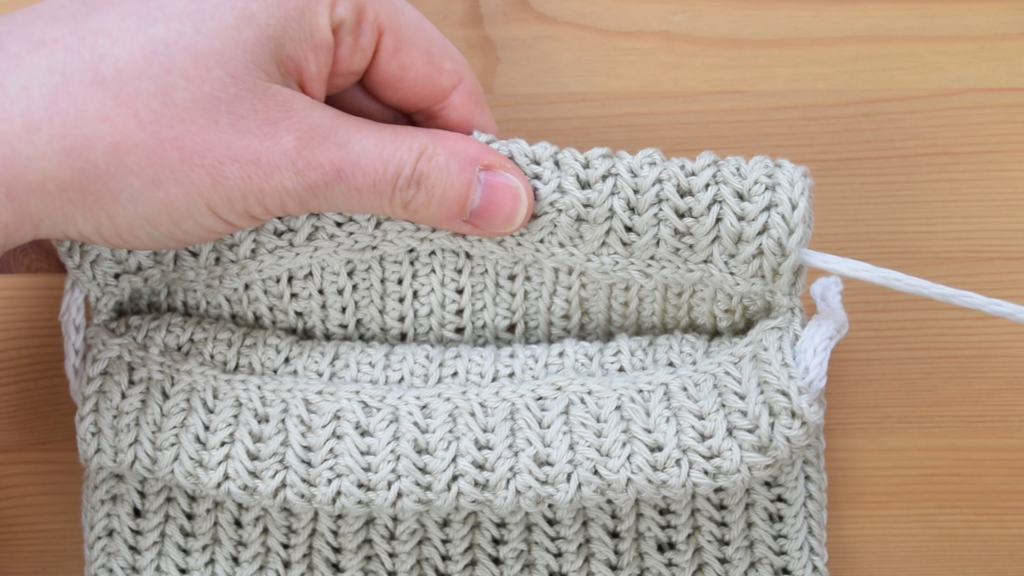
ASSEMBLY
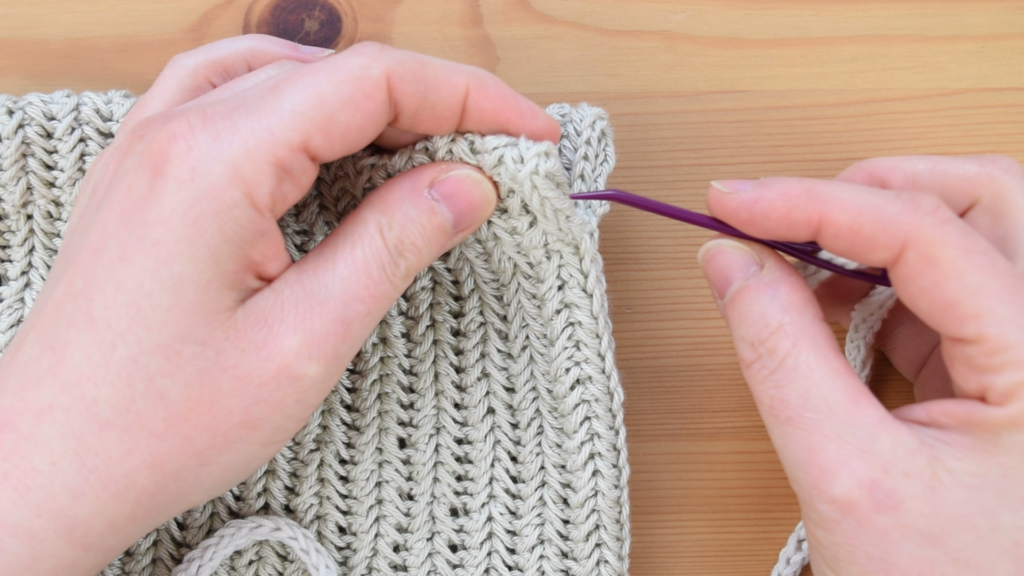
Folded Hem
Fold both shorter edges of the rectangle along the length of about 3cm (along 15 stitches, to the stitch markers).

Use slip stitches to stitch along each fold and create the casing for the drawstring.
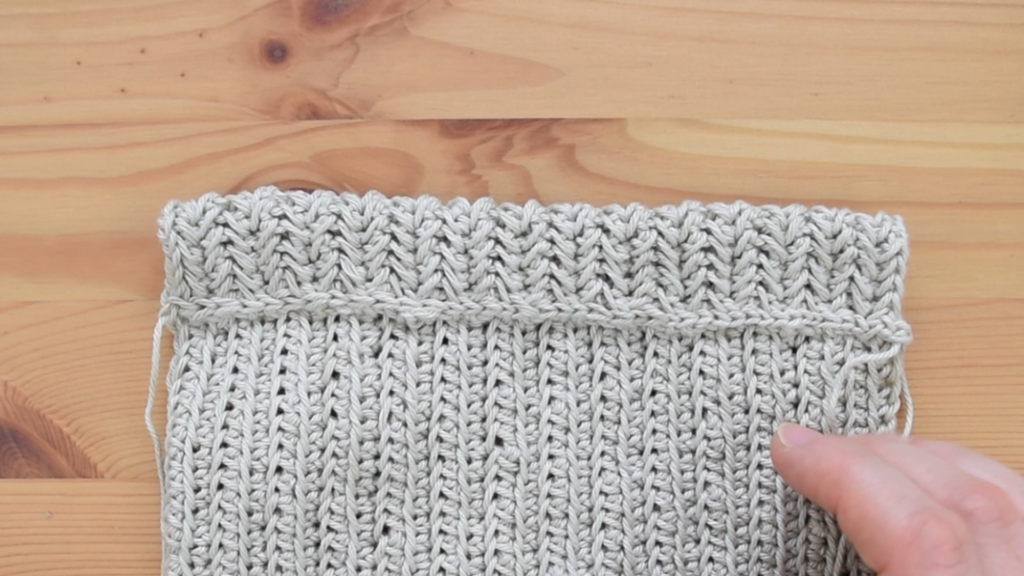
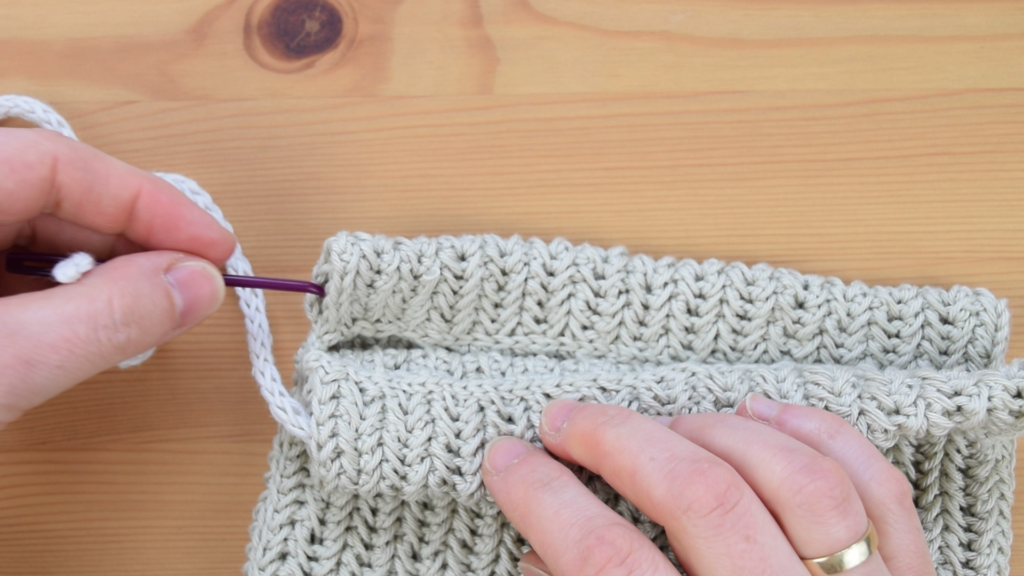
Next, fold the rectangle in half and sew the both edges up to the point of the folded hem using the mattress stitch joining technique (or any other favourite joining method e.g. whip stitch).
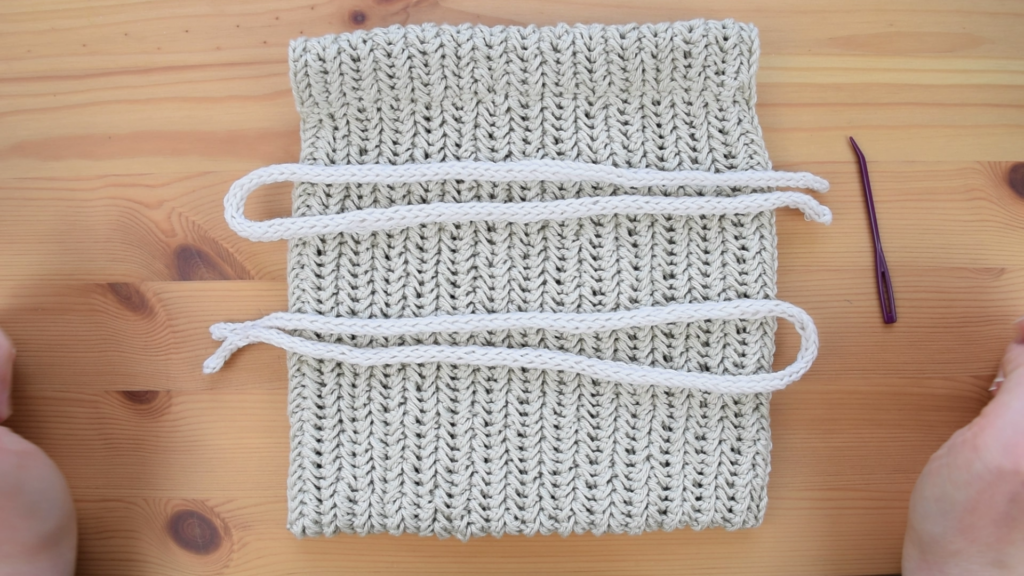
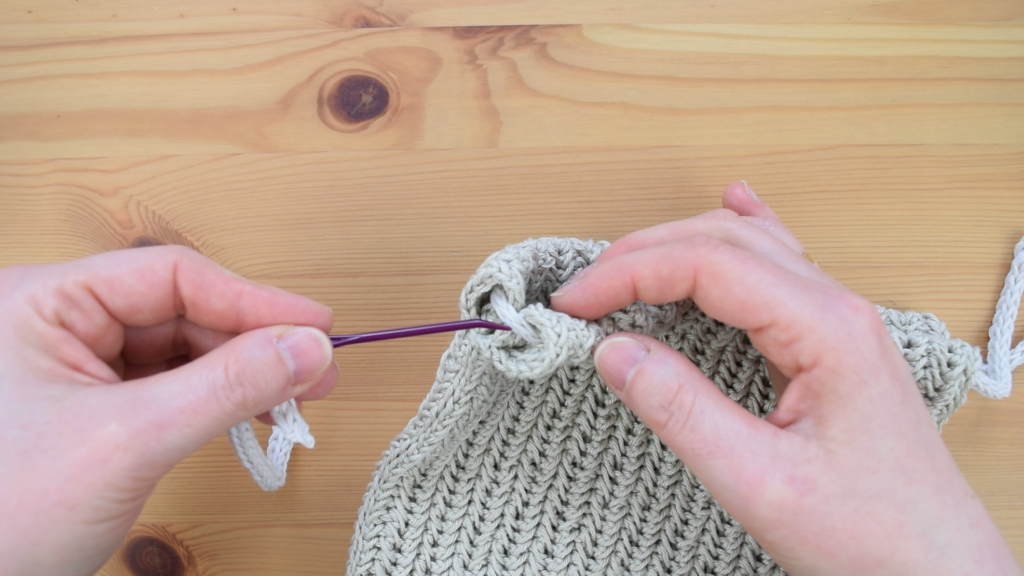
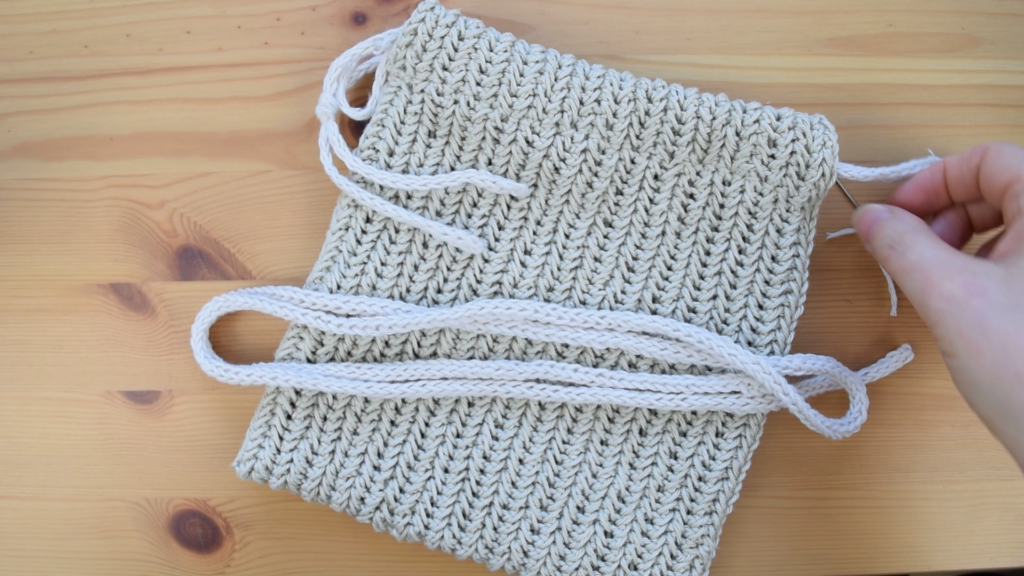
Drawstrings
Now it’s time to crochet three I-cords: two shorter ones for the drawstring and one longer one for the strap. These cords add a lovely finishing touch and make the bag both stylish and functional.
I’ve provided detailed instructions on how to make these I-cords on my blog, so be sure to check it out. Follow along, and you’ll have your I-cords ready in no time!
You can also use a different cord or ribbon for the drawstring if you like. Make sure they are the same length and fit through the folded hem easily.
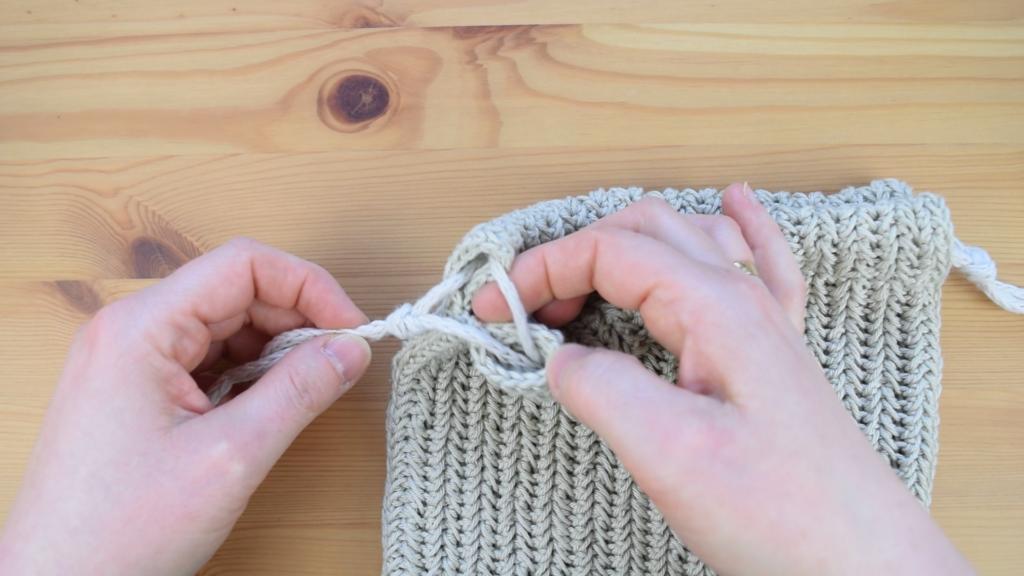
To insert the drawstrings:
Use a tapestry needle and start with the front folded hem (the one closest to you).
Work the drawstring through the right-side opening and out through the left-side opening.
Without pulling the whole string through, work it through the left-side opening of the back hem and out through the right-side opening.
For the second drawstring:
Start with the front hem (the one closest to you).
Use the tapestry needle to work the drawstring through the left-side opening and out through the right-side opening.
Without pulling the whole string through, work it through the right-side opening of the back hem and out through the left-side opening.

Secure the drawstrings together on each side of the bag by tying the ends into a simple knot.
Attaching the Strap to the Bag
To attach the strap to the bag, first, crochet a longer I-cord using the same method as for the drawstrings.
Decide where you want to place the strap on the inside of the bag, making sure the ends are evenly spaced from the sides.
Thread a tapestry needle with the same yarn you used to make the I-cord. Insert one end of the strap into the bag at the chosen spot and use the needle to sew it securely in place with several stitches.
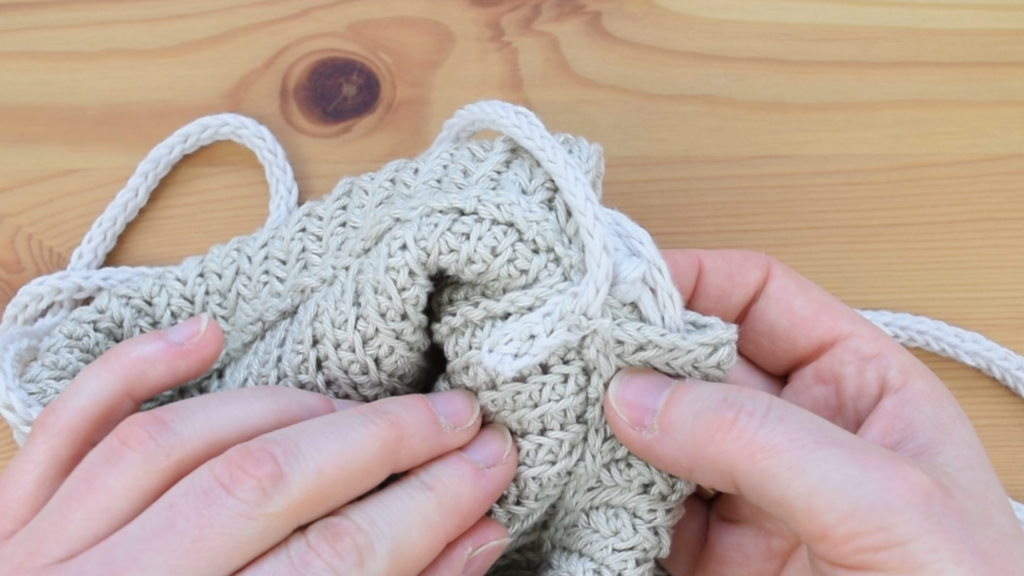
Do the same for the other end of the strap on the opposite side.
Make sure both ends are firmly attached, then knot the yarn tightly and hide any loose ends.
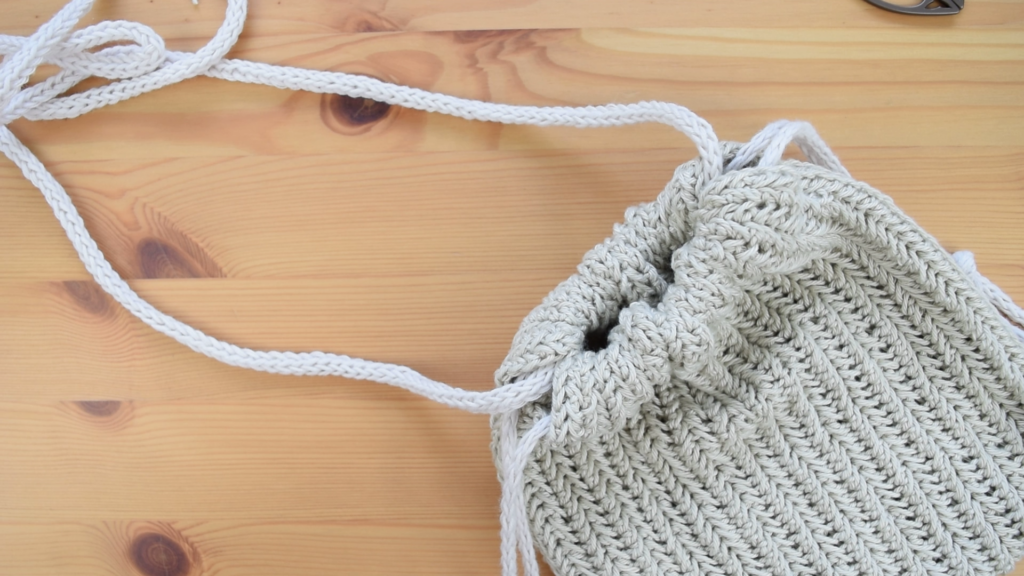
Your bag now has a secure strap!
Weave in all loose ends.
Wash and block the bag if needed. If you want, you can sew in a lining. Make sure to attach the lining where the folded hem is secured.
Embroidery Decoration: Daisy Flowers
I decided to decorate the bag with several embroidered daisy flowers. While I won’t provide a tutorial for this, as I am not an expert, you can easily find excellent tutorials online to guide you through the process.
If you prefer, you can choose a different type of decoration or even opt not to decorate the bag at all.
Some other decoration ideas include:
- One big flower: Make one large flower and sew it onto the bag as a bold statement piece.
- Beads and Sequins: Sew on some shiny beads or sequins to give your bag a bit of sparkle.
- Patches: Find some cool patches that you like and sew them on. It’s a great way to show off your personality.
- Buttons: Add colorful buttons in patterns or just randomly. It’s an easy way to add a playful touch.
- Pom-Poms: Attach small pom-poms around the edges or in a fun pattern. They add a playful vibe.
- Fabric Flowers: Make or buy fabric flowers and sew them on. They can be in different colors and sizes.
- Metal Charms: Add small metal charms or keychains to the drawstrings or corners. Pick charms that mean something to you.
- Tassels: Attach tassels to the corners or edges for a boho style.
- Brooches: Pin on some brooches. You can change them out whenever you want for a new look.
- Fringe: Add fringe along the bottom or sides for a fun and dynamic look.
Feel free to use your creativity and make the bag your own with any decoration you like!
If you have any suggestions or have detected any mistakes, please feel free to email me at mycrochetory@gmail.com
Don’t forget to save this Pin for easy reference: 📌
I’d love to hear about your crochet adventures and see your beautiful creations.
Drop a comment below sharing your thoughts, questions, or even your favorite crochet tips! Your voice adds a vibrant thread to our crafting community.
Sharing is caring! If you found this guide helpful, consider spreading the love. Click the share button and inspire other crocheters.
Stay in the loop with my latest crochet guides, tips, and inspiration. Subscribe to my newsletter for exclusive content straight to your inbox. Never miss a stitch—subscribe today!
Happy crocheting, and may your yarn always be tangle-free!
Join my Facebook Group and Official Ravelry Group where you can find necessary support, you can ask questions or share your finished projects.
You can also follow my Instagram, Facebook page and Pinterest.
Very nice design. I haven’t heard from you in a while and hope you are good. The world is crazy now. My name is Sylvia, so much like yours. I am old enough to be your mother. If you need anything please email. ellieloulou11@icloud.com.
Very proud of you to make your business work.
Very nice bag. Can’t see a link to the video though.