Updated: 30 April 2025 by Sylwia (MyCrochetory)
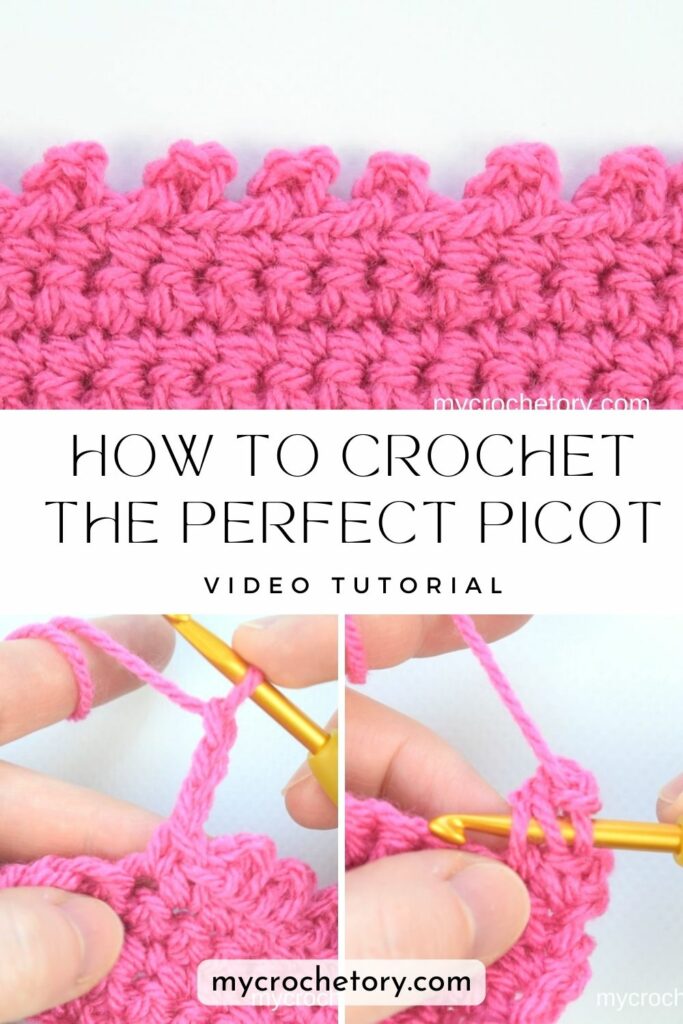
Learn how to crochet the picot stitch like a pro with our step-by-step tutorial. Perfect for beginners wanting to master crochet basics.
Introduction
Welcome to my beginner-friendly crochet tutorial on how to crochet the picot stitch! If you’re new to crochet or looking to learn a new stitch, you’re in the right place.
In this guide, I’ll show you step-by-step how to crochet the picot stitch, a simple yet charming addition to your crochet projects.
But first, what exactly is a picot stitch? A picot is a small bump or loop that’s made by chaining a few stitches and then joining them back to the main fabric. It’s a decorative element that can add a lovely touch to your crochet work.
Learning how to crochet the picot stitch is important because it can help you add beautiful details to your projects. Whether you’re making a scarf, a blanket, or a hat, knowing how to crochet the picot stitch can make your creations stand out.
In this tutorial, I’ll compare the traditional method of crocheting picots with a better, more efficient technique.
We’ll guide you through each step using simple instructions and clear pictures. Plus, we’ll provide a video tutorial to make learning even easier.
So if you’re ready to learn how to crochet the picot stitch and take your crochet skills to the next level, let’s get started!
How to Crochet the Picot Stitch for Beginners
In crochet, understanding how to crochet the picot stitch is essential for creating beautiful designs. Let’s explore what the picot stitch is, its common uses, and why it’s valuable to learn this technique.
What is the Picot Stitch?
The picot stitch, pronounced “pee-koh,” is a tiny loop made within crochet stitches. It’s formed by chaining a few stitches and then joining them back to the base of the stitch, creating a small bump or loop.
Common Uses for Picots in Crochet Projects
Picots are handy for adding decorative touches to crochet projects. Here are some common ways they’re used:
- Edging: Picots make lovely edgings for blankets, scarves, and more. They add a delicate finish and make your work look neat.
- Lacework: In lace patterns, picots create pretty accents between clusters of stitches, giving your project an elegant look.
- Embellishments: Picots can be used on their own or as part of larger motifs to create intricate designs, like flowers or scalloped edges.
Benefits of Learning How to Crochet the Picot Stitch
Learning how to crochet the picot stitch offers several advantages:
- Picots add a decorative touch to your crochet projects, making them look more polished and professional.
- The little bumps created by picots give your work a nice texture, making it more interesting to look at and touch.
By mastering the picot stitch, you’ll have a valuable skill that you can use to add charm and elegance to your crochet creations.
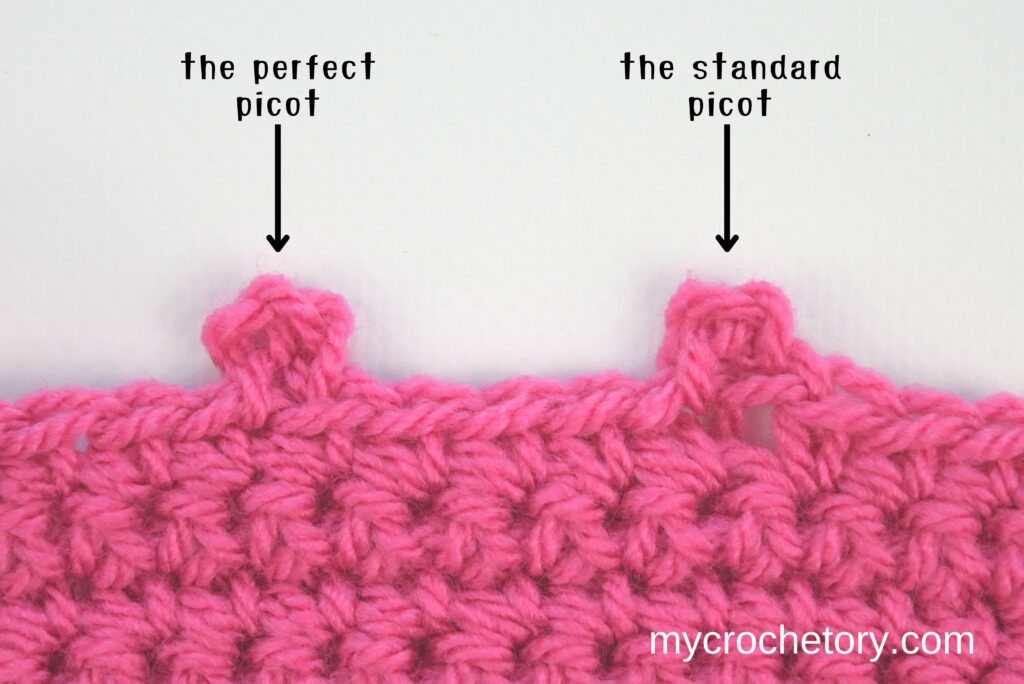
Traditional vs. Perfect: A Comparison
When it comes to crocheting picots, there are two main methods: the traditional way and the perfect method.
Understanding these differences is crucial for perfecting your picot stitches.
Traditional Method
The traditional way of crocheting picots involves chaining a few stitches, usually three to five, and then slip stitching into the first chain to form a small loop.
However, this method can be tricky, especially when inserting your hook into the small loop, and it may leave gaps in your stitches.
Perfect Method
In the perfect method, you still start with a chain of three stitches (or more) , but instead of slip stitching into a chain, you slip stitch into the front loop at the top of the stitch and in front of the stitch itself.
This creates a neater and more precise picot without leaving gaps.
Advantages of the Perfect Method
- Precision: The perfect method offers greater control, resulting in neater and more consistent picot stitches.
- Reduced Gaps: By working directly into the stitch, the perfect method minimizes the risk of gaps between stitches.
- Versatility: This method can be used in various crochet projects, making it suitable for beginners and experienced crocheters alike.
Mastering the perfect method of crocheting picots is essential for achieving professional-looking results in your crochet projects.
Practice this technique to improve your skills and create beautiful picot embellishments.
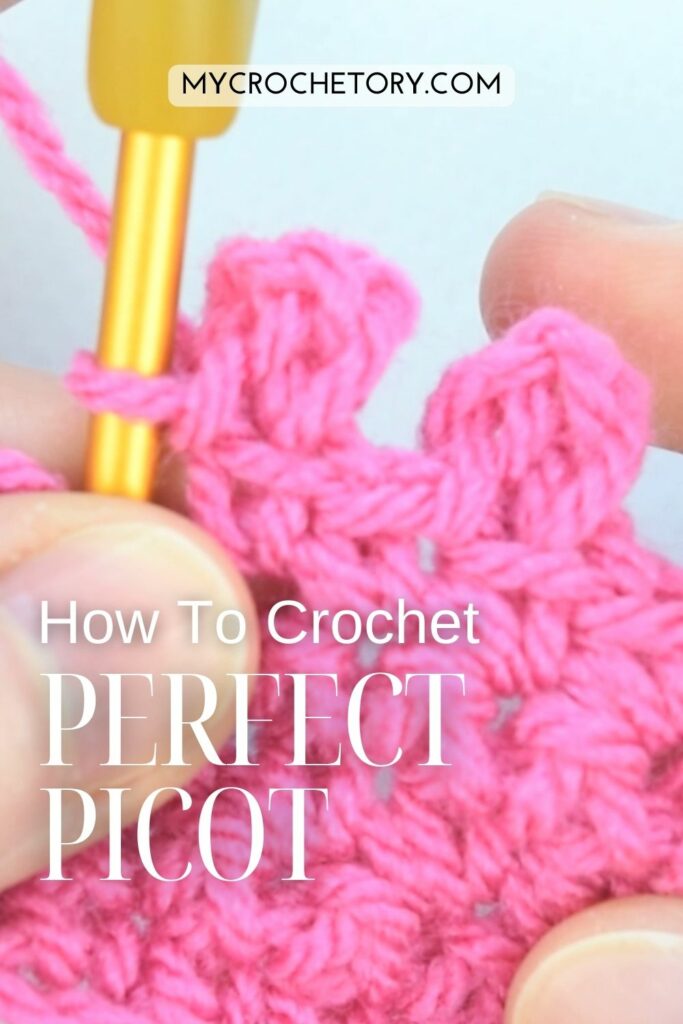
How To Crochet The Picot: The Perfect Method Tutorial
Materials Needed
- Crochet hook (appropriate size for your yarn),
- Yarn (medium weight, light color),
- Scissors,
- Tapestry needle,
Video Demonstration
Before we start, watch the video below for a clear demonstration of how to crochet the picot using the perfect technique.
TIP: To view this video tutorial properly, please disable any ad-blocker you have running.
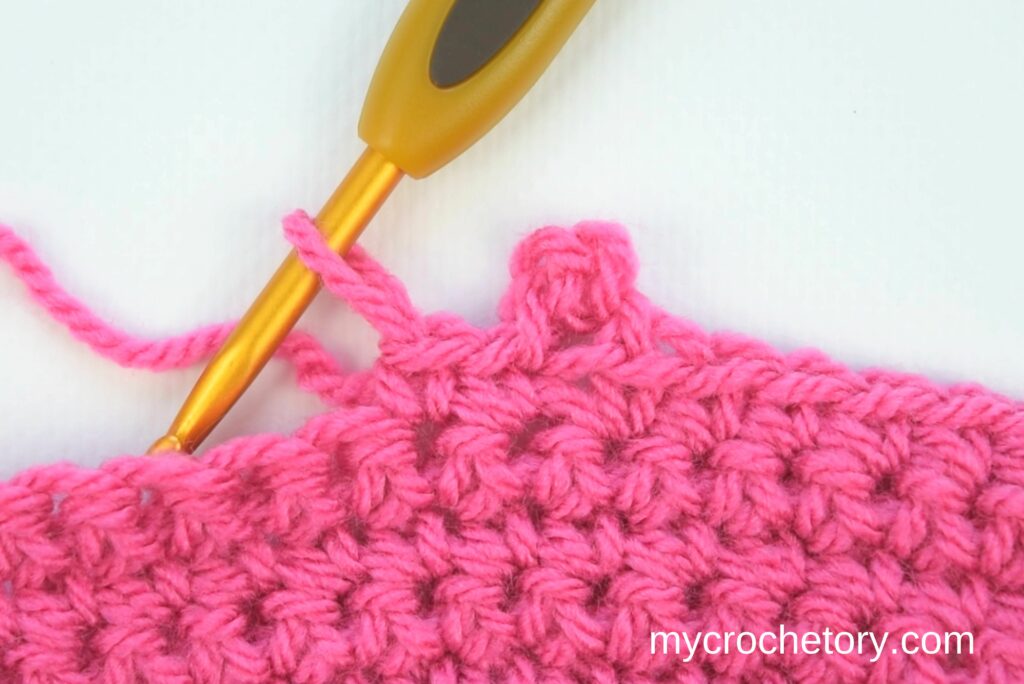
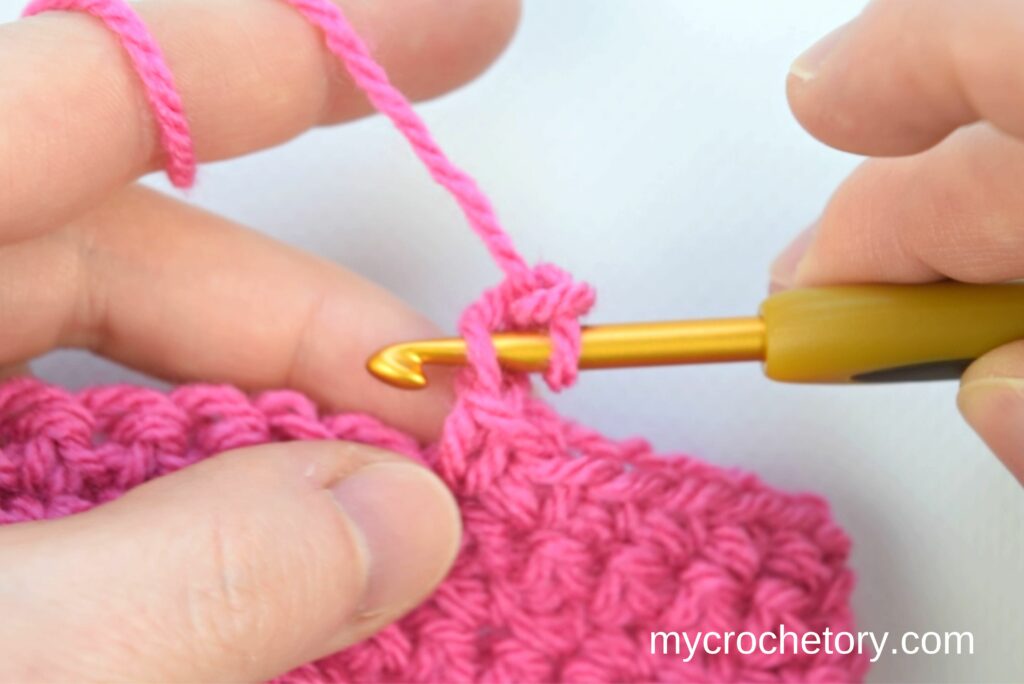
Written Instructions
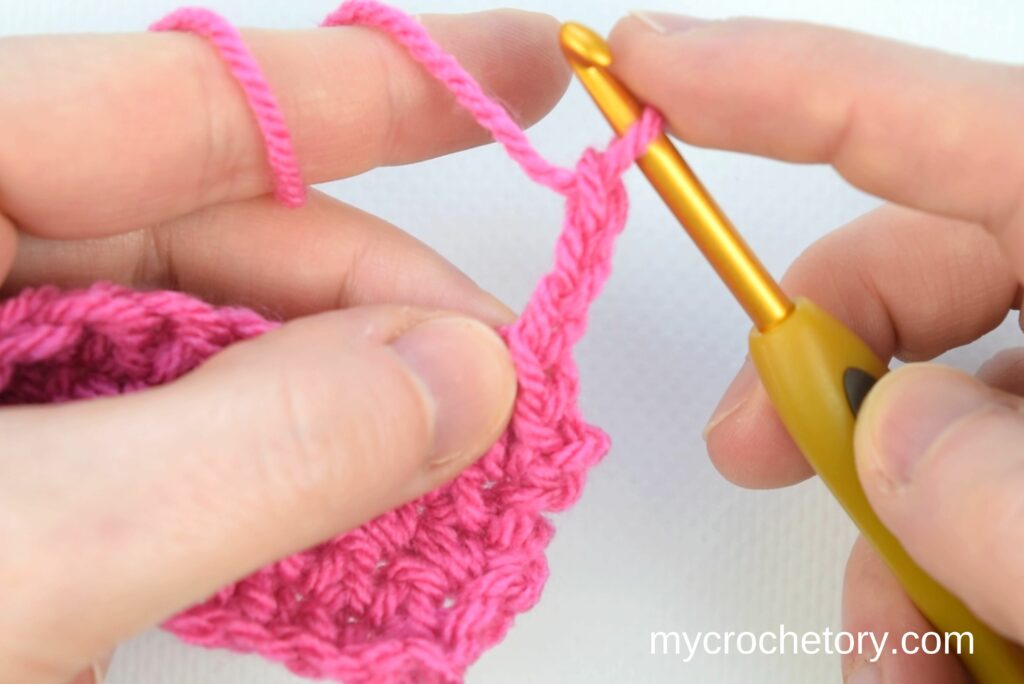
Step 1: Chain 3.
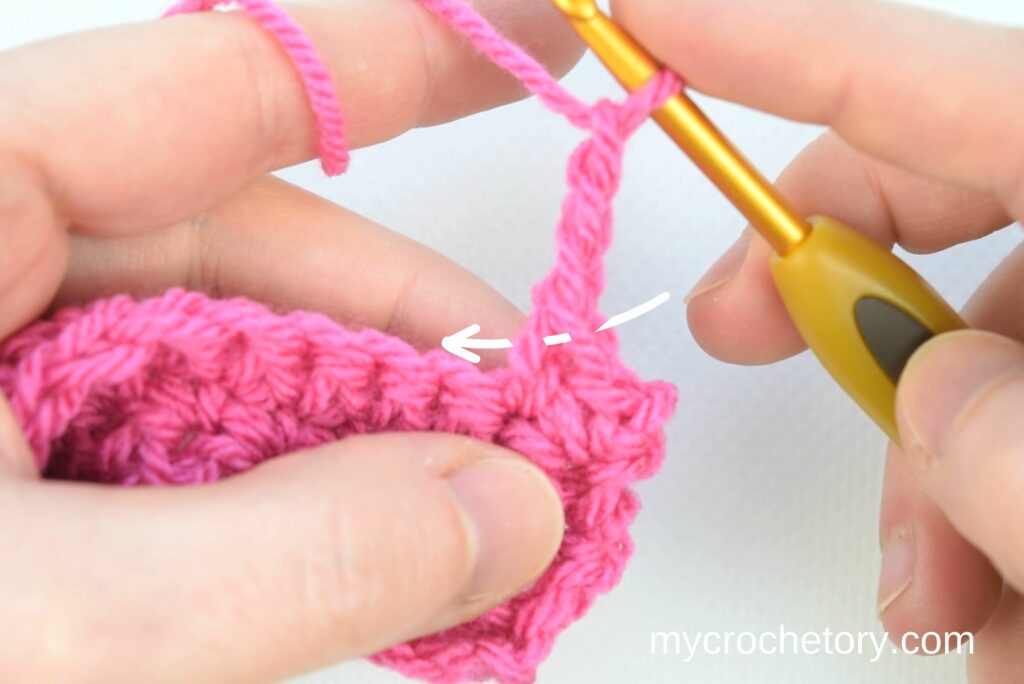
Step 2: Insert your hook into the front loop and the small slanted loop of the stitch you just made.
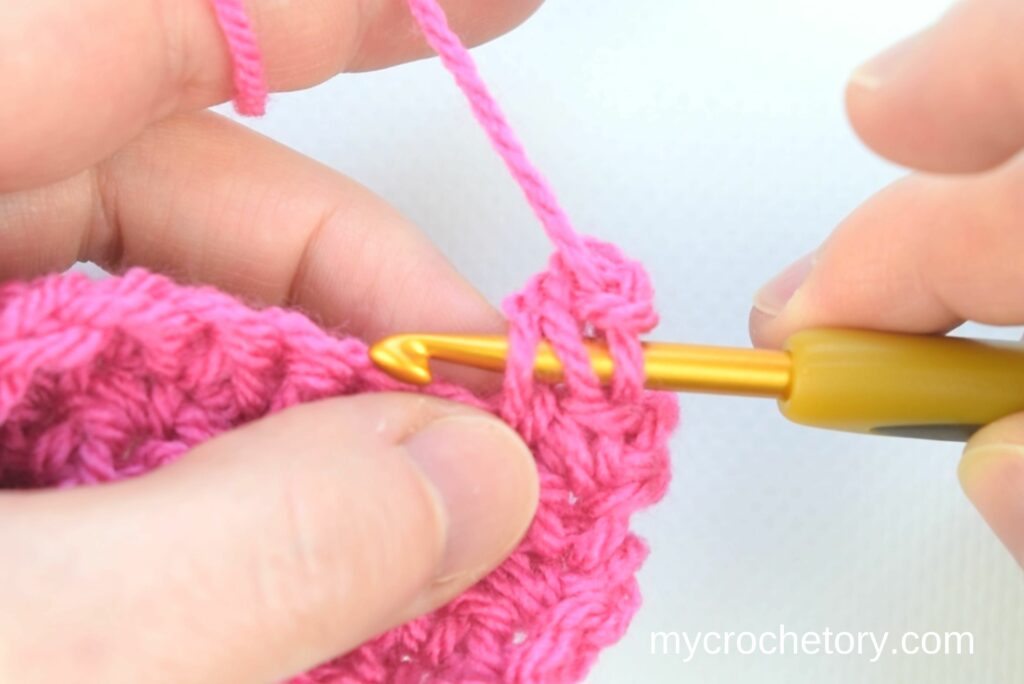
Step 3: Yarn over and pull throught three loops on the hook.
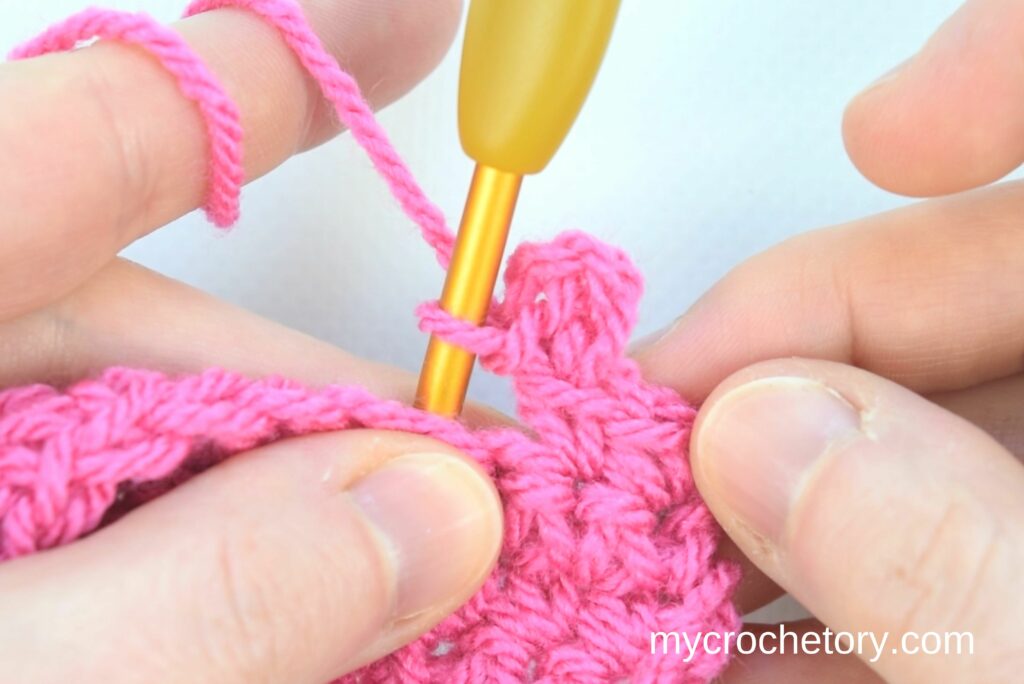
Congratulations! You’ve successfully learned how to crochet the picot using the perfect technique.
Keep practicing to perfect your picot stitch skills and incorporate it into your crochet projects.

For more crochet tutorials and tips, stay tuned to our blog.
MORE CROCHET TUTORIALS
If you found this the perfect picot tutorial helpful, you might also like posts:
- How to foundation single crochet
- How to double crochet 2 rows at the same time
- How to make a slip knot – 3 Easy Ways
- How to crochet a magic ring – 3 easy ways
- How to crochet ribbing
- Mattress stitch join tutorial
Don’t forget to save this Pin for easy reference: 📌
We’d love to hear about your crochet adventures and see your beautiful creations.
Drop a comment below sharing your thoughts, questions, or even your favorite crochet tips! Your voice adds a vibrant thread to our crafting community.
Sharing is caring! If you found this guide helpful, consider spreading the love. Click the share button and inspire other crocheters.
Stay in the loop with our latest crochet guides, tips, and inspiration. Subscribe to our newsletter for exclusive content straight to your inbox. Never miss a stitch—subscribe today!
Happy crocheting, and may your yarn always be tangle-free!
Join my Facebook Group and Official Ravelry Group where you can find necessary support, you can ask questions or share your finished projects.
You can also follow my Instagram, Facebook page and Pinterest.
Leave a Reply